The team over at ProGrade sent us their ProGrade PG10.5 Pro Mini SSD to try out!
ProGrade PG10.5 Pro Mini SSD
The ProGrade PG10.5 Pro Mini SSD is a compact, high-speed external drive designed to fit seamlessly into ProGrade’s existing workflow system. It features USB 4.0 and suggests up to 4,000 MB/s read speeds and 3,500 MB/s write speeds, which, if you know much about file transfer speeds, is pretty darn quick! So even the largest files from the most modern digital cameras are no match… Super quick! I ran a quick test with the Black Magic disk speed test software and it did very well!
Real world? It’s much faster when connected to my little Mac Mini M4 than any other disk I currently own, including my other 2tb SSD. The USB 4.0 really does the trick.
Black Magic Disk Speed Test of the ProGrade Digital SSD
What are the main features?
Blazing Speeds: Well obviously speed is a big factor here, SSD via USB 4.0, if your computer can handle it, is going to be the driving force behind most people purchasing this little guy.
Sustained Performance: An import via my ProGrade card readers directly into the ProGrade PG10.5 Pro Mini SSD: certainly moved the regular bottle-neck of file import away from the saving to disk part of the process! 400 90mb RAW files from my Sony a7R imported smoothly and quickly. – USB 4.0 interface provides transfer rates of up to 40Gb/s (5GB/s)
Compact Design: Big in performance, small in footprint? ProGrade PG10.5 is well about 3″ or 70mm square, oh, and it’s magnetic, so you can attach it to things (Like the Prograde Pro Hub) as well as the included stick-on metal plate that you adhere to (for example) your laptop lid so it can be fixed there while you’re working on the go.
Durability: A sturdy little beastie, the Pro Mini SSD is X-Ray and Shock proof (I still won’t loan it to my 15yo…!) and also comes with a very sturd feeling, certified high-speed USB4 cable.
So who is it for?
Beginner to Intermediate Photographers: If you’re transitioning from basic storage solutions and require faster, more reliable storage for larger files, the PG10.5 is a worthy investment.
On-the-Go Professionals: Its compact size and rugged design make it perfect for photographers who frequently travel or work on location. If I was still a music photographer, this thing would LIVE in my bag – perfoect form factor, speed and damage resistant.
Workflow Integration: Like me, if you already use the ProGrade readers (I use the SD and MicroSD for my drone) the PG10.5 is a no brainer to keep everything all in the one place.
Pros & Cons?
Price Point: While offering top-tier performance, the PG10.5 comes at a premium price, which might be a consideration for those on a tight budget – After weeks of solid use, the SSD hasn’t skipped a beat and continually surprises me with its speed – you get what you pay for I guess!
Platform Compatibility: Compatible with Thunderbolt 4, Thunderbolt 3, USB 3.2, and 3.1 Type-C ports
My final thoughts
The ProGrade PG10.5 Pro Mini SSD is a high end solution for those wanting to “do it well, do it once” it isn’t cheap by comparison to some external storage solutions, but it does offer excellent speed, form factor and also has a 3 year warranty.
If you’re a “Just give me the facts” kind of reader, I’ve summed this one up and shared it here for you! — Simon
Foreground elements enhance depth: Including strong foregrounds in a photo creates a three-dimensional feel, helping the viewer feel immersed in the scene.
Foregrounds provide context: In modern travel and landscape photography, foregrounds can ground the image by showing location-specific details (like rocks, flowers, or textures), adding storytelling value.
Creates visual interest: Thoughtful use of foregrounds can break up negative space and lead the viewer’s eye into the image, making it more engaging.
Helps with composition: Foregrounds are crucial in widely used compositional techniques like leading lines, framing, and the rule of thirds.
Foregrounds aid in perspective: Placing elements at varying distances in the frame (foreground, midground, background) enhances spatial awareness—key in both DSLR and mobile photography today.
Still relevant across styles: Whether you’re shooting for Instagram, stock, or fine art, using foregrounds to build depth is just as important now as it was in the past.
After my last overseas trip I received emails from two fellow travelers from the tour group I shared two weeks with as I toured around Turkey. Both emails contained some of the ‘best’ photos that my two fellow travelers. Many of the photos that each of them took were in the same locations (mainly landscape photography) and I was fascinated to compare them because despite being taken in the same location – many of them were remarkably different in terms of quality.
One of my fellow travelers consistently had taken better shots and one of the reasons for this was that he’d obviously given some thought to the foregrounds in his shots and used them to really add depth to the shots he’d taken. His shots made you feel like you were standing right in the scene itself. The foregrounds added context, perspective and interest.
On the other hand – my other friend had quite obviously given the foreground in his images little, if any, thought at all. The resulting images were one dimensional and lacked a way into the shots.
1. Check your Foreground Before Hitting the Shutter Release
Ok – so this was the same point that I made in the background article but it applies here too (I promise the rest of the points in this post will be more unique). Before you hit the shutter always run your eye around the viewfinder (all of it).
Check your foreground for distracting elements but also move your camera around a little to see what you’re missing from your foreground that could ADD something to your shot. You see good foregrounds don’t just happen. Sometimes you have to search them out and make them happen.
2. Get Down Low
One of the strategies that many landscape photographers use when trying to accentuate their foreground is to lower the height that they take their image from. Crouch down and/or lower your tripod and you’ll find the perspective of your shots can be changed quite remarkably.
3. Raise your Horizon
Similarly when you change the positioning of the horizon you change the influence that a foreground has on the image. Most people naturally place horizons in the middle of a frame but as we’ve discussed previously they tend to do better along one of the horizontal ‘thirds lines’. If you place it on the bottom third line you tend to emphasize the sky in your shot – however when you put the horizon on the top third line you accentuate the foreground. Either can work of course – depending upon what’s going on in the sky or foreground but if you have an interesting foreground you’ll generally want a higher horizon.
4. Use Leading Lines
Another very effective strategy with foregrounds is to look for ‘leading lines’ that will draw the viewer’s eyes into your image. They’re usually vertical lines (sometimes with a diagonal direction) of some kind.
Leading lines could be actual lines but they might also be objects, patterns or shapes that create flow from the bottom edge of the imaged up into the main part of the frame.
5. Aperture
Depending upon the type of image and the effect that you’re after – you’ll probably want to use a reasonably small aperture (a larger number) in order to have a large depth of field. This will keep as much of the image in focus as possible (from your foreground and into the background).
We have posted many times on the benefits of backing up, external storage vs NAS etc, and we have also spoken many times on the benefit if the Synology NAS, and while it’s true, backing up and storage IS for everybody, not everybody wants or needs to get super complicated with it! A simple solution is something like a directly attached disk, but if you want to go one step better, allowing you much more freedom to backup multiple devices without having to get super-nerdy, maybe this Synology BEE Station is a great option for you to consider?
Synology shipped us an 8TB BeeStation to configure and use for the purpose of this review.
If you’re an amateur photographer shooting more than just the occasional weekend snap, your digital photo collection has probably already started ballooning! Whether you’re capturing RAW files with a mirrorless camera, shooting time-lapses, or backing up phone pics for your growing portfolio, managing your files becomes critical—and that’s where the Synology BeeStation 8TB steps in.
Unlike general-purpose external hard drives, the BeeStation is your own, private personal cloud storage device, giving photographers a reliable and private place to store, access, and share their images—without the monthly fees of cloud services like iCloud, Dropbox or Google Drive. But how exactly can photographers take advantage of it? Here’s how you can make the most of the BeeStation…
1. Easily Back Up Your Photos
The BeeStation connects directly to your home network and runs 24/7. That means your photos can be automatically backed up from multiple devices—including your desktop, laptop, and even your phone.
For example:
You’re editing in Lightroom on your main computer, but you’re also snapping mobile shots with your phone. The BeeStation can back up both sets of images automatically using Synology’s apps (like BeePhotos and BeeFiles). It’s especially handy if you’re on location a lot and want peace of mind knowing your files are being saved as soon as you connect to Wi-Fi.
2. Organise Your Library Like a Pro
The BeeStation isn’t just about dumping files—it lets you organise your entire photo library. Tag images, sort them into albums, and search by date, keyword, or device.
Why it matters:
Over time, finding that one shot from a trip three years ago gets harder. BeePhotos’ AI-powered organisation makes image retrieval faster, so you spend less time searching and more time editing.
3. Share Albums with Clients or Family
You can share galleries or folders directly from your BeeStation with a secure link, letting you control who sees what—and whether they can download, comment, or upload their own files.
It’s more professional than uploading to Facebook, and you’re not handing over any rights or quality to social media compression.
4. Edit from Anywhere
Because it’s cloud-connected, the BeeStation lets you access your RAW or JPEG files from anywhere. Using apps like Lightroom or Affinity Photo, you can download files straight from your BeeStation while you’re travelling or at a café.
Example Scenario:
You’re away on a weekend shoot and need to prep a few selects for social media or a blog post. You can grab them directly from your BeeStation using Synology’s mobile app.
5. Free Up Space on Your Devices
Between massive RAW files and 4K video clips, storage fills up fast. Offloading older or completed projects to your BeeStation means you can keep working efficiently without clogging your internal drive.
Extra Tip:
Use folders labelled by year, client, or project type to streamline your workflow.
Final Thoughts
For photographers looking to level up their file management, the Synology 8TB BeeStation is more than just a digital shoebox. It’s a private cloud, gallery hub, backup tool, and workflow enhancer all in one. Best of all, it requires no advanced tech knowledge to get started. Synology designed the BeeStation to be beginner-friendly—making it perfect for photography enthusiasts who want to spend more time behind the camera, and less time worrying about file chaos.
Oh and By The Way!
Don’t forget to back up your BeeStation itself! Use an external drive or cloud redundancy for critical files—no single solution is foolproof!
How far through your ‘100 Things’ are you? Post your latest in the comments! – Ed
Sooner or later, we all run out of things to photograph. Or we think we do.
In truth, there are countless subjects worth photographing – and many of them can be found in your house, in your backyard, or on a short walk.
I’ve compiled a list of more than 100 photography ideas, which I share below. It includes dozens of things to photograph along with lots of example photos. So if you’re looking for cool photos to take or you’re in need of inspiration, read on!
Note: I include a handful of idea categories, including nature, people, animals, events, and architecture. I recommend you start by tackling a category you’re not especially familiar with; that way, you can spend time exploring an area of photography that feels fresh.
Nature photography ideas
There is a whole wide world out there, and it’s waiting to be explored by you and your camera! I’m not just talking about natural subjects that your eyes can see; I encourage you to find what is hidden underneath and behind and inside.
First, pull out your closest-focusing lens and capture the surfaces of the natural world. Try photographing:
Flowers
Trees, branches, and bark
Vines
Leaves
Fruits and vegetables
Driftwood
Tall grass
Don’t just go for the typical nature shot. Adjust your angle, experiment with different settings, and do what you can to shoot from close and far away.
Also, photograph these natural subjects at many different times: noon, golden hour, dusk, and everything in between. Don’t forget to photograph after it rains.
Then bring out your wide-angle or telephoto lens and spend time capturing:
Fields
Orchards (in bloom or full of fruit)
Pumpkin patches
Sunflower fields
Next, explore water. If you’re up for it, consider purchasing underwater housing for your camera. Here are just a few water-related items to take pictures of:
Water spraying from the sprinkler or hose
Rain
Creeks, ponds, lakes, and oceans
Waves
Ice
Snow
Steam
If you’re interested in more unusualnature photography ideas, consider shooting the ground, such as:
Rocks
Sand
Gravel
Soil
And if you’re more of a people photographer, bring some friends along with you on a morning walk and include them in your photos. You might capture beautiful shots of people on:
Pathways
Trails
Dirt roads
Portrait photography ideas
Looking for some people photography ideas? Here are a handful of subjects you can photograph from home:
Newborns
Toddlers
Children
Teens
Siblings
Twins and triplets
A whole family
3+ generations
Note that there are many ways to photograph people. You could take posed shots, of course – but you might also capture candid moments.
And don’t pressure yourself to go big. Just find somebody you can take pictures of. You don’t have to know what you’re doing; just aim your camera and something interesting will emerge.
(Worst-case scenario, just photograph yourself! There are plenty of awesome self-portrait ideas worth trying, such as multiple exposures, abstract blurs, and more.)
If you have a child, you can capture an infinite number of possible photos. For instance, you might photograph them:
Playing with bubbles
At a playground
Riding a bike
Playing sports
Swimming
Balancing
Maybe you prefer to photograph friends? That’s okay, too! Grab a friend and photograph them:
In an interesting job
Engaging in a hobby
Playing (or listening to) music
On a farm
Playing sports
Having fun with paints
Cooking
Working with tools
Acting very professional
Really, you could produce an entire portfolio just by photographing one person over a month or two.
Animal photography ideas
If you like the idea of capturing animals, now’s your chance to get started. Consider photographing:
Pets
At a farm
At a vet
At a shelter
At an animal rescue
At a pet store
At a zoo
At an aquarium
Bugs
Birds
Local wildlife
Fish and other water creatures
Event photography ideas
Events combine plenty of great photographic subjects, such as people, places, food, and interesting activities. You can find plenty of events listed on city websites, but consider capturing household events, too.
Here are just a few events to photograph:
Sports
Festivals
Parades
Local charity events
Animal shelters
Farmers markets
Boating events
Air shows
Car shows
Dances
Concerts
Architectural photography ideas
Architectural photography might sound a little boring, but in my experience, it can be a whole lot of fun! You don’t need to restrict yourself to the “standard” architectural subjects (like real-estate interiors and churches). Instead, try your hand at a few of these unusual photography ideas:
Old buildings
Barns
Farmhouses
City neighborhoods
Ruins
Modern buildings
Glass buildings
Train stations
Museums
Walls
Pay careful attention to your perspective, and – if necessary – shoot wide and make distortion corrections during post-processing.
Still-life photography ideas
Still life photography is a great way to memorialize precious objects. You can create complex still life arrangements – or you can capture single items.
Note that you can aim to convey the essence of your subject, or you can strive to tell a story.
Here are just a few meaningful objects to photograph:
Products for a small business
Crafts for a friend’s Etsy store
Family heirlooms
Museum artifacts
The items on your desk
Your cameras
The furniture in your house
Junkyard items (such as rusty old cars)
Photo project ideas
Looking for a more contemplative photography idea? Then consider a photography project that spans several months (or even years).
For instance, you might produce a series of photos that aims to convey the essence of:
Winter
Spring
Summer
Fall
Or you might produce a photo series that captures the essence of:
Sunrise
Midday
Sunset
Night
Moonlight
Cloudy days
Stormy days
You might also select a single subject (perhaps from the photo ideas shared in previous sections), then capture it across several seasons or across an entire day.
Creative technique ideas
I’ve shared plenty of ideas about what to take pictures of…
…but in addition to all the options mentioned above, consider how you can use different techniques to capture unique shots.
For instance, regardless of your subject matter, you might capture:
Black and white shots
Silhouettes
Close-up or macro shots
Shadows
Reflections
Also, consider the different results you can achieve by focusing on:
Angles
Backgrounds
Light
100+ photography ideas: final words
Hopefully, you’ve found this list – detailing over a hundred things to take pictures of – useful!
You have plenty of potential subjects. So grab your camera and start photographing!
Now over to you:
Have any additional photography ideas to add to my list? Share them in the comments below!
The best thing about trying your hand at real estate photography? You can practice in your own home – over and over until you’re happy with the results. Have you ever thought about it? Tried it? Share a photo in the comments or on our social media #dPSRealEstatePhotography — Updated 2025
Do you want to capture beautiful, eye-catching real estate photos?
You’ve come to the right place.
Real estate photography might seem difficult and even high pressure, but with a little know-how, you can start creating outstanding images right away.
I’ve spent plenty of time learning the ins and outs of real estate and house photography, and today, I’d like to pass that knowledge on to you. So if you’re ready to learn how to photograph houses like a pro, then let’s dive in, starting with:
Real estate photography: key camera equipment
To get started with real estate photography, you’ll need a few basic items:
A camera
A wide-angle lens
A tripod
Your camera should allow you to add a cable release, a flash, different lenses, and wireless triggers. For cropped-sensor cameras, a lens around 10-22mm or 12-24mm is perfect, and for full frame sensor cameras, a lens around 16-35mm will do the job.
Tilt-shift lenses help avoid converging vertical lines such as wall edges and door frames. There are a handful of tilt-shift lenses available, but while these lenses are wonderful to use, they are fixed focal length. So if you need more flexibility, a 16-35mm zoom lens is a great alternative (or companion) to a tilt-shift lens.
This image shows diverging vertical lines from using a 16-35mm lens tilted down to add foreground and minimize ceiling.
Now, real estate shooting techniques can get pretty complex, from exposure blending and HDR to wireless flash and light painting with multiple exposures. No matter your shooting style, the camera should not be moved (to guarantee image alignment of multiple exposures), and the self-timer, a cable release, or a wireless trigger helps ensure zero camera movement. Certain apps will also trigger the camera and provide a preview of the photo on your smartphone or tablet.
The best lighting for exterior real estate photos
The first image a potential buyer (usually) sees when reviewing properties online is an exterior photo, so you must capture a beautiful outdoor shot. A big part of this is lighting, so you’ll need to carefully choose your time of day and lighting quality.
Most exterior house photography benefits from lighting early and late in the day, when the light is soft and golden. The sun direction is also important, so you’ll want to use an app such as PhotoPills to determine the sun’s position prior to the photo shoot. In general, aim to photograph with light hitting the front of the home, like this:
In winter, some south-facing homes never have the sun hitting the front of the house. In such situations, I highly recommend keeping the sun at your back, even if it means shooting the home from an angle.
If you don’t like the result you get with morning or afternoon light, you might consider shooting on an overcast day. Cloudy skies can eliminate problems with the sun’s position, but discuss it with your client first, because white skies can lessen the impact of an otherwise great exterior image.
Also, if you’re struggling to find a good time to shoot during the day, you have one more option:
The dusk/dark technique, which gets you photos like this:
Simply head to the house around sunset and choose the best angle to showcase the home, ignoring the ambient light. Turn on all the lights or even add lights to the rooms; then wait until after sunset, when the sky’s exposure balances the room lights’ exposure. That’s when you can create a beautiful, pro-level image!
Getting started with interior photography: composition
After you’ve shot some stunning exterior shots, you’ll need to get on with the interior real estate photos. This can be tedious, but it’s essential you approach the task with care.
Homes come in all shapes, sizes, styles, and conditions. You want the house to look as good as possible, so I recommend you send your clients a task list for prepping the home prior to the photo session.
Once you’ve arrived, photograph the main rooms: the living room, kitchen, dining area, master bedroom, and master bath, all of which are “must-shoot” rooms. There could also be a library, office, large walk-in closet, and more. The client can often tell you what they deem important; don’t be afraid to ask.
The master bathroom!
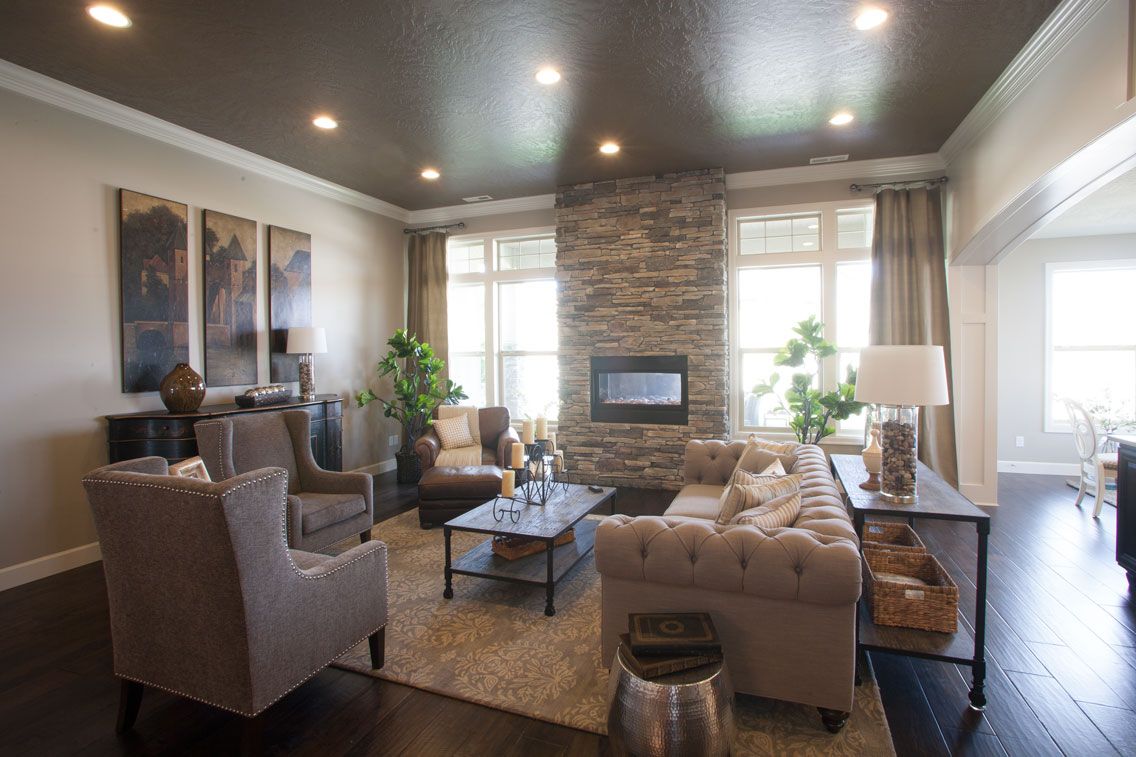
Once you’ve entered a room and are preparing to take a photo, seek out the best perspective. I like to use indoor elements – furniture, windows, and room layout – to create visual flow. I generally try to avoid including a large element in the foreground that prevents the eye from flowing through the room.
This is the first test shot I took of this room. The foreground chair blocked the flow!
By rotating the chair and lowering the camera height slightly, the eye flows through the room more easily. (This image also has its vertical lines corrected.)
Key composition tip: get the verticals right
In interior house photography, there is broad agreement among clients and photographers: Verticals must be correct! Most interiors feature plenty of verticals, including edges and corners of walls, door frames, and windows, and these edges need to truly be vertical. Wide-angle lenses that are not level (e.g., they’re tilted slightly upward toward the ceiling or downward toward the floor) will make vertical edges converge or diverge and no longer appear straight.
If you use a tilt-shift lens, the problem is solved right off the bat, but not everyone likes TS lenses. So what do you do? How do you prevent converging and diverging verticals from ruining your photos?
One common approach is to level the camera – that is, ensure it’s not tilting up or down – because a perfectly level camera will record straight verticals. While this is a simple solution, it doesn’t always make for the best compositions; a level camera at chest height can cut off foreground subjects like furniture at the bottom and leave too much ceiling at the top. Lowering the camera height will improve this problem, but how low can you go and still have an effective photo?
This image by one of my online course students, Simone Brogini, illustrates this point. His camera is chest high and is leveled to avoid diverging verticals. But the foreground furniture is cut off and there is too much ceiling that lacks interest.
Simone also shot this bedroom image the same way. It looks pretty good, but I advised him again that the camera height might be just a little too high, as the bed and furniture get only about 1/3 of the frame and the wall and windows use 2/3 of the frame.
So what is the perfect camera height? There are many opinions. Some suggest chest height while others suggest door-knob height or even lower. I prefer chest height or close, and I also correct vertical lines using other methods, like a tilt-shift lens or the Lens Correction tool in Photoshop (or Lightroom).
This image shows the power of the Lens Correction tool. The bed and furniture cover 2/3 of the frame and provide a fuller view of the room, plus the verticals are straight!
Real estate photography settings: how to get the perfect exposure
Exposing for interior elements can be challenging, because you’re balancing bright window light with darker interiors.
You can deal with this contrast in many ways; one is to shoot when outdoor light levels are lower, such as during or after sunset, or on a cloudy day. Turning on every light inside increases the interior brightness, and if the outdoor brightness is lower, a RAW file can often capture the scene in one frame. Alternatively, you can shoot a series of bracketed images, then blend them together in post-processing.
On a bright, sunny day, the room has a dark ceiling, a dark floor, window flare, and hot spots with too much contrast for one capture.
On an overcast day, the interior exposure is quite good, as is the window exposure.
Even in low-contrast lighting situations, I’d recommend you take a few extra shots to ensure you have all the necessary exposures for a great image. First, determine your base exposure, the image that has most of the data centered in the histogram. Then bracket in one-stop increments of varied exposures. You may not need these extra images, but if the dynamic range of the scene turns out to be too much, they can really save the day (i.e., you can blend them into a great final image!).
Real estate photography: interior lighting
While some real estate photographers stick to ambient lighting, just like a finely lit portrait, interiors can benefit greatly from carefully styled external lighting. Bracketing and blending can manage scene contrast but cannot create highlights and shadows in areas that have no directional light – and if you have a dark cabinet against a dark wall, for instance, adding supplemental light can bring out the much-needed detail.
Most interiors have two light sources: window light and interior lights. You can add continuous lights or use strobes/flashes. Personally, I recommend flashes or strobes, which provide flexibility when lighting interiors.
Before I dive into the basics of interior lighting, I’d like to emphasize its purpose: to bring out detail, balance the overall lighting effect, prevent distracting dark spots, and emphasize the key parts of the scene. Always think in terms of what the ambient lighting conceals and what your studio lighting will reveal.
Now, photographers shooting for architects or magazines often have plenty of time to photograph a property with finely crafted lighting techniques, but a real estate photographer’s time is usually limited, making flash the perfect tool. You can master the balancing act of using direct on-camera flash to fill in a scene, or you can bounce on-camera flash for great results.
Feel free to take a test shot without flash, then review the image on your LCD and determine the areas that require fill light. That’s what I did for the scene below:
Here, the only light was coming from a window on the left and the ceiling fixtures, leaving dark areas in front.
Adding bounce flash, handheld just to the right of the camera, filled in those darker areas effectively.
Also popular are multi-flash wireless set ups allowing the flash to be placed around a room for styled lighting. Oh, and you might try the light-painting approach, where areas are selectively lit across several exposures, then all exposures are blended in post-processing.
This image uses light painting for a balanced, detailed result.
By the way, you’ll need to be aware of lighting color temperatures and color balance, which can become a problem when indoor lighting (studio or otherwise) is combined with ambient outdoor lighting.
When you have mixed light, such as daylight-colored window light alongside tungsten-colored ceiling lights, and you then throw in a fluorescent kitchen light, you’ll end up with a palette of different light colors in your image. Walls closest to windows will be blue while the walls closest to the tungsten ceiling lights will be amber and the ceiling in the kitchen will have a green tint.
Here’s an image with mixed lighting:
There is a blue color cast around the window and on the floor to the left.
So what do you do about mixed lighting? Two things:
Work as much as you can to minimize mixed lighting by color-matching your studio lights to the lights in the scene.
Use selective color adjustments in Lightroom, Photoshop, or another post-processing problem to neutralize the unwanted color casts after the fact.
Here’s a corrected version of the previous image:
The final image shows color correction, as well as corrected verticals and the removal of window flare.
Providing the client with the final images
Once you have photographed the house and done the necessary post-processing, you will need to deliver the image files. Clients usually request low-resolution files for the web and high-resolution files for print publication.
Be sure to save your files in the proper file format and size for the intended use. Most online listing services specify their accepted formats and acceptable sizes. I use low-resolution JPEGs and high-resolution TIFF files, then I make a final delivery of the images via Dropbox or a comparable online service.
Real estate photography: final words
Now that you’ve finished this article, you’re ready to rock some real estate photos! Here are a few items to remember before heading out to your first house:
You are not photographing for yourself; you are photographing for clients who will expect professional-quality work.
Don’t get all the best gear; only buy what is required to do the job well.
Master the creative side of photography, such as angles, perspectives, and composition.
Master the technical side of photography, such as exposure, HDR, supplemental lighting, color matching, and exposure blending.
Be careful when processing real estate images; don’t misrepresent the property.