Mar 3, 2019

[Photography] Review of the Sigma 28mm f1.4 Art DG HSM for Canon

The post Review of the Sigma 28mm f1.4 Art DG HSM for Canon appeared first on Digital Photography School. It was authored by Karthika Gupta.

A couple of weeks ago I got my hands on the Sigma 28mm f1.4 Art DG HSM for Canon (also  available for Nikon, and Sony) and got to play with it for a couple of weeks. Let me tell you; it was a tough one to give back. This lens is quite amazing in terms of build, weight, and, most importantly, performance.

Karthika Gupta Photography Sigma 28mm f1.4 review

Ergonomics and build

The Sigma 28mm f1.4 Art DG HSM is a very standard Sigma lens when it comes to the ergonomics. Many of their primes more or less follow the same formula when it comes to the exterior design. In this case, and with pretty much most cases, there is a large rubber ring that makes up the focusing ring. This rubber ring helps greatly when it comes to the grip and overall ergonomic feel of the lens. The front of the lens has a 77mm filter thread and comes with a lens hood. The side of the Sigma 28mm f1.4 Art DG HSM has a switch for autofocus control.

The Sigma 28mm f1.4 Art DG HSM has weather sealing built into the lens. I was able to test this when I took it out in the snow. We have had an unusual cold spell here in Chicago, and when I was walking around downtown with this lens, the temperatures dipped, and it started to snow. I was a bit apprehensive taking out my gear in the snow, but I am glad I did because this lens performed beautifully with my weather resistant Canon 5D MkIII. Photographers who regularly operate in the outdoors with rain and snow will find this beneficial.

When you hold the Sigma 28mm f1.4 Art DG HSM, you feel a solid lens. My primary everyday lens is a Canon 24-70mm f/2.8. This lens has been in my bag for the past 9 years, and I like the feel of the solid form and am comfortable with the weight. The Sigma 28mm is a bit smaller, and a little lighter than I am used to, so switching to it was a non-issue for me.

Karthika Gupta Photography Sigma 28mm f1.4 review

The canon 24-70mm f/2.8 is on the left and the Sigma 28mm f/1.4 is on the right.

Technical Specifications (from Sigma)

These specifications are from Sigma’s website.
Typical photography applications for this lens is listed as Creative, Travel, Landscape, Wedding & Events, Family. 
  • Best-in-class performance
  • Dust- and splash-proof structure
  • Designed to minimize flare and ghosting
  • Designed to meet all shooting conditions
  • Compatible with Canon Lens Aberration Correction
  • Nikon electromagnetic diaphragm mechanism included
  • Manual Override (MO) capable of switching two full-time manual modes
  • Lens angle is 75.4deg
  • Filter size is 77mm
  • Minimal aperture is f16
  • Minimal focusing distance is 28cm/11in

Performance

I gauged the performance of this lens in three different areas:

  • Low light performance
  • Color output
  • Wide angle

Low light performance

The Sigma 28mm features a very fast lens design at f/1.4. This makes it an ideal low light photography lens. Moreover, the mechanics of the lens also delivers incredible sharpness even at its widest aperture. I love photographing at wide apertures and am generally at f/2.8 or f/4.0. So the f/1.4 was attractive to me, especially in low light. I tested the low light performance at a couple of places in Chicago and was very happy with the results. The lens was also quite fast at focusing in these low light situations.

Karthika Gupta Photography - Memorable Jaunts Sigma 28mm lens review low light Chicago Atheletic Club Location

The Chicago Athletic Club Hotel is beautiful but so dark. The low light was an easy gig for the sigma lens

Karthika Gupta Photography - Memorable Jaunts Sigma 28mm lens review low light Chicago Athletic Club Location Portrait

Thank you to my friend Sandy Noto (www.sandynoto.com) for snapping this photo of me with the Sigma. The wide angle at closeup range did not distort the image at all.

Karthika Gupta Photography - Memorable Jaunts Sigma 28mm lens review Chicago Museum Of Science and Industry Interiors

The interiors of the museum of science and industry in Chicago are quite dark but I was at ISO 320 and f/1.4. The 28mm captured the entire shuttle in the frame.

Color output

Sigma’s Art series is known for its superb color rendition, and the 28mm Art lens did not disappoint in this area. I tested the lens in a variety of lighting conditions, both indoors and outdoors, as well as on bright sunny days and overcast days. In each scenario, the lens output was beautiful.

Karthika Gupta Photography - Memorable Jaunts Sigma 28mm lens review low light Chicago Downtown

Even at f/1.4 the image output and quality was exactly what I was hoping for. The lens is tack sharp even at f/1.4

Karthika Gupta Photography - Memorable Jaunts Sigma 28mm lens review Chicago The Bean wide angle photo Karthika Gupta Photography - Memorable Jaunts Sigma 28mm lens review Downtown Chicago Yellow Taxi Cab

Wide angle

The Sigma 28mm f/1.4 is a fixed zoom lens. Unlike my Canon 24-70mm zoom which gives me more flexibility and freedom in the range of focal lengths, the fixed zoom does take a little bit getting used to. But if you were to use this as a walking-around-everyday-travel lens, which is what I use my 24-70mm, the fixed zoom is not an issue. The wide angle does take a little getting used to, but all the other features like fast focusing, low light, and superb color output make up for the wide-angle fixed zoom.

Karthika Gupta Photography - Memorable Jaunts Sigma 28mm lens review Chicago The Bean Wide Angle Photo in winter

The 28mm focal length was just perfect to get the entire Chicago bean a.k.a as the cloud gate in the frame.

Karthika Gupta Photography - Memorable Jaunts Sigma 28mm lens review Chicago Downtown L train photo

Karthika Gupta Photography - Memorable Jaunts Sigma 28mm lens review Chicago Riverwalk in winter

Additionally, I found minimal to no chromatic aberration around the edges of the frame that is predominant in most wide-angle lenses.

Conclusion

Overall, I was very pleased with this lens. It is a good solid lens from the Sigma Art series and well worth the investment, making it an ideal lens for street photography and wide-angle photography.

The post Review of the Sigma 28mm f1.4 Art DG HSM for Canon appeared first on Digital Photography School. It was authored by Karthika Gupta.


it's from Digital Photography School https://ift.tt/2GWWQer
via Karthika Gupta

Mar 2, 2019

[Photography] What’s The Highest ISO You Can Use? How To Find Out For Yourself

The post What’s The Highest ISO You Can Use? How To Find Out For Yourself appeared first on Digital Photography School. It was authored by Peter West Carey.

Do you know the limits of your camera’s ISO?

By limit, I mean the point at which, egads!, it’s just too much noise. If not, or if you’ve never bothered to figure out your camera’s limits, I have an easy experiment for you to try.

Each camera model is different and camera manufacturers are improving ISO performance with every new release. This is why it’s important not to assume that Mark IV version is mostly the same as the Mark III.

What is ISO?

ISO stands for the International Organization for Standardization. Do big, long governmental-style names make you fall asleep? I’ll make this quick.

The ISO group sets standards so 100 speed Kodak film is the same as ISO 100 Fuji or Agfa or any other manufacture. It’s good to have standards otherwise you wouldn’t know how to set your shutter speed and aperture.

Carry that concept over to digital and ISO is a measure of the sensitivity of your camera’s sensor. The lower the number, the less sensitive, therefore, you need more light to make an exposure. A higher ISO allows for less light in the same situation, which can result in a faster shutter speed or more optimal aperture setting.

Why should you care?

Increasing your ISO setting has one big drawback: the increased sensitivity can create unwanted artifacts called “noise.”

In the days of film, higher ISO meant added grain in an image, something some of us enjoy in our photos. Noise, on the other hand, is disliked by all. It discolors images, mostly in the dark and black areas. It muddles things.

Let me show you the difference with two shots, the first was taken at ISO 12,800 and the second at ISO 80.

Can you see the green and purple discoloration? That’s noise.

Use the lowest ISO you can

Knowing that a higher ISO can create this ugly noise, it’s a good idea to almost always take photos at the lowest ISO that still gives you a crisp image. For instance, landscape photographers in the days of film loved ISO 50 film and some still return to their film gear for the amazing smoothness that film lends to its images.

There are many DSLRs that can utilize ISO 50, such as the older Canon EOS 5D.

Machermo and the Moon – Nepal’s Himalayas – Canon 5D ISO 50

Unless you can’t

But what about dark situations? For instance, what about when you have a dimly lit auditorium or stage? Parents with kids in indoor sports or drama classes and school plays or holiday programs know this situation well. Here’s an example:

ISO 5000

In situations like this it is good to know what your camera’s maximum useable ISO is. It’s also a great idea to know how much noise you will encounter if you go above that self-imposed maximum, because sometimes the emotions and memories are more important than worrying about noise-free images.

Or perhaps you need a high shutter speed given the current lighting conditions and a flash would ruin the scene.

ISO 5000

A simple experiment

The experiment to find out the highest ISO you should use, without gaining too much noise beyond your tastes, is quite easy.

You will need:

  • Camera
  • Table or tripod
  • A variety of objects, with dark and black colors, maybe some shadows too
  • Ample lighting (but not overly bright)

  1. Set up your camera either on a table or tripod. You’re going to want it steady because some of the photos you take might have a slow shutter speed. Blurring will ruin the results.
  2. On the other end of the table set up your objects. I suggest objects without much gloss and as solid a field of black as you can find. Black fur on your kids’ stuffed animals might hide some noise and so will flecks of fabric in a shirt of the like.
  3. Make sure there is enough light in your scene.
  4. Set your camera to Program mode unless you have a favorite.
  5. Also turn off any in camera noise reduction options.
  6. Set your ISO to 100 or L if it goes lower than 100.
  7. Focus on your black objects and take a photo.
  8. Now change the ISO to 200 and take another photo.
  9. Continue moving up your ISO by one stop (a doubling of the number) while snapping an image each time.
  10. Stop when you reach the highest limits of your camera. This may be ISO 3200 or maybe ISO 512,000.

Examine the results

Transfer your images into a computer so you can pixel-peep the results. As your camera was in Program mode, the overall exposure of your images should be close to the same. If you’re using photo editing software like Lightroom, I suggest turning off any automatic noise reduction widgets.

Now zoom in on your images.

ISO 12,800

As the ISO gets higher you will notice more and more noise creep into the dark areas. As mentioned, it’s discoloration that is often purple and green in color. It doesn’t look right and it is not the grain that was characteristic of high ISO films.

At some point, and the choice is yours, the noise gets to be too much. Each camera model is a little different and in the 18 years I’ve been using digital cameras, the quality consistently gets better and better. This is why this experiment is one of the first things you should do with a new camera.

Examples

Let me give you a few examples of what looks like too much noise. These are just my opinion, but I hope the examples can help you get a better idea of where your camera has its limits.

ISO 12,800

ISO 12,800

ISO 12,800

ISO 40,000

Conclusion

Knowing the ISO limits of your camera is important in any type of photography. There are times that might warrant a higher ISO, such as shooting in very low light. How much noise is too much for your situation and camera is a level best tested before the situation arrises.

One additional note: This experiment does not take into account the wonderful ability of most modern photo editing software to greatly reduce the negative aspects of noise. That’s a whole other article!

The post What’s The Highest ISO You Can Use? How To Find Out For Yourself appeared first on Digital Photography School. It was authored by Peter West Carey.


it's from Digital Photography School https://ift.tt/2tMAdkn
via Peter West Carey

[Photography] How to Correct Perspective Distortion in Photoshop

The post How to Correct Perspective Distortion in Photoshop appeared first on Digital Photography School. It was authored by Ana Mireles.

When talking about perspective, you step into a deep and somewhat complicated subject. It has to do with geometry, history of art, viewpoint and so on. However, solving that big issue won’t be the point of this tutorial. Instead, it focuses on solving perspective issues in your photography using photoshop. So keep reading to learn which Photoshop tools can help you out.

Because perspective can be a broad term, in this article, I’m going to narrow it down to one aspect, and that is the way straight lines seem to converge as they get further away. This can be used as a creative element of the picture, or it can help convey a sense of depth and tridimensionality as per this example:

You may be familiar with this effect, such as when you’re walking on the street, and you tilt your camera up to photograph a building. Now, this might be your intention, but sometimes you don’t want or need this distortion. Of course, you can correct this issue by using tilt and shift lenses, or with a large format camera. However, many of us don’t have access to that equipment. This is where Photoshop is handy to fix perspective in post-production.

As usual, Photoshop has different ways of dealing with the same problem. One may work better than others in different cases. However, I find that more often than not, you need to combine them to get the job done. So here’s an introduction to some different approaches:

Lens correction and transformation

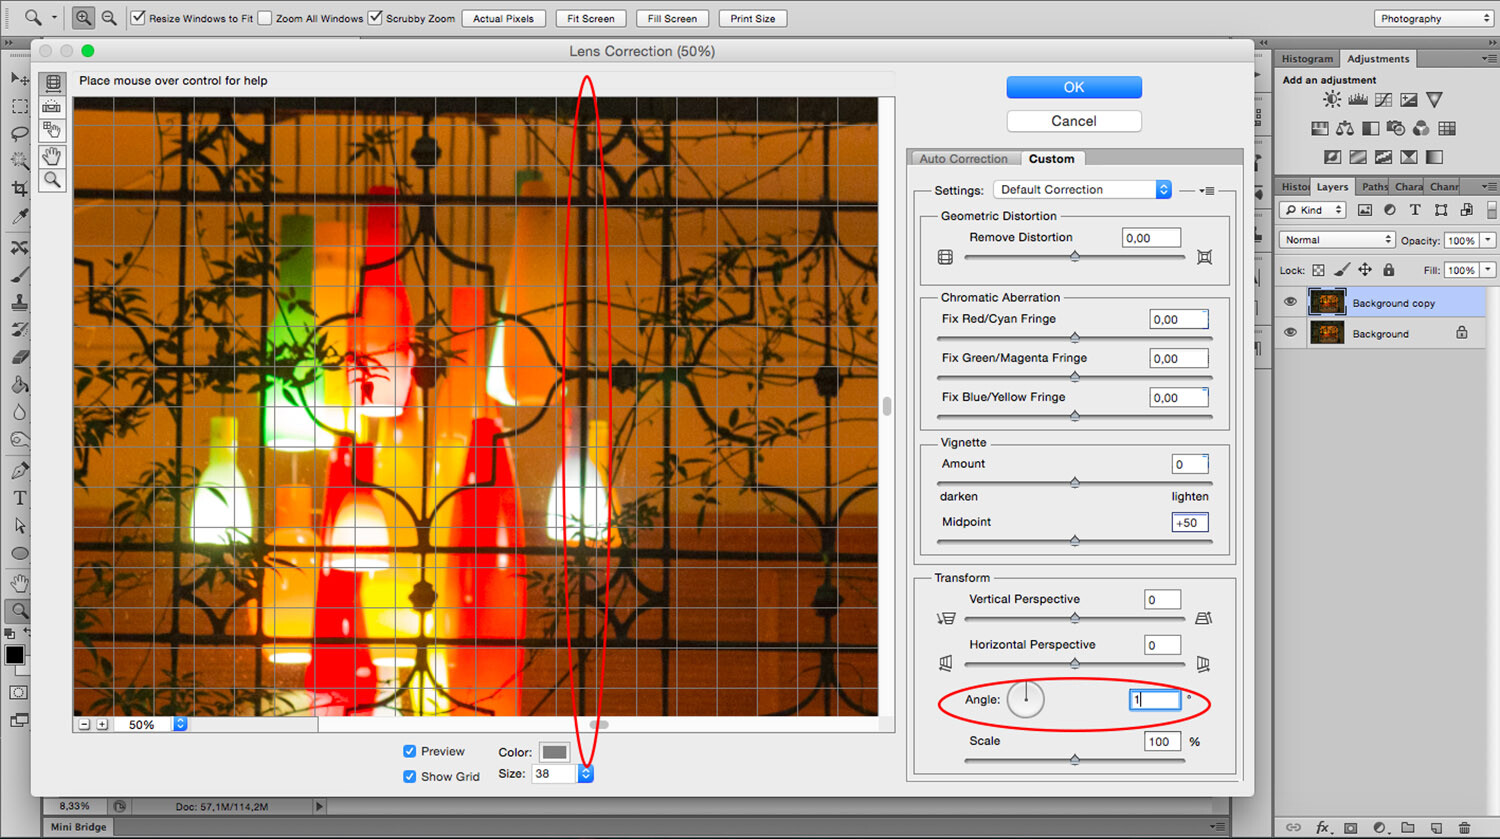
One way to correct perspective distortion is by using the Lens Correction Filter. You can find it under the Filter Menu. When you choose this, a new window pops up. To start working on it, ensure you’re in the Custom tab to access the settings and set your grid with the bottom slider so that you can have it as a reference.

For this exercise, you’re only going to need the Transform part of the panel that you’ll find in the bottom right. I find that starting with the center point saves time as the changes you make after happen on both sides simultaneously. So I zoomed in to the center and rotated the angle so that the central line aligned with the grid. Remember, you can make the grill tighter if you need to.

Now you can start fixing the vertical and horizontal lines with the sliders. On the sides of each slider, you can see an icon showing the way the image gets affected. If you pull the vertical slider to the left, the top part gets wider or sliding to the right the bottom part is the one that becomes wider and so on.

As you move the lines around, you may be losing part of the image towards the edges. To bring everything back in, use the scale slider. After you’re done, you’ll have to crop out the blank pixels.

As you can see the Lens Correction Tool can be handy, but sometimes you still have to make some adjustments here and there. For this step, you can use the different Transform tools found under the Edit menu.

In this case, I’m using the Skew tool which allows me to move all the corners and middle points independently. Whenever you’re using any of these tools, you can pull out Guide Lines by clicking on the ruler and dragging. That way you can work more precisely without leaving the transform mode.

For this image that’s all I needed to do. However, remember that all the transformation tools can help to correct perspective, so experiment with them to find the one that works best for you and your image. Here, you can see on the left how I started, and on the right, is the new corrected version.

Perspective Tool Crop

Another way of fixing the problem is with the Perspective Tool Crop. This feature corrects the lines almost automatically. However, I wanted to give you the option of doing it manually first so that you have more control over the perspective. If you want to try it out, draw a rectangle around the image with the Perspective Tool Crop active and then drag the corners to match the grid with the distorted lines.

It usually does a good job, but you might still need to tweak it a little bit with the transform tools. Be aware that the Perspective Tool Crop, as the name says, crops your image. You might lose some information from the borders. In any case, you can give it a try and decide which method is best for you.

If you have any other tips to correct perspective distortion, share them with us in the comment section.

The post How to Correct Perspective Distortion in Photoshop appeared first on Digital Photography School. It was authored by Ana Mireles.


it's from Digital Photography School https://ift.tt/2ND8trn
via Ana Mireles

Mar 1, 2019

[Photography] Weekly Photography Challenge – Backlighting

[Photography] Canon EOS RP Full-frame Camera – Why Some People Won’t be Buying this Camera

The post Canon EOS RP Full-frame Camera – Why Some People Won’t be Buying this Camera appeared first on Digital Photography School. It was authored by Caz Nowaczyk.

Canon have released their new Canon EOS RP full-frame mirrorless camera, and not without some controversy. The Canon EOS RP is it’s entry-level mirrorless camera that comes in at US$1299.

Find out the reasons why some people won’t be buying this new camera in these great videos by Jared Polen, Matti Haapoja,and SLR Video Shooter.

You’ll be surprised by the results.


The disappointments of Canon EOS RP for people shooting video:

While this is one of Canon’s lightest full-frame cameras, some people will be highly-disappointed to know that the camera has no 24p video capabilities in HD. It only offers it when shooting 4k. So for many photographers who also like to do video, this will be a major source of disappointment.

The other major downfall is when you use crop sensor lenses on this camera, you lose the ability to shoot in HD. What?!

So, unless Canon comes out with a firmware fix to these issues, you will likely want to choose an alternative camera for video.

However, If you are wanting to use this camera for photography, you will likely find this a great lightweight, affordable, full-frame, mirrorless camera.

So, will you be buying the Canon EOS RP, or will you stick to the Canon EOS R?

You may also find the following articles helpful:

Best Vlogging Cameras for 2019

Fujifilm X-T3 versus Fujifilm X-H1: The Best Mirrorless Camera for You?

9 Recommended Accessories for Your New Sony a7R III or a7 III Camera

Camera Comparison – The Fujifilm X-H1 Versus the Sony a7R III

Gear Review: Canon EOS M50 Mirrorless Camera Kit

The post Canon EOS RP Full-frame Camera – Why Some People Won’t be Buying this Camera appeared first on Digital Photography School. It was authored by Caz Nowaczyk.


it's from Digital Photography School https://ift.tt/2NATv5f
via Caz Nowaczyk