Nov 3, 2019

[Photography] Photoshop Layers for Beginners – What, When and How to Use them Best

The post Photoshop Layers for Beginners – What, When and How to Use them Best appeared first on Digital Photography School. It was authored by Nisha Ramroop.

photoshop-layers-for-beginners

This introduction to Photoshop Layers for beginners will help you learn a great editing habit. So, what exactly is a Photoshop layer? Quite simply put, if you imagine a stack of transparent paper, each sheet is equivalent to a Photoshop layer. When you add/change/remove any of the layers, what you see at the top of the stack forms your entire image.

The first time you open Photoshop, by default, the layers panel is on the right side of your screen and your image opens as a layer named “Background”. Keep this in mind as you read on.

Photoshop Layers for Beginners – What, When and How to Use them Best

Why use Photoshop Layers?

Now that you have an idea of what a layer is, here is why you should use them:

1. It is a way to work non-destructively

Destructive editing occurs when you move and change the pixels directly in your original image. This happens if you edit your original image/background layer when working in Photoshop. While you can undo your changes, if you exceed the number of “undos” you can apply, those changes commit. Also, you may like some changes, but not others, and there is no way to go back to just that change without undoing other changes you have made too.

Alternatively, when you edit your image on separate layers, both the edited image and the original save (they are saved to a .psd file and this maintains all your layers). This allows you to go back to your original image at any time, simply by hiding layers, or deleting them entirely.  This is a form of non-destructive editing.

One thing to remember, however, is that if you resize your entire document (via menu->image->image resize) at any point, that is a form of destructive editing, and you will lose image quality if you try to resize it back to the original size later.

As your editing style evolves, you will appreciate the option of going back to original images at a later date.

Image: Easily add text without affecting your original image

Easily add text without affecting your original image

2. It allows organized and flexible editing

Photoshop is usually a great option when you want more control over your editing process. While you start off with a certain end result in mind, you may change your mind, during (or even at the completion of) your process. Surely there are better ways than undoing multiple changes or starting over from scratch right?

Enter, layers.

Image: Since your original image is unaffected, you can change the text at a later date

Since your original image is unaffected, you can change the text at a later date

Layers allow you to work with your vision without affecting/destroying the original. Since you can work on each layer separately, you have major flexibility. With layers, you can also combine several images into one (composite), These include (but is not limited to), swapping out elements from your image, changing color, tones, and lighting, adding text and resizing, replacing or rotating an object independent of everything else in your image.

Image: You can use layers to replace a plain sky

You can use layers to replace a plain sky

This non-destructive editing style allows you to undo a change at any point in time, and you have control over each individual layer. This means you can work with different objects and elements of your image without affecting anything else.

How to use Photoshop Layers

If you do not see the Layers Panel on the right-hand of your screen, you need to turn it on. To do so, go to Menu->Window->Layers.

As mentioned before, when you open an image in Photoshop, it opens as a background layer. You will notice that there is a small lock icon on the right side of the background layer. This lock is intended to prevent inadvertent changes.

The first step is usually to duplicate this layer. That way, the background layer remains untouched (original).

Photoshop Layers for Beginners – What, When and How to Use them Best

To start, duplicate your background layer:

  1. Open an image in Photoshop
  2. Right-click on the thumbnail image in your layers panel named “Background,” and choose the duplicate layer option
  3. Click OK. A new layer will appear above your original layer with the default name “Background Copy” – you can rename it to anything you want. I suggest renaming it to something that relates to the changes you are making. This makes it easier to find later if you have many layers.

photoshop-layers-for-beginners

As you become comfortable working with layers, you will find yourself making new layers for each change you want to make e.g. if you are retouching an image or replacing a sky. This comes with the knowledge that, later on, you can adjust the intensity of any of those changes independently.

Image: I used Layers for Sky Replacement, with a Layer Mask to recover the top branches

I used Layers for Sky Replacement, with a Layer Mask to recover the top branches

Adjustment Layers

Photoshop also has another layer type called Adjustment Layers. These layers are not a duplicate of other layers; instead, they adjust the information of the layer directly beneath it. Thus you can simply use an Adjustment Layer to effect change on the image without changing the original layer image. For example, you can increase/decrease the contrast or brightness of your layer.

photoshop-layers-for-beginners

Notice how adjustment layers look different from other layer types. These adjust the layer below them.

Adjustment layers do not actually contain any pixels but instead are a series of instructions for Photoshop on what changes you ask it to make. You can access the Adjustments Layer menu at the bottom of the Layers panel or choose Windows and check the Adjustments option.

Layer Masks

A Layer mask is another non-destructive editing technique in Photoshop, used to control the transparency of the layer you apply it to. An even simpler definition is that a layer mask can make a layer visible or invisible. This is done by painting either white (to make it visible) or black (to make it invisible).

photoshop-layers-for-beginners

Blending Modes

At the upper left corner of the Layers panel is the blend modes drop-down menu. These “modes” are set to Normal by default and control how pixels on the different layers interact with each other. An easy way to understand what the different blending modes do is to duplicate your image (as described above) and cycle through them.

photoshop-layers-for-beginners

An example of how different blend modes change the look and feel of your image: 1. Normal 2. Multiply 3. Soft Light 4. Vivid Light 5. Hue 6. Luminosity

Important layering notes for beginners

When there are several layers, your changes only affect the layer that is active or selected. This is why it is a good practice to name your layer (Step 3 above) based on what you are using the layer for.

You can save the edits as a Photoshop (PSD) file, close it and open it at a later date to find all your layers (and changes) as you left it. Of note, saving it this way increases the size of your file. If you are finished with your edits and don’t need a large PSD file, you can merge all the layers (or flatten the file) and save it to a smaller, more compressed file type, such as a jpeg. Of course, in doing so, you will no longer have the ability to access those individual layers later.

Layers work in order. This means that the layer on top “covers” everything below it. You can, however, reorder your layers by moving them up or down by simply dragging them. Keep in mind that the layer on the top will be most visible.
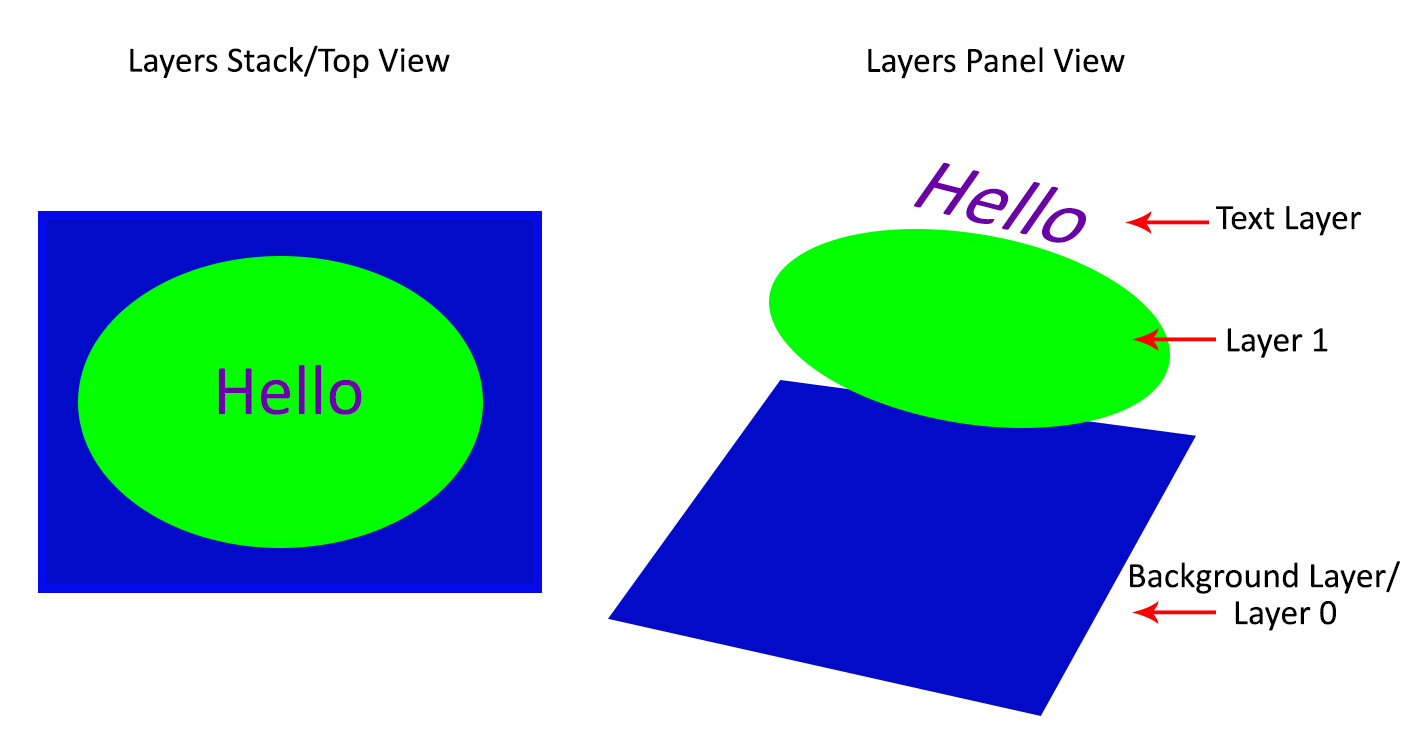
photoshop-layers-for-beginners

Conclusion

The key thing to remember as a beginner is that Photoshop layers are a recommended non-destructive way to work. It is flexible, which allows you to organize your work, effect change in selected areas, and undo changes easily.

When you do not merge your layers, you can open your Photoshop file years later and make changes, all without affecting your original image.

I hope you can utilize these Photoshop Layers for Beginners tips, and if you have any tips on this topic, please share in the comments below.

The post Photoshop Layers for Beginners – What, When and How to Use them Best appeared first on Digital Photography School. It was authored by Nisha Ramroop.


it's from Digital Photography School https://ift.tt/34iesZQ
via Nisha Ramroop

Nov 2, 2019

[Photography] Portrait Editing with Luminar 4 – Using Artificial Intelligence

The post Portrait Editing with Luminar 4 – Using Artificial Intelligence appeared first on Digital Photography School. It was authored by Caz Nowaczyk.

In this video by Jacques Gaines, he looks at Portrait editing in Luminar 4 using the artificial intelligence features.

Luminar 4 is a stand-alone software or works as a plugin in Adobe Photoshop (which is great if you like working in Photoshop and don’t want to completely swap to new software).

This video uses the plugin version with Photoshop.

Jacques uses a retouched, flattened image in Photoshop and then opens the Luminar 4 plugin and does further editing work on his portrait.

He discusses the different portrait enhancement options that Luminar 4 offers.

Within Luminar, there is a section called “Portrait.”

This is the section that consists of:

  • AI Skin Enhancer
  • Portrait Enhancer
  • High Key
  • Orton Effect

AI Skin Enhancer

Smoothes out the skin on a portrait and does it realistically. You can decide how much you want to apply it from 0-100%.
If you don’t want it to apply to certain sections, you can also mask it out using a brush tool.

Portrait Enhancer

The Portrait Enhance panel consists of:

  • Face Light
  • Red Eye Removal
  • Eye Whitening
  • Eye Enhancer
  • Dark Circles Remover
  • Slim Face
  • Enlarge Eyes
  • Eyebrow Improve
  • Lips Saturation
  • Lips Redness
  • Lips Darkening
  • Teeth Whitening

Jared shows the effects these settings have on a portrait.

When you apply the changes in Luminar, it makes the image as a new Photoshop layer. You can then use a mask to paint out any areas in the image that you don’t want the effects applied to.

Have you done portrait editing with Luminar 4? Share with us your thoughts in the comments!


You may also like:


The post Portrait Editing with Luminar 4 – Using Artificial Intelligence appeared first on Digital Photography School. It was authored by Caz Nowaczyk.


it's from Digital Photography School https://ift.tt/2PCWDQX
via Caz Nowaczyk

Nov 1, 2019

[Photography] Weekly Photography Challenge – Black and White

The post Weekly Photography Challenge – Black and White appeared first on Digital Photography School. It was authored by Caz Nowaczyk.

This week’s photography challenge topic is BLACK AND WHITE!

Image: Photo by Jim Hamel

Photo by Jim Hamel

Inspired by our Black and White Photography e-book sale, I decided to make this weekly photography challenge Black and White. Black and white offers so much depth and emotion and has a timeless nature to it.

So go out and capture anything in black and white. You can use Monochrome Mode on your camera, or turn them into black and white with your favorite post-processing application.

They can be street photography, landscapes, architecture, patterns and textures, automotive, or use creative techniques such as slow shutter speeds, night photography, or intentional camera movement. Whatever you decide to photograph, just be sure they are black and white!

Check out these inspiring pics by some of the dPS writers, have fun, and I look forward to seeing what you come up with!

Black and white photography

Photo by Andrew S. Gibson

Image: Photo by Simon Bond

Photo by Simon Bond

Check out some of the articles below that give you tips on this week’s challenge.

Tips for Shooting BLACK AND WHITE

A Beginner’s Guide to Doing Black and White Photography

Avoid These 5 Common Mistakes in Black and White Photography

How to Make Brilliant Black and White Photos with Dramatic Composition

How to Use Color Temperature in Black and White Conversions

Mastering Monochrome Mode

Black and White in the Outdoors: Learning to see in Monochrome

The Pros and Cons of Black and White Versus Color for Street and Travel Photography

Experimenting with Low Key Black and White Photography

How to Use a Black and White Filter to Improve Your Photos

How to Create Silky Split Toned Black and White Photos Using Luminosity Masks

How to Enhance your Black and White images with Infrared Photography

Weekly Photography Challenge – BLACK AND WHITE

Simply upload your shot into the comment field (look for the little camera icon in the Disqus comments section) and they’ll get embedded for us all to see or if you’d prefer, upload them to your favorite photo-sharing site and leave the link to them. Show me your best images in this week’s challenge.

Share in the dPS Facebook Group

You can also share your images in the dPS Facebook group as the challenge is posted there each week as well.

If you tag your photos on Flickr, Instagram, Twitter or other sites – tag them as #DPSblackandwhite to help others find them. Linking back to this page might also help others know what you’re doing so that they can share in the fun.

The post Weekly Photography Challenge – Black and White appeared first on Digital Photography School. It was authored by Caz Nowaczyk.


it's from Digital Photography School https://ift.tt/2qi8OIf
via Caz Nowaczyk

[Photography] Why Blurry and Unfocused Photos Can be Great

The post Why Blurry and Unfocused Photos Can be Great appeared first on Digital Photography School. It was authored by Megan Kennedy.

blurry-and-unfocused-photos

Often looked over or discarded altogether, blurry and unfocused photos are usually dismissed as a waste of space on the hard drive.

Upon closer inspection, however, these photos can actually be beautiful and highly engaging.

Here are four ways in which blurry and unfocused photography can be great!

Why Blurry and Unfocused Photos Can be Great

Blurry or unfocused…What’s the difference?

blurry-and-unfocused-photos

Blur occurs during an exposure when the camera and/or subject moves.

Unfocused imagery, on the other hand, is affected by aperture, focus, and distance.

Blurry images are directional or streaky, while unfocused images are fuzzy.

To achieve intentionally blurred images, photograph a moving subject and/or move the camera during an exposure.

To make unfocused photography, use a wide aperture for a very shallow depth of field and/or use distance and manual focus to keep sharpness down.

Of course, there are degrees of unfocused or blurry imagery. An unfocused image could still have elements nearing sharpness. Likewise, a blurry image could have aspects of near-stillness.

How blurry or unfocused an image is will be up to you and the incidental whims of the photographic process.

1. Color and light

blurry-and-unfocused-photos

We spend a lot of our photographic lives trying to achieve perfect sharpness, so why create intentionally blurry/unfocused imagery?

The first reason is color and light.

Color photography came into mainstream use in the 1930s. Since then, the incredible variety of colors in our world has been encapsulated both digitally and on film.

Blurry and unfocused imagery strips a photograph back to the bare bones of color and light, generating an abstracted visual study of the environment around us.

We assign specific properties to different colors too. For example, yellow is paired with joy and blue with sorrow.

Because of this, blurred and unfocused depictions of color and light draw connections with viewers through powerful emotional associations.

2. Reflections on art history

Why Blurry and Unfocused Photos Can be Great

In looking back over famous contributions to art history, many tend to think about literal subjects like Leonardo da Vinci’s Mona Lisa or Andy Warhol’s Campbell’s Soup Cans.

But many artists have transcended the rigidity of the representative, instead, focusing on the event of light, color, and form.

For example, Mark Rothko generated highly emotional responses from audiences with dreamlike forms and colors.

Color field artists like Helen Frankenthaler and Ronnie Landfield, painted artworks that conveyed the subliminal mechanism of seeing.

Blurry and unfocused photography makes images that are rooted in the history of visual art.

This history strengthens a blurry or unfocused image, giving it form and a conceptual standing of its own.

3. Abstraction

blurry-and-unfocused-photos

Also known as non-objective or conceptual photography, abstract photography depicts imagery free from an immediate association to the objective subject matter.

Photographers like Eileen Quinlan and Barbara Kasten work within the realm of abstract photography to elicit a unique visual response.

Without the presence of immediately identifiable subject matter, the experience of the ineffable filters through.

Both incidental and intentionally blurred and unfocused imagery can take on the life of the abstract. Like an abstract painting, unfocused and blurry photography reflects the viewer’s own impressions and associations.

In addition, abstract photography is subjective. Blurry or unfocused abstract photography encourages a viewer to imbue a photograph with their own meaning and experience.

4. Fun!

Why Blurry and Unfocused Photos Can be Great

Nowadays there is a lot of emphasis on pin-sharp photography.

Letting loose and allowing unfocused of blurry photography to come through can be a lot of fun.

Unfocused or blurry photography is a little like finger-painting; part of the fun is in relinquishing the paintbrush and allowing the artistic impulse to guide your fingers.

Fresh color combinations, new approaches to the subject matter, engaging camera motions…experimenting with blurry and unfocused photography is a great way to discover new angles to incorporate into your future photography.

Conclusion

Blurred and unfocused photography may seem like a strange approach to photography, however, letting go and experimenting with your camera is one of the most enjoyable and educational parts of photographic practice.

Blurry photography introduces dynamic movement to an image, while unfocused photography distributes soft renderings of light and color.

Moreover, blurry or unfocused photography can create engaging visual experiences that reflect the physical nature of seeing.

By experimenting with blurred or unfocused photographic practices, you can generate an abstract perspective that is both engaging and unique.

What are your thoughts? Do you think there is a place for blurry and unfocused photos? Share with us in the comments your thoughts, or your photos!


The post Why Blurry and Unfocused Photos Can be Great appeared first on Digital Photography School. It was authored by Megan Kennedy.


it's from Digital Photography School https://ift.tt/2WxtxUv
via Megan Kennedy

[Photography] Are Photography Competitions Good for Your Soul?

The post Are Photography Competitions Good for Your Soul? appeared first on Digital Photography School. It was authored by Charlie Moss.

are-photography-competitions-good-for-your-soul

Are photography competitions good for your soul? The idea of diving headfirst into the promising ocean of photographic competitions is one that can be appealing. Imagine yourself surrounded by admirers – fame, and accolades aplenty for your work. The thought is pretty appealing, isn’t it?

Are-Photography-Competitions-Good-for-your-soul

But for most of us, that cool blue water of success turns out to be little more than a dream. Most competitions for most photographers and artists end with little more than a rejection letter, or a place on the shortlist if you’re very lucky.

What is there to gain?

Well, to be quite frank, there’s an awful lot to gain from entering your photography work into competitions. And pretty much all competitions will help you grow and improve as a photographer if you put some thought into the images you’re selecting.

Image: Internet competitions can be a good way of working out which are your better images.

Internet competitions can be a good way of working out which are your better images.

You can use competitions for different purposes. For instance, local club competitions or some of the online competition sites can be good for working out which variations of images appeal to people more. If you’re a little stuck with an image, then entering a local club competition might help you see some of the flaws in your shot.

Prizes, notoriety, or self-improvement?

At the top of the scale, there are huge cash awards and even residencies to win through photographic competitions. Of course, you can’t just make a living by winning competitions with your photos, but the kind of cash prizes that some competitions award will certainly pay a good chunk of your living expenses for a while!

Are-Photography-Competitions-Good-for-your-soul

But for most of us, what we gain is a wider audience and a better sense of our work. And these things are both important to photographers in their own way.

Having an audience isn’t just important for pros, it can open all kinds of doors for amateurs too. Plus, as much as we sometimes loathe to admit it – nice comments and ‘likes’ can go a long way to making us feel good about our work.

The process of selecting images to enter into a competition can be extremely powerful for your work. Trying to narrow all the photos you’ve taken into just a small handful that fit a brief is a difficult process. But this process should tell you something about yourself and your work, and perhaps even push your future work in a particular direction.

Entering competitions can be a great learning experience.

Protecting your mental health

We don’t always win competitions. Of course, it would be impossible for everyone to win every competition that they entered. Not placing in shortlists time and time again can be tough on our mental health.

Are Photography Competitions Good for Your Soul?

You must make sure you’re entering competitions for good reasons, and not those that end up lowering your mood when you face rejection. Finding these reasons can be difficult even for seasoned photographers.

So how can you change bad reasons to good?

Think about why you’re entering competitions

Every now and then I like to reassess where I am with my competition goals to make sure I’m on track, and I invite you to do the same right now. Take a notepad and a pen and spend no more than five minutes jotting down the reasons that you might want to enter competitions.

Once you’ve taken some time to make that list, grab a coffee and review it. Take particular note of reasons that relate to your self-esteem. They could be reasons such as “I want to win competitions to prove I’m not a bad photographer,” or “I want to win competitions to show that time spent on my hobby is worthwhile.”

By framing your ambitions in this way, you’re dangerously close to resting your photographing (and personal) self-esteem on the result of the competition. Screw up the competition, and your photographic self-esteem drops. Photography should be pleasurable and fun to participate in, and competitions should support that.

Setting better goals

Instead, try to focus on goals that aren’t tied to your self-esteem. Hone in on more positive reasons to enter competitions such as “I want to enter competitions to help me develop my photographic voice” or “I want to enter competitions to encourage me to shoot a wider variety of subjects.”

Are-Photography-Competitions-Good-for-your-soul

These goals are not only much more achievable, but we don’t face the same kind of mood drop if we end up not winning. We have met our goal because our goal was simply to refine our work or shoot more variety. Anything additional, like placing on a shortlist, is a bonus.

Don’t forget to be kind to yourself

It’s important when entering competitions to be kind to yourself. Winning a competition can be a glorious feeling, but allow yourself to fail too. Failing is a very human trait, and it’s not something you will be able to escape.

Have compassion for yourself when the lows happen. Treat yourself to something you enjoy photographically and then go back out and get those goals on track.

Ultimately, you mustn’t allow competitions to have power over you. If the results of competitions become tied to the worth of your photography, then you’re on a rocky path that could end up with you falling out of love with photography. And you wouldn’t be here on this site if you didn’t love taking pictures.

Finding competitions to enter

If you start building your network of photographers who also enter competitions, you’ll start hearing about opportunities via word of mouth. But that’s not the only way to find new places to enter your photographs.

Are Photography Competitions Good for Your Soul?

I use a service by Google called Alerts to keep up to date with what competitions are opening for entries. All you need is a Google account, and you can set the service up to send you regular alerts every time it picks up new content using the keywords you define.

These alerts have led me to hear about some interesting photography competitions that I wouldn’t have otherwise found.

So are photography competitions good for your soul?

In my opinion, they certainly can be. I feel that they help me develop my practice as a photographer, allow me to experiment freely, and allow me to be judged amongst my peers. Those three things are very important to me.

Competitions can also be a great chance to meet new photographers and discover new work. Going to your local camera club, or even the exhibition from a larger competition can be both productive and exciting!

But you must take steps to understand why you want to enter competitions with your photography and if you’re entering for good reasons. When stepping into the competitive photography arena, you first of all need to take steps to protect your mental health and ensure you’re not putting yourself at risk.

Do you think photography competitions good for your soul? Share your thoughts with us in the comments!

The post Are Photography Competitions Good for Your Soul? appeared first on Digital Photography School. It was authored by Charlie Moss.


it's from Digital Photography School https://ift.tt/36h3EwK
via Charlie Moss