Aug 3, 2021

[Photography] 12 Creative Photography Project Ideas to Get You Motivated

The post 12 Creative Photography Project Ideas to Get You Motivated appeared first on Digital Photography School. It was authored by Simon Bond.

12 creative project ideas to get you motivated

Looking for some fun, creative photography project ideas to get you inspired and excited about taking photos?

It’s always good to be involved in a photography project, and in this article, I’m going to share 12 of my favorite project ideas, including 52-week projects, 365-day projects, and more.

So if you’re ready to find the right project for your needs, then let’s get started!

zoom blur technique
Learning a new technique, such as the zoom burst, makes for a great creative photography project.

Before you start your creative photography project

As with anything in life, once you have a project idea, it’s important to think it over and make a clear plan of action. This is a big step toward being successful. So if you have a project in mind, before you actually start snapping photos, consider the following points:

  • Give yourself time. Keep in mind the amount of free time you have. Is it realistic for you to complete the project? There are some projects that take a real time commitment; make sure you have a good plan in place if this is the type of project you decide to tackle. And ask yourself: Are there any important events over the next few weeks, months, or year, such as a wedding or a house move, that might make it difficult to finish?
  • Plan out all the details. If your project is long term, perhaps lasting a whole year, then make a plan for how you’ll achieve it. A 365 project is especially demanding, as you need to take a photograph every day. If you can, plan out every day of the project – and make your plan prior to getting started.
  • Allow for the unexpected. There will be times when you get sick, come home late, or your drive or motivation isn’t quite there. The plan you make for your project should include some easy days. Think of it as cooking ahead and having some frozen food in the fridge ready to reheat. In photography, there are always a number of photos that are very easy to take but still look striking. Keep some easier photos held back for times that you need a break.

12 creative photography projects to energize your work

As a year is 12 months long, I’ve included 12 project ideas (though some of them will take all year, whereas others might only take a weekend). Pick your favorite, or – if you’re ambitious! – choose more than one!

1. The 52-week project

This is a year-long project where you take one photograph per week. Tackling such a lengthy project is demanding, but if you can plan out some (or all) of your shots before the project starts, you’ll be a lot more successful.

Note that you can always customize the project to keep things more interesting and/or cohesive:

If you want to do regular photography but you’re not quite ready for a daily project, the 52-week project is a great one to pick.

digital blending creative idea
This photo used a technique called digital blending. Doing a 52-week project where you learn one technique a week can do wonders for your skills as a photographer.

2. The 365-day project

This is an intimidating project to take on, which is why many people go for the 52-week version listed above. However, like a relationship that requires a major time commitment, the reward for this project is often worth it.

Now, the original 365 project required daily self-portraits, which made it even tougher to complete. But a lot of people simply look to take one good photograph per day, be it a landscape, portrait, or macro shot. If you’re not sure how to get started, here are a few ideas:

  • The self-portrait 365 project. Take a selfie every day for a year.
  • What’s on your plate? Photograph your meal every day.
  • Life at sea. Show the different aspects of sea life. This is a diverse project that can include seascapes, macro photos, fishermen, and underwater photography (if you have the gear).
food photography idea
You eat every day. Why not turn your food into a 365-day project?

3. Follow one consistent theme

Want to really focus your mind (and hone a specific set of photography skills)? Choose a theme, and only take photos aligned with that theme.

This creative photography project can easily work as a 365-day or 52-week project. Here are just a few ideas to get you started:

  • Concentrate on a single technique. Take photos with a crystal ball, using an infrared camera, etc.
  • Have a topic for inspiration. Look at everyday objects and occurrences, then pick a topic that interests you. You might photograph only Chinese food, for example. Or you could do a clothes-related project – you could photograph only denim, or if you’re in Korea, you could photograph hanbok.
  • Photograph at the same time every day. Pick a time of the day and photograph only at this time. For instance, you might shoot every day at 6 PM, which will offer plenty of interesting light (plus, it will change throughout the year).
women dancing in the street
Photographing with a theme, such as a country’s traditional clothes, can be a great project. In this photo, all the women are wearing Korean hanbok.

4. Limit yourself to 24 photos

Photographers who photograph film know all about restraint – they will attest to the importance of really considering every photograph. So why not put yourself in their shoes and limit yourself to a certain number of shots per outing, day, or week?

The specific limit is a personal choice, but make sure the number isn’t too large (you want the project to involve some actual work, after all!). Personally, I like the idea of 24 shots – this hearkens back to the days of film – though you can also do 36, 20, or even 10.

To really emulate the feeling of shooting film, try only capturing 24 photographs for one week (no deleting)! With this project, every time you hit the shutter, you need to know you’re photographing from the best possible angle and with the best composition. Learning to successfully shoot with restraint will improve your work in leaps and bounds.

5. Use the title of a song or album

Delving into other mediums can be a great way to come up with a cool creative photography project. A lot of people take a photo, then make a title to go with it – but a better approach for creativity is to know the title of your photograph before you hit the shutter button.

In other words: You determine your photography concept in advance based on your shot title. Then you problem-solve to get the result you need.

You can get your titles anywhere, but I recommend looking to your favorite music album or song. Here are a few additional ideas:

  • The project could use an artist’s album titles
  • You could choose song titles, then turn them into photo titles
  • You can use the lyrics in a song to inspire photos
man sitting on the subway with a phone
“The Passenger” is a famous song by Iggy Pop. Song titles can be great inspiration for photographs!

6. Use only one (prime) lens

Most photographers own quite a few lenses, not to mention zooms with huge focal length ranges. And while this isn’t necessarily a bad thing, you may find yourself becoming lazy over time – using your zoom lenses, staying in the exact same place, not making a significant effort to really work a scene.

That’s where this photography project idea comes in handy. Simply shoot with a single lens for a day, a week, or a month, and you’ll quickly appreciate the value of careful composition, zooming with your feet, and more.

A really good lens to get started with is the nifty 50 (i.e., a 50mm f/1.8 or f/1.4). The fixed focal length will force you to consider composition more carefully, and you’ll get a perspective similar to the human eye.

Of course, you have plenty of options, and any lens you could choose will have its merits. If you want to get really creative, try using a fisheye, tilt-shift, or macro lens.

three Canon lenses
You get to choose one lens. Which will it be?

7. Only use a smartphone

Who says your creative photography project should be high-tech? There’s a lot to be said for stripping your photography gear down to the basics, and your smartphone is perfect for this.

There are plenty of camera apps that can give your smartphone DSLR-like functionality (and you can buy clip-on lenses if you’re looking for added flexibility).

That said, the purest smartphone project will only use your phone’s basic camera app. So don’t be afraid to pack away your fancy cameras and use your smartphone’s native camera app for a week. Focus on what you can do with composition, light, and a perfectly timed moment of capture.

creative photography project ideas photographing with a smartphone
The best camera is the one you have with you, especially when the sky does this! An iPhone 4 was used to take this photo.

8. Find a story

No matter where you live, you can find a story to tell, though it will likely differ depending on whether you’re in a city, the country, a hot climate, or a cold one. Is your local area famous for any type of food? Are there any famous landmarks such as castles or temples nearby? How about an annual festival?

Once you’ve settled on your story, approach it in the way you’d photograph on assignment for a magazine. Try to tell the entire story. Use a variety of techniques and shoot a variety of subjects.

At the end of the project, you should spend some time picking a final set of photos – not necessarily the best individual shots, but the images that best tell a story. If you get a good result, you might even consider pitching it to a magazine!

magazine spread with woman on a rock in a stream
It’s good to practice photographing for a magazine. That way, when National Geographic comes knocking, you’ll be ready!

9. Learn a totally new technique

Once you know how to use your camera, it’s easy to get complacent – to shoot with the exact same techniques, the same settings, the same rhythm. So why not try focusing your project on a new technique?

Learning a new technique can be both exciting and intimidating. It may also require a significant time commitment. There are not many creative photography projects more energizing than learning something brand new, though. Here are some fun techniques to consider:

  • Digital blending. This technique will improve both your landscape photography and your Photoshop skills. There are aspects of blending that are tough to master, but it will absolutely be worth it.
  • Crystal balls. Using a glass ball as a type of external lens is a lot of fun, and it’s a great way to create some unusual photos.
  • Light painting. This is a hot topic in photography. Will you learn to take zoom bursts? How about making light orbs? Will you use a Pixelstick?
  • Drone photography. This is another photographic genre that’s becoming increasingly popular. Invest in a drone, shoot with it regularly, and you’ll be on the cutting edge of photography.
  • Hyperlapse. Take a series of photos and turn them into a video. Some of the most creative photography projects out there use this technique!
  • Off-camera flash. Many photographers struggle to master flash; take the time to learn it, and you’ll go a long way.
photography flash strobe
Learning to use off-camera flash will give your creativity a huge boost.

10. Have a potluck photography party

Everyone’s been to a potluck party – they’re the ones where everyone brings along their own food. And the collaborative nature of potluck parties makes them perfect for getting together with other photographers as part of a creative photography project.

How do you organize a potluck photography party? Each person should bring along the following:

  • A camera body and one camera lens
  • One prop or piece of camera equipment

While everyone will use their own camera to take photos, the idea is that the prop or piece of equipment can be shared – so you might end up with one tripod, or one umbrella, for the entire group. And at every event, the available equipment will be different, offering different image opportunities.

You can come up with a theme for the potluck that everyone must follow, or you can have a theme for your own shots. This one’s a very open-ended project idea, so have fun with it!
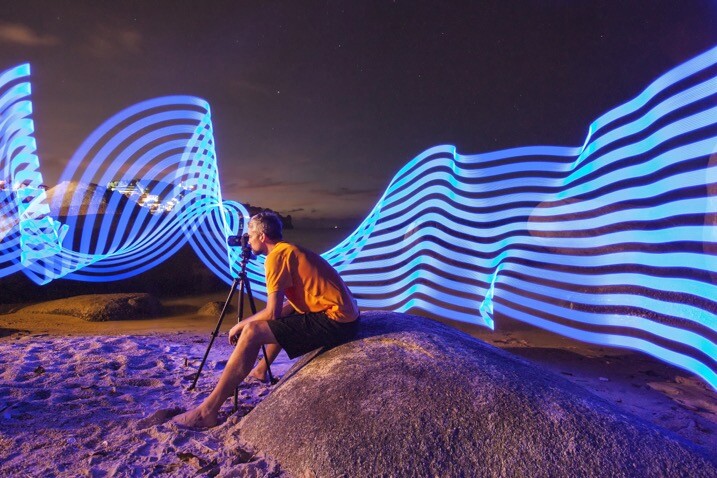
photographer on the beach with light all around
Photography collaborations are a great way to improve your photos. They give you a chance to bounce ideas off others, which is always helpful.

11. Follow an A-Z photography list

This type of project can be extremely fun. All you do is photograph the alphabet!

You might start by writing out a list of topics you want to photograph (one for each letter). Or you can take a more spontaneous approach and photograph each letter as you encounter it.

This is a fun game that can be used for group photowalks, or you can play it on your own – when traveling, or simply when out with your camera.

people swimming in rooftop pool
“K” is for “Kuala Lumpur.” Are you a frequent traveler? Consider making your project about photographing places with an A-Z list!

12. A day in the life

A day in the life is a good, short project to work on – because it only lasts one day! Simply find someone whose life you want to photograph and ask them if you can tag along for a day.

Of course, you don’t have to stop there. You can always do a series covering different people. And the project doesn’t have to be about people; life is everywhere, so you could follow your pet or even photograph a natural area.

That said, the best projects do tend to be about people and their lives (a day in the life that looks at different people’s professions is a great choice).

maid putting sheets on a bed
Following a person for a day and photographing their life can be a rewarding experience.
Apsara dancer creative photography project idea
This woman was a chambermaid by day and an Apsara dancer by night.

Get started with your creative photography project!

Well, there you have it:

12 photography project ideas to get you motivated! Hopefully, you found at least one or two of these ideas compelling – so pick your favorite, make a plan, and then dive in!

Now over to you:

Have you tried a photography project before? Do you have any favorite projects you’d like to share? Also, which project from this list do you plan to do? Share your thoughts in the comments below!

The post 12 Creative Photography Project Ideas to Get You Motivated appeared first on Digital Photography School. It was authored by Simon Bond.


it's from Digital Photography School https://ift.tt/3foIink
via Simon Bond

Aug 2, 2021

[Photography] Camera vs Lens: Which Should You Upgrade Next?

The post Camera vs Lens: Which Should You Upgrade Next? appeared first on Digital Photography School. It was authored by Anabel DFlux.

camera vs lens: which should you upgrade?

If you can’t decide whether you should upgrade your camera or your lens, then you’re not alone. Photographers frequently struggle to determine the better upgrade, especially when their gear and budget are limited and they desperately want to improve their photos.

But while it can be difficult to pick the best gear, it’s not impossible – and in this article, I aim to help you deal with a longtime debate:

Camera vs lens.

Let’s dive right in!

two dogs sitting together

What are your weaknesses?

Every photographer is at a different place, with different gear, different interests, and different shooting capabilities.

So you need to pick the upgrade that most improves your particular photography.

Before you start looking at cameras and lenses, ask yourself three key questions:

  1. What are my current gear weaknesses?
  2. What are my current technical weaknesses?
  3. What matters to me most as a photographer?

For instance, if you want to shoot birds but are a relative beginner with a 70-300mm lens, your gear weaknesses include a lack of sufficient focal length while your technical weaknesses may include an inability to track birds in flight.

And if you want to shoot stunning wide-angle nightscapes but only own a kit lens and an entry-level APS-C camera, your gear weaknesses probably include a lack of high-ISO capabilities and a slow lens (i.e., the maximum aperture is too narrow). Your technical weaknesses might include an inability to expose properly.

Whatever the type of photography you do, think about which of these weaknesses are more important, then determine whether they can be fixed (or at least improved) with an upgraded camera or an upgraded lens. In fact, I’d highly recommend you make a list of weaknesses before continuing on with this article. That way, you can keep them in mind as you read the next few sections.

By the way, it is important to note: buying new gear will not instantly fix your technical weaknesses. If you’re not good at tracking birds in flight, for instance, a new camera won’t turn you into a tracking pro. But it can make a significant difference, which is why it’s important to think about technical weaknesses as well as gear weaknesses when upgrading your equipment.

Why is the camera important?

Your camera will affect these key aspects of your photography:

  • Image dynamic range
  • Image noise levels
  • Autofocus speed and tracking
  • Continuous shooting (burst mode) speeds
  • Image resolution
  • Comfort when shooting
  • Speed when changing settings
  • Setup durability

Of course, the lens affects some of these elements – autofocusing speeds, for instance, depend on the lens’s focusing system. And the photography experience (comfort when shooting and speed when changing settings) relies on the lens, too.

But in all the areas listed above, the camera is a major player, so think about your current weaknesses. Will a change in the camera affect any of those shortcomings?

dog with beautiful backlight

A quick note: Beginners tend to ignore comfort and ergonomics, instead choosing to focus on autofocus speed and resolution. But from a physical standpoint, the camera body is what you’ll hold in your hands. Its comfort is very important when shooting for long hours, so don’t forget to think about ease of use.

Also, if you’re an outdoor photographer, make sure to consider weather-sealing. Higher-end cameras have better weather-sealing than lower-end cameras, so a change in your camera body can make a big difference to your setup’s durability and longevity, especially if you spend a lot of time shooting in sea spray, out in the rain and snow, etc.

people in dark clothes

Why is the lens important?

Your lens will affect these key aspects of your photography:

  • Image sharpness
  • Image bokeh
  • Autofocusing speed
  • Focal length reach
  • Comfort when shooting
  • Setup durability
  • Low-light shooting

For many photographers, lens sharpness is everything. But the truth is that lens sharpness is only one of a handful of important lens characteristics, and it’s not always the most important one, either. For instance, you might have the sharpest lens in the world, but if it doesn’t have a wide maximum aperture, you won’t be able to use it for night landscapes, nor will you be able to use it to capture creamy background bokeh in full-body portraits.

portrait of a man

By the way, if the artistic look of your photos is important to you – and I’m guessing that it is! – the lens will offer far more control than the camera body. This is because aperture, focal length, and sharpness are all dictated by the lens, so by using the right lens and the right lens settings, you can achieve beautiful background bokeh, stunningly sharp subjects, perfect compositions, and more.

dog running along the beach

Camera vs lens: image quality

At this point, you should be familiar with the effects of a camera and a lens on your photography. And you should know that it’s not just about image quality. Ergonomics, durability, autofocusing speeds – it all matters.

That said, image quality is a major piece of the puzzle, and so in this section, I’d like to discuss cameras vs lenses, specifically considering image output.

As I’ve emphasized above, both a camera and a lens will impact image quality. But on the grand scale, most camera bodies won’t make a noticeable difference unless you’re shooting in difficult situations such as low light (in which case higher-end cameras have lower noise levels, for instance).

The lens, on the other hand, will significantly affect the final result. Photographers often experiment with pairing a high-end lens with a low-end body and a high-end body with a kit lens, and they find that the audience gravitates toward the photographs produced with the high-end lens and low-end body combination; the lens just impacts photos so significantly.

You’ll likely never be able to determine whether a high- or low-quality camera body was used in a shot – but you can often pick out the quality of the lens.

camera vs lens a shallow depth of field dog portrait

Also, a good lens will withstand the test of time as you try many different camera bodies. The lens will travel with you from camera to camera. The lens will also help you create your specific style of shooting, as the aperture and perspective will shape and support your personal preferences.

Are you someone who prefers a shallow depth of field? Wide-angle fisheye? What about epic action shots with a tight zoom? All of these effects are done with the lens, not the body.

moody wolf portrait

A lens is generally the better investment

guitarist playing in a concert

If you’re worried about budgeting and finances, it’s important to note that a lens is often the better investment because it’ll last much longer than a camera body. Some photographers use the same lenses for decades, for two main reasons:

  1. Lenses are more durable than camera bodies, especially because cameras have a limited number of actuations before the shutter fails.
  2. Lens technology changes more slowly. A camera from five years ago is often easily surpassed by a new release, whereas plenty of lenses are still top-notch after five, ten, and even twenty years.

Also, a lens will also retain more of its resale value compared to a camera. Cameras go out of date fast and their used prices tumble, especially when newer versions are released. On the other hand, plenty of lenses can be resold for the same price today as they could be ten years ago (and sometimes the prices even go up!).

Camera vs lens: final words

Cameras and lenses can both make a big difference in your photography – but by recognizing key weaknesses, you can pick the perfect upgrade for your needs.

So think about what matters to you. Think about what would impact your photos most. Sure, lenses will heavily affect image quality, but cameras will majorly affect autofocusing and ergonomics. Lenses will retain more value, but cameras will boost your resolution.

In the end, it’s up to you!

Now it’s your turn:

Which do you plan to upgrade, your camera or your lens? And why did you make that choice? Share your thoughts in the comments below!

camera vs lens horses portrait

The post Camera vs Lens: Which Should You Upgrade Next? appeared first on Digital Photography School. It was authored by Anabel DFlux.


it's from Digital Photography School https://ift.tt/2EvyQJO
via Anabel DFlux

Aug 1, 2021

[Photography] Zone Focusing: How to (Always) Capture Sharp Street Photos

The post Zone Focusing: How to (Always) Capture Sharp Street Photos appeared first on Digital Photography School. It was authored by James Maher.

zone focusing: how to capture sharp street photos

Do you struggle to capture consistently sharp, in-focus street photos? You’re not alone.

In street photography, consistently nailing focus, especially if you don’t have the opportunity to look through your camera’s viewfinder, can be insanely difficult (and often seems impossible).

That’s where zone focusing comes in.

You see, zone focusing lets you set your focus in advance. And then, when your subject steps into the frame, snap – you get the shot.

Not every street photographer zone focuses, but the ones who do swear by it. And while I use autofocus when I can, I swear by zone focusing, too.

So what, specifically, is zone focusing? How does it work? And how can you learn to do it for sharp photos?

All will be revealed in this article! Let’s get started.

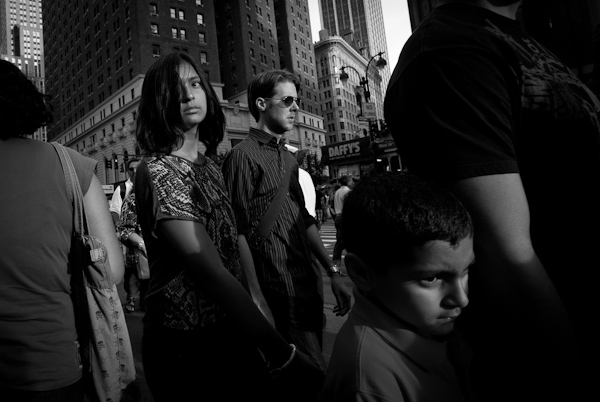
zone focused composition of boy in a crowd
Canon 5D Mark II | 17mm | f/11 | 1/320s | ISO 1800

What is zone focusing?

Zone focusing is a technique where you manually prefocus your lens to a certain distance and adjust your aperture for a deep depth of field. Then, when you’re confronted by an interesting subject, you don’t need to focus through your viewfinder; instead, you wait for your subject to enter your acceptable zone of focus and capture the photo.

Note that zone focusing is very flexible. If you like to shoot intimate portraits, you can zone focus just a few feet in front of your lens. And if you prefer wider shots with more distant elements, you can zone focus 10+ feet away.

Why is zone focusing so useful?

Zone focusing works to varying degrees in plenty of photography genres, but it’s most commonly used by street photographers for two major reasons:

  1. When shooting on the streets, the world happens fast. Gorgeous photo opportunities slide by in the blink of an eye. If you take the time to focus, you’ll often miss the shot.
  2. In street photography, putting a camera to your eye often makes your subject (and you) uncomfortable. So if you can focus without looking, you’ll be able to keep discomfort to a minimum while capturing more honest scenes.

In other words, if you’re a street photographer, zone focusing is an easy way to increase your keeper rate while keeping your photos perfectly candid.

Zone focusing and depth of field (dof)

woman walking along outside the subway
Canon 5D Mark II | 28mm | f/4 | 1/250s | ISO 3200

Before I explain how to zone focus, it’s important that you understand the factors that go into creating a zone of sharp focus, also known as a deep depth of field.

As you may already be aware, depth of field refers to the zone of acceptable sharpness in a scene. So when you focus on a subject and you create a deep depth of field (more on how to do that in a moment!), your subject will turn out sharp – but so will a certain area in front of and behind your subject.

For instance, if you focus on a subject that’s 10 feet away, a deep depth of field would ensure sharp focus from around 8 feet to 14 feet, depending on your specific camera settings. Keep in mind that the area behind your subject that is acceptably sharp will always be greater than the area in front of your subject, and in many cases, it will be much greater.

What affects your depth of field? Three simple factors:

  1. Aperture. The smaller your aperture, the greater the depth of field. So if you’re shooting at f/16, you’ll have far more in focus than if you shoot at f/2.8.
  2. Focal length. Wider focal lengths create a deeper depth of field. So if you are shooting at 28mm, much more of your scene will be in focus than if you are shooting at 100mm. (This is why I rarely zone focus with lenses longer than 35mm.)
  3. Distance to the subject (or point of focus). The further away you focus, the more depth of field there will be in a scene. So if you focus on a person 10 feet away, then you’ll have a deeper depth of field than if you focus on a person 3 feet away.

If you want to test out these different factors and see how they affect the depth of field in real life, check out this website, which offers a handy depth of field calculator.

How to zone focus: step by step

man walking with hat and suitcase zone focused
Canon 5D Mark II | 17mm | f/8 | 1/400s | ISO 1600

You can zone focus in three simple steps:

  1. Adjust your camera settings for a deep depth of field
  2. Prefocus your lens in the right area
  3. Hit the shutter button when your subject moves into range

Let’s take a look at each step in greater depth:

Step 1: Adjust your camera settings for a deep depth of field

When zone focusing, you want the range of sharpness (i.e., the depth of field) as large as possible. That way, you have the most room for error, and you’ll end up with the most keepers. Plus, a deep depth of field will allow you to keep multiple subjects sharp, which is useful if you’re capturing a more complex, layered shot.

First, you’ll need to choose a wide-angle lens, such as 24mm, 28mm, or 35mm. My personal go-to focal length is 28mm, but any of these options work for zone focusing. Unfortunately, if you zoom any closer (50mm, for example), you’ll struggle to get a usable depth of field range.

Next, make sure your camera is set to Manual mode, and dial in a narrow aperture. I’d recommend working at f/8 and beyond – so depending on the light levels, you might use f/8, f/11, f/13, or even f/16.

Because zone focusing is often done with moving subjects (and you might be moving, too!), make sure your shutter is at least 1/250s, though higher is better, if you can afford it. And adjust your ISO to keep your exposure sufficiently bright.

Really, it’s the combination of the wide focal length and narrow aperture that’ll give you the deep depth of field you need, but it’s important not to neglect your other settings.

Step 2: Prefocus your lens in the right area

Now that you have your camera settings dialed in, it’s time to determine where you want to focus your lens.

Part of this should be personal preference and may depend on the context. For instance, if you prefer more intimate street portraits, you’ll want to focus a few feet in front of you. Or if you’re shooting in an environment where people are passing at a distance, you’ll want to focus farther away.

But it’s not just about artistry. Recalling the discussion of depth of field, you know that a closer point of focus decreases the range of acceptable sharpness. So if you want to maximize the chances of a sharp shot, it’s a good idea to focus far off in the distance.

Regardless of where you plan to focus, a lens with a manual focus display is a huge benefit here. I’m talking about something like this:

manual focus display on a 24-105mm lens

That way, you know exactly where your lens is focused (and you can consistently prefocus in the same spot).

If your lens doesn’t include a manual focus display, that’s okay, but you’ll need to spend extra time learning to estimate distances.

Step 3: Hit the shutter button when your subject moves into range

You’ve got the right settings, and you’re prefocused in the right spot.

Which means that all you need to do is take the photo.

Keep an eye out for interesting photo opportunities. Estimate your range of focus.

Then, when something interesting happens, wait until the subject comes into your focusing zone, then take a photo. The closer your subject gets to the center of your range of focus, the better (and don’t be afraid to capture multiple photos to maximize your chances of nailing a sharp shot).

A zone focusing tip: learn to guess distances

Zone focusing works really well, and if you’re shooting in bright light with a narrow aperture, you’ll have a lot of leeway.

But if you’re like me, then you often do street photography in less than ideal lighting, such as on the subway. And thanks to the poor light, you’ll need to widen your aperture – to f/2.8 and beyond.

What does this mean? Well, even with a wide-angle lens and a relatively distant subject, you’ll need to be very careful; your range of sharpness will be quite small.

man standing by the subway tracks
Fujifilm X100 | 35mm | f/2 | 1/250s | ISO 3200

For this reason, you must learn to estimate the distances away from your camera’s lens, all the way up to around 12 feet. I suggest using a tape measure and measuring out the distances. Then just go out and practice.

Find different objects and try to guess their distance. Then, before you head out to shoot, pick an object at a known distance, focus on it, and use it as a sort of “calibrator” for all your future photos.

The other reason to get good at guessing distances? People move and scenes develop. You might want to capture a person walking toward you at 10 feet, then again at 5 feet. To nail both those shots, you’ll need to have one hand on the focusing ring, and practice manually focusing back and forth, from 10 feet to 8 feet to 6 feet and so on.

Eventually, you’ll be able to capture someone walking toward you at both 10 feet and 6 feet, without even having to look through the viewfinder. It’s an incredibly effective technique, and you can use it for some gorgeous results.

couple walking together zone focused
Canon 5D Mark II | 28mm | f/5 | ISO 1600

How to zone focus: final words

Now that you’ve finished this article, you should be a capable zone focuser – though I certainly recommend you spend some time really getting to know different distances (and how to accurately prefocus at those distances, too).

So head out with your camera. Have some fun with zone focusing. You’ll love the results!

Now over to you:

Have you tried zone focusing? What do you think? Do you like it? Share your thoughts in the comments below!

Table of contents

Street Photography

The post Zone Focusing: How to (Always) Capture Sharp Street Photos appeared first on Digital Photography School. It was authored by James Maher.


it's from Digital Photography School https://ift.tt/3xiJpLB
via James Maher