The post 10 Wildlife Photography Tips for Stunning Results appeared first on Digital Photography School. It was authored by Guest Contributor.

Do you want to capture beautiful, powerful, eye-catching images of wildlife?
As a professional wildlife photographer, I’ve spent years developing the techniques needed to get consistently great shots. And in this article, I aim to share my secrets, from the perfect wildlife lighting to the best ways to capture those once-in-a-lifetime moments.
So no matter your skill level, if you’re looking to take your wildlife photography to the next level, you’ve come to the right place.
Let’s get started.

1. Know your gear
This sounds like a huge cliché, but it’s absolutely, one-hundred percent true.
The really great, action-packed moments in wildlife photography last, on average, between 5 and 20 seconds. If you’re not deeply familiar with the settings of your camera or the capabilities of your chosen lens, you‘ll either miss the shot or ruin the images you do manage to capture.

Here’s what you need to know:
- The minimum shutter speed at which you can obtain a sharp image with your camera/lens combo
- Any added shutter speed margins that the in-camera or lens stabilization gives you
- How to quickly toggle between focus points or focus modes
- How high you can push your camera’s ISO setting and still achieve acceptable results
Now, you need to be able to make most, if not all, of the necessary adjustments to your exposure/focus settings without lifting your eye from the viewfinder. That way, you can make changes on the fly without fumbling around (and potentially missing the action!).
The movement you see between the cheetahs in the following image lasted all of 10 seconds, even though we sat with them for more than an hour:

2. Know the wildlife
Since much of wildlife photography is based upon capturing fleeting moments of natural history (read: interesting poses or behavior), it pays to be able to predict your subject’s behavior beforehand.
Granted, not every species is as predictable as the next. But there are patterns of behavior ingrained into every animal species. Knowing your subject may be the difference between capturing that “golden moment” and watching in agony as it flies by.
In my experience, there is only one way to get to know wildlife:
Spend time with your subject. Don’t just hang around for a few minutes and seek out the next subject if the one you’re observing or photographing isn’t delivering the goods. Sit with wildlife. Watch wildlife. Wait.
(This also ties into patience, which I will discuss in more detail later.)
My understanding of lilac-breasted rollers allowed me to capture the image below; I knew what it was going to do to its grasshopper lunch, and I was ready for it:

3. Know the wildlife photography “rules,” but don’t be afraid to break them
First, know the absolute basics: Proper exposure and the use of the histogram, as well as compositional guidelines such as the rule of thirds. Ingrain them in your brain. To capture fleeting moments, you need to have complete mastery over exposure and composition.
Second, know the wildlife-specific rules. For instance, eye contact with the subject is a big deal, as it gives life to the image. In the case of bird photography, you can take this a step further: the head should be at least parallel to the camera sensor, and ideally turned a few degrees toward the viewer.
The image below, for example, follows strong rule-of-thirds compositional guidelines:
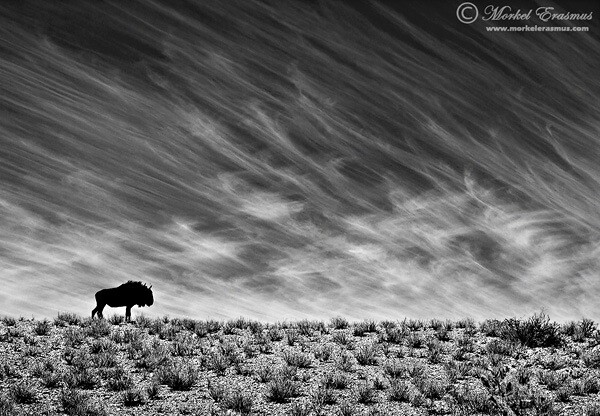
Once you know the guidelines, and once you know when and how to apply them, it’s time to start breaking them. Experiment with composition and exposure. Test the boundaries.
Take a look at the image below. I mentioned the “need” for eye contact, yet sometimes you can shoot an image without eye contact and still get a strong result:

4. Photograph when the light is great
When I started shooting, here’s the first piece of advice I ever got:
Stick to the hours of golden light (i.e., the time just after sunrise and just before sunset).
This means getting up early in the morning and being in the field before sunrise, and going out in the afternoon to make the most of the last hours of sunlight. The light at midday (mostly between 11:00 and 4:00, at least where I live) is generally harsh and looks, well, bad.
The exception is on overcast days, when clouds act like a massive softbox and filter out the light evenly. On those days, you can shoot all day (as long as there are willing subjects!).
In wildlife photography, you need to know how to use the light to your advantage. Often, you’ll find yourself in a position where the light isn’t ideal, or heaven forbid, the light is nice but is coming from the wrong direction (and you aren’t in a position to move to a better spot).
The good news is that light from the wrong direction can add lots of mood to an image. Shooting into the light is tricky to pull off, but if you follow my first tip (know your gear!), you can get some pretty interesting images from a less-than-ideal position. The image below is one such photo; it uses backlight to create interesting silhouettes and atmosphere:

5. Don’t be afraid to shoot wide (or up close!)
Too many wildlife photographers get fixated on what I call the “focal-length debacle,” where it becomes an obsession to have the longest/biggest lens possible.
Now, I know this is location-dependent, as you might need a huge lens to get any shot at all in certain wide-open spaces. But in general, wildlife photographers care too much about ultra-tight framing, which creates sterile, boring images with a perfectly smooth background and no sense of the subject’s environment.
Instead, challenge yourself to shoot wider. Give the viewer a better idea of where you took the image and where your subject lives. This is applicable to any species you photograph, from a squirrel to a deer to an elephant.
The elephant below was photographed with a wide-angle lens, and the resulting image gives you a sense of the environment and makes the most of the clouds and the sky:

The flip side to shooting wider is (you guessed it!) shooting closer.
And I mean way closer. Get in-your-face close (by changing your position or using a longer lens with an optional teleconverter). Try to create unique, interesting studies of the animals and birds you photograph. This will also help you think in terms of more abstract compositions.
Have a look at this photo of a Cape buffalo, for example:

It’s unusual, right? You don’t see a lot of wildlife photos like it – which is part of what makes it special.
6. Include multiple subjects
No intricate explanation is needed for this one; in wildlife photography, one is company and two is even better, especially when there’s food or shelter involved. If you have a good view of more than one member of a species, stay a while!
Make sure to capture the interaction between your subjects, if possible. Be ready to photograph the subjects fighting, preening one another, mating, or just having a good time. Really, pretty much any action between two animals will lead to a great photo.
Look at the images below. First up: a solitary African spoonbill, minding its own business on a perch, happy as can be. It’s a fine photo, but throw another spoonbill into the mix, and you have a recipe for good interaction:

7. Get down low
This is a major wildlife photo tip, and one that every beginner wildlife photographer should commit to memory.
You see, in wildlife photography, you must pay careful attention to your point of view. Do you shoot from up high? Do you shoot from a standing height? Do you shoot from flat against the ground? Each option will provide you with a completely different result, some of which will be much more impactful than others.
So here’s my recommendation:
Shoot from an eye-level perspective (or go even lower if you can). This brings the viewer of your image right into the scene. It adds intimacy. It shows them the world from your subject’s perspective.
Obviously, what counts as eye level is relative (you will pretty much always be lower than eye level with a giraffe, for example), but you get the idea.
Always bear in mind the constraints of your environment. In most South African reserves, you are not allowed to get out of your vehicle. This restricts you to a certain perspective.
Look at the images below for illustration. The first African painted dog was photographed from an open game viewer, slightly above the dog’s eyeline. The result is a somewhat bland shot; it’s nothing special to my eyes.
The second image, however, was taken lying flat on my stomach in a sandy riverbed not 20 meters from the pack of canines, and the alpha male was checking me out. This perspective makes the image come alive, plus the low position creates a beautiful background blur.

8. Photograph every animal that comes your way
On an African safari, every tourist wants to see the “big 5,” or at least a lion. But if you’ve ever spent time around wild lions in the daytime, you will know that they are actually shoddy models for photography. They sleep up to 20 hours per day.
Conversely, I have had great photo opportunities from impala, who are the most common ungulate you’ll come across down here in the bush.
The lesson? Photograph what you can. When the light is good, look for photos, regardless of the species.
Have a look at these two images: an impala jumping gracefully, and a standard portrait of a male lion, both in good light. Which do you prefer?

Let’s use a second example, common in nearly every location:
Squirrels.
Everyone sees squirrels, right? In the images below, the top squirrel is munching something with nice soft light and a nice low angle. And at the bottom, a mommy is carrying her youngster over a large branch at speed by biting down on the youngster’s stomach flap while it holds on for dear life.

My point is simply that you can capture good images of “boring” subjects. Don’t restrict yourself to powerful or much-loved wildlife; instead, photograph what you can, when you can.
9. Work on your patience
Photographing wildlife is unpredictable. Anything can happen at any time, but most things happen only rarely.
It is therefore imperative that you become patient. Very patient.
Often, you need to return to the same spot for days. And even if you do that, you run the risk of nothing happening and wasting your time.
But that’s just the nature of wildlife photography. For days, you might not get the shot. But eventually, your waiting will pay off. You’ll get the shot you’re after. And you’ll feel inspired once again.
If you’re struggling with patience, that’s okay. It’s something to work at. Even after years of wildlife photoshoots, I’m sometimes impatient out in the field.
The image below was captured after staking out a tree with the impala kill for more than five hours. I had also driven past this tree many times earlier that day to see if there was any action. I knew the leopard would return, but I had no guarantee that it would return before nightfall. It could’ve been a bust, and my whole afternoon could’ve been wasted; fortunately, in this case, it wasn’t, and I got the shot.

10. Be there and enjoy it
Here’s your final wildlife photography tip:
Be there and enjoy it!

I don’t just mean that you should physically show up and be at the right place at the right time (although of course that applies).
You need to be present in the moment. Don’t get so caught up in the technical issues and your settings that you don’t take in the beauty you are witnessing while out photographing birds and wildlife. Be mindful of the privilege of spending time in nature. Enjoy your time in places where humans haven’t quite exerted their full force.

Maybe it’s the most isolated spot in your local park where you can sit and observe and photograph squirrels and birds. Or maybe it’s facing a wild Kodiak bear on the Alaskan floodplains.

Regardless, enjoy what you are doing! Have fun doing it! How does it help to spend so much time on this amazing art form if you are not enjoying yourself?
Wildlife photography tips: final words
Now that you’ve finished this article, you’re ready to go out and take some great wildlife photos!
So remember what I’ve shared with you. Learn the rules of wildlife photography. Learn patience. And above all, have fun!
Now over to you:
Do you have any wildlife photography tips of your own? Which of these tips resonated with you most strongly? Share your thoughts in the comments below!
About the author: Morkel Erasmus
Besides being widely published, Morkel has been honored for his commitment to his craft with various awards in the short span of his photographic career, most notably by receiving a “Highly Commended” award for one of his images in the 2010 BBC Veolia Wildlife Photographer of the Year competition. Morkel is a devoted husband and a proud father of a beautiful daughter and soon-to-be-born son.
See more from Morkel on his homepage or blog, and connect with him on Facebook, Twitter, 500px, and on Instagram.
Table of contents
Wildlife Photography
-
GENERAL
-
-
PREPARATION
-
SETTINGS
-
LIGHTING
-
GEAR
-
ADVANCED GUIDES
-
CREATIVE TECHNIQUES
-
POST-PROCESSING
-
INSPIRATION
-
RESOURCES
The post 10 Wildlife Photography Tips for Stunning Results appeared first on Digital Photography School. It was authored by Guest Contributor.


it's from Digital Photography School https://ift.tt/2YoS8Ah
via Guest Contributor


