Jan 4, 2022

[Photography] Tethered Photography: A Step-By-Step Guide

The post Tethered Photography: A Step-By-Step Guide appeared first on Digital Photography School. It was authored by Suzi Pratt.

a complete guide to tethered photography

Tethering lets you view your images on the computer monitors seconds after you capture them. But what actually is tethered photography? How does it work? And how can you tether your camera while shooting?

In this article, I explain everything you need to know about tethering, including:

  • How tethering can instantly improve your workflow
  • When you should (or shouldn’t) tether your camera
  • Two simple ways to shoot tethered

Let’s dive right in.

What is tethered photography?

Tethered photography is the process of connecting your camera to a computer, tablet, or even a smartphone via a cable or wireless app. Once you’ve successfully connected the devices, any new image captured by the camera is then passed directly to the computer and saved in a designated folder.

Therefore, as soon as you press the camera shutter button, you can see your image displayed (in high resolution) on the computer screen. If you’re tethering in a program like Lightroom, you can even make adjustments to your file; for instance, you can boost contrast, convert the shot to black and white, and apply presets.

Many tethering programs allow you to adjust camera settings from your computer, tablet, or smartphone – and you can fire the camera shutter from your device, too.

The benefits of shooting tethered

Tethering lets you quickly preview each photo on a large monitor within moments of firing the shutter button. That way, you and your client can scrutinize your shots on a big screen. You can check for perfect composition, focus, exposure, and subject blemishes – and your client can indicate what they like or dislike about each new file.

Depending on the tethering software you use, you might be able to apply various presets to the image, so as to better visualize the final (edited) result.

Tethering also lets you organize your images as you go along. In a program like Lightroom, you can add notes, star ratings, keywords, and more to each new photo. That way, you can stay on top of your file management, and you can record key information while it’s still fresh in your mind.

how to shoot tethered

The downsides of tethered shooting

Tethering is great – but if you’re not careful, it can cause problems, too.

For one, you or your client might get too caught up in little details while inspecting the photos, which can stall a photoshoot. When tethering, it’s important to set expectations with your client. Let them know how you work and do what you can to set a steady pace.

Tethering can also suck the battery life out of both your camera and your connected computer. You should always carry extra batteries and – if possible – shoot near a wall socket in case you need to plug in your laptop.

And tethering software is notoriously finicky. It sometimes stops working for no apparent reason, so you’ll want to get set up and take some test shots before your photoshoot starts (so you have time to troubleshoot). You should also have a backup plan, just in case.

Finally, tethering requires extra equipment, such as a lengthy cord and a laptop or desktop computer. So while it might be tempting to tether for on-location shoots, consider carefully before hauling along your expensive electronics.

Ultimately, whether you tether is up to you. It’s a great way to improve the final product – but it can be slow, plus it involves extra software and moving parts, so if you need to do a fast-paced portrait session or an outdoors product shoot, it might be better to shoot the “normal” way.

Tethering your camera: essential equipment

The traditional and most reliable way to connect your camera to a computer or another device is with a cable. There are a variety of different cables and ports available, so the specifics will depend on your exact devices. (For further information, check your camera manual.)

Some cameras even offer wireless tethering. The image transfer process can be slower compared to cabled tethering, but if you prefer to work without a cord, this is a great method to try.

If you plan to tether with a cable, you’ll need:

I’d also recommend a portable table to hold your laptop such as the Tether Tools Aero Table, as well as a Jerkstopper to prevent your USB cable from being yanked from your camera.

Tether Table Aero for tethered shooting
The Aero Table is a lightweight, durable, aluminum platform that attaches to almost any tripod or light stand. It’s a great way to hold a laptop or extra camera gear.

If you’d prefer to tether wirelessly, then you can forgo the cable and the Jerkstopper – but you’ll still need the laptop, the table, and the tethering software.

How to shoot tethered: step-by-step instructions

In this section, I explain how to tether with two low-cost, simple programs: Adobe Lightroom and EOS Utility. I’m assuming you’re tethering with a cable (though the process is similar when tethering wirelessly, albeit with a few extra wireless activation steps when starting out).

Shooting tethered in Lightroom

If you already own Lightroom, the quickest way to get started is with the Lightroom Tethered Capture feature.

Step 1: Connect your camera to the laptop

Make sure your camera is turned off. Connect one end of the cable to your camera and the other end to your computer. Then turn the camera on.

Step 2: Start Tethered Capture in Lightroom

Open Lightroom. Select File>Tethered Capture>Start Tethered Capture.

using Lightroom's Tethered Capture feature

Step 3: Choose your tethered settings

In the Tethered Capture Settings dialog box, you can enter a session name, select a naming template, pick a file destination, and apply metadata and keywords.

Pay careful attention to where the photos will be saved (after all, you need to be able to find them later!).

creating a studio session in Lightroom

Once you’re satisfied, click OK.

If all goes well, you’ll see the screen displayed below, with a narrow control panel and a Library where photos captured via the tethered shooting connection will appear. You should see your connected camera listed on the left-hand side:

Tethered Capture menu bar

However, Lightroom does sometimes have difficulty detecting the connected camera; in that case, you’ll get a No Camera Detected message:

no camera detected Lightroom tethering

If that happens, make sure your version of Lightroom and your camera’s firmware are up to date. Also, check to ensure your camera can do tethered capture in Lightroom. If your camera cannot tether in Lightroom, you can use a third party plugin as a workaround; do a search for your camera model and you may find a solution.

Finally, try rotating through several different USB cables to make sure they’re working well.

If you’ve done all of the above and you still can’t get tethering to work, you might want to try tethering using a different program, such as EOS Utility:

Shooting tethered with EOS Utility

If you use a Canon camera, you can use the free EOS Utility software, which offers a simple tethering program. In my experience, this method is more reliable and consistent than Lightroom’s Tethered Capture option.

Step 1: Download EOS Utility

Head over to the Canon website, find your camera, then select the latest version of EOS Utility:

Tethered Photography: A Step-By-Step Guide

Open the program on your camera, then select the Remote shooting option: Tethered shooting

Step 2: Work with the EOS Utility interface

Once you’ve successfully selected Remote Shooting, you’ll see the following interface:

Tethered 05

The display lets you adjust certain settings from your computer, though there are some functions, such as lens zooming, that you’ll need to do manually.

Next, if you have the option, set your camera to Live View mode. Your camera display should appear directly on your computer screen, so you can see exactly what your camera sees.

Tethered 09

Finally, when you take a photo in tethered shooting mode, the captured photo will appear on your desktop!

Tethered photography: final words

Now that you’ve finished this article, you know how to shoot tethered in both Lightroom and EOS Utility. And you’re ready to do some high-quality product or portrait photography.

So connect your camera to your computer. Test out tethering. See what you think!

Now over to you:

What photoshoots do you plan on tethering? Which software will you use? Share your thoughts in the comments below!

The post Tethered Photography: A Step-By-Step Guide appeared first on Digital Photography School. It was authored by Suzi Pratt.


it's from Digital Photography School https://ift.tt/34a2oPp
via Suzi Pratt

Jan 3, 2022

[Photography] 9 Tips for Great Telephoto Photography (+ Examples)

The post 9 Tips for Great Telephoto Photography (+ Examples) appeared first on Digital Photography School. It was authored by Jim Goldstein.

tips for great telephoto photography

Capturing beautiful telephoto photography might seem hard, but it’s actually pretty easy – once you know a few tricks. I’ve been photographing with a telephoto lens for years, and over time, I’ve developed plenty of techniques that can elevate your shots to the next level.

Now, in this article, I aim to make you a telephoto expert. I’ll explain:

  • When a telephoto effect is useful
  • How to work with a telephoto lens for sharp pictures
  • Extra equipment you may need to get the best results
  • How to create stunning telephoto compositions
  • Much more!

So if you’re ready to have plenty of telephoto fun, then let’s dive right in, starting with…

1. Use a tripod for the sharpest telephoto photography

a telephoto lens on a tripod

Telephoto lenses are heavy, which means they’re prone to camera shake, plus they’re long, so they magnify any shake that does occur.

That’s why I always recommend you use a tripod with your telephoto lens if possible. Yes, tripods can be inconvenient and can limit flexibility, but they’ll keep your setup in a stable position while you shoot, and your files will turn out significantly sharper.

If you’d prefer not to work with a tripod, you might also consider a monopod, which is lighter, more mobile, and will still increase stability.

(By the way, a tripod or monopod has health benefits, too: It’ll save your back and arms from major fatigue and pain!)

silhouette telephoto photography

2. Use a shutter release

If you do put your telephoto setup on a tripod, then you’re free to fire away…

…but I’d urge you to purchase a shutter release, which lets you fire off shots without actually touching your camera body.

Why is a shutter release so important? The simple act of pressing the shutter button will cause camera shake, and as I explained in the previous section, camera shake and telephoto lenses do not go well together. A shutter release will let you set up your camera, dial in the right settings, and then engage the shutter without causing extra vibrations.

Of course, there are times when a shutter release isn’t feasible. If you’re photographing fast-moving sports or birds in flight, you’ll want to ditch the shutter release and use your finger instead. But in other situations (e.g., when doing landscape photography), a shutter release will be a big help.

Also, if you use a DSLR, either activate the mirror lock-up setting or set your camera to Live View before taking a shot. When you hit the shutter button on a DSLR, the camera mirror flips up to expose the sensor, and this can create vibrations of its own – but mirror lock-up and Live View both flip the mirror in advance, preventing any loss of sharpness.

3. Bring the near and far together

Telephoto lenses offer a unique optical effect:

They flatten scenes, even those scenes that technically have great depth. And when used correctly, this can create some stunning results.

For instance, you can take two subjects, such as a person in the foreground and a mountain in the background, and make them appear on a similar plane. Or you can take a tree in the foreground and a moon in the background, smash them together (thanks to the telephoto effect), and get a shot like this one:

9 Tips for Great Telephoto Photography (+ Examples)

Do you see what I mean about the compressive telephoto effect? The tree and the moon look like they’re practically next to one another, and this gives a very graphic, striking result.

Of course, a telephoto effect isn’t always what you want – sometimes you might want to emphasize depth, and for that, a wide-angle lens is your friend – but I highly recommend you embrace telephoto compression and see what you can achieve.

4. Tightly frame your subject

Telephoto lenses let you get close to your subject. And you should use this capability to generate lots of impact.

Obviously, you can use a telephoto lens to get close to wildlife and show gorgeous details, like this shot (taken at 1200mm):

9 Tips for Great Telephoto Photography (+ Examples)

And by tightly framing the sea otter, I was able to create a more compelling, intimate composition.

But I recommend you go beyond tightly cropped wildlife shots. Try to crop tight with everything just to see what you get; go for tight buildings, tight people, tight landscapes, and more.

Tight crops aren’t always good, and there are times when it’s better to pull back a bit to show the subject in its environment. But a tight composition is a great place to start, especially if your subject includes lots of interesting details.

5. Isolate your subject

Here’s another telephoto photography composition tip:

Whenever possible, use your telephoto lens to hone in on and isolate subjects of interest from their surroundings.

Yes, you can capture isolated images of birds and other animals, which is great – but you can also isolate individual features of the landscape, as I did for this waterfall shot:

9 Tips for Great Telephoto Photography (+ Examples)

In fact, some of the most compelling landscape shots involve careful isolation, which is often best done at a telephoto focal length.

Don’t be afraid to include other relevant landscape features, of course, but before you go wide, ask yourself: What is essential to this composition? What do I care about? What do I want to show?

Often, by zooming in with a telephoto lens, you can get a simple – and stunning! – photo.

6. Embrace a shallow depth of field for a complementary background

Telephoto and super-telephoto lenses get you very close to the subject, and this decreases the depth of field.

In other words, when you’re shooting at 400mm, 500mm, and 600mm, you’ll have a razor-thin plane of focus to work with while the rest of the scene will be rendered as a blur.

And fortunately, thanks to the compressive effect of telephoto lenses (discussed above), the background blur tends to look really, really good. It’ll help your subject stand out, plus it can look gorgeous all on its own.

Note that, for the best bokeh effect, you’ll need to ensure there is a significant distance between the subject and the background. You should also dial in a wide aperture, somewhere between f/2.8 and f/6.3 (at least for most situations).

Check out the monkey shot below; do you see how the background has been blurred into oblivion so my subject is emphasized?

9 Tips for Great Telephoto Photography (+ Examples)
 

7. Try some telephoto macro photography

Did you know that telephoto lenses are amazing for macro photography, especially when combined with extension tubes?

You see, telephoto lenses offer great background bokeh (as I explained above), as well as compression, which means that you can isolate macro subjects without needing to get down in the dirt. The biggest issue is that they can’t always focus close enough, but that’s why you should invest in a handful of extension tubes, which let you get closer to the subject without reducing optical quality.

These clusters of flowers are smaller than a US quarter, yet I was able to photograph them at 420mm:

9 Tips for Great Telephoto Photography (+ Examples)

Note that telephoto lenses and true macro lenses have their benefits and drawbacks, so don’t feel like you should ditch your macro lens in favor of a telephoto lens or the other way around. Macro lenses let you get up close and personal with your subjects, and you can create interesting compositions by getting down on the ground with flowers, grasses, and the like.

But telephoto lenses offer flexibility, plus you get a nice background, so if you already own a telephoto lens, why not give it a shot?

8. Pan when photographing action

Panning is the practice of carefully following a moving subject with your camera (as opposed to leaving your camera stationary and waiting for the subject to venture into the frame).

And when you’re taking telephoto action pictures, I recommend you pan constantly.

For one, panning will ensure you nail focus as consistently as possible. It’ll also get you the sharpest shots because your lens will “stop” subject movement by staying in sync.

And panning can also give rise to a very cool effect, especially if you drop your shutter speed to around 1/60s and below. The subject will remain sharp – but the background will blur (as will any independently moving parts on your subject, like the legs of a running deer). Not everyone loves the slow-shutter panning effect, but it can look so artistic, and it’s a great way to keep shooting when the light is low.

telephoto photography panning with car

9. Experiment with astrophotography

With a long-enough lens, your camera will become a low-power telescope, and you can capture images of the moon, the stars, and various planets.

No, your photos won’t be in the same class as astrophotography shots taken with a telescope, but you’ll certainly get eye-catching photos, especially if you restrict yourself to larger subjects such as the moon.

Before you get started, make sure you definitely have a stable tripod that can handle the weight of your entire telephoto setup, as well as a cable release (see the previous sections!).

I’d also recommend you set up in an area where there is little light pollution; that way, you can capture the most detail.

Note that the slightest vibration is enough to blur an astrophotography shot, so take special care to avoid this (use your camera’s mirror lock-up, and if your camera offers an electronic shutter, make sure it’s activated!).

For optimal drama, shoot with a high-resolution sensor and crop down in post production (while maintaining jaw-dropping detail!). That’s how I captured this moon photo:

9 Tips for Great Telephoto Photography (+ Examples)

Telephoto photography tips: final words

telephoto lens

Well, there you have it:

9 tips for using telephoto lenses to capture beautiful photos. As long as you follow these tips, you’ll have a great time!

Now over to you:

What do you like to shoot with your telephoto lens? Do you have any telephoto tips I missed? Share your thoughts in the comments below!

The post 9 Tips for Great Telephoto Photography (+ Examples) appeared first on Digital Photography School. It was authored by Jim Goldstein.


it's from Digital Photography School https://ift.tt/3FWCRaI
via Jim Goldstein

Jan 2, 2022

[Photography] Cold Weather Photography: How to (Safely!) Take Photos in the Cold

The post Cold Weather Photography: How to (Safely!) Take Photos in the Cold appeared first on Digital Photography School. It was authored by David Shaw.

cold weather photography tips

In this article, I’ll explain everything you need to know for cold weather photography, such as:

  • How to protect your cameras and lenses from condensation and freezing
  • How to keep yourself safe when out shooting (including some gear recommendations)
  • How to keep your camera working long after other photographers will have called it quits

Yes, capturing cold photos is a challenge. But if you put in the effort and you take the proper precautions, you can photograph some of the most beautiful conditions on the planet.

Let’s dive right in.

snowy landscape scene cold weather cold weather landscape frozen trees

1. Dress properly

person standing in the snow

To shoot the Aurora during mid-winter in Alaska, you need to dress warm!

If you’re after stunning cold weather photos, you’ve got to dress right.

It doesn’t matter whether the light is beautiful and the scenery is jaw-dropping gorgeous; if you get frostbite on your fingers and can’t operate the camera, you won’t get the shot (and you will get a trip to the hospital).

So what should you wear? The specifics depend on the weather, but I’m a big proponent of layers. When dressed in my winter-photo clothing, I feel a bit like an onion, because I wear long underwear underneath, then a fleece or wool sweater and pants, then a down or synthetic vest, an 800 fill down jacket with hood, windproof Thinsulate pants, two pairs of thick wool socks topped by expedition-quality winter boots, a musher’s style hat complete with ear flaps, a balaclava or face mask, and nimble gloves with a pair of expedition overmitts dangling from wrist straps. And I’ll often throw a couple of chemical hand-warmers into my jacket pockets.

Here are two of my clients on a photo tour, properly dressed for the weather:

cold weather photographers properly dressed

It’s not fashionable, but it’s safe, and that’s what counts.

Now, depending on your photoshoot location, the above list of clothing might be overkill. I live in Alaska, where temperatures drop to -40 Fahrenheit. But if your winter temperatures tend to hover around 20-40 F, then you can dial back the number of layers, and you can potentially do away with the balaclava and windproof pants.

Regardless of your location, however, I do recommend a warm hat, an insulated jacket, good boots, and two pairs of gloves (one set of thin gloves that you can use to easily operate your camera, and one set of thicker gloves or mittens that your thinly gloved hands can fit inside). And the hand warmers are always nice to have around, especially on those ultra-cold days when you can barely bring yourself to head outside.

2. Pay attention to your batteries

A cold battery won’t work as well as a warm battery – so on a brutally cold day, your camera and flash batteries will last only a small fraction of the time they would at room temperature.

To prevent any problems, here’s what you should do:

  1. Make sure your batteries are completely charged before heading out to shoot. Each and every battery should be fully powered and ready to go, because every drop of electricity counts.
  2. Carry as many spare batteries as possible. You can buy extra batteries from all the standard photography retailers (though make sure they’re compatible with your specific camera model!). You might also consider purchasing third-party batteries, too.
  3. Keep all your spare batteries in your inside jacket pocket. That way, they stay as warm (and charged) as possible. You can even put dead batteries back into your camera after time in a warm pocket, and they’ll let you shoot for another handful of minutes. I find I can photograph at extremely cold temperatures for the better part of a day by cycling two batteries back and forth from my pocket to my camera, though the specifics will vary, depending on your camera’s power requirements.

aurora with person silhouette

3. Don’t breathe near your lens

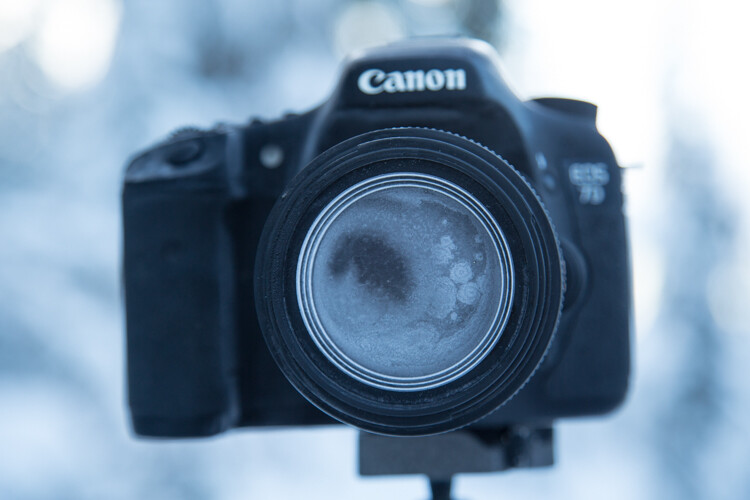
Have you ever tried breathing on your lens in the extreme cold? Don’t. Here’s what’ll happen:

camera with frosty lens

In other words, a warm, humid breath will condense on your lens, resulting in a layer of milky frost on the glass. It doesn’t matter how much money you spend on your lenses; no amount of sharpness will make up for that damage, and your lens will be out of commission for the rest of the day. Wiping at the frost usually just smudges it more, and defrosting the lens inside (see below) can take hours.

Bottom line: Watch where you breathe. If you turn your camera around to check lens settings, don’t exhale. And if you’re standing in front of your camera, make sure you don’t let out a badly positioned breath.

I’d also recommend wearing a neck gaiter or balaclava; when this is pulled up over your mouth and nose, your breath will be directed upward where it’ll frost on your eyelashes instead of your camera. (But make sure you also pay careful attention to moisture on the viewfinder, which can be a major cold weather photography problem!)

snowy coniferous trees with low light

4. Use your lens cap

While foggy lenses are often caused by breath or sudden changes in temperature, when shooting at night, there’s always the change that natural frost will form.

To avoid this, snap on your lens cap when you aren’t shooting. Get in the habit of using that lens cap whenever you’re taking a break, searching for a new composition, or walking from one location to another.

Personally, when I’m out shooting the Aurora at night, my cap is on my lens, even if I’m just walking a short distance to a new shooting location.

I’d also recommend using a clear filter on the front of your lens. That way, if you do end up with lens frost and it gets scraped or smudged, you don’t need to worry about damaging the lens’s front element.

Aurora and cabin in the cold

5. Seal your gear before going back inside

Did you know that a rapid move from a cold environment to a hot environment can cause condensation on glass? It’s why glasses tend to fog up when coming in from the cold, and why, on a hot day, a cold beer glass gathers condensation.

For lenses, this can be extremely problematic. A cold lens brought directly indoors will fog up, so you won’t be able to use it for any indoor photos – and the excess moisture can lead to smears, smudges, and potentially even fungus on the front lens element.

Fortunately, there’s a way to prevent this. Simply put your camera gear in a sealed airtight compartment – such as a simple ziplock bag – before heading inside. Then let it adjust to the warmer temperatures for a few hours.

That way, if you decide to go indoors to warm up, you can keep your gear safe and free of condensation. Then, when you’re ready to go back outside, your gear will be in perfect shape (just keep it sealed until you’re back in the cold).

And even if you’re heading inside because you’re done for the day, sealing up your gear is a great idea, as it’ll keep your lenses moisture-free!

camera in a plastic bag

Check out my bagged-and-sealed camera, ready to be taken back indoors after a cold outdoor shoot.

Pro tip: While ziplock bags work well for sealing up your gear, I recommend lightweight roll-top dry bags like those used by boaters. They’re tough, reusable, and work like a charm!

Cold weather photography: final words

cold and snowy landscape photography

The cold scares a lot of photographers, and rightly so. But with a few precautions – warm clothes, spare batteries, avoiding frost, and protecting against condensation – you can keep your gear safe, and you can capture plenty of beautiful cold photos along the way!

Now over to you:

How do you like to shoot in the cold? Do you have any additional cold weather photo tips that we missed? Share your thoughts in the comments below!

The post Cold Weather Photography: How to (Safely!) Take Photos in the Cold appeared first on Digital Photography School. It was authored by David Shaw.


it's from Digital Photography School https://ift.tt/3qL8oWJ
via David Shaw

Jan 1, 2022

[Photography] Happy New Year From the dPS Team (2022!)

The post Happy New Year From the dPS Team (2022!) appeared first on Digital Photography School. It was authored by Jaymes Dempsey.

Happy New Year 2022

On behalf of the dPS team, I’d like to wish you a great end to 2021 and a fantastic start to 2022!

We’ll be offering plenty of photography tips, tutorials, and advice in the new year, so be sure to check back regularly for our best content.

One more thing: If you’re hoping to improve your photography and you can’t wait to get started, then take a look at our dPS Ultimate Guides, which offer everything you need to level up your photos:

Simply click on a link to access the corresponding Guide! (And if you like what you see, feel free to grab your favorites as PDFs!)

We look forward to fun photographic adventures in 2022!

The post Happy New Year From the dPS Team (2022!) appeared first on Digital Photography School. It was authored by Jaymes Dempsey.


it's from Digital Photography School https://ift.tt/3mNOHfA
via Jaymes Dempsey