Jul 4, 2022

[Photography] Golden Hour Photography: A Complete Guide (+10 Tips)

The post Golden Hour Photography: A Complete Guide (+10 Tips) appeared first on Digital Photography School. It was authored by Anabel DFlux.

golden hour photography: a guide plus 10 tips

What is the golden hour in photography? When is golden hour? And how can you use it to capture beautiful photos?

Golden hour is a special time for photographers. The sun is low in the sky, and the light looks soft, warm, and absolutely magical. By combining proper photographic technique with golden hour lighting, you’re practically guaranteed to capture stunning images – which is what this article is all about.

Below, I’m going to share everything you need to know about golden hour photography. I’ll answer all your burning questions, and I’ll explain how to improve your golden hour images with a few expert tips and techniques.

Let’s dive right in!

What is the golden hour in photography?

The golden hour refers to (roughly) the first hour after sunrise and the last hour before sunset. It’s a time that’s great for photography; hence, the golden hour is also referred to as the magic hour.

During the golden hour, the sun hits the world at a lower angle – and because the light must travel a greater distance to reach the earth, it looks softer, more flattering, and redder. (Compare this to sunny midday lighting, which beams down from directly overhead to produce hard, generally unflattering illumination.)

Here’s a typical golden hour photo:

golden hour photography dog in grass

Notice the beautiful yellow hues and unbelievably flattering light? That’s what golden hour offers for photographers.

When is the golden hour?

While the standard definition of the golden hour – see above! – emphasizes the hour or two before sunset and after sunrise, the golden hour actually fluctuates over the year, and its length depends on your geographical location.

If you live near the equator, the golden hour tends to last one or two hours, and the time won’t change too much as you go from winter to summer and back. But if you live closer to the North or South Pole, you’ll notice a massive change in the golden hour timing, and the golden hours often last far longer.

Really, if you’re serious about taking advantage of beautiful golden hour light, I’d just recommend paying careful attention to the sun for a few days. Ask yourself: When does it rise? When does it set? When does the light start to get warm and soft in the evening? And when does the light start to get hard in the morning? While you can calculate exact golden hour times using astronomical charts, it’s often best to simply observe the light; pretty soon, you’ll be very attuned to the sun’s changes, and you’ll know when you can (and can’t) expect magic-hour lighting.

Why is the golden hour so special?

I’ve already emphasized the low, soft, warm light produced by a magic-hour sun – but what makes it so great for photography?

Well, generally speaking, soft light is a photographer’s best friend. It doesn’t create harsh shadows and it tends to decrease the dynamic range of a scene, so the resulting images don’t feature dark shadows or bright highlights.

Plus, the warm color temperature produced by the golden hours can look beautiful and flattering, as shown in this next photo:

golden hour portrait woman on a beach

And a low sun hits the subject more directly, so there are fewer shadows produced under subjects’ eyes, noses, and chins.

That said, the golden hour isn’t great for all types of photography. While portrait photographers, wildlife photographers, and landscape photographers love magic-hour light, street photographers generally prefer to shoot around midday, when the hard light of the sun produces lots of crunchy contrast and shadows. And many macro photographers prefer to shoot when the sky is overcast; that way, they can capture saturated colors and lots of detail.

So don’t feel like you must work during the golden hour. Just know that it’s a great way to enhance many types of photos. Got it?

The golden hours vs the blue hour

If you’re just diving into photographic lighting, you may have come across the term “blue hour” in addition to “golden hour.” So what’s the difference?

While the golden hour is the hour after sunrise and the hour before sunset, the blue hour is the opposite: It’s the hour before sunrise and the hour after sunset.

In other words, the blue hour refers to the time when the sun is just below the horizon. During the blue hour, the sky turns beautiful cool colors – blues and purples – which look great in landscape and even portrait photos. Unfortunately, the lack of strong light during the blue hour can cause technical problems, but if you choose the right gear, set your ISO carefully, and/or use a tripod, your photos will be spectacular.

Five key lighting techniques for golden hour photography

The golden hour offers five powerful lighting techniques:

Front light

Front lighting is when your subject faces directly into the sun:

front light during golden hour

During the golden hours, front light offers a warm, flattering effect that’s perfect for photographing people, wildlife, and birds. (And because the sun isn’t too bright, portrait subjects won’t need to squint!)

Just point your shadow at your subject, let the sun fall over your shoulder, and have fun shooting.

Backlight

Backlight occurs when the sun is behind your subject. And during the golden hours, backlight creates a soft, warm, hazy, glowing effect, like this:

back lighting in the evening

Golden hour backlight works great, but you need to be careful; it’s easy to accidentally underexpose your subject and end up with a partial silhouette. To avoid this problem, make sure to meter off your subject, not the background.

Rim light

Rim lighting is when the sun creates a halo around your subject:

rim lighting dog

(This halo will be especially prevalent when your subject is positioned against a dark background.)

While you can create rim lighting with backlight, the sun doesn’t need to sit directly behind your subject. The background just needs to be (relatively) dark, and the sun just needs to come from (roughly) a back angle. You’ll have to move around until you find a sweet spot, though getting down low is a good start.

Sun flare

When stray light hits your lens, you’ll often get a sun flare effect, like this:

sun flare portrait

And during the golden hour, the sun is at the optimal height for beautiful flare.

How does it work? Simply angle your camera and lens so that your subject is partially covering the sun. Then move around (sometimes you only need to move an inch or two left or right) until you can see flare coming out from around your subject:

band with sun flare

(Another way to achieve a flare is to position your lens and camera so the sun is just outside of the frame.)

Silhouette

A silhouette is created when your subject is rendered black against a bright background:

Golden hour photography dog silhouette

It’s pretty easy to achieve a silhouette during the golden hours. Just get down low, and photograph your subject directly against the light. (Make sure to expose for the background, not the subject, and don’t be afraid to add extra contrast in post-processing!)

10 golden hour photography tips

There are several ways to take advantage of the golden hours and achieve consistently stunning images. Here are my best tips to help you out:

1. Observe the sky the day before your photoshoot

As I mentioned in a previous section, the best way to figure out when the golden hour will be at its peak is through simple observation!

So the day before your scheduled photoshoot, peek out of the window. See how the sun moves and how the light changes. The sun’s position and timing change very little from one day to the next, so you can assume that two back-to-back days will feature fairly similar lighting angles.

Then make sure you’re on location and are ready to shoot when the light looks its best.

puppy at golden hour

2. Plan your shoot in advance

No one wants to feel stressed, anxious, or rushed when doing photography, so be sure to plan your golden hour photoshoot well in advance.

If you can, begin setting up for your shoot at least 60 minutes before the golden hour starts. That way, you have plenty of time to ensure that your subject is feeling relaxed and your equipment is ready for that perfect moment.

woman and horse

3. Watch out for clouds!

Depending on the level of cloud coverage in the sky, the golden hours can change or even fail to appear. Clouds can enhance the brilliant sunrise and sunset, or they can block the light entirely.

So before you head out, check the weather forecast. And when you’re shooting, be sure to frequently analyze the light. Make careful decisions that take into account the volume of the cloud cover! (Pro tip: If you’re shooting quickly and the sun keeps passing behind clouds, consider using a semi-automatic shooting mode such as Aperture Priority or Shutter Priority. It’ll help keep the exposure even as the light changes.)

hands intertwined

4. Set your white balance to Cloudy or Shade

Your camera’s white balance is designed to correct for color casts – but did you know that you can actually use white balancing to create artistic effects? You see, by shifting your white balance, you can emphasize the warm colors of the golden hour.

Both the Cloudy and Shade white balance settings will add more warmth to your photos. Don’t be afraid to use them to enhance that stunning magic-hour look. (And if you forget to apply a warmth-enhancing white balance setting while shooting, you can always add the effect in post-processing!)

woman with stunning bokeh

5. Shoot with a wide aperture

Golden hour light can create incredible background blur (i.e., bokeh). But you’ll need to use a wide aperture, such as f/1.8, f/2.8, or f/4 (which will require a relatively fast lens; here, prime lenses are your friend!).

A wide aperture, combined with the dazzling yellows, reds, and oranges of the golden hour, will produce a rather exceptional backdrop:

dog with beautiful bokeh

6. Don’t stop photographing

During the golden hour, the sun is setting…

…and as the sun sinks on the horizon, the light changes constantly.

dogs with backlight

Light at the start of the golden hour can look wildly different from light at the end – so once you bring out your camera, keep shooting and don’t stop! Pay careful attention to the quality of the light, and try to savor each new moment.

7. Try different angles and positions

The sun flares, colors, and intensity of the light are all affected by how you angle your lens.

So experiment constantly. Try as many different positions as humanly possible. To get the most out of the golden hours, manipulate the light as much as you can!
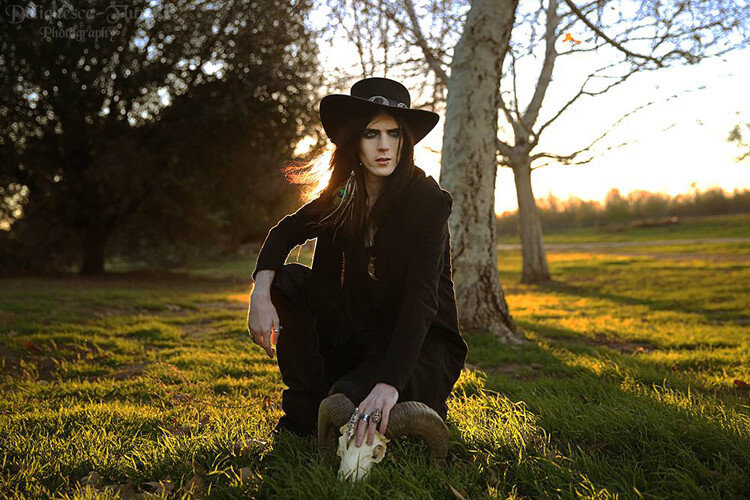
man in a field

8. Subtly underexpose to add more vibrance

Did you know that it’s harder to darken an overexposed image than to lighten an underexposed image?

It’s true. It’s easy to recover lost details in a too-dark shot, but if you overexpose dramatically, then you’ll lose lots of detail. Plus, brighter images tend to look washed out.

So if you want to guarantee plenty of detail, and you want to bring out the beautiful vibrancy of sunset or sunrise, then don’t be afraid to subtly underexpose.

golden hour portrait

9. Explore HDR photography

HDR photography involves capturing multiple exposures, then layering them on top of one another in post-processing. The idea is to preserve detail in the shadows and highlights, and the results can look amazing!

One tip: Make sure you use a tripod, and if you’re photographing people, make sure they remain as still as possible. When you blend together the images, excessive movement can cause major problems.

HDR photo

10. Experiment in post-processing

I’ve offered lots of tips and tricks to help you get great results while shooting – but a lot of the magic happens behind the scenes, during the post-processing period.

So use your favorite editing program to enhance the colors in your images. Have fun bringing out hues and adding elaborate color grades!

dog on a rock

Golden hour photography: final words

The golden hours are full of limitless possibilities, and no two files will look the same.

So get out during golden hour – and take plenty of shots!

How do you plan to use the golden hour? What subjects will you shoot? Share your thoughts – and images! – in the comments below.

What is so special about the golden hour?

The golden hour features a low sun, which produces warm, soft, and flattering light. Golden hour light is a great way to capture stunning silhouettes, beautiful sun flare effects, gorgeous landscapes, amazing portraits, and more!

What time is the golden hour?

The golden hour changes over the year. It’s generally the hour after sunrise and the hour before sunset, but depending on your location, this may occur at 12 PM – or it may occur at 12 AM!

Is the golden hour actually an hour?

Not necessarily. In certain locations – generally closer to the equator – the golden hour does last an hour. But in other locations, such as Alaska, the golden hour lasts far longer!

What is the difference between the golden hour and the blue hour?

The golden hour refers to the time just after sunrise and just before sunset, while the blue hour refers to the time just before sunrise and just after sunset.

The post Golden Hour Photography: A Complete Guide (+10 Tips) appeared first on Digital Photography School. It was authored by Anabel DFlux.


it's from Digital Photography School https://ift.tt/40nTAvd
via Anabel DFlux

Jul 3, 2022

[Photography] How to Become a (Great) Nature Photographer: 9 Essential Tips

The post How to Become a (Great) Nature Photographer: 9 Essential Tips appeared first on Digital Photography School. It was authored by Will Nicholls.

How to Become a (Great) Nature Photographer: 9 Essential Tips

Want to be a nature photographer? You’re in the right place.

Becoming a great nature shooter isn’t as hard as you might think. With the right tools, techniques, and approach, you can level up your camera skills, find amazing subjects, and have plenty of photographic fun along the way. And if you’re really, really dedicated, you might even become a paid professional.

Below, I offer my top 9 tips for nature photography success – so if you’re ready to capture stunning birds, wildlife, plants, and more, then let’s dive right in!

1. Make sure you like it

Nature photography involves a lot of time and effort. You’ll often spend long days in the field, only to head home empty-handed when the light doesn’t cooperate, your subject doesn’t cooperate, or you just can’t seem to make the shot.

And even when things do go to plan and you get that perfect image, the scouting and traveling and waiting can be tough.

I’m not saying that you must be head-over-heels in love with nature photography from the get-go; over time, your passion may develop and you’ll come to love certain elements of shooting that you previously found tedious.

But you should like nature photography, and you should be able to see yourself loving it as time goes on. In other words, to succeed as a nature shooter, passion and drive are essential.

2. Distinguish yourself

These days, nature photography is wildly popular. Everyone wants to shoot nature, and while it’s great to have people across the globe appreciating the natural world, this brings with it a lot of competition.

So if you want to stand out from the crowd and attract the attention of magazines, you have to be different.

Think about your interests. Is there a specific type of subject – such as songbirds or bears – you could focus on? Think about your technical approach, too. Might you capture unique photos by using the light in an unconventional way? Could you use a focal length or a depth of field generally avoided by nature photographers?

I spend a huge amount of time photographing red squirrels, and my dedication has allowed me to capture behaviors like this:

Will Nicholls 5

3. Take risks

I don’t mean that you should take physical risks; instead, be prepared to take risks with your time because, as the saying goes, “Nothing ventured, nothing gained.”

As I mentioned earlier in the article, nature photography is rarely a sure thing. The light is difficult to predict, and subject behavior – if you like to photograph birds or wildlife – is even trickier to anticipate. You will strike out from time to time, and it’ll be frustrating, but if you never take risks, you’ll miss all the best shots!

So don’t be afraid to plan nature photography trips, even if you’re not sure about the light. Don’t be afraid to check out new locations, even if you’re not sure whether they’ll pan out.

Recently, there was a display of the aurora borealis in the north of England. Typically, it’s hard to predict this phenomenon, and available forecasts only look an hour ahead. The display can finish as quickly as it starts, so planning for such an event isn’t really possible. I decided I wanted to capture the northern lights with a British castle in the foreground, but the structure I had in mind was over two hours away.

Nevertheless, at 2 AM, I dropped everything and raced off to the coast. When I arrived, the display was weakening, but after two hours of waiting, the lights erupted in front of me. I got home at 8 AM, but the image made it well worth the effort:

Will Nicholls 8

4. Always be ethical

Unfortunately, not all photographers are respectful of nature – but in my view, taking an ethical approach in your photography, especially when photographing animals, is of utmost importance.

You’ll have a much better time shooting if you’re not harming wildlife in the process. And there are reasons of self-interest to consider, too: Photographers who are unethical are shamed by others in the industry, and they lose the respect of the majority of photographers who care about their subjects.

No photo should come before the welfare of an animal or a place. It’s that simple, and if you remember this rule, your photos will improve in the long run. The best photographers don’t cut corners, and they have a great affinity for the environment, too.

Will Nicholls 4

5. Think about what you want to express

Once you find a good subject, you may be tempted to simply press the shutter button – but if you click without thinking, you’ll often end up with boring photos.

Instead, upon finding a good subject, ask yourself: What do I want to convey to the viewer? How can I make the viewer feel like they’re in my shoes?

Then, once you realize what you’re after, adjust your gear, settings, composition, and lighting for the perfect result.

Will Nicholls 7

For instance, if you want to capture a dramatic, breathtaking landscape, you might deliberately pick a wide-angle lens, find a powerful foreground subject, and get down low so it looms large in the frame. That way, you’ll get an image filled with astonishing depth and plenty of detail.

And if you want to capture a beautiful bird portrait, you should choose a long lens, get in close to fill the frame, carefully position the bird within the overall composition, and wait until the bird strikes an engaging pose.

6. Convey scale

One of the toughest parts of nature photography is communicating the size of a subject, whether it’s breathtakingly large (as in the case of a mountain, a tree, or an incredible sunset), or absolutely minuscule (as in the case of a bird, a flower, or an insect).

Fortunately, nature photographers use a nifty trick: They introduce well-known objects in the scene, which then act as points of reference for the viewer.

If you’re shooting a huge mountain, for instance, you can adjust your framing to include a house at its base; if you’re photographing a tiny frog, you can include a daisy in the background. (And if you ever struggle to find an object that works, you can always step into the photo yourself!)

For this next photo, I chose a location with a tree in the foreground, which helped convey the expanse of the sky:

nature photography

7. Try a different lens

Once you’ve become a more seasoned nature photographer, you may find yourself taking the same type of shot over and over again. Fortunately, it’s easy to break out of these creative ruts:

Simply swap lenses!

Grabbing a different lens will force you to experiment with new compositions, think about new approaches, and maybe capture something unique.

So if you’re used to doing wide-angle photography, try bringing out that telephoto lens. And if you generally shoot with a super-telephoto, go wide-angle, or even consider using your macro lens for a completely different perspective.

Will Nicholls 2

8. Plan before you shoot

Nature is relatively unpredictable…

…but that’s no excuse not to plan before each outing! Planning can help you:

  • Determine where the sun will be when you arrive on location
  • Increase your chances of finding wildlife
  • Ensure you have the right gear for the job

Yes, it can be fun to head out on spontaneous photography excursions. But while there’s nothing wrong with the occasional impromptu expedition, I encourage you to stop and think before each trip. Do location research, check the tide charts, and look at sunrise and sunset times.

That way, when you do arrive, you’re more likely to capture that perfect, once-in-a-lifetime shot!

9. Don’t give up

Becoming a serious nature photographer isn’t impossible, but it’s not super easy, either. (If it were, then everyone would be a nature photography phenom!)

Nature photography requires a lot of time, effort, and knowledge, and at points, you may want to throw in the towel.

But when you’re feeling down, just remember the good times. Look at your past photos, and remind yourself why you chose nature photography in the first place.

Results don’t come instantly, and it takes practice to achieve great images. But if you put in the required hours, then you’ll eventually get great results.

Will Nicholls 6

How to become a nature photographer: final words

Well, there you have it:

9 tips for becoming a top-notch nature shooter. Nature photography can be incredibly rewarding, and while it’s not always easy, it’s certainly worth pursuing.

So remember these tips, take a deep breath, and go become a nature photographer!

Which of these tips do you plan to focus on first? And what kind of nature photographer do you hope to become? Share your thoughts in the comments below!

Table of contents

Nature Photography

The post How to Become a (Great) Nature Photographer: 9 Essential Tips appeared first on Digital Photography School. It was authored by Will Nicholls.


it's from Digital Photography School https://ift.tt/RW2Guv6
via Will Nicholls

Jul 2, 2022

[Photography] 5 Creative Lenses for Beautiful and Artistic Photos

The post 5 Creative Lenses for Beautiful and Artistic Photos appeared first on Digital Photography School. It was authored by Simon Bond.

creative lenses for beautiful photos

Are you looking to capture artistic photos? Do you want to work with creative lenses that’ll take your images to the next level, fast?

In this article, I share my top five favorite creative lens options for photographers. Some of the lenses are cheap, some are more expensive, but all guarantee fun and unique results.

So if you’re ready to take images that stand out from the crowd, then let’s dive right in, starting with my first pick:

1. A fisheye lens

Fisheye lenses produce an ultra-wide rounded effect, like this:

Five Creative Lenses That Will Make Your Photos Pop

Which means you can use them to distort corridors, warp skylines, and even bend faces.

Fisheye lenses are a lot of fun to work with; they’re plenty versatile, and once you learn to predict how a fisheye lens will render each new scene, you can turn boring subjects into stunning works of art.

Fisheye lenses aren’t too expensive, either. You can grab third-party options for a couple hundred dollars, and you can even purchase cheap fisheye lens accessories for your smartphone.

Here are a few basic ways to get started with a fisheye lens:

  1. Capture some standard wide-angle landscapes. Fisheye lenses are decent wide-angle lens alternatives, especially if you like that ultra-wide look. To minimize distortion, you’ll need to position the horizon line toward the middle of your image.
  2. Move on to some “round-earth” compositions. Once you start to understand the way the fisheye renders the world, try heading to a body of water, such as a lake or – better yet – a beach. Position the horizon line near the top or bottom of the frame, then watch as it’s warped like crazy!
  3. Combine the fisheye effect with leading lines. See if you can find a scene filled with lines. For instance, you might look up a spiral staircase or down a long corridor. Let the fisheye lens create lots of interesting distortion effects.

Of course, you don’t need to stick to landscape and architectural images. You can create stunning fisheye portraits by positioning the lens close to the subject. Try playing around with different vantage points, too!

Five Creative Lenses That Will Make Your Photos Pop

2. A Lensbaby Composer

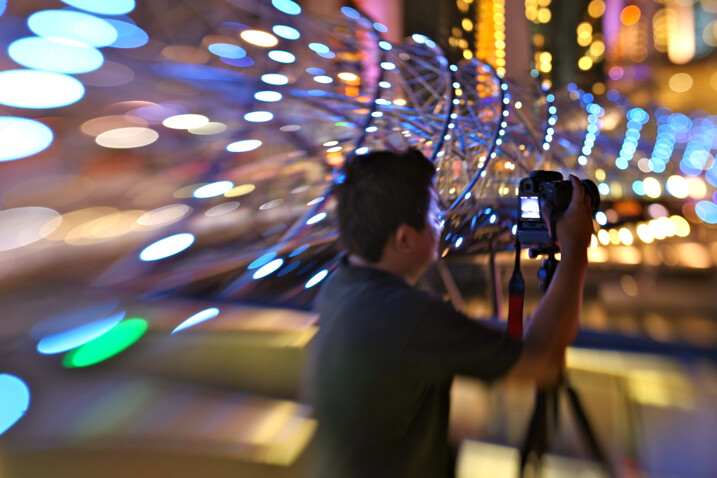
The Lensbaby Composer allows you to adjust the part of the frame with the sharpest focus, and while the best way to understand the Composer’s effect is to simply use one, here’s a simple example:

5 Creative Lenses for Beautiful and Artistic Photos

For the shot displayed above, I focused on the photographer’s camera and let the rest of the scene blur into oblivion.

You can use the Composer to highlight faces, emphasize flowers, capture creative abstracts, and much more. A few easy ideas:

  • Photograph fairy lights. If you shift the angle of the composer lens, you can create stretch bokeh (see the left side of my example image). Try photographing fairy lights, but be sure to focus in front of the nearest lights and make sure to shift the point of focus.
  • Do Lensbaby portraits. As I hinted at earlier, Lensbaby lenses are a great way to draw the viewer’s eye straight toward the model’s face. By rendering a sharp subject surrounded by background bokeh, you can create a captivating portrait; just make sure you keep a little distance between the subject and the background.
  • Try to shoot landscapes. Lensbaby Composers aren’t known for their landscape capabilities, but in my experience, you can use them to capture uniquely artistic scenic shots. Look for strong subjects – such as lone trees in fields – with plenty of distance between the subject and the background. Focus on the subject, then let the background blur into beautiful bokeh!

3. An ultra-fast lens

A fast lens features a wide maximum aperture, often in the area of f/1.8, f/1.4, or even f/1.2.

And while you can use a fast lens to capture conventional photos, you can also use a fast lens to produce highly creative works of art.

You see, the wider you open the lens aperture, the stronger the background bokeh. So by working at f/1.8 or wider, by carefully positioning your subject in front of a colorful backdrop, and by ensuring there’s plenty of distance between the subject and the background, you can create beautiful images that combine a sharp subject and lots of background bokeh:

Five Creative Lenses That Will Make Your Photos Pop

You’ll need a lens that’s at least 50mm (and an 85mm focal length works, too). You’ll also need to pay careful attention to the light; you can create especially cool effects by combining a shaded subject with a well-lit background.

One more tip: When working at f/1.8, the depth of field will generally be razor-thin, so make sure that you nail focus on your subject!

4. A macro lens

Macro lenses offer lots of magnification, and this is a great way to capture unique images of frequently encountered subjects.

Five Creative Lenses That Will Make Your Photos Pop

Unfortunately, macro lenses can be on the expensive side, but if you don’t want to shell out for a true macro lens to begin with, you do have the option of trying out close-up filters, extension tubes, or the reverse-lens technique.

What’s special about macro photography is the focus on hidden, unseen worlds: the bed of moss at the foot of a tree, the water droplets inside a tulip, the intricate arrangement of a spider’s web – all of these offer plenty of gorgeous subjects! Here are a few ideas:

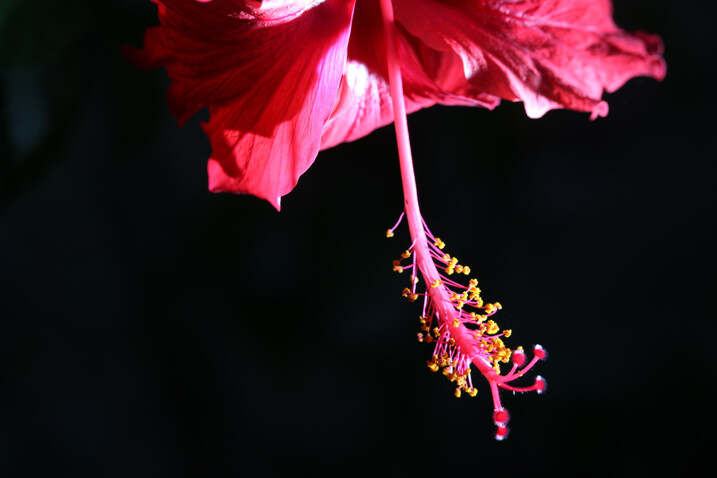
  • Photograph flowers. A macro lens will get you up close to flowers. You can capture abstract images of the petals, you can highlight all the tiny pollen granules on the anthers, or you can capture creative shots of the flower stem!
  • Shoot water droplets. Water droplets are a macro photography classic. At high magnifications, the droplets will loom large in the frame. You can even create refraction images by placing a beautiful subject, such as a flower, behind the water droplets.
  • Capture household items. A macro lens can make pretty much anything look interesting! Try selecting boring household objects – like money, food, or fabric – then zoom in close and see what you can create!
Five Creative Lenses That Will Make Your Photos Pop

One more tip: At high magnifications, the depth of field will be tiny and your autofocus will struggle. I’d recommend switching over to manual focus, and if you need to, try a focus-stacking technique.

5. A tilt-shift lens

Tilt-shift lenses can do two things:

  1. They can tilt, which adjusts the plane of focus so that close-up and distant objects are similarly sharp.
  2. They can shift, which helps correct perspective distortion.

Shifting isn’t so useful for creative photography, and it’s primarily used by architectural shooters – but tilting is a great way to compose images with an interesting “tiny worlds” look. Parts of the image is in focus, while parts fade into blur, making the scene look like a miniature model:

Five Creative Lenses That Will Make Your Photos Pop

Unfortunately, tilt-shift lenses are designed for professionals and tend to be very expensive. But you do have other options; for instance, you might consider freelensing, which lets you adjust the plane of focus by detaching your lens from your camera body.

You might also consider creating a tilt-shift effect in post-processing. No, it’s not quite as satisfying as producing the effect in-camera, and it’s not always quite as realistic, but it can still look great!

Which creative lens will you choose?

Hopefully, you now realize that you have tons of creative options. You can work with a macro lens, a Lensbaby, a tilt-shift lens, and more.

So which will you choose? Which lens will you try? Share your thoughts in the comments below!

The post 5 Creative Lenses for Beautiful and Artistic Photos appeared first on Digital Photography School. It was authored by Simon Bond.


it's from Digital Photography School https://ift.tt/MiBvhgK
via Simon Bond

Jul 1, 2022

[Photography] Nikon Releases the Z30, Its Cheapest Mirrorless Camera Yet

The post Nikon Releases the Z30, Its Cheapest Mirrorless Camera Yet appeared first on Digital Photography School. It was authored by Jaymes Dempsey.

Nikon releases the entry-level Z30

Nikon has officially unveiled the Z30, a diminutive, lightweight, and cheap mirrorless model, claiming that the camera offers “comprehensive consideration for video recording of a wide range of scenes, from daily shooting to creative expression including vlogs.”

In particular, the Z30 boasts a handful of video-focused features, including: 

  • Uncropped 4K/30p recording
  • 1080p recording up to 120 frames per second
  • A prominent “Record” button
  • A built-in microphone
  • An articulating screen

In other words, the Z30, despite its position in a primarily stills-focused lineup, is not designed as a stills camera; instead, it’s an entry-level video-leaning model, one that’s designed specifically for vloggers, social media creators, and YouTubers. (It also lacks an electronic viewfinder, which is a Nikon mirrorless first, and further points toward the company’s video-focused goals.)  

That’s not to say that the Z30 isn’t capable of great stills photography. Like all of Nikon’s mirrorless cameras, it can undoubtedly take great photos, and Nikon included features that make it suitable for a bevy of genres. 

There’s the solid 21 MP sensor – pulled straight from the respectable Nikon Z fc, according to Nikon’s press release – which offers enough resolution for high-quality landscape photos, product shots, and still-life images. 

Then there’s a powerful autofocus system, not to mention 11 frames-per-second continuous shooting, which are more than enough for intermediate-level (and even advanced) wildlife photography, event photography, and even sports photography. 

And the Z30’s articulating screen, while useful for video recording, is also great for still shots. Use it to capture beautiful ground-level macro subjects, to achieve bird’s-eye angles when doing portraiture, and to carefully frame your self-portraits before shooting.

But the lack of an EVF is frustrating. If you want to track birds, wildlife, sports players, or even kids on the move, a viewfinder is a major help (and, for some users, absolutely essential). Most videographers won’t mind composing via the touchscreen LCD, but plenty of photographers will. 

Of course, if you’re upgrading from a point-and-shoot camera or a smartphone, the lack of an electronic viewfinder might not be a problem. And the Z30 is impressively cheap, coming in at just over $700, body only (or $847 with a 16-50mm kit lens). 

Note that the Z30 will enter the Nikon lineup below the Nikon Z50 and the Nikon Z fc, both of which cost around $850, body only, and are geared toward beginners and first-time mirrorless users. They’re solid cameras, but if you’re only just diving into photography and you’re looking to save money, the Z30 is certainly an option worth considering. And if you’re less focused on stills, but are instead a vlogger or videographer in need of a well-priced, high-quality camera, the Z30 may just be a perfect choice. 

To learn more about the Z30 or to preorder the camera, check it out on B&H.

Now over to you:

What do you think about the Nikon Z30? Are you impressed? Disappointed? Will you buy it? Share your thoughts in the comments below!

The post Nikon Releases the Z30, Its Cheapest Mirrorless Camera Yet appeared first on Digital Photography School. It was authored by Jaymes Dempsey.


it's from Digital Photography School https://ift.tt/B8X1eYE
via Jaymes Dempsey

[Photography] Weekly dPS Photography Challenge : Nature

The post Weekly dPS Photography Challenge : Nature appeared first on Digital Photography School. It was authored by Sime.

Hello! Welcome to another week of the dPS Weekly Photography Challenge, I was on a call this morning and everyone was heading off for a long ‘4th of July’ weekend, I’m in Melbourne, Australia, so I’m not prone to BBQ’ing and blowing stuff up (someone on the call’s words, not mine haha) and I thought, well I’d like to get out into nature for MY weekend, and so I thought no, let’s not make it 4th of July themed, let’s make it NATURE themed this week. Any aspect of nature, your best nature photo – it MUST be taken for this challenge though.

Some stunning examples below! Be inspired by them, even if your ‘nature’ is your local park!

Use the hashtag #dPSNature in your post, do the best you have with what you’ve got, ask for help from the community if you’re out of ideas, ask in the comments, ask in our private group.

10 Ideas for ‘nature photography’ in your back yard!

Weekly dPS Photography Challenge : Nature
Photo by David Marcu on Unsplash
Weekly dPS Photography Challenge : Nature
Photo by Qingbao Meng on Unsplash
Weekly dPS Photography Challenge : Nature
Photo by Quino Al on Unsplash
Weekly dPS Photography Challenge : Nature
Photo by Henry Be on Unsplash
Weekly dPS Photography Challenge : Nature
Photo by Adam Kool on Unsplash

The post Weekly dPS Photography Challenge : Nature appeared first on Digital Photography School. It was authored by Sime.


it's from Digital Photography School https://ift.tt/mlKn9De
via Sime