Feb 4, 2023

[Photography] 5 Tips for Gorgeous Costume Photography

The post 5 Tips for Gorgeous Costume Photography appeared first on Digital Photography School. It was authored by Charlie Moss.

Tips for beautiful costume photography

There’s been an explosion of interest in costume photography over the last few years. From movie cosplays to historically-inspired portraits, there’s no end to the kind of costumes that need photographing – and these images can inject plenty of variety into any up-and-coming portrait shooter’s portfolio.

Additionally, capturing someone who is playing a role will add a whole new dimension to your images; when people are pretending to be someone else, they often lose their discomfort about being in front of the camera, which can result in surprisingly genuine photos.

But how can you ensure stunning results? In this article, I share my top five tips to create amazing shots. By the time you’ve finished reading, you’ll be ready to capture – and process – beautiful costume photos!

1. Be inspired by history

Since the early days of photography, artists have created portraits based on historical clothing and characters. Julia Margaret Cameron was a 19th-century British photographer who used to shoot people dressed up as characters from Shakespeare, while her contemporary, David Wilkie Wynfield, photographed his friends wearing fancy dress in the style of the great 16th-century Venetian artist, Titian.

So take a look at the work of other photographers and see what you can learn. You might even be inspired by certain costumes, lighting styles, and moods, all of which you can try to incorporate into your own photos.

And don’t just look at photography, either; there are thousands of years of painted portraits to take inspiration from, too. For this next portrait, I was inspired by a da Vinci painting called La Belle Ferronnière:

Costume photography tips

I’ve also been inspired by other painters; if you’re not sure where to start, try viewing Rembrandt’s portraiture and see if you can recreate the Rembrandt lighting pattern, which tends to look amazing.

By the way, never be afraid to try self-portraiture when you’re experimenting with different lighting techniques and looks. It can take a bit of practice to get a good result, and you can be your own most patient model. The shot above was the result of an hour spent in my studio experimenting with light!

On a related note, most artists of the past used available light, and if you’re generally a flash shooter, costume photography can be a great time to step out of your comfort zone and try something different.

Costume photography tips

2. Check the costume’s faithfulness

I’m not suggesting that you should obsess over historical or film accuracy in your costume portraits, but it does pay to think through all of the elements that your subject is wearing before capturing the final shot. (You should also check the subject’s surroundings and background; a modern car will certainly look out of place in a Renaissance-type scene!)

In a costume portrait – even more than with a regular portrait – every aspect of the clothing and makeup, as well as any props you add, should contribute to the story being told by the final image. Ideally, nothing should appear in the final image that wasn’t put there intentionally to enhance the narrative.

So if you’re shooting a portrait inspired by a period of history or by a film or comic book, just take a little time to research your inspiration before scheduling a shoot. Check that the costume, accessories, props, and surroundings aren’t going to work against the story you’re trying to tell.

If you’re new to styling portraits, this is where it might be worthwhile to consult a costume designer. Their advice could save you an awful lot of time and heartache in the long run! Of course, there are always opportunities to rent costumes from theatres, too (which can be a surprisingly cost-effective option).

Costume photography tips

3. Set the scene

Think about the scene that you want your character to inhabit. Do you aim to photograph them as royalty sitting atop a beautiful throne? Or do you want to capture a post-apocalyptic warrior tracking danger in the forest? Scouting out a location and sourcing props to fit the scene can be half of the fun when it comes to staging a costume portrait!

If you’re struggling to identify a good location for your portrait, take a breath. You can often find great opportunities in the most surprising places. I’ve shot in front of huge roller shutter doors on industrial estates, in scrubby bits of forest that came out looking like a dreamy estate, and against an old stone wall in my backyard. With the right lighting, portrait lens selection, framing choices, and post-processing, the most mundane locations can give you precisely the results you’re after.

Of course, you don’t always need to seek out locations; there’s always the option to head into the studio instead. In fact, if you take a subject into the studio and place them against a plain backdrop, the resulting images will often highlight the story you’re trying to tell through their costume and appearance (by putting the focus squarely on the subject).

That said, this style of studio shooting can be a double-edged sword. Given the increased focus on the subject, there is less room for mistakes in controlled studio portraits – but the payoff can be more than worth it!

Costume photography tips

4. Give your subject a character

When people usually sit for portraits, they play themselves. So when you have someone sit for a costume portrait, it can be helpful to have them play a role. In my experience, this approach can help them get into the right state of mind much more quickly and easily.

So before you do a shoot – while you’re determining the right styling and location – think about the character that you’re looking to capture and write down a few thoughts.

Is your subject a brooding young Victorian poet who lost their love? Or are they an underground rebel trying to uncover a government conspiracy four decades in the future? These details might seem unnecessary, but the character and their motivations are the driving force behind the entire shoot. Do your best to really bring the character to life by fleshing out the relevant backstory, then communicate the narrative to your model.

Once your subject is dressed up, equipped with props, properly briefed, and in your location of choice, all these elements should come together to help them portray the character. It’s their ability to inhabit the role that will shine through, tell the story, and truly make the images portfolio-worthy.

Costume photography tips

5. Don’t forget about post-processing

You’ve styled an amazing shoot in a fantastically atmospheric location with a great team, and you’ve collaboratively told a compelling story. So what is next? Should you share your images with the world?

Not so fast. Before anyone else sees your photos, you should spend plenty of time post-processing the files. You see, the choices you make on the computer or in the darkroom will really help emphasize the story. In my experience, good post-processing can elevate a portrait to something extraordinary.

But don’t necessarily follow a standard portrait post-processing workflow. You can make stylistic choices that you may wish to avoid when shooting regular headshots or family portraits. For instance, when I capture images with an apocalyptic theme, I tend to add lots of layers over the top to create a grungy look to the piece. And if I’m shooting a character inspired by a sci-fi movie, then I often push the colors to resemble the film grading used by cinematographers. Finally, if I shoot something designed to look medieval, I usually dull all the colors down and make the finished shots look dusty and worn.

With practice, you’ll develop your own style for post-processing costume photography. Just remember: Everything about costume portraits is completely different from how most people approach portrait photography. So view the post-processing stage as a chance to experiment!

Costume photography tips

Costume photography tips: final words

Now that you’re armed with my top tips for shooting costume portraits, it’s time to take some photos. So start thinking about some images you’d like to create!

Remember to flesh out a backstory, set the scene, and carefully consider every element that you place in the image. That way, you can tell a compelling and consistent story that shines through in the final shot.

Now over to you:

What costume portraits do you plan to capture? Share your thoughts (and images) in the comments below!

Table of contents

Portrait Photography

The post 5 Tips for Gorgeous Costume Photography appeared first on Digital Photography School. It was authored by Charlie Moss.


it's from Digital Photography School https://ift.tt/5jhakug
via Charlie Moss

[Photography] The Canon EOS R50 and EOS R8 Will Debut “Next Week”

The post The Canon EOS R50 and EOS R8 Will Debut “Next Week” appeared first on Digital Photography School. It was authored by Jaymes Dempsey.

Canon EOS R50 and R8 to debut "next week"

Looking for a mirrorless camera that’s both affordable and plenty powerful? Canon has not one but two models on the way, both of which will be “announced…next week” and feature a combination of high-level tech and sub-$1500 price tags.

According to Canon Rumors, the imaging company is preparing to unveil the EOS R8 and EOS R50. The two products – a full-frame and an APS-C camera, respectively – will boast RF mounts and round out the entry-level end of Canon’s mirrorless lineup, giving beginner and intermediate photographers an opportunity to access the latest camera technology without paying thousands of dollars.

But while we don’t have any official specs for the EOS R8 and the EOS R50, we do know – based on reliable rumors reported by CR – that they’re far from identical and are designed to appeal to different sets of users.

The EOS R8 will likely contain a full-frame 24 MP sensor, top-notch autofocus capabilities, a whopping 40 frames-per-second continuous shooting mode, and 4K/60p recording. CR notes that the camera won’t offer in-body image stabilization, though it will be remarkably lightweight (1.02 lb/461 g) and cost just $1499.

Based purely on the specs listed above, the EOS R8 should target several types of consumers: intermediate photographers looking to make the jump to full frame, entry-level photographers seeking a combination of speed and solid image quality, and hybrid shooters in need of a model that can handle both video recording and still photography. The lightweight (and presumably compact) build will make the R8 attractive to vloggers and travel photographers, especially when you factor in the low price.

Then there’s the EOS R50. Canon Rumors has had very little to say about this model, but we do know that it will contain an APS-C sensor and cost an unprecedented $679 (or $1029 with multiple kit lenses). At present, Canon’s cheapest RF-mount mirrorless camera is the $879 EOS R10, but the EOS R50 – with its budget-friendly price tag – should do more to draw in digital photography beginners looking to capture high-quality files without spending a fortune.

The EOS R50 will undoubtedly include a far more limited feature set compared to the EOS R10 and the EOS R8, but you can still expect the camera to offer excellent image quality, reasonably fast autofocusing, solid ergonomics, and fast continuous shooting.

So if you’re a beginner or intermediate shooter looking for a new camera, keep an eye out for the upcoming EOS R8 and EOS R50 announcements!

Now over to you:

Are you interested in the EOS R8? How about the EOS R50? Why or why not? Share your thoughts in the comments below!

The post The Canon EOS R50 and EOS R8 Will Debut “Next Week” appeared first on Digital Photography School. It was authored by Jaymes Dempsey.


it's from Digital Photography School https://ift.tt/2Vi4uUY
via Jaymes Dempsey

Feb 3, 2023

[Photography] 12 Tips for Stunning Landscape Photography

The post 12 Tips for Stunning Landscape Photography appeared first on Digital Photography School. It was authored by Kav Dadfar.

Tips for stunning landscape photos

Landscape photography is breathtaking, exhilarating, and lots of fun – but it can also be difficult, disappointing, and downright frustrating, especially when you’re just starting out. Composition, lighting, camera settings, and more; it’s a lot to wrap your head around, but if you don’t use the right strategies and techniques, you’ll often end up with subpar images.

Fortunately, I’ve spent years capturing the landscape, and in this article, I share my best tips, including:

  • Key landscape imaging accessories
  • The best light for incredible shots
  • Easy ways to improve your compositions
  • Much more!

So if you’re ready to level up your landscape photos, then let’s dive right in!

KD-2016-DPS-Landscape Tips-7

1. Pick your location carefully (and scout in advance)

Landscape photography is as much about planning as it is about the actual process of photography. Don’t just wander around with your camera; instead, always have a clear idea of where you are planning to go and the time of day that will allow you to capture the best photographs.

Learn how to read maps and understand how you can utilize them to find the perfect location. You can use photography apps (like PhotoPills) to anticipate the sun’s direction long before you arrive on-site, and you can use Google Earth to check topography and even consider potential compositions.

Of course, the best way to pick locations is by visiting potential spots in advance, but due to time and travel constraints, that’s not always possible. Regardless of how you approach it, scouting and planning will ensure you can make the most of your time; it’ll also ensure that you get to your location safely and in plenty of time and that you find your way back (usually after sunset).

2. Be patient

It’s a fact of (landscape photography) life: The elements are practically always conspiring to ruin a perfectly composed photo.

Therefore, landscape photography requires patience. If you arrive on location only to find the sunset blocked by clouds, don’t head back home. Set up your composition and wait – just in case the clouds disperse just long enough to allow the sun to break through.

It’s important that you always plan for extra time at a location just in case waiting is necessary. Relatedly, check weather forecasts before leaving so you know what to expect!

KD-2016-DPS-Landscape Tips-4

3. Don’t be lazy

One of the reasons we’re often stunned by an impressive landscape photo is because it features a scene captured in a unique, never-before-seen way. Such images often take significant effort to take, but they’re absolutely worth it. A photo taken from the top of a mountain, for instance, requires a huge amount of time and effort. But it displays a view that most people will never see for themselves.

So don’t rely on easily accessible viewpoints that everyone else can just drive up to and see. Instead, look for those unique spots that offer amazing views, even if they require real effort, determination, and planning to get there.

(On the other hand, don’t shy away from capturing an image just because the location was easy to access. The best landscape images sometimes are actually rather simple!)

4. Shoot in the best light

Light is one of the most important factors in any photograph, but this is especially true for landscape photography. If the light doesn’t do a scene justice, then it really won’t matter how great the location is or how you compose your photo; the image will fail.

So what’s the right light for landscape images? It does vary depending on your photographic goals, the weather, and the scene itself, but the best light is generally early in the morning or late in the afternoon (the golden hour). The time just before sunrise and just after sunset – known as the blue hour – is also very nice, though the lack of sun does lead to certain technical difficulties.

That said, don’t limit yourself based purely on the light. Part of the challenge of landscape photography is adapting and coping with different lighting conditions; for example, great landscape photos can be captured even on stormy or cloudy days. The key is to use the best light whenever you can and to make the most of the less-ideal light when you can’t.

KD-2016-DPS-Landscape Tips-3

5. Always carry a tripod

Simply put, if you want to capture the best photographs, then a tripod is an essential piece of equipment. Much landscape shooting occurs in low-light conditions (e.g., early morning and late evening), and if you don’t use a tripod, you’ll need to increase your ISO, which will in turn degrade image quality.

Additionally, if you want to capture a scene using a long-exposure technique (when photographing moving clouds or water, for instance) then unless you have a tripod on hand, you simply won’t be capable of creating sharp photos.

Good landscape tripods can be pricey, but I encourage you to really invest. A sturdy model can last years, and it’ll dramatically increase your photographic capabilities!

6. Maximize the depth of field

12 Tips for Stunning Landscape Photography

The best landscape photos are usually sharp throughout, from the nearest foreground object to the most distant background element – and to achieve such a deep depth of field effect, you’ll need to carefully adjust your camera settings.

Start by setting your camera to Manual mode or Aperture Priority mode, then choose an aperture of f/8 or narrower. (For very deep scenes, you may want to shoot at f/13 or even beyond.)

Focus about a third of the way into the scene, then take a test shot. Zoom in on your LCD and check for sharpness in both the foreground and the background. If portions of the shot aren’t sharp, try narrowing the aperture or tweaking the point of focus. Eventually, you should get your desired effect, though if you’re struggling, you can always try using a focus-stacking technique where you capture multiple images and blend them together in Photoshop.

KD-2016-DPS-Landscape Tips-4

7. Use landscape composition techniques

Composition – that is, the arrangement of different elements in your images – is an essential part of good landscape photography. And while it’s possible to improve a composition through cropping, you should always aim to get it right when out in the field.

So how do you capture great compositions? Start by training yourself to use various techniques, such as the rule of thirds, leading lines, and symmetry. Learn the techniques, then experiment with applying them in real-time. As you practice, you’ll become better and better at honing your compositions, and the process will eventually become second nature.

8. Don’t forget to bring filters

Every landscape photographer should carry two types of filters:

Neutral density (ND) filters and polarizers. Often, you’ll find yourself needing to manipulate the available light, and that’s what these filters do best.

For example, if you’re taking photos that include water, you may wish to avoid reflections from the sun. A polarizer will minimize the reflections and consequently enhance the colors (i.e., the greens and blues of the water). It’s important to remember, however, that polarizing filters often have a limited effect if you’re facing into the scene or turned so the sun is at your back. For the most dramatic results, position yourself between 45° and 90° in relation to the sun.

KD-2016-DPS-Landscape Tips-2

Another big challenge in landscape photography? Getting an exposure that shows movement in clouds and water – even when the light is bright. A neutral density filter will block out the light so you can extend your shutter speed without overexposing your files.

Note that you should choose your filters carefully. There are a lot of cheap polarizing filters and ND filters available on Amazon and eBay, but they rarely work well and will instead decrease image quality. A good set of filters is expensive, but it’s definitely worth the investment.

9. Use the histogram

A histogram is a simple graph that displays the different tones in a file. The left side of the graph corresponds to dark tones, while the right side of the graph represents bright tones.

Most modern cameras allow you to access the image histogram moments after you’ve pressed the shutter button (and some cameras even let you see a histogram preview in advance!). So after (or before) you take each image, give the histogram a look. If the majority of the graph is shifted to one side, it’s an indication that the photo is too light or dark (i.e., overexposed or underexposed).

Overexposure or underexposure isn’t necessarily bad – some images look good either way or can be processed to look great – but if you find that the histogram peaks push up on the right or left edge of the graph, that’s a sign that you’ve lost detail in your images, which is rarely ideal. So if you do notice this issue, make a slight adjustment to your camera settings and reshoot.

10. Never settle for a good photo

This is true no matter the genre of photography. It doesn’t matter if it is a landscape or a portrait; if you can do it better, then you should.

But often because of the time and effort that landscape photography requires, people settle for a good photo rather than waiting or coming back later to take a great one. In my view, you should always aim to photograph your subject at the best possible time, in the best possible way, even if that means waiting or coming back later.

Of course, you may not always have the option to come back down the line, and if that’s the case, don’t simply ignore a landscape because you can’t capture a perfect shot. Aim to do your best, even if it’s not perfect.

KD-2016-DPS-Landscape Tips-1

11. Shoot in RAW format

This landscape photography tip is quick but essential:

If your camera is capable of capturing photos in RAW format, then you should always capture RAW files. They contain much more information, and they give far greater flexibility in post-production.

Remember, you can always save RAW files in any other formats after the fact, but you will not be able to save JPEGs as RAW files; if you shoot in JPEG, you’re ultimately limited by the level of compression.

12. Experiment

For all the techniques and rules that exist to help aid your compositional and settings choices, there is always room to experiment. The beauty of digital photography is that taking a photo isn’t wasting a negative (and costing money), so there is ample opportunity to break the rules and even your own style sometimes.

Even if the majority of the time the experimental images don’t work and you’re disappointed in the result, that’s completely okay. You’ll still learn something new – and every now and again, you might end up with a gem!

KD-2016-DPS-Landscape Tips-5

Landscape photography tips: final words

Landscape photography is one of the most rewarding genres you’ll ever encounter – and while it might seem difficult, with practice, hard work, and patience, you can capture stunning landscape photos that will look great in your portfolio.

So take some time and think about potential landscape opportunities. Go for a hike. Peruse Google Earth. Then spend some time with your camera!

Now over to you:

Do you have any landscape tips you want to share? Which of these techniques do you plan to use first? Share your thoughts in the comments below!

The post 12 Tips for Stunning Landscape Photography appeared first on Digital Photography School. It was authored by Kav Dadfar.


it's from Digital Photography School https://ift.tt/gkvWXsf
via Kav Dadfar

[Photography] dPS Weekly Photo Challenge – What is it?

The post dPS Weekly Photo Challenge – What is it? appeared first on Digital Photography School. It was authored by Sime.

We’re trying something a little different this week, a slight twist if you will! This week your challenge is to make an abstract photograph, and share it, but then take a look at images shared by others and see if you can guess what their photographs are of! Leave comments, take a guess, have a little fun with it.

WHAT IS IT?

I’ve just spent 8 minutes 42 seconds making three photographs within a couple of meters of my desk (honestly, it only took two minutes, I had to pat my dog for the other 6 minutes) so here they are (and don’t worry, for those playing at home, they’re not radishes!)

Use the hashtags #dPSWeeklyChallenge and #dPSWhatIsIt in your posts this week!

dPS Weekly Photo Challenge – What is it?
What is it? This one’s easy!
dPS Weekly Photo Challenge – What is it?
Surely someone will get this one!
dPS Weekly Photo Challenge – What is it?
Maybe this one’s more difficult?

Leave your cryptic photograph, and your guesses down below or over in our Facebook Group (or in both places!)

Right! I’m off to bed, school sports starts again in the morning, and I must remember to charge my…. [literally stopped here, mid sentence, and put my batteries on charge!] …camera!

Have a happy week, be kind to strangers.

–Simon

The post dPS Weekly Photo Challenge – What is it? appeared first on Digital Photography School. It was authored by Sime.


it's from Digital Photography School https://ift.tt/2kleIgv
via Sime

Feb 2, 2023

[Photography] Tripod vs Monopod: Which Should You Use?

The post Tripod vs Monopod: Which Should You Use? appeared first on Digital Photography School. It was authored by Daniel.

Tripod vs monopod: Which should you use?

Tripods and monopods are popular camera accessories designed to keep your camera and lens stable. But while both products have their benefits, they’re not identical – and they also come with several major (but different) drawbacks.

In this article, I share everything you need to know about tripods vs monopods. I discuss their advantages, their disadvantages, and I explain which one is the better choice for your needs.

Let’s dive right in!

What is a tripod?

Pretty much every photographer, from beginner to professional, has seen a tripod; it’s a three-legged accessory that supports camera rigs.

Tripods vs monopods

With your camera mounted to a tripod, you’re free to walk around, investigate different compositions, even leave the scene and come back – though as I explain below, the primary benefit of a tripod is its stability, which allows you to eliminate camera shake and create stunning long-exposure images.

Note that tripods vary widely in terms of maximum and minimum height, sturdiness, and weight. You can grab lightweight tabletop tripods that can literally fit in a purse, and you can also purchase huge carbon fiber tripods that are cumbersome to carry but are rock-solid in the field.

What is a monopod?

A monopod, as the name suggests, is like a tripod, except it has only one leg:

Tripods vs monopods

You might think of a monopod as a walking stick for your camera. It’ll support a camera rig, it’ll improve stability, but it won’t stand on its own. As you can probably imagine, this comes with various drawbacks – discussed in detail below – but also several major advantages, including greater speed and flexibility.

Like tripods, different monopods offer different levels of sturdiness, heights, and weights.

Tripod vs monopod: tripod benefits

Many professional photographers prefer tripods over monopods, for two key reasons:

1. Tripods are far more stable

Tripods vs monopods

While a monopod can reduce camera shake – leading to sharper photos, especially in low-light scenarios – a sturdy tripod can eliminate camera shake completely.

With a tripod, you can capture long-exposure landscape photos that feature a mix of tack-sharp detail and motion blur (due to moving water and clouds). That’s why tripods are heavily favored by landscape photographers and astrophotographers; without a tripod, their long-exposure shots would be soft throughout, and though a monopod might somewhat reduce this softness, it just isn’t stable enough to get pro-level results.

Tripods are also favored by product and still-life photographers. Often, these photographers need to focus stack (i.e., capture several identical images with different focus points), and a sturdy tripod is essential for maintaining the camera position as they fire off multiple shots.

2. Tripods force you to slow down

Tripods vs monopods

Most photographers don’t really think about this, but tripods are slow to set up. And while this can be a drawback (see below!) it can also be a benefit.

The extra effort that goes into tripod setup forces you to really think about each composition and whether it’s genuinely worth pursuing. And as you set up the tripod, you may notice other composition opportunities that you wouldn’t have considered had you been working with a (much faster) monopod.

Tripod vs monopod: tripod drawbacks

Tripods are invaluable photographic accessories, yet they come with plenty of difficulties. Here are a few key downsides to consider:

1. Tripods are expensive

Tripods vs monopods

There are a lot of cheap tripods on the market. Unfortunately, these products tend to be very low quality, which means that they’re often very difficult to use and they won’t keep your camera steady in most (if not all) cases.

Good, sturdy tripods that are capable of capturing long-exposure images often cost a pretty penny. Many photographers purchase tripod legs and the tripod head separately; depending on your desired stability, portability, and features, expect to pay $500+ for a satisfactory model.

2. Tripods are cumbersome and inconvenient

Nearly every tripod ever made – regardless of the price – has been far more cumbersome than a standard monopod. (The exception is tabletop tripods, though these are limited in their functionality.)

Tripods are heavier than monopods, which means that you may start to feel fatigued or even frustrated carrying one around all day. They’re also more difficult to pack in a camera bag or a suitcase, and when fully extended, they can get in the way (which is why tripods can often cause problems when used along busy city sidewalks, for instance, and why tripods are often banned from museums and other popular attractions).

3. Tripods are slow

I know, I know; in the previous section, I claimed that the slow, deliberate tripod approach was beneficial! And that’s true – it can be helpful – but in certain situations, it can also be a drawback.

For instance, if you’re photographing from the bleachers at a football game, every time you change position, you’ll need to fold up your tripod legs. Then, once you’ve found your new spot, you’ll need to get set up again, during which you may miss out on some key images.

In other words, when you’re working in a fast-paced scenario, a monopod is likely the better accessory to have; it’ll keep your camera sturdy, but it won’t take precious seconds to set up and take down and set up again.

Tripod vs monopod: monopod benefits

Tripods might be the more popular option, but monopods certainly have their place. Here’s why:

1. Monopods are faster and more flexible

Tripods vs monopods

Sports photographers love to use monopods. You can set up a monopod in seconds, and once your camera is mounted to the monopod head, you’ll never have to take it off.

Action is happening at the far end of the field? No problem! Just grab your entire rig and sprint into position. Because monopods are so much slimmer than tripods, you won’t have to worry about hitting pedestrians or other photographers along the way.

And because monopods are so much lighter than tripods, they’re easy to carry around without getting tired. In fact, a monopod will prevent fatigue by supporting your heavy lenses.

2. Good monopods cost less

Tripods vs monopods

As I explained above, tripods can be very pricey, especially if you’re looking for a model that can handle difficult outdoor scenarios.

But a solid monopod costs nowhere near as much. You can grab a very nice monopod for around $100 – one that you can use in plenty of situations – though you’ll generally need to buy a head separately, so do bear that in mind before purchasing.

Tripod vs monopod: monopod drawbacks

Monopods come with one major disadvantage:

1. A monopod won’t keep your camera rock-steady

Monopods are great, and they certainly allow you to shoot for long hours without arm fatigue and lower your shutter speed while capturing sharp photos.

But a monopod, no matter the quality, won’t keep your camera completely steady. You can’t use a monopod to capture a 10-second long-exposure shot, which is the reason landscape photographers (and other long-exposure fine-art photographers) almost never use them.

Tripod vs monopod: which should you choose?

Tripods vs monopods

Tripods and monopods both offer lots of support for your camera, and they both have their place in a photographer’s toolkit. However, there are a handful of scenarios where a monopod is better than a tripod or vice versa.

Specifically, I recommend purchasing a monopod if:

  • You often shoot in fast-paced scenarios where speed is key
  • You work with long lenses and want to give your arms a break
  • You need a bit of extra stability but aren’t looking to capture long-exposure shots
  • You work in low-light scenarios and want to be able to marginally lower your shutter speed without issue

On the other hand, I’d encourage you to buy a tripod if:

  • You want to capture long-exposure images of landscapes, cityscapes, or the night sky
  • You don’t mind working at a slower pace
  • You’re willing to spend significant money for a quality product
  • You need to capture multiple images with identical framing

Tripod vs monopod: final words

Now that you’ve finished this article, you know the benefits and drawbacks of tripods and monopods – and you’re hopefully ready to make a purchase.

Remember that tripods and monopods are both excellent pieces of equipment. The key is to figure out what you want to shoot, then make your purchase accordingly.

Now over to you:

Which do you plan to use, a tripod or a monopod? Have you tried either option before? Share your thoughts in the comments below!

The post Tripod vs Monopod: Which Should You Use? appeared first on Digital Photography School. It was authored by Daniel.


it's from Digital Photography School https://ift.tt/km60Gwb
via Daniel

Feb 1, 2023

[Photography] 6 Tips for a Faster Lightroom Workflow

The post 6 Tips for a Faster Lightroom Workflow appeared first on Digital Photography School. It was authored by Simon Ringsmuth.

6 tips for a faster Lightroom workflow so you can get back to taking photos

Many photographers rely on Lightroom to organize, edit and share their photos. While the program has a vast array of tools, it’s not exactly known for its speed. Recent updates have helped, but if you’re seeking a faster Lightroom workflow, there are a few simple steps you can take to supercharge your post-processing.

And that’s what I share below: Six easy methods to speed up your editing and organizing in Lightroom. They aren’t hacks or plugins; instead, they’re simple tweaks that are guaranteed to save time, improve your results, and make your life a lot easier.

So without further ado, let’s dive right in, starting with:

1. Apply a preset when importing images

The first thing you can do for a faster Lightroom workflow? Apply a preset on import.

Lightroom’s Develop module has a mind-boggling array of options to try and sliders to adjust. If you use the same types of edits on most – or even some – of your pictures, you can use Presets to shave hours off your workflow time. If you’ve been using Lightroom for a while, you probably know this already, but you might not be aware that you can actually apply Presets when initially importing files.

On the right side of the Import screen, there is an Apply During Import option. Use this to select one of Lightroom’s many built-in presets (or select one of your own presets that you’ve previously saved) and ensure that it’s automatically applied to your pictures on import:

Faster Lightroom workflow tips

In the screenshot above, you can also see an option called Nikon RAW Import. It’s a custom preset that contains specific adjustments I like to regularly apply to my Nikon RAW files, which gets me to a good starting point when editing. That alone has helped speed up my workflow, and applying it to a batch of photos on import is an even greater speed boost.

By the way, there’s no need to worry about messing up your images when applying import presets. Like everything else in Lightroom, the adjustments are non-destructive, meaning you can always go back and change things later.

2. Sync settings across multiple images

If you’ve spent time editing multiple similar images in Lightroom, particularly from an event or photo session with clients, you have no doubt found the Copy/Paste Settings option to be useful. Right-click on any image in the Develop module and choose Settings>Copy Settings. Then check the boxes next to any (or all!) of the settings you want to copy.

Next, go to another photo, right-click, and choose Settings>Paste Settings. (Or better yet, use Ctrl/Cmd+C and Ctrl/Cmd+V as you would with any word processor.) The adjustments will immediately be applied to the selected photo!

This process works great, but what if you want to paste your settings onto 5, 10, or 100 images? Even the keyboard shortcut method starts to feel like a chore.

Fortunately, there’s a better way.

Make sure you’re in the Develop module, then select a single picture in the filmstrip at the bottom of the screen. Hold down the Shift key and select more images. Finally, click the Sync… button to synchronize any (or all) of your edits from the original image to the rest:

Faster Lightroom workflow tips
Image 21 is selected, and Images 17-20 are highlighted. After clicking the Sync… button, all the edits from Image 21 will be applied to Images 17-20.

When I discovered this trick, I almost fell out of my chair. It didn’t just speed up my Lightroom editing; it supercharged it!

Faster Lightroom workflow tips
I captured dozens of photos of this wasp. The Sync Settings option let me edit a single image and then apply those edits to my other wasp images in an instant.

3. Straighten your pictures with the Auto button

I’m always a little leery of using anything that says “Auto” when I’m editing photos. I don’t need my computer to do what it thinks is best – I want my computer to do what I think is best! Therefore, while I occasionally use some Auto options (like when setting the white balance for RAW files), I think of these as providing a rough draft that I then go and refine.

However, there is one Auto setting that I have learned to use over and over again: Auto Straighten. It may seem trivial, but if you want your photos to look professional, it’s important that you straighten (or at least check) each and every image. Learning to embrace this Auto setting has saved me a lot of time and has genuinely led to an overall faster Lightroom workflow.

Simply select the Crop tool in the Develop module, find the Auto button, and give it a click:

Faster Lightroom workflow tips

If your image is crooked, it’ll suddenly straighten up:

Faster Lightroom workflow tips
My tripod was askew when I shot this, but Lightroom fixed it with a simple click of the Auto button.

The reason Auto works so well for straightening images (but often fails in other scenarios) is that it doesn’t try to guess the artistic goals of the photographer. It simply looks for straight lines – such as light poles, buildings, or horizons – and then adjusts images accordingly.

No, it’s not perfect, but it works far better than I initially anticipated, and it certainly speeds things along!

4. Automatically organize images with Smart Collections

Lightroom Collections are an easy way to organize your images. You can create as many Collections as you want, and one photo can exist in multiple collections. What you may not realize, however, is that Lightroom lets you create Smart Collections, which are populated dynamically according to your specified rules.

To create a Smart Collection, choose the + button at the top-left of the Collections panel. Then select Create Smart Collection… and specify your parameters as required:

Faster Lightroom workflow tips

I create Smart Collections that sort my photos by month. I do this each January, and for the rest of the year, my photos are automatically sorted month by month:

Faster Lightroom workflow tips

These Smart Collections don’t include any photos with the keyword “PhotoSession,” which I apply to any images taken for clients. Photos with that keyword go in another set of Smart Collections that I use to keep client images separate from personal photos.

You can use Smart Collections to organize your photos by adjusting dozens of parameters, including Rating, Pick Flag, Color Label, Keyword, and even metadata such as the camera model and lens focal length. They are an incredibly powerful yet amazingly simple way to make your day-to-day Lightroom organization significantly faster!

5. Use multiple export presets

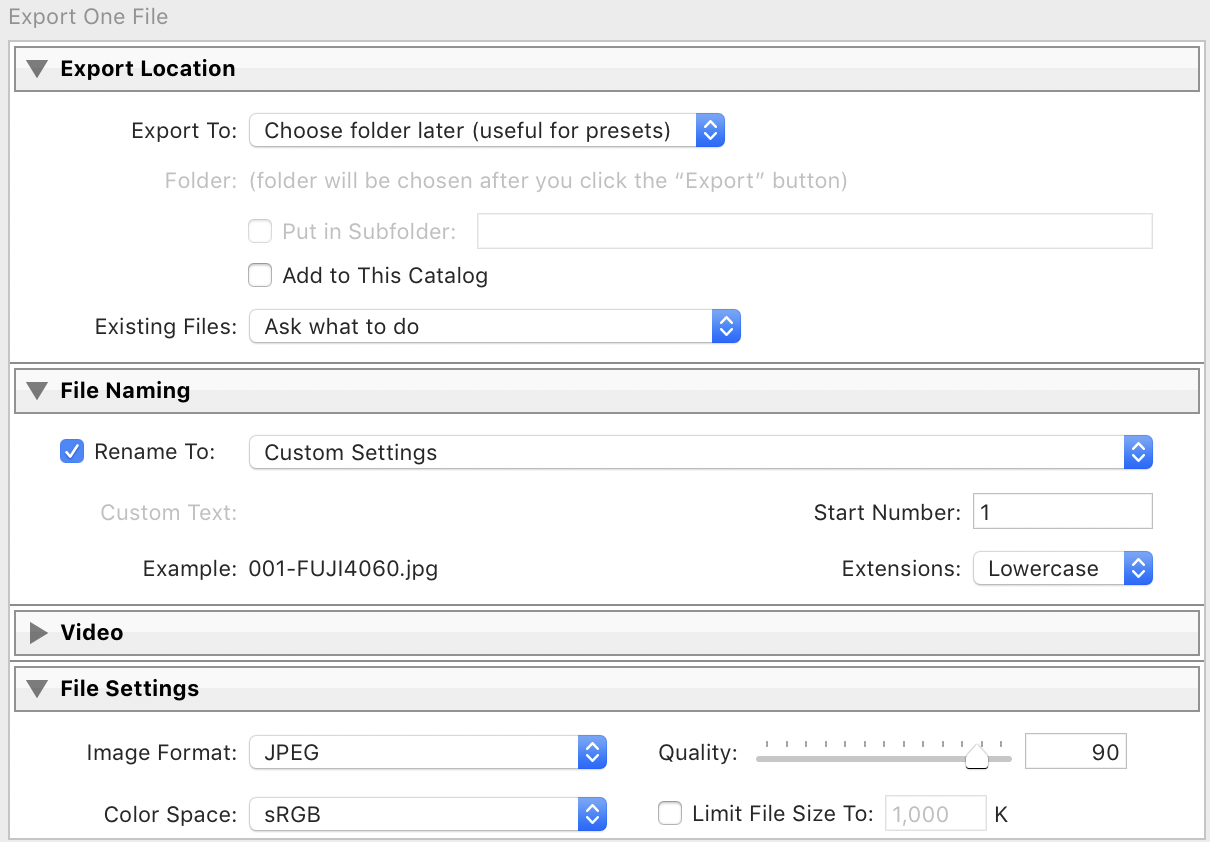
Lightroom has long offered customizable export presets. These allow you to export photos with certain parameters, such as file type, image size, quality setting, and even with custom names.

Faster Lightroom workflow tips

Yet starting just a few years ago, Lightroom now lets you perform a single export operation that utilizes multiple Presets. This means you no longer have to do an export operation for full-size JPEGs at 100% quality, another export for low-resolution proofs at 80% quality, and so on.

Just check the Export presets you want to use, and Lightroom will take care of the rest:

Faster Lightroom workflow tips

This is a great way to save time when you’re ready to export your images, and though it’s not the kind of workflow addition that will change your life, it’s another effective process that’s guaranteed to shave precious minutes from your editing. (And as someone who exports a lot of photos regularly, those minutes add up!)

6. Cull using Lightroom Mobile

One of my favorite aspects of the Adobe Creative Cloud Photography plan is the synchronization between Lightroom Classic and Lightroom Mobile. While the mobile version of Lightroom isn’t as full-featured as its desktop-based big brother, it does one thing incredibly well that has made a huge difference for me when editing photos for clients: culling.

Here’s how it works:

First, click the checkbox next to any Collection to sync the photos with Lightroom CC. This means you’ll be able to access low-resolution previews of those files on the web, on your phone, or on your tablet. (Note that this doesn’t work with Smart Collections, only regular Collections.)

Faster Lightroom workflow tips

Open up Lightroom Mobile on one of your devices, load a picture in a Collection that you’ve already synced, then click the Star icon in the right-hand corner:

Faster Lightroom workflow tips

This switches to a mode where you can quickly assign star ratings or flags to any picture. Tap one of the Flag or Star icons at the bottom of the screen, then swipe with your finger to load the next image.

All your edits on Lightroom Mobile, including Star ratings and Flag statuses, will instantly be synced back to Lightroom Classic on your computer.

And here’s another little trick that will send your culling into overdrive:

Instead of tapping on the Star rating and Flag icons, simply slide a finger up or down on the right side of the photo to change the Flag status. Slide a finger up or down on the left side to assign a Star rating. Then swipe to the next image and repeat.

I used to dread the arduous culling process, but thanks to this clever syncing technology, I can work so much faster. A few weeks ago, I returned from a photo session with over 1,100 images. In about an hour, I was able to cull them to a fraction of that amount in Lightroom Mobile.

I don’t find Lightroom Mobile particularly useful for detailed editing, but it absolutely runs circles around the desktop program when performing culling operations. If you have an iPad, it could honestly change your entire approach to culling your images. It also works pretty well on other mobile devices, too.

Faster Lightroom workflow tips
There were hundreds of images from this session that I had to sort through. Lightroom Desktop makes this a burden, but with Lightroom Mobile, it’s a breeze!

Tips for a faster Lightroom workflow: final words

I hope you found this article helpful; all six of the techniques I shared have saved me a huge amount of time over the years.

So head over to Lightroom and test out a few of these suggestions. See what you think. With any luck, they’ll dramatically speed up your workflow!

Now over to you:

Do you have any other tricks or suggestions for a speedier Lightroom workflow? Share them in the comments below!

The post 6 Tips for a Faster Lightroom Workflow appeared first on Digital Photography School. It was authored by Simon Ringsmuth.


it's from Digital Photography School https://ift.tt/IFVAdkj
via Simon Ringsmuth