Low-angle photos give us a completely different view of the world.
Most of our lives are spent well above ground level – by the time we are teenagers, we rarely find ourselves crawling around on the floor. Yet there’s a whole other world down there, an alternative perspective that provides an eye-opening, even shocking, experience.
Therefore, when done well, low-angle photography can create genuinely striking shots. With a bit of low-angle compositional magic, you can show a boring, everyday scene in a new light.
But how can you capture beautiful images? In this article, I share my top seven tips for amazing results, starting with:
1. Use your rear LCD
When taking low-angle photos, it’s important that you start by acknowledging that you will not be able to look through your viewfinder most of the time. (A lot of the best shots are captured so low to the ground that only the smallest of frogs could take a peek!)
Instead, you’ll need to compose via your camera’s rear LCD screen. If possible, use a camera with a fully articulating or tilting screen; that way, you can frame each photo without needing to physically get down on your camera’s level. (If you’re serious about low-angle photography – that is, if you plan to do it regularly – and you don’t have a tilting screen, you may want to consider purchasing a camera that does. This feature makes a huge difference!)
Shooting without a tilting LCD is hard but not impossible. You’ll need to work partially by feel, but you can also do your best to get physically low to the ground and do approximate framing via the screen, even if you aren’t able to achieve a perfect viewing angle.
2. Use a wider lens
Wide-angle lenses facilitate perspective distortion, which causes scenes to appear more expansive (as opposed to compressed). And this effect looks amazing in most low-angle photography, in part because it specifically emphasizes the low-angle effect. Yes, you can capture low-angle shots with a telephoto lens, but the down-low perspective will be less obvious, and you’ll lose that sense of the scene rushing away from the viewer into the distance.
Here’s an example of a shot taken with a wide-angle lens:
So how wide is wide enough? If you’re using an APS-C camera, a lens in the 10-22mm range will work beautifully, though you can also get great results with an 18-55mm or 16-50mm kit lens. If you’re using a full-frame camera, a 24mm lens is a good choice, but for an even more extreme effect, try using a 16-35mm zoom or even a 12-24mm option.
3. Maintain a deep depth of field
Almost by definition, a low-angle shot will have elements in the near foreground and the distant background – and the best photos tend to keep all of these objects in sharp focus. In other words, it’s important that you maximize the depth of field in your photos so foreground and background objects are crisp and detailed.
One way to increase the depth of field is to back away from your foreground subject, but this is often counterproductive as it will destroy that breathtaking low-angle effect. So you’ll instead need to narrow your lens’s aperture.
Technically, you can just crank the aperture to f/22 (or whatever your lens allows), but this can actually decrease sharpness due to something called diffraction. The better move is to only narrow the aperture as much as you need; f/8 is a good starting point, and while you can stop down to f/11 or even f/16, watch out for diffraction. Ultra-narrow apertures such as f/16 also have another drawback: They require slow shutter speeds to keep the images well-exposed, so it’s difficult to shoot without a tripod.
My recommendation? Start with f/8 and see what you get. Even if the shots aren’t perfectly sharp from front to back, as long as the foreground and background objects are relatively clear, you’ll still end up with a usable shot. This next image isn’t perfectly sharp throughout, but the depth of field is large enough that the composition works well:
4. Make sure your camera is level
Whenever you set your camera low to the ground, don’t just compose and immediately fire your shutter. Instead, take an extra second to ensure your horizontal lines are perfectly straight.
A crooked horizon is one of the easiest ways to tell beginners from professionals, so believe me when I tell you that you should avoid a tilted frame at all costs.
Now, it’s true that you can straighten a crooked horizon in pretty much any editing program. But the straightening process will crop your image, which means you’ll lose information around the edges. This isn’t always a problem, but it can be, so it’s best to just get it right in the field.
Some mirrorless cameras actually offer electronic levels, but if this isn’t an option, you can always purchase a little bubble level that mounts on your camera’s hot shoe and makes leveling a quick and painless process.
5. Watch for blown-out skies
Because low-angle shots are, well, low, they often include a portion of the sky in the frame, like this:
After all, to capture the shot, you’re pointing your camera up from down low.
Including the sky isn’t necessarily a bad thing (and it can enhance your shots by adding interest or creating cool foreground silhouettes). But if you’re not careful, you’ll end up with a white, detailless sky, which often doesn’t look so great.
You see, skies are generally far brighter than foregrounds, and because every camera has a limited dynamic range, it’s often difficult to include detail throughout the entire frame – dark foreground and bright sky. Because many low-angle shots include more foreground than sky, your camera will often automatically expose for the foreground and turn the sky bright white.
Fortunately, there are a handful of techniques you can use to deal with this problem:
You can choose your exposure values extremely carefully so as to strike a perfect balance between foreground and sky. As long as your camera’s dynamic range is large enough and you choose your exposure values carefully enough, you can retain detail in both the sky and the foreground.
You can shoot multiple bracketed frames, then blend the files together in an editing program. This process is time-consuming and works best if you shoot from a tripod, but you can also keep your framing consistent by placing your camera against the ground.
You can accept the limits of the scene. In other words, you pick between underexposing the foreground or overexposing the background and roll with it. If the sky is highly interesting, underexpose to maintain cloud detail. If the foreground is incredible, overexpose and accept that the sky will be blown out.
Regardless of the approach you choose, make sure you pay careful attention to the sky. A well-rendered sky can be the difference between a great shot and a bland one!
6. Include a clear subject
While a low-angle perspective is very powerful, a shot that relies solely on the angle won’t really impress the viewer. It’s important to include a compositional point of focus in each image; that way, the viewer knows where to look!
Note that your point of focus can be anything: a rock, an apple, a bird, or a person. You don’t necessarily need to include a breathtakingly beautiful or especially interesting main subject. As long as you have some element to catch the viewer’s eye, your shot can work.
Note that a low perspective will often make small objects look huge – as if they’re towering over the camera. This can be a great way to impress the viewer and make them feel like a tiny insect surrounded by giants.
One tip: Make sure you position your subject carefully in the frame. If the main area of interest is right in the middle of the shot, the composition might feel a little static. Consider using the rule of thirds to add some dynamism!
7. Shoot, review, and repeat
This is where the digital photographic process can be wildly helpful. While I’m not a fan of reviewing every shot on a camera’s LCD, learning rapidly from your mistakes has never been easier. Take advantage of this technology!
As soon as you’ve taken a few shots, peek at the back of your camera and see what you think. How is the exposure? The composition? The sharpness? The lighting? Consider what you might change to make the image better, and reshoot until the image you want is captured. Over time, you’ll get better at nailing each and every photographic variable so you can get each shot right from the start, but when you’re just a beginner, your camera’s playback function will be invaluable.
Repeatedly reshooting a subject will result in quite a few duplicate images, so you’ll have your photo-organization work cut out for you. When you get back home, make sure you select the best shots and separate them from the rest. (If you like, you can delete all the failed shots, though you should be very careful; there’s always the possibility that you’ll change your mind about an image or two later on!)
You should also spend time reviewing your best images so you can understand precisely what made them so great. Thanks to this thoughtful analysis, you’ll become better and better at identifying opportunities for low-angle photos.
Low-angle photography: final words
Now that you’ve finished this article, you know how to capture breathtaking photos from a low perspective.
So head out with your camera, get down in the dirt, and see what you can create. Photograph people, animals, trees, flowers, buildings, street scenes, and more. It’ll be a ton of fun – I guarantee it!
Now over to you:
What low-angle subjects do you plan to photograph? Do you have any tips that we missed? Share your thoughts in the comments below!
Emotions can be easy to capture in a photograph, but sometimes you need to be in the right place at the right time to photograph an expressed feeling. This week we’re trying to freeze the emotion of sadness in a photograph – how will you do it?
Use the hashtag #dPSWeeklyChallenge and #dPSSadness in your posts on social media so we can find them.
Remember, sadness doesn’t need to be a portrait of a person, like this beautiful example below:
Emotion can also be expressed through a scene, like this example below of a landscape (Black & White tends to lend itself to the sadness emotion, don’t you think?)
If you shoot in RAW and you want your photos to look realistic, photo editing is a necessary step in the photographic workflow. Unedited RAW files simply do not look like what you saw with your eyes! For instance, in high-contrast lighting, the human eye can see more detail in the highlights and the shadows – and when faced with colorful subjects, RAW shots just don’t have the same pop as the real-life scene.
That’s where RAW photo editing in Lightroom comes in handy. With a bit of effort, you can balance the light and color to get your photos looking lifelike – so they more closely match the view you experienced.
In this article, I offer five easy tips to ensure you can effectively edit your RAW photos in Lightroom. That way, the next time you capture a batch of RAW files, you know exactly how to process them for outstanding results!
Let’s dive right in.
1. Don’t believe what you see
Many photographers review their images on the camera’s rear LCD screen and find them to be colorful and punchy – but then are confused when the shots look flat and dull on the computer. “What happened to my vibrant, contrasty image?” they ask.
Here’s what’s going on: What you see on your camera screen is a JPEG photo, not a RAW file. The JPEG is automatically processed by your camera to look more true to life, but when you import the RAW image into Lightroom, all your camera’s processing disappears, and you gain access to the original, unaltered file.
Fortunately, this has major benefits. For instance, the JPEG image may show a lack of detail in certain areas – the extreme highlights and shadows – yet the RAW file retains that information. When you process the RAW file in Lightroom, you can carefully tweak the tonal sliders to recover this detail and create a far superior image.
But it’s essential that you account for this when out shooting with your camera. If you want to capture the most detail, spend time understanding precisely how your camera renders JPEGs and RAW files, and know how your camera’s RAW files respond when you post-process them. That way, you can have a sense of what’s achievable when you view the images in the field.
Here’s an original, unedited photo.
Here’s the same image; it’s been edited to look more vibrant and realistic.
2. Don’t be afraid to use (and make) presets
Lightroom has many presets, which let you make dramatic changes to your shots in a single click. Some of these presets come with the software, while others can be downloaded online and added to your Lightroom collection.
Many presets, when applied, will give your photos a somewhat surreal look. You can create images with cinematic effects, incredible vibrancy, artistic fades, film-like colors, and more. Many of these looks will be gimmicky, but if you put in the effort, you can find presets that will make your images look natural and lifelike.
Spend some time looking through Lightroom’s built-in preset collection. Test out the different options, and see if you can find any you like. As I mentioned above, you can also find presets online, so if you don’t like any of Lightroom’s included offerings, that’s a solid option.
Another approach is to make presets of your own. This isn’t hard to do, and it’s a great way to develop presets that are particular to your editing style.
My RAW image with a preset applied.
You can choose presets that look however you like – it’s your photos, after all! – but if you’re looking to make your RAW photos more realistic, then you should be somewhat restrained in your approach. When making your own presets, don’t push the sliders too far, and don’t go for wild color shifts or major tone curve adjustments.
Also, when you develop presets for a natural-looking result, keep in mind how you saw what you photographed. How was the lighting? Was it high or low contrast? Did it have a warm or cold cast? Was it more neutral? What did the colors look like? If you consider the reality of a scene, then you can accurately recreate it during RAW photo editing.
Thinking about what you saw when you were taking your photos will help you create more realistic edits, but it’s not always possible to remember clearly. That’s when you need to think objectively and aim to find a balance in lighting, contrast, and color when you working on editing, as I explain in the next section:
3. Find a balance
As I emphasized in the previous tip, it’s easy to go off the rails when editing RAW photos in Lightroom and end up with highly unrealistic results. Now, a lack of realism isn’t bad if it’s your goal, but most shooters are interested in creating images that accurately reflect how they saw the scene.
Therefore, it’s important that you always think about achieving the right balance when shooting. You generally don’t want to adjust every slider, but should instead focus on using small tweaks to the main sliders until you get a nice result. In Lightroom, the sliders I use most often to achieve a natural effect are:
Temp
Exposure
Highlights
Shadows
Blacks
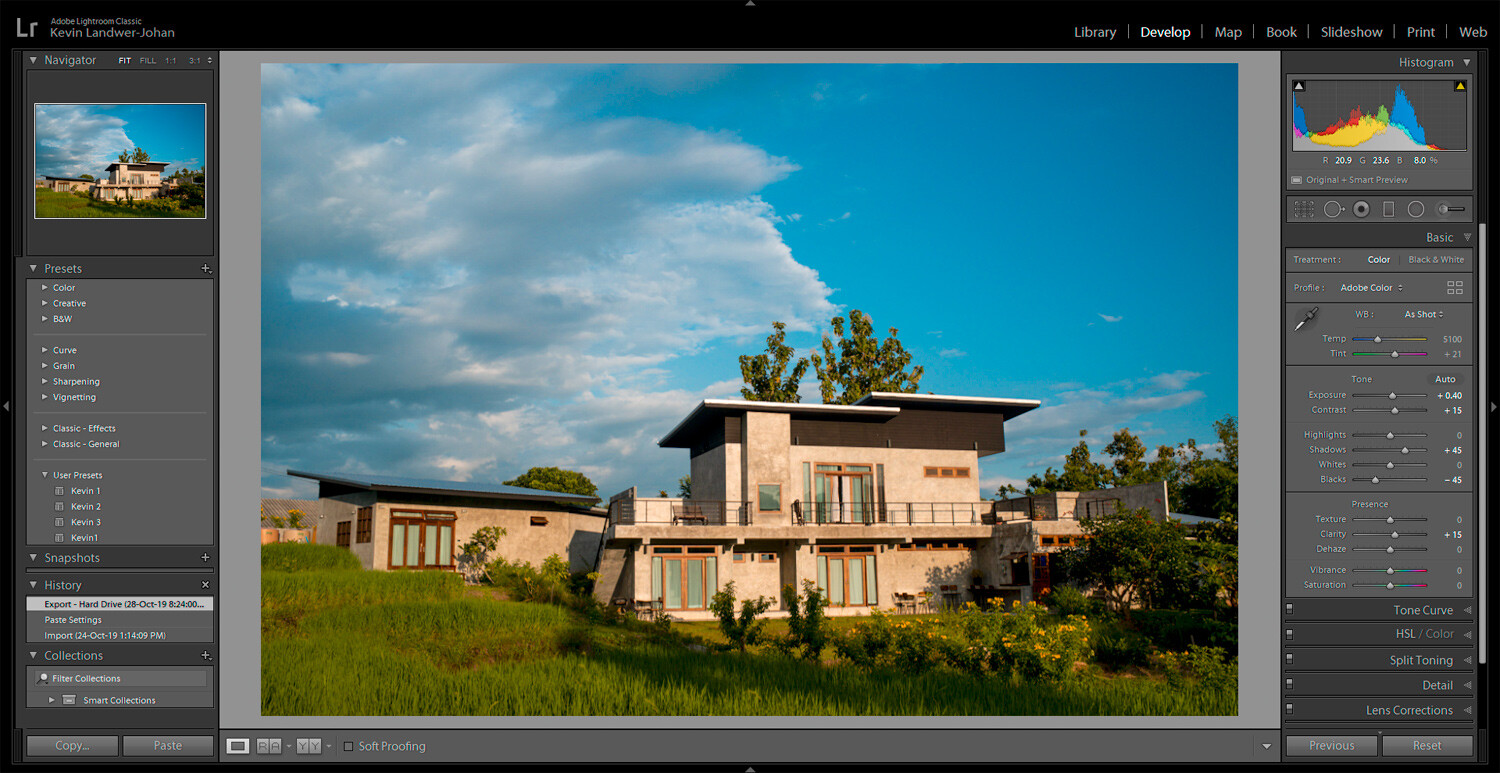
Use the sliders in the Develop module to make photos look life-like!
I use the other sliders less often (their use depends on the lighting conditions at the time of capture). At times, I will make alterations to individual colors using the Saturation and Luminance sliders, which you can find in the HSL panel.
Photos taken at different times of the day and night require different edits to suit the lighting. For instance, photos taken on a sunny day will require different editing compared to photos you take when it’s cloudy or indoors. Whether the light is high contrast or low contrast will also make a difference.
I know I mentioned this above, but it bears repeating: Don’t overdo your adjustments. Avoid pushing sliders to their extremes. This will help you achieve a far more realistic outcome. Additionally, once you start maxing out the sliders, you’ll find that image quality begins to deteriorate. Pixelation, banding, and other imperfections will begin to appear, plus you’ll often lose detail in key areas.
4. Adjust the highlights and shadows
Lightroom’s RAW photo editing technology – and RAW photo editing technology in general – has its limits. These depend primarily on the original file; if your RAW shot doesn’t contain detail in the highlights and shadows, you won’t be able to bring it back, even with extensive Lightroom processing.
However, every RAW file contains more detail than might be immediately apparent, and bringing back this detail is essential to creating realistic edits. That’s why I recommend you check the highlights and the shadows of each image, and if you notice a loss of detail, take steps to recover it.
Specifically, bringing down the highlights and boosting the shadows will bring back lost information and make the file look more true to life. You can use Lightroom’s Highlights and Shadows sliders to do this – however, it’s important that you first correct the exposure (using the Exposure slider), or else you may struggle to get a good result.
Here, the histogram is your friend. While there’s no single best histogram, watch for peaks that push up against the sides of the graph (because these indicate a loss of detail!).
And don’t just think about exposure and detail recovery when processing. Make sure that you also get your settings right in the field, and compose your photos carefully so that the contrast range you capture is within the dynamic range of your camera. If you’re faced with very bright and very dark areas in the same frame, you may want to simply recompose.
That said, if you’re in a situation where you desperately want to take the photo but can’t avoid a loss of detail, I’d recommend allowing the highlights to be overexposed while making sure to retain some shadow detail. This mimics how our eyes naturally handle bright lighting conditions; we often can’t see detail on light-colored or very reflective surfaces, but we can see detail in the shadows.
5. Think about Lightroom RAW editing when you take photos
Make sure that your editing process and your shooting process aren’t completely separate. In other words, when you take photos, consider the changes you can make to your RAW images later; that way, you can optimize your settings and your compositions to fit your imagined final shot.
To some, thinking about what you can do in post-production might seem like cheating, but I don’t see it that way. It’s a matter of working with the tools we have available! Modern digital technology gives us opportunities to make photos look more realistic, and you should take advantage of that fact. Knowing how your RAW file can be adjusted later on is a major help, not a harm.
So whenever you head out with your camera, always keep various processing possibilities in the back of your mind. Recognize what detail you can recover and what detail you can’t, and recognize how different RAW files will appear (and how you can adjust them later to create a natural look).
Editing RAW photos in Lightroom: final words
There you have it:
Five key tips to improve your RAW photo editing! I hope you found this article useful; learning to successfully edit your RAW shots is an essential skill, and while it will take time to master, it’s certainly a worthwhile pursuit.
So head into your archives and find some photos to edit. Try to remember how the scene looked when you took the shot, and practice making adjustments so it looks more true to life!
Now over to you:
Do you have any additional tips for RAW editing in Lightroom? What does your workflow look like? Share your thoughts in the comments below!
Picking the best lens for macro photography can be a real challenge. There are dozens of options available, all capable of transforming small objects into works of art, and each offering a slightly different set of features. Fortunately, no matter your skill level or budget, there is almost certainly a macro lens suited to your needs – you just have to know how to find it!
Below, I share my top 11 macro photography lenses, including a range of options for all budgets, subject preferences, and major brands. I’ve also made sure to include models for both DSLR and mirrorless cameras, so no matter your needs, we’ve got you covered.
The Canon EF-S 35mm f/2.8 is one of my absolute favorite macro lenses because it’s simple, inexpensive, and highly effective. I wholeheartedly recommend it for beginners who are looking for a way into macro photography without breaking the bank (plus, it’s designed for Canon’s less-expensive line of APS-C cameras, which are wildly popular among beginner and amateur shooters). The 35mm focal length does require you to get very close to your subject, but after taking Canon’s 1.6x crop factor into account, the effective focal length is actually in the area of 56mm.
Note that you can use the 35mm f/2.8 on APS-C DSLRs like Canon’s Rebel lineup – or you can purchase an adapter and mount the lens on one of Canon’s excellent APS-C RF-mount mirrorless cameras, such as the EOS R10 or EOS R50.
The best part about this lens is the built-in ring light. No, it’s not extremely powerful – but it can easily be the difference between a good shot and a blurry shot, and it’ll cast a nice, even glow over your subjects. The lens also features image stabilization, which is always a nice bonus. Note that you’ll need to get extremely close to your subject for high magnifications, so the lens isn’t ideal for insect macro photography – but it works great for shooting flowers, products, and other still subjects. It may not be as versatile or even as sharp as other lenses on this list, but this lens offers outstanding value for money!
Pros
Inexpensive
Built-in ring light
Optical stabilization (unusual for this price range)
Cons
Optical performance isn’t as good as more expensive lenses
Plastic construction instead of metal
No weather sealing
Not suitable for full-frame cameras
2. Nikon AF-S 40mm f/2.8G Micro
This 40mm f/2.8 macro lens has long been revered as one of the best options for Nikon shooters who want to get started with close-up photography (and who also appreciate a versatile all-around lens). It’s small, light, and lets you shoot brilliant photos of tiny subjects without spending a lot of money.
In fact, the Nikon 40mm f/2.8 is quite similar to the aforementioned Canon 35mm macro lens, though it does lack both a ring light and image stabilization. Neither of these omissions is a huge deal, however; if you’re set on a ring light, you can always purchase one as an accessory, and image stabilization is more of a luxury than a necessity when doing macro work. As with the Canon 35mm lens listed above, you’ll need to get very close to your subjects for the most detailed shots, so unless they’re very cooperative, you may struggle to capture insects – but you can certainly enjoy plenty of flower and nature photography without issue.
This is a DX lens, which means it won’t function on full-frame cameras. But on APS-C models, the 40mm focal length is equal to 60mm, so in addition to macro shots, the lens will offer plenty of potential for portraits and street photography. While the f/2.8 aperture can’t compete with f/1.8 or f/1.4 lenses, it still offers pleasing bokeh and out-of-focus backgrounds. My favorite aspect of the 40mm f/2.8 is the price: It’s by far the cheapest option on this list, so if you’re a Nikon shooter and you’re on the fence about diving into macro photography, it’s an excellent first choice.
Pros
Incredible value; one of the cheapest autofocus macro lenses available
Great optical performance
Cons
Designed for crop-sensor cameras
Autofocus can be a bit slow
Plastic construction and no weather sealing
3. Canon RF 100mm f/2.8L Macro IS USM
Serious macro shooters who want top-notch image sharpness will be more than pleased with the RF 100mm f/2.8L, one of Canon’s most recent lens releases and an all-around photography powerhouse. It’s designed for RF-mount mirrorless cameras, and its high price point does put it out of reach for most beginners and hobbyists, but you do get what you pay for.
Not only does this lens produce optically stunning images, but it packs some outstanding bonus features that’ll impress any macro photographer. There’s a three-position focus limiter, which guarantees faster, more-reliable autofocus for different shooting scenarios. There’s also an innovative ring for controlling spherical aberration, which basically lets you adjust the optical quality of the out-of-focus elements of your image – not a must-have, but a nice feature that can certainly come in handy.
If you’re a serious macro photographer looking to upgrade from a more basic macro lens, or if you’ve long appreciated Canon’s 100mm f/2.8L designed for DSLRs but are switching to mirrorless, this is the lens to buy.
Pros
Exquisite image quality
Reliable, accurate autofocus
Unique spherical aberration control ring
Cons
Very expensive; not ideal for casual shooters
Autofocus can be a bit slow
Focusing elements tend to be noisy
4. Nikon Z MC 105mm f/2.8 VR S
For years, the Nikon AF-S 105mm f/2.8G IF-ED lens was basically the holy grail of Nikon macro photography. First released in 2006, it easily held its own against much more modern competitors and is still an excellent lens option to this day. However, Nikon recently launched an updated version specifically designed for Z-mount mirrorless cameras, the Nikon Z 105mm f/2.8 VR S, and the result is a stunning performer that ought to sit at the top of every Nikon macro shooter’s wishlist.
What makes this lens stand out? For one, it offers near-impeccable optical quality. Images are wildly sharp, which is essential if you want to capture pro-level macro photos. Additionally, autofocus is fast and reliable, and the lens even offers a custom function button that you can assign to different functions in your camera menu. Then there’s the built-in image stabilization, which will help you get sharp images even when handholding in low light (or at high magnifications!), and there’s also a focus limiter switch that’ll increase autofocus speeds in certain situations.
Of course, like the Canon RF 100mm f/2.8L discussed above, the Z 105mm f/2.8 is quite expensive. But if you’re a serious shooter looking to make prints of your work – or simply aiming to capture as much detail as possible – it’s worth every penny.
Pros
Amazing image quality
OLED screen shows focusing information
Less expensive than the Canon 100mm f/2.8
Cons
OLED screen is somewhat of a gimmick
The focus limiter switch only includes two positions
Still relatively pricey
5. Sony FE 90mm f/2.8 Macro G OSS
If you’re a Sony photographer in need of a world-class macro lens, then look no further than the 90mm f/2.8 Macro, which combines the best of what its Nikon and Canon competitors have to offer. The lens features strong, durable construction along with dust and moisture resistance, which can be especially helpful when doing macro photography in rain, snow, and more.
Image stabilization can be enabled via a switch on the side, and this lens also has a three-position focus limiter similar to the Canon RF 100mm f/2.8. Sony’s lenses are renowned for their superb optical quality and this one is no exception, producing images that are tack sharp with outstanding contrast and color rendition. There is a customizable function button, and you can quickly change from manual focus to autofocus with a sliding ring.
One slight limitation is this lens’s f/22 minimum aperture – even stopped down to f/22, depth of field is still extraordinarily thin at high magnifications. But you can always use focus stacking to compensate (which will help you bypass diffraction for sharper results). At the end of the day, flower and product photographers will adore this lens, and while insect shooters may wish for a slightly longer focal length, it’ll still do an excellent job.
Pros
Specially coated optical elements help reduce lens flare and other common problems
Very fast autofocus
Focus ring can slide backward and forward to engage and disengage manual focus
Cons
90mm isn’t quite as long as the 100mm and 105mm focal lengths offered by competitors
Relatively large minimum aperture of f/22
6. Sigma 105mm f/2.8 DG DN Macro Art
While some photographers are reluctant to use third-party lenses, manufacturers like Sigma and Tamron have been working hard to produce outstanding glass, and recent offerings from both companies have been equal to first-party counterparts in every respect – and even besting them in some areas. Plus, third-party models tend to be substantially cheaper than Canon, Nikon, and Sony lenses, so they’re an excellent way to gain access to serious photographic features without breaking the bank.
Sigma’s 105mm f/2.8 Macro deserves serious consideration from any photographer interested in taking beautiful macro shots; it offers everything a close-up shooter could need, including stunning image quality, fast autofocus, and good weather resistance. One interesting feature is the manual aperture ring, which lets you smoothly change the aperture by hand. This lens also focuses internally, so unlike some other lenses, you won’t see the front barrel protruding outward (which helps if you’re taking pictures of skittish insects, and it’ll also stop you from knocking flowers or products as you photograph).
Some users find Sigma’s autofocus to be a bit slow, but that has never been my experience – plus, most macro photographers prefer to work with manual focus, anyway. Currently, Sigma only makes this lens for Sony and Leica cameras, which might be an important limitation to keep in mind depending on your current gear. If you’re a Canon or Nikon shooter looking for a high-quality third-party macro lens, I do recommend some other options below, but you might also check out some of Sigma’s handful of alternative macro lenses, many of which are truly excellent (though they can be difficult to find new).
Pros
Outstanding value; priced lower than similar first-party lenses
Solid, durable construction
Physical aperture control ring for those who prefer a more tactile shooting experience
Cons
Images are sharp but don’t quite match the quality of top-notch macro lenses on this list
Only available for Sony and Leica mounts
7. Fujifilm XF 80mm f/2.8 R LM OIS WR
It might seem a little strange to see an expensive 80mm macro lens on this list, but keep in mind that Fujifilm does not produce full-frame cameras; this lens is designed for their X line of APS-C cameras, which gives this lens an effective focal length of 120mm. In other words, the Fujifilm 80mm f/2.8 gives you the best of both worlds: the versatility of a shorter lens combined with the extra working distance of a longer lens. In fact, as one of the longer lenses on this list, the 80mm f/2.8 is a particularly good choice for insect and even pet photographers, who wish to capture stunning detail shots but struggle to get close to their subjects.
This lens sports all the features you would expect given the price tag, including weather sealing, a focus limiter switch, and a ring for manually adjusting the aperture. Built-in optical image stabilization is rated at five stops, which is a huge benefit for macro photographers who prefer to work without a tripod, and autofocus is fast and silent. I do wish the minimum aperture went beyond f/22, but it’s definitely not a deal-breaker, and you can often get better results by focus stacking, anyway.
Unlike other camera systems, you won’t find a huge range of macro lenses for Fujifilm models, but with a lens this good, you won’t really need to look at anything else.
Pros
Effective 120mm focal length when mounted on a Fujifilm APS-C camera
Sturdy build quality
Good built-in image stabilization
Cons
Somewhat expensive, especially for an APS-C lens
Surprisingly large
8. Tokina ATX-i 100mm f/2.8 Macro
Macro photographers who want to move beyond inexpensive lenses such as the Nikon 40mm and Canon 35mm but don’t want to empty their pocketbooks will find a lot to love in Tokina’s 100mm f/2.8 macro lens. Built for full-frame cameras, this lens offers astonishing value and great optical performance, even if it lacks some of the features offered by its higher-priced competitors. Its 100mm focal length is great for macro photography as well as portraits, and image quality is very good.
Though this lens is half the price of others in its focal-length bracket, it does come with some trade-offs. Body construction is high-grade plastic instead of metal, and there is no weather sealing or image stabilization. Autofocus is fine but not quite as snappy as similar lenses from Sony, Canon, and Nikon. Fortunately, these drawbacks probably won’t matter to most macro shooters, while you and your bank account will definitely appreciate getting a great lens at such a low price.
Pros
Excellent value; half the price of many of its peers
Clutch mechanism for quickly switching between manual focus and autofocus
Barrel does not rotate when extended
Cons
Plastic build is fine but not as durable as metal
Some photographers prefer lenses with internal focusing
Autofocus is on the slower side
9. Olympus M.Zuiko Digital ED 60mm f/2.8 Macro
While Micro Four Thirds cameras aren’t as popular as they once were, they still enjoy a dedicated following, and there are plenty of photographers who appreciate their small size and impressive selection of lenses. When using a Four Thirds sensor, focal lengths are doubled to find their full-frame equivalent – so this Olympus 60mm f/2.8 macro lens offers an effective 120mm of reach. It’s also significantly cheaper and lighter than similar full-frame lenses, which is a huge benefit for macro photographers who like to travel (or those who simply wish to avoid lugging a heavy lens into the field).
In terms of features and image quality, this Olympus 60mm f/2.8 macro lens has everything you’d expect from a top-notch performer: Images are sharp, focusing is fast and reliable, and a three-position focus limiter lets you shoot subjects that are far away, really close, or all of the above. There’s no built-in image stabilization, but many MFT cameras offer in-body stabilization for sharper shots at high magnifications or in low light.
Overall, if you want to capture macro shots with an Olympus or Panasonic camera, you can’t beat the combination of price, size, weight, and performance this lens has to offer.
Pros
Small and lightweight
Effective 120mm focal length
Lens barrel has helpful built-in indicators for focusing on close subjects
Works on both Olympus and Panasonic cameras
Cons
No built-in image stabilization
Good image quality for an MFT lens but can’t quite match that of its full-frame peers
10. Irix 150mm f/2.8 Macro
At first glance, the Irix 150mm f/2.8 might not seem worth considering: It’s manual focus, doesn’t include image stabilization, and its optical performance isn’t in the same league as some of its peers. Look closer, however, and macro shooters will quickly find a lot to like. For one, it features the longest focal length of any lens on this list, which is great for photographers who want to take high-magnification shots without getting physically close to their subjects. With 150mm of reach, you can capture bees, grasshoppers, and butterflies in glorious detail, and you won’t have to worry quite so much about scaring your subjects away mid-shot.
The lens features outstanding weather sealing, and a huge, chunky manual focus ring to help you nail the shot. If you’re only just delving into macro photography, working manually may take some getting used to, but it’s actually a highly effective method for specifying the point of focus with precision. Focus can also be physically locked so it won’t change from one shot to the next, and you even get a large, Arca-type foot that works great on many tripods. Finally, the price is about half the cost of its Canon-, Nikon-, and Sony-made peers, so if you need a long lens but you’re on a budget, this is a great pick.
Pros
Long focal length compared to most of its peers
Strong weather sealing
Built-in tripod foot for improved ease of use
Cons
Manual focus only
Images aren’t quite as sharp compared to other macro lenses
No built-in image stabilization
11. Laowa 100mm f/2.8 Ultra Macro APO
Laowa has made quite a name for itself by producing unique lenses that offer outstanding results; this 100mm f/2.8 macro lens continues the tradition by going beyond “standard” macro magnifications. You might even consider this a super macro lens.
You see, most macro lenses, including every other lens on this list, let you reproduce subjects at a 1:1 ratio. It sounds complex, but it really just means that the sizes of objects on your camera sensor will correspond to the sizes of the objects in real life. In other words, at 1:1 magnifications, you can capture incredible detail that you just can’t get with a normal lens. But this Laowa lens takes things a step further: it’s capable of shooting at a 2:1 ratio, so tiny subjects are twice as large on your camera sensor as they are in real life. That feature, combined with the 100mm focal length, means you can capture shots with this lens that you can’t get with any other lens on this list.
There are some important trade-offs, however. The Laowa 100mm f/2.8 is not only manual focus but also manual aperture, which means you can’t set the aperture on your camera. This adds up to quite a steep learning curve, but if you want mind-blowing macro shots that are impossible to achieve with other lenses, then it’s worth the effort. It’s also half the price of its peers, which makes its limitations a little easier to deal with. That said, if you’ve never used a close-focusing lens before, you may want to start with one of the other models on this list; the Laowa 100mm f/2.8 is really a specialist model, and 1:1 macro magnification is plenty close for most purposes.
Pros
Incredible 2:1 magnification
Excellent value
Large, easy-to-reach focus ring
Cons
All-manual control makes for a steep learning curve
Barebones set of features compared to its peers
The long focal length with no image stabilization is difficult to use without a tripod
The best lenses for macro photography: final words
Macro photography is an incredibly fun, challenging, and rewarding pursuit, and for many photographers, brings an almost endless amount of joy. Boring, everyday objects can look like priceless works of art when photographed up close, while flowers, insects, and other elements of the natural world can take on an otherworldly beauty.
While you can explore this type of photography with close-up filters and extension tubes, a true macro lens can take things to a whole new level. If you’re looking for the best lens for macro photography, you can’t go wrong with any of the options on this list; the important thing is to find a lens that fits your style and budget.
Now over to you:
Which macro lens do you plan to pick? Which do you like best? Share your thoughts in the comments below!
Best lenses for macro photography FAQ
Do I need a special camera to take macro photos?
No. Any interchangeable-lens camera can take macro photos as long as you have the right lens.
Can I take macro photos with my phone?
Many phones now have a built-in macro mode, and there are also attachments and accessories that let you take beautiful close-up shots. However, many people prefer longer focal lengths and other qualities that you can only get with a dedicated camera and macro lens.
How do I know if I’m really taking true macro photos?
“Macro” is kind of a catch-all term, and it really just means “super-duper close.” Most photographers define macro photography as replicating subjects at a 1:1 ratio, but that definition isn’t written in stone. If you are able to take sharp images of tiny subjects up close, it probably counts as macro photography.
Do I need a tripod to shoot macro photos?
You do not need a tripod, but it definitely helps. I like to take close-up shots with small apertures at low ISOs; this usually means long shutter speeds, and shots like that are definitely easier with a tripod and a still subject.
Why don’t macro photographers shoot wide open at f/2.8 to get a shallow depth of field effect?
Wide apertures are great for shallow depth of field effects in normal shooting conditions, but when you get into macro photography, you’ll quickly find that f/2.8 results in extremely shallow depth of field at high magnifications. So most macro photographers don’t shoot wide open unless they plan on doing focus stacking afterward.