Jul 8, 2023

[Photography] Motion Blur Photography: The Ultimate Guide ( Tips)

The post Motion Blur Photography: The Ultimate Guide (+ Tips) appeared first on Digital Photography School. It was authored by Darren Rowse.

A guide to motion blur photography (+ tips)

Discover the secrets of stunning motion blur photography. Learn how to add a sense of dynamism and energy to your shots!

Are you looking to capture motion blur in your photography? While photographing motion blur might seem difficult, it’s actually pretty easy; with a bit of camera know-how, you’ll be taking stunning photos like a pro.

And that’s what this article is all about: giving you the tools and techniques you need to get beautiful results!

Note that motion blur can look great in any photography genre, so don’t try to limit yourself. Instead, embrace the power of the blur!

What is motion blur photography?

Motion blur photography is all about embracing blur for artistic impact. While photographers typically strive for sharpness and clarity, motion blur photography takes a different approach. It’s about intentionally incorporating blur caused by fast-moving subjects to create a sense of action and movement in your photos.

motorcyclist motion blur photography

Imagine freezing a moment in time where the subject is a streak of motion, but everything around it is in sharp focus. That’s the essence of motion blur photography. It allows you to convey the speed at which a subject was moving while highlighting the stillness of the background; it also allows you to capture the dynamic energy of scenes teeming with movement, whether it’s cars speeding by, people walking briskly, or sports players in action.

Motion blur photography may not work in every situation or with every subject, but when you find the right moment and context, it can result in captivating and visually striking photographs.

The best settings for motion blur shots

train moving fast with platform

Creating stunning motion blur shots requires careful control over your camera settings. Remember, we’re aiming to capture that beautiful blur caused by a fast-moving subject. So here’s what you need to know:

First things first, set your camera to Shutter Priority mode. This mode gives you control over the most important setting for motion blur: the shutter speed. You want to be able to adjust it according to your creative vision.

Now, let’s talk about the shutter speed. It’s all about finding the right balance between freezing the subject and creating that desired blur. A fast shutter speed like 1/1000s will freeze the action, leaving no trace of motion. But if you want that sense of movement, go for a slower shutter speed, such as 1/2s or even longer.

Finding the perfect shutter speed will depend on the specific subject and the effect you want to achieve. In general, aim for shutter speeds below 1/60s to capture a pleasing motion blur. Anything faster tends to result in sharper images that may lack the artistic touch.

After adjusting the shutter speed, pick an ISO setting. Using the camera’s base ISO (usually 100) allows you to have a slower shutter speed without overexposing the image.

As for the aperture, your camera will select this automatically, but keep an eye out and make sure it doesn’t start narrowing too much. An aperture in the range of f/16-f/22 can introduce blur due to diffraction, so if you do notice the aperture creeping upward, increase the shutter speed or consider using a neutral density filter (discussed below).

By setting the right combination of shutter speed, ISO, and aperture, you’ll be well on your way to capturing mesmerizing motion blur photographs. Don’t be afraid to experiment and adjust these settings until you achieve the desired effect.

How to take motion blur photos: the basics

boats in the water

To start, you’ll need to find a subject in motion. Consider scenes with cars whizzing by or people bustling through a crowded street; these scenarios provide excellent opportunities to experiment with motion blur. When you’re just beginning, it’s helpful to choose subjects that move predictably, making it easier to anticipate their path.

Note: While motion blur photography can be practiced at any time of day, working during the early morning or late evening can be advantageous. These times offer softer lighting conditions, allowing you to slow down your shutter speed and avoid overexposing your images.

Though not always necessary, using a tripod can be invaluable when aiming to capture a sharp background with a blurry subject. Mount your camera securely to the tripod and thoughtfully compose your shot.

Now it’s time to adjust your camera settings. Recall the previous discussion on shutter speed (the key to the whole technique!). Select a shutter speed that will render your subject as a blur, taking into account the subject’s speed and your artistic vision. As a starting point, around 1/30s for fast-moving subjects and 1s for slower subjects often yield pleasing results.

Then, when your subject moves through the frame, take the shot! To prevent blur caused by camera shake, consider using a remote release or activating the two-second timer. After capturing an image, review it on your camera’s LCD screen. Identify any areas for improvement, make necessary adjustments, and continue shooting. Remember, motion blur photography is an experimental process, so don’t hesitate to test different shutter speeds until you achieve the desired effect.

Creating outstanding motion blur shots requires practice and exploration. Predicting precisely how a blurred subject will appear is challenging, so be prepared to capture a multitude of images and select the best ones later. Embrace the joy of experimentation and trust your creative instincts as you refine your motion blur photography skills.

Tips and tricks for outstanding motion blur shots

Now that you know how to capture motion blur, you’re ready to head out and start creating some beautiful shots. For even better results, however, follow these tips:

1. Use a neutral density filter

motion blur in front of buildings

If you find yourself shooting in bright light conditions, like during a sunny day at noon, you may struggle to use a slow shutter speed without pushing the aperture to f/22 and creating unpleasant diffraction effects. Fortunately, there’s a nifty tool that can come to your rescue: the neutral density filter.

Think of a neutral density filter as a pair of sunglasses for your lens. It works by reducing the amount of light that enters your camera, allowing you to extend your shutter speed and achieve a well-exposed image with a beautiful sense of motion while keeping your aperture at a reasonable setting.

Neutral density filters come in different strengths, giving you flexibility in adjusting the amount of light reduction. For instance, a 3-stop neutral density filter is handy when you only need a slight extension of your shutter speed. On the other hand, a more powerful 10-stop neutral density filter can be a game-changer when you want to really stretch that shutter or shoot in extremely bright conditions.

Having a couple of neutral density filters in your kit can give you the versatility to adapt to various lighting situations, opening up new possibilities for creating stunning motion blur shots. So don’t forget to pack one on your next photography adventure!

2. Try a panning approach when shooting action

panning with motorcycle

One exciting technique you can try when capturing motion blur in photography is called panning. This technique allows you to create stunning shots that showcase a sharp subject against a beautifully blurred background.

Panning involves capturing the movement of your subject by following it with your camera as it moves across your frame. By using a slower shutter speed and smoothly tracking the subject, you can create a sense of dynamism and speed while keeping the subject relatively sharp.

To start, choose a moving subject such as a cyclist, a car, or a runner. Set your camera to a shutter speed that allows for a longer exposure, around 1/30s or even slower depending on the speed of the subject. Keep in mind that practice and experimentation will help you find the perfect shutter speed for different situations.

Now, with your camera in hand, follow the subject’s movement while pressing the shutter button. The key is to keep the subject in the same position in your viewfinder as it moves across the frame. Maintain a smooth and steady movement, almost as if you’re dancing with the subject.

As you pan, the background will blur due to the slower shutter speed, creating a sense of motion and energy. If done correctly, your subject will stand out sharply against the blurred surroundings, making for an eye-catching and dynamic photograph.
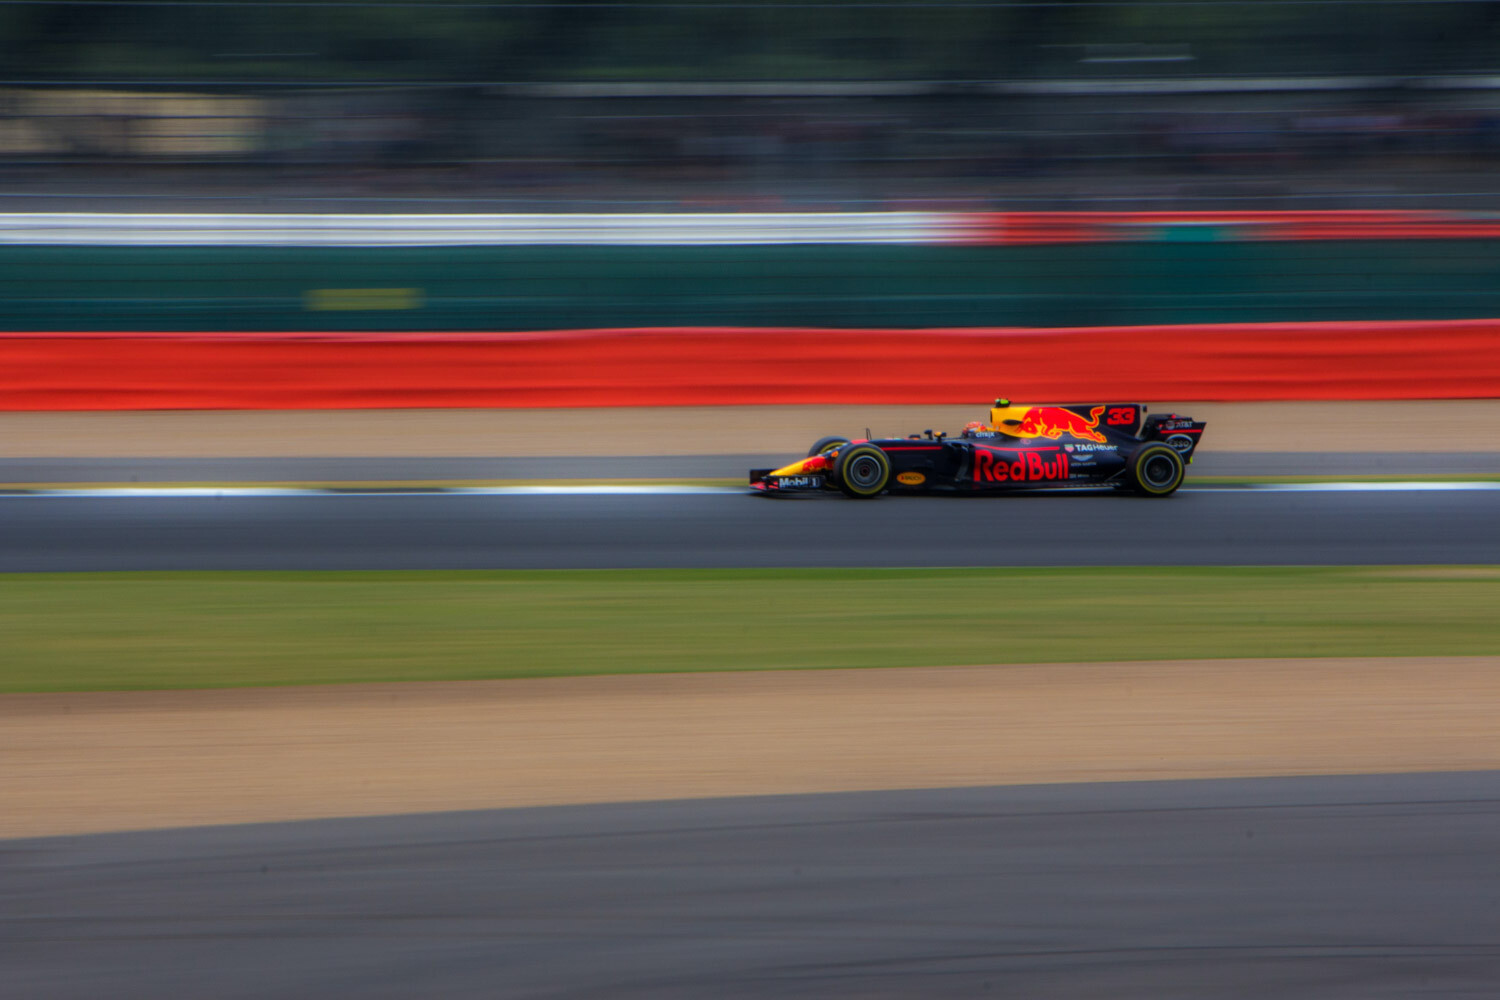
capture motion blur photography racecar

Panning takes practice to master, so don’t get discouraged if your first attempts don’t turn out as expected. Keep refining your technique, adjusting your camera settings, and experimenting with different subjects and speeds.

3. Combine sharp and blurry elements

capture motion blur photography

To create captivating motion blur shots, it’s crucial to strike a balance between sharpness and blur. The magic happens when you have both elements coexisting in your image. Imagine a scenario where your subject is in motion, streaking across the frame with a mesmerizing blur, while the background remains crisp and sharp.

By juxtaposing the blurred subject against a static backdrop, you engage the viewer’s attention and create a visually dynamic effect. This technique allows the viewer to anchor their gaze on the sharp areas while also appreciating the mesmerizing motion conveyed by the blurs.

To achieve this, it’s essential to use a tripod. Without a stable base, your entire image will suffer from unwanted blurriness. So, set up your camera on a tripod and compose your shot thoughtfully. Consider the path your subject will traverse and frame your image accordingly.

Remember, a successful motion blur shot combines the graceful movement of your subject with the solidity of the background. It’s a delicate dance between capturing fleeting moments and preserving stillness. So, take your time, experiment, and let your creative vision guide you.

4. Try adding a flash

Motion blur photography

If you’re doing motion-blur photography with a wide-angle lens and lots of distant subjects, using a flash won’t do much for you – it won’t light up the whole scene. But here’s where things get interesting: when you’re working with a model or a subject up close, adding a flash can have a remarkable impact!

Here’s the deal: you slow down your shutter speed, and then you fire the flash either at the beginning or the end of the exposure. It’s called front-curtain sync or rear-curtain sync, respectively. The magic happens because the flash is incredibly fast, freezing the subject in mid-action. But since the shutter speed is slow, the subject still shows that motion blur in the direction they were moving. When you do it right, the results can be absolutely stunning.

So, if you’re up for some experimentation and want to add an extra dimension to your motion blur shots, grab that flash and give it a go. You might be amazed at the creative possibilities it brings to your photography!

Motion blur photography: final words

And there you have it! We’ve dived headfirst into the captivating world of motion blur photography, and now that you’re armed with the knowledge and techniques shared in this article, you’re ready to unleash your creativity and add a sense of motion to your photos like never before.

So, go out there and find your moving subjects. Whether it’s cars zooming by, athletes in action, or the ebb and flow of bustling city streets, let the blur tell a story of dynamic energy and vibrant motion.

Keep shooting, keep experimenting, and most importantly, have fun along the way!

Now over to you:

Have you tried taking motion blur photos? Did it go well? Do you have any tricks or tips? Share your thoughts (and images!) in the comments below!

Motion blur photography FAQ

What are the different types of motion blur in photography?

The most common approach is capturing a sharp background while blurring the subject, but you can also experiment with panning techniques to blur the background while keeping the subject (relatively) sharp. Additionally, using flash creatively can render a subject both blurry and sharp simultaneously.

What aperture setting is right for motion blur?

While there is no one-size-fits-all answer, a narrower aperture is generally preferred in motion blur photography to ensure sufficient depth of field (and therefore a sharp background).

What shutter speed is used to blur motion?

To achieve motion blur, you need a slower shutter speed that allows enough time for the subject to move within the frame. The specific shutter speed depends on your desired effect and the speed of the subject. Experimentation will help you find the perfect balance.

Should you use motion blur in photography?

Absolutely! Motion blur is a fantastic tool for creating unique and captivating images. It adds a sense of dynamism, action, and artistic flair to your photos, setting them apart from static and conventional shots.

The post Motion Blur Photography: The Ultimate Guide (+ Tips) appeared first on Digital Photography School. It was authored by Darren Rowse.


it's from Digital Photography School https://ift.tt/eRv82i3
via Darren Rowse

Jul 7, 2023

[Photography] dPS Bi-Weekly Photo Challenge From Where I Stand

The post dPS Bi-Weekly Photo Challenge – From Where I Stand appeared first on Digital Photography School. It was authored by Sime.

Your challenge this week is to take a photograph from ‘where you stand’ include your feet, and make it creative. Make it a series (up to 5 images) if you like.

Last challenge was a little tricky for some, timing and such, but this challenge ANYONE can pull off. As usual it needs to be a new photo, you can post it in the comments below or over on our Facebook Group – details how to share, below the photos below.

These are my photos – My Morning and My Afternoon. #dPSFromWhereIStand

Make sure you include the hashtags #dPSWeeklyChallenge and #dPSFromWhereIStand in your post, here in the comments or over on social media. You can tag us on Facebook, Instagram or Twitter!

Find all of our previous weekly challenges here.

Simply upload your shot into the comment field below this post (look for the little camera icon in the Disqus comments section) and they’ll get embedded for us all to see or if you’d prefer, upload them to your favourite photo-sharing site and leave the link to them in a comment below. Show me your best images in this week’s challenge. Sometimes it takes a while for an image to appear so be patient and try not to post the same image twice.

Share in the dPS Facebook Group

You can also share your images in the dPS Facebook group as the challenge is posted there each week as well.

Have fun creating, be good to each other.

The post dPS Bi-Weekly Photo Challenge – From Where I Stand appeared first on Digital Photography School. It was authored by Sime.


it's from Digital Photography School https://ift.tt/gJMicbH
via Sime

Jul 6, 2023

[Photography] Chromatic Aberration: The Ultimate Guide ( Examples)

The post Chromatic Aberration: The Ultimate Guide (+ Examples) appeared first on Digital Photography School. It was authored by Joshua Burke.

A guide to chromatic aberration in photography

Don’t let chromatic aberration ruin your shots! Discover everything you need to know about pesky fringing and learn how to banish it from your photos.

Chromatic aberration is a huge image-quality killer, but many photographers don’t know what it is and how it can be prevented.

But fear not! In this article, we’ll delve into the realm of chromatic aberration. I’ll explore its causes, and I’ll equip you with practical strategies to avoid it like a pro.

Specifically, I explain:

  • What chromatic aberration is
  • Why CA happens
  • Seven powerful strategies to minimize its effects and keep your photos fring-free!

So without further ado, let’s discuss how to deal with that pesky chromatic aberration once and for all.

What is chromatic aberration?

Chromatic aberration is when a lens doesn’t focus all light wavelengths at the same point, resulting in unnatural colors in your photos. Because these colors are often visible along high-contrast edges, this problem is known as fringing.

Chromatic Aberration example
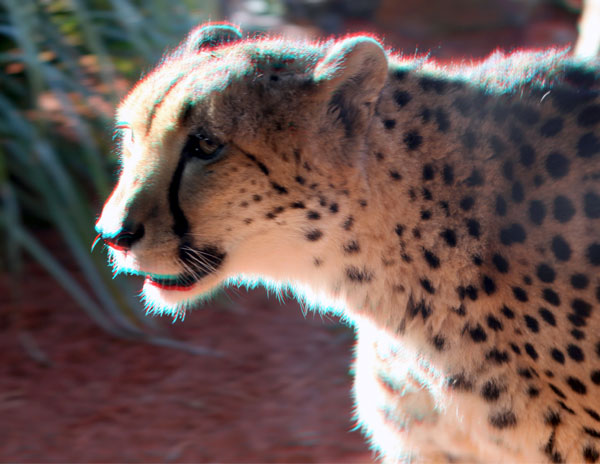
The left-hand side of this cheetah shows chromatic aberration along the sharp edges of the subject.

To help you understand chromatic aberration a bit better, remember that the focal plane is your sensor’s point of focus, where all the light from your lens should join together to be correctly captured and recorded. But depending on the construction of your lens and your chosen focal length, certain wavelengths (colors) may converge at points in front of or behind the focal plane; wavelengths can also converge at a point that’s off-center.

When different wavelengths converge at different points, the individual colors become visible, resulting in unpleasant chromatic aberration effects. Take a look at the diagram below. Do you see how the red, green, and blue light hits the sensor in different spots? That’s chromatic aberration at work.

What is chromatic aberration and why it happens.

CA doesn’t look so great, and it can also reduce image sharpness. Therefore, photographers often funnel significant time and money into avoiding or removing chromatic aberration in their images. Fortunately, as I discuss below, there are a handful of ways of dealing with CA – though they’re not all equally effective, so it’s important to make careful choices both in the field and in the editing room for the best results.

Longitudinal vs lateral chromatic aberration

A guide to chromatic aberration in photography

While many photographers are familiar with chromatic aberration as color fringing, it’s important to understand that there are actually two types: longitudinal (axial) chromatic aberration and lateral (transverse) chromatic aberration. Both types involve the focusing of different wavelengths at different points, but their key distinction lies in the direction of the differential focusing.

Longitudinal chromatic aberration occurs when different colors focus in front of and behind one another. This type is commonly observed in telephoto lenses and less common when using wide-angle glass. The manifestation of longitudinal chromatic aberration is seen as unnatural colors across the entire image, rather than just at the edges.

On the other hand, lateral chromatic aberration occurs when different colors focus at different points along the same plane, next to one another. This type is commonly observed in wide-angle lenses. Lateral chromatic aberration manifests as unnatural colors along high-contrast edges in the image.

The difference between these two types of chromatic aberration might seem trivial, but identifying which type is causing the issue can be helpful in finding the most effective solution.

What causes chromatic aberration?

Chromatic aberration happens because your lens acts as a prism. It bends light, and the colors passing through the lens are split at different angles.

Why does chromatic aberration occur prisms splitting the light

Here, it’s important to remember that light is actually made up of several different wavelengths (colors). So for your camera’s sensor to capture the combined color of light, your lens needs to make all wavelengths of that particular ray hit the exact same point on your sensor.

It may sound simple, but various wavelengths (and thus various colors) strike your lens all at once, and each of these wavelengths will behave slightly differently depending on the lens glass that it is passing through.

The feat of engineering required to correctly align all of these different light rays is generally achieved by the manufacturer’s use of a lens array (rather than a single lens element). In fact, if you were to pull your favorite camera lens apart, you’d probably find upward of 16 lens elements – all designed to correct for various things along the light’s journey between your lens and your sensor.

Lens elements A guide to chromatic aberration in photography

Unfortunately, this is also where chromatic aberration tends to rear its ugly head. Hidden within the design of these lens elements are defects – either in the glass or the design of the lens itself – which, under specific conditions, may cause your photos to exhibit CA.

Now, I’m not saying you need a pro-level lens. In fact, a key point is that all lenses suffer from chromatic aberration in one form or another, no matter the cost. What matters is whether or not your lens exhibits visible chromatic aberration, and whether the amount of visible CA is a dealbreaker for your particular needs.

Is chromatic aberration a major problem?

A guide to chromatic aberration in photography

Chromatic aberration can have a significant impact on the quality of your photographs if you don’t take steps to avoid it. This optical phenomenon can make your images look imperfect and even amateurish. While a small amount of chromatic aberration may go unnoticed, once it becomes noticeable, it will distract the viewer and diminish the overall unity of the photo.

Unfortunately, chromatic aberration is sometimes unavoidable, especially when using certain lenses. In such cases, you’ll need to employ post-processing techniques to minimize or eliminate its effects. Many photo-editing programs offer tools to address chromatic aberration, although they may not always provide a perfect solution.

How to avoid chromatic aberration defects: 7 powerful strategies

Chromatic aberration is a major problem, especially on cheap lenses. But the good news is that, if you are stuck working with a lens that exhibits some form of visible chromatic aberration, there are several easy-to-understand strategies to remove or minimize its effect on your photos.

1. Avoid high-contrast scenes

CA Cheetah High Contrast

Chromatic aberration tends to flare up when shooting high-contrast scenes. Particularly problematic are darker subjects surrounded by white backdrops, landscapes against a bright sunrise, or – as in the example of the cheetah above – heavily backlit subjects.

There’s no easy in-camera method of avoiding contrast. So there’s often nothing you can do here except adjust your composition. Swap your backdrop out to something that more closely matches your subject’s tones, or simply wait for more favorable lighting conditions.

If you absolutely must capture an image as-is, then shoot in RAW and prepare for a touch-up in post-production.

2. Adjust your focal length

Chromatic Aberration Focal Length

Although it’s nice to have access to a wide range of focal lengths, the fact is that most zoom lenses exhibit chromatic aberration at their focal length extremes. So setting the focal length toward the middle of your lens’s range will usually help remove the offending CA.

Note that using a zoom lens at its widest will usually introduce various other defects in your image. So if you’re set on a wide-angle perspective, choose a prime wide-angle lens to handle the job, or make a panorama at a longer focal length, then join the photos in post-processing.

3. Stop down your aperture

CA Aperture

Although the result will depend on the type of lens you are using, stopping down your aperture helps minimize most lens defects, including chromatic aberration.

So instead of using an f/2.8 or f/4 aperture, try going to f/8 or f/11 – then take a few test shots to see if the chromatic aberration has disappeared. Of course, you’ll need to consider reducing the shutter speed or boosting the ISO to compensate for the light loss.

(Note: A narrower aperture will specifically reduce longitudinal chromatic aberration but won’t affect lateral chromatic aberration, so if you’re not seeing the results you want, try one of the other options on this list.)

4. Reframe with your subject at the center of the image

chromatic aberration rhino reframe

Chromatic aberration is often more noticeable toward the edges of the frame, not the center. (This is generally due to the curvature of the lens elements.)

Therefore, if you reframe your shot but put your main subject closer to the middle, you’ll often end up with little-to-no chromatic aberration on your subject.

Of course, you may still have noticeable CA around the edges of the frame, but you do have the option to crop this away. It’s not ideal if you need to retain every pixel in your photo (e.g., for large prints), in which case you should consider one of the other preventative measures discussed above. But if you’re creating small prints or you plan to distribute your photo online, cropping shouldn’t be a big issue.

5. Remove the chromatic aberration in post-processing

Cheetah Chromatic Aberration Comparison

If you come across a photo with noticeable chromatic aberration or find yourself in a situation where it can’t be avoided, post-processing can be a game-changer. Fortunately, popular editing software like Lightroom, Luminar, and Capture One offer straightforward tools for chromatic aberration removal. The process is usually as simple as clicking a button or selecting a checkbox, although you may have the option to fine-tune the results manually.

To begin, import the problematic image into your preferred editing software and locate the chromatic aberration removal tool. Typically, you can find it under the lens correction panel. Activate the tool and let the software do its thing; then take a look at the Before and After views, if available. Assess whether the chromatic aberration is completely eliminated or at least significantly reduced.

If the results are satisfactory, you can proceed with your usual editing process. However, if the chromatic aberration persists, you might consider trying manual adjustments within the software or experimenting with a different editing program.

6. Convert to black and white

If you’re finding it challenging to effectively remove chromatic aberration using the dedicated tools in your photo editing software, there’s another straightforward option at your disposal: converting the image to black and white. While not every photo looks as striking in black and white as it does in color, this quick conversion can be a powerful technique for dealing with those unsightly color fringes.

It’s important to note that converting an image to black and white won’t magically eliminate the blur caused by chromatic aberration. So, even if you plan to shoot in black and white, it’s still worth mastering the art of avoiding chromatic aberration in the field. However, when faced with persistent fringing that’s difficult to remove through other means, this method can provide an effective solution.

7. Purchase a better lens

When aiming to minimize chromatic aberration, it’s essential to consider the quality of your lens. Different lenses exhibit varying levels of fringing, which can be attributed to factors like focal length and lens design. By investing in a lens with limited chromatic aberration, you can significantly reduce the occurrence of color fringing in your images.

Higher-quality lenses, although often pricier, offer a range of benefits beyond minimizing chromatic aberration. These lenses boast superior optics for better image quality overall as well as fast focusing, a robust build, and smooth handling.

To find low-CA lenses, seek out models with low-dispersion elements; they’re specifically designed to handle chromatic aberration!

Chromatic aberration: final words

Well, that’s it: All the chromatic aberration essentials, including what it is and how to avoid it. Now armed with knowledge and strategies, you’re ready to conquer this pesky foe and unlock the full potential of your images.

That said, don’t be disheartened if you encounter a hint of color fringing in your shots. With the right techniques, you can minimize or even eliminate the problem.

Now you know how to keep your images free of CA, and you know how to capture stunning photos – even with cheaper lenses.

Over to you:

Are you struggling with chromatic aberration in your photos? Have you tried any of the measures discussed above? Share your thoughts (and images) in the comments below.

Chromatic aberration FAQ

What causes chromatic aberration?

Chromatic aberration is caused by the inability of a lens to focus all colors of light at the same point, resulting in color fringing in your photos.

Is it easy to fix chromatic aberration?

Fixing chromatic aberration can vary in difficulty depending on the severity and type. While some photo editing software provides tools to remove it, complete elimination may require more manual adjustments or using higher-quality lenses.

What can eliminate chromatic aberration?

To eliminate chromatic aberration, you can use post-processing techniques in editing software that offer chromatic aberration removal tools. Additionally, using lenses with low-dispersion elements can significantly reduce or eliminate the issue.

Why do I see purple in my photos?

The appearance of purple color in your photos is a common manifestation of chromatic aberration, particularly when high-contrast areas are present. It occurs when different wavelengths of light are focused at different points, causing a purple fringing effect.

The post Chromatic Aberration: The Ultimate Guide (+ Examples) appeared first on Digital Photography School. It was authored by Joshua Burke.


it's from Digital Photography School https://ift.tt/piDSUPJ
via Joshua Burke

Jul 5, 2023

[Photography] The Best Lens for Street Photography: Top 12 Picks (in 2023)

The post The Best Lens for Street Photography: Top 12 Picks (in 2023) appeared first on Digital Photography School. It was authored by Simon Bond.

The best lens for street photography

Take your street photography to new heights with these game-changing lenses. From 50mm primes to all-purpose zooms, find your perfect match.

Are you looking to hit the streets and capture the vibrant essence of urban life? If you want to up your street photography game, you’ll need the perfect lens by your side. Whether you’re drawn to wider perspectives that embrace the bustling chaos or prefer to focus on individual subjects, having the right lens can make all the difference.

In this article, I share the 12 best street photography lenses available in 2023, including options for all budgets and shooting styles, including top contenders from renowned camera brands. So whether you’re a die-hard Canon shooter, a Nikon aficionado, or a Sony mirrorless convert, there’s something here for everyone. I’ll also explain how you can pick the perfect street lens for your needs by taking into account important factors such as focal length, sharpness, and low-light performance.

Ready to choose a lens and start capturing stunning street photos? Then let’s dive in, starting with my top pick:

1. Canon EF 50mm f/1.8 STM

Canon 50mm f/1.8 The best lens for street photography

The Canon 50mm f/1.8 STM is a classic street photography lens, and for good reason. The large aperture lets you photograph in low-light conditions without needing to boost the ISO, the optics are great, and the build is wonderfully compact (so you can shoot discreetly and won’t have to worry about alerting your subjects). The 50mm f/1.8 works well for both candid street photography and street portraits (i.e., posed portraits with people on the streets), and the standard focal length offers enough reach for intimate compositions. Plus, the lens is unbelievably cheap, especially for the quality!

  • Low-light performance: Pretty good, thanks to a relatively large maximum aperture
  • Quality: A little plasticky
  • Price: You can pick up this lens for just over $100 USD – it’s just about the cheapest lens you can buy
  • Weight: The size and weight of this lens make it easy to carry around

2. Fujinon XF 35mm f/1.4 R

Fujinon 35mm f/1.4 The best lens for street photography

The Fujinon 35mm f/1.4 is a great lens for any Fujifilm camera user, whether you’re interested in street photography, portraits, or simply creating abstract bokeh. The lens is sharp, has decent focus speeds, and offers an f/1.4 for nice blurred-out backgrounds and nighttime photography. The bokeh effect is especially good (and can produce very nice street photography backgrounds).

  • Low-light performance: With a 35mm focal length and a maximum aperture of f/1.4, this lens is ideal for low-light shooting.
  • Quality: A solid, dependable lens; will keep up with the fast pace of street photography
  • Price: Midrange ($599 USD), thanks to the wide maximum aperture
  • Weight: Decent to carry around for a day on the street

3. Sony E 50mm f/1.8 OSS

The best lens for street photography

If you’re just getting into street photography, you’re a Sony APS-C user, and you want an affordable option, then the Sony 50mm f/1.8 could be the lens for you. The sleek, compact design makes it ideal for the street photographer, and its fast focusing is important for nailing the perfect shot. You get a 75mm effective focal length, which is a bit tight for some photographers – but if you like the narrower field of view, then the 50mm f/1.8 is a perfect choice.

  • Low-light performance: The larger maximum aperture is good for most low-light situations
  • Quality: Well built; ideal for both beginners and more experienced photographers
  • Price: Offers great value (around $350 USD)
  • Weight: Standard primes aren’t usually heavy, and this lens weighs just over 7 oz (200 g)

4. Canon RF 35mm f/1.8 Macro IS STM

The best lens for street photography

If you’re a beginner street photographer using Canon RF-mount cameras, the Canon RF 35mm f/1.8 STM is a lens you definitely want to consider. With its slightly wider perspective, this lens is perfect for capturing expansive street scenes that include multiple subjects or a solitary figure against a stunning backdrop. One of the standout features of this lens is its exceptional optics, ensuring sharp and clear images without any loss of detail due to lens errors. It even offers a 1:2 magnification ratio, allowing you to effortlessly capture small subjects like interesting paint patterns on the road.

Low-light situations are no problem for the Canon RF 35mm f/1.8. Its maximum aperture of f/1.8 lets in ample light, making it an ideal choice for night photography on the streets. Additionally, the built-in image stabilization feature comes in handy when shooting handheld in dimly lit environments. Not only does this lens perform exceptionally well, but it also comes at an outstanding price point. So if you’re looking for a versatile lens that delivers stunning results for street photography, the Canon RF 35mm f/1.8 is a fantastic option to consider.

  • Low-light performance: Reasonably good thanks to the f/1.8 maximum aperture and image stabilization
  • Quality: The build isn’t the strongest, but the optics are outstanding
  • Price: Extremely reasonable
  • Weight: Very compact; perfect for casual street shooting

5. Nikon AF-S 50mm f/1.8G

Nikon 50mm f/1.8 The best lens for street photography

Nikon users looking for an affordable street photography lens should consider the 50mm f/1.8G. It offers good quality with an aperture that’s large enough for most situations, plus the 50mm focal length is a street photography classic. Nice build, weight, and size make it a great option for any Nikon street photographer.

  • Low-light performance: Good for most situations
  • Quality: Well built
  • Price: The most affordable lens for Nikon street photographers (that offers a decent maximum aperture)
  • Weight: The slightly smaller aperture means less lens glass, which means it’s easy to carry

6. Nikon Z 28mm f/2.8

The best lens for street photography

While many street photographers tend to gravitate towards more common focal lengths, such as 35mm or 50mm, opting for a wider lens can give your photographs an unusually expansive viewpoint – and that’s where the Nikon Z 28mm f/2.8 comes in.

This little 28mm lens is an outstanding option for a whole host of reasons; it’s sharp, it focuses quickly, and the f/2.8 maximum aperture allows you to work in low light without issue. The 28mm f/2.8 is also both lightweight and highly compact, so you can carry it everywhere you go for those spontaneous shots, plus you can shoot without being noticed. While the build quality of the Nikon Z 28mm f/2.8 may not be the most robust, it still holds up well if treated with care. Considering its price, it offers a fantastic value, making it an affordable option for both experienced street photographers and those who are just starting to explore this genre.

  • Low-light performance: Decent, though not as good as f/1.8 options
  • Quality: The build is plasticky, but the optics are very sharp
  • Price: A great budget pick
  • Weight: Ultra-light for on-the-go street shooting

7. Canon EF 135mm f/2L USM

Canon 135mm f/2 The best lens for street photography

Those looking for a longer street photography lens could do a lot worse than the Canon 135mm f/2L. At 135mm, you’ll be able to photograph your street scenes from a distance, though the size of the 135mm f/2 makes discreet shooting difficult. It’s a great lens for separating your main subject from a busy background – you can use that extra focal length to compress the scene, and the f/2 aperture helps achieve outstanding background bokeh. And while the 135mm f/2 isn’t as forgiving as a 50mm lens, you can use it in low light, especially at f/2.

  • Low-light performance: Good for the longer 135mm focal length
  • Quality: A great build that’s usable in all weather conditions
  • Price: Reasonable ($999 USD) for a high-level lens
  • Weight: Relatively heavy, but much lighter than a 70-200mm f/2.8

8. Nikon AF 24-85mm f/2.8-4D

Nikon 24-85mm The best lens for street photography

Thanks to its zoom range, the Nikon AF 24-85mm f/2.8-4D offers a little more flexibility than other options on this list – and it can double as a general-purpose lens, too. It’s a step up from a kit lens and offers you an aperture of f/2.8 on the wide end. This lens covers the 50mm focal distance that many consider optimal for street photography, and you’ll be able to zoom in and out, a major advantage if you want to frame a photo quickly without needing to move. The major downside is the 24-85mm’s low-light capabilities; the f/2.8 to f/4 maximum aperture just won’t be enough for some situations.

  • Low-light performance: Decent, but not what you get with a prime lens
  • Quality: Good overall quality for street photography
  • Price: In the midrange price bracket (around $750 USD). You’re paying for a zoom lens with a large maximum aperture.
  • Weight: The lens is heavier than a prime lens (a compromise for more focal length flexibility)

9. Sony 35mm f/2.8 Sonnar T FE ZA

The best lens for street photography

While 35mm is on the wider side for street photography, the Sony 35mm f/2.8 is great for those with an APS-C sensor who want to photograph with a 50mm field of view. Build quality is good, so you can shoot in most conditions. And while the f/2.8 aperture isn’t ideal for nighttime outings, it’s more than enough for daytime and twilight street photography.

  • Low-light performance: It’s going to be more of a challenge to use this lens in dim light, though the wide focal length means you can handhold at a slightly slower shutter speed.
  • Quality: It’s a nice lens, and its compact size is a definite plus for street photography
  • Price: In the midrange price bracket ($799 USD)
  • Weight: Coming in at just 4.2 oz (119g), this lens isn’t heavy

10. Fujinon XF 56mm f/1.2 R

Fujinon 56mm f/1.2 The best lens for street photography

The Fujinon 56mm f/1.2 offers a wide maximum aperture, one that’s perfect for low-light street photography, plus it can generate beautiful backgrounds. The focal length is on the long side – on Fujifilm APS-C cameras, it’s an effective 84mm – but you can use it for close-ups, tighter scenics, and intimate street portraits. And for an f/1.2 lens, the price is pretty reasonable!

  • Low-light performance: You’re not going to get a better lens than this for low-light scenes
  • Quality: This is a great piece of glass that produces excellent images
  • Price: Quality lenses cost a lot; this lens will set you back around $1000 USD
  • Weight: It’s heavier than most of the primes on this list, but that’s one of the tradeoffs for such a wide maximum aperture

11. Sigma 35mm f/1.4 ART DG HSM

Sigma 35mm f/1.4 The best lens for street photography

Sigma has been making excellent lenses with its ART series, and the 35mm f/1.4 is no exception. The lens comes in mounts for all the major camera manufacturers, including Nikon, Canon, and Sony, and while it’s a third-party lens, it does well against the other glass on this list. The large aperture and medium-wide focal length make this an ideal lens for any street photographer, whether shooting during the day or at night. It really is one of the best lenses for street photography available today, and it’s cheaper than the high-end lenses offered by other major manufacturers.

  • Low-light performance: Strong. This is a fast lens that allows for great images in tricky lighting
  • Quality: Very nice; Sigma is one of the best third-party manufacturers, and the ART series is top-notch
  • Price: For around $700 USD, you’re picking up excellent glass at a midrange price.
  • Weight: The Sigma 35mm f/1.4 is on the heavier end of the scale

12. Tamron 24-70mm f/2.8 Di VC USD G2

Tamron 24-70mm f/2.8 The best lens for street photography

Looking for a versatile street photography lens? The Tamron 24-70mm offers a similar focal range to a kit lens but with a fast f/2.8 aperture. You get significant flexibility thanks to the wide-to-telephoto zoom capabilities, so you can easily capture street photos that require rapid changes in composition. The downside is this lens’s size and weight (f/2.8 zoom lenses are always on the heavier side). For a zoom lens, the f/2.8 aperture is impressive and will let you blur out backgrounds, though you might prefer a larger-apertured prime lens in low light. Bottom line: The 24-70mm is a good daytime street photography lens, and it’s also perfect for other types of photography, such as travel.

  • Low-light performance: Not the best; you’ll primarily use this lens in the daytime
  • Quality: Good quality, with image stabilization compensating for the smaller aperture
  • Price: On the pricier side ($1200 USD), though it is multifunctional thanks to its range of focal lengths
  • Weight: Pretty heavy, but the zoom range lets you carry one lens rather than several

Factors to consider before buying a street photography lens

All the lenses on this list are great, but the final decision is up to you – and should depend on your shooting style and preferred type of street photography.

So here are the key items to consider when looking for the perfect street photography lens:

Focal length

Many photographers say the best focal length for street photography is 50mm, and 50mm lenses do offer a great perspective (plus, this field of view has been popularized by many famous street photographers). Those who like the 50mm focal length but use crop sensors should go for a 35mm lens.

That said, you don’t need to feel constrained by what has come before, and wider focal lengths are becoming more popular among street photographers.

Low-light performance

best street photography lens nighttime

For moody and dramatic street photos, you’ll often need to shoot in low light. You might find yourself doing street photography in a dingy indoor market, at twilight, or at night – and in all of those situations, a lens with a large aperture provides a major advantage. Yes, modern cameras perform well at high ISOs, which negates the need for a high aperture to some extent. However, a large aperture is still required if you want beautiful bokeh lights in the background of your low-light photos.

Size and weight

the best street photography lens

To get great street photos, you’ll need to be out walking for much of the day. This means a smaller, lighter setup is a big help. Try to pick just one lens and keep it as light as possible.

Autofocus speed

Street photography is often done in fast-paced and dynamic environments, so if your lens is too slow to focus, you’ll miss a lot of shots. You need a lens that focuses almost instantly, especially if you hope to capture action-oriented street images.

Sharpness

people walking on the street

Pretty much all forms of photography require sharpness, and street photography is no exception. Look for a lens that gives you crisp, clear, detailed photos. Some street photographers do like a softer, grainier look, but you can add this in post-processing. Generally speaking, the sharper the lens, the better.

The best lens for street photography: final words

street at night

So there you have it: The ultimate rundown on the best street photography lenses! We’ve explored some fantastic options that are capable of producing breathtaking shots (and most of them won’t break the bank, either!).

Remember, when it comes to street photography, it’s all about finding the right focal length that speaks to your artistic preferences. Whether you’re a fan of the natural perspective of a 50mm lens or you crave the wide-angle excitement of a 35mm lens, there’s something for everyone out there. And hey, if you’re feeling daring, why not give the 28mm lens a whirl and capture the world from a whole new perspective?

Now over to you:

Which of these lenses is your favorite? Is there one in particular that appeals to you for street shooting? Share your thoughts in the comments below!

Street photography lens FAQ

What focal length is good for street photography?

For a natural perspective, go with a 50mm lens. If you want to capture the energy and chaos of urban life or need a wider field of view, opt for a 35mm lens. And if you’re feeling adventurous, try a 28mm lens for a unique and expansive perspective.

What type of lens is best for street photography?

Primes are the go-to choice for street photography. They are compact, allowing you to carry them easily, and they push you to become intimately familiar with a single focal length, enabling you to shoot without hesitation.

Is 50mm or 85mm better for street photography?

While 50mm lenses are highly popular among street photographers for their versatility, the use of an 85mm lens is less common in this genre. It can be challenging to capture wider scenes with an 85mm lens, but if you prefer the telephoto field of view, don’t hesitate to give it a try!

Is 35mm or 50mm better for street photography?

Both focal lengths have their merits, and the choice ultimately depends on personal preference. A 50mm lens allows you to get slightly closer to your subject, isolating them from complex surroundings. On the other hand, a 35mm lens captures a broader view, allowing you to encompass more action in a single shot.

The post The Best Lens for Street Photography: Top 12 Picks (in 2023) appeared first on Digital Photography School. It was authored by Simon Bond.


it's from Digital Photography School https://ift.tt/CXdngrU
via Simon Bond

[Photography] Candid Photography: The Essential Guide ( Tips and Examples)

The post Candid Photography: The Essential Guide (+ Tips and Examples) appeared first on Digital Photography School. It was authored by Darren Rowse.

Candid photography: the essential guide

Ready to take perfect candid photos? Our expert advice will help you master unposed photography in any setting.

Candid photography is a great way to capture spontaneous, honest images, the type of shots that tell real stories about their subjects. But taking candid photos can be difficult – even stressful – especially if you’ve never done it before.

Fortunately, there are plenty of tips and techniques that pro-level candid photographers use to get consistently great results, and in this article, I aim to share them all, including:

  • How to photograph without drawing attention to yourself
  • A simple technique to keep your subjects acting natural (even once they’ve noticed you)
  • The right candid photography settings and gear for sharp, well-exposed images

I also cover the basics, including what candid photography is and whether it’s legal. So if you’re ready to add that authentic feel to photos you take of loved ones, portrait subjects, street scenes, wedding shots, and more, let’s dive right in!

What is candid photography?

Candid photography

Candid photography is any photo that captures an authentic, unposed moment. It’s about preserving genuine expressions, emotions, and interactions without any forced poses or awareness of the camera. Instead of arranging the scene or instructing subjects to pose, candid photography aims to document life as it unfolds organically.

In this style of photography, images are often taken while subjects are often engrossed in their activities or simply being themselves. The photographer’s role is to observe and seize those fleeting, authentic moments that reveal the true essence of the subject.

That said, some candid photos are taken with the subject’s awareness. During a wedding, for instance, guests often know that the camera is pointed in their direction, but they still act naturally, resulting in beautiful candid shots. The key here is the authenticity of the photo; whether or not the subject knows they’re being photographed, if the image is authentic, then it’s a candid shot.

When is candid photography useful?

Candid photography

Candid photography is incredibly useful in various situations and genres, allowing you to capture spontaneous and natural moments. Here are some instances where candid photography shines:

  • Portrait photography: Candid portraits offer a wonderful authenticity compared to posed shots. They effectively capture the true essence of your subject. During a portrait session, you can encourage your subjects to act naturally or engage in activities, discreetly photographing them as they do. You can also seize candid opportunities between poses or while transitioning from one location to another.
  • Wedding and event photography: Candid wedding and event photography is very popular – and for good reason! These occasions present a multitude of possibilities, from capturing the bride getting ready to the groom adjusting his tie, and guests enjoying themselves at the reception. Candid shots in these scenarios are often effortless and stress-free, as the subjects are typically accepting of the camera’s presence while being engrossed in the main event.
  • Street photography: Almost all street photography relies on candid shots taken without the subject’s consent. The goal of a street photographer is to remain unnoticed, capturing individuals in their natural states. Street candids can encompass wide street landscapes, interactions between a few subjects, or a solitary person lost in thought, walking through the rain, or simply observing their surroundings.
  • Travel photography: When exploring different destinations, candid shots can help depict the unique essence of a place. Travel candid photography often resembles street photography, highlighting the people, clothing, lighting, and architecture that make a location distinctive.

While candid photography without consent is generally legal in many places, such as the United States, the rules can vary depending on your location. It’s crucial to check the laws of the specific place where you plan to do candid photography to avoid any legal trouble.

That said, candid photography with consent is widely accepted and legal almost everywhere. This means that if you’re in an area where shooting without consent is prohibited, you can still capture some fantastic candid shots by simply asking for permission first. Once your subject agrees, you can take photos as they naturally go about their activities.

How to take stunning candid photos: 16 tips and tricks

Struggling to take the kind of candid shots you can be proud of? Here are 16 tips to instantly improve your photos:

1. Take your camera everywhere

Candid photography tips and examples

The best way to take spontaneous photos? Always have a camera! That way, when the moment presents itself, you can quickly flick the On button, snag a few shots, and (if all goes well!) get a great result.

When I’m on a shoot, I’ll use my DSLR – but when I’m between shoots, I carry a point-and-shoot camera. If I see a good opportunity, I’ll whip it out and capture the scene. Of course, you don’t need to head out and buy an expensive second body – these days, smartphone cameras are very high quality and more than adequate for most candid photography.

Also, taking a camera everywhere helps people become more comfortable with you taking their photo. I find that my friends and family just expect me to have my camera out, so when I do fire it up, it’s not a signal to pose, it’s just a normal part of our interaction. And when I do take an image or two, the subjects are relaxed and the photos look natural.

2. Use a long focal length

To capture candid photography without being noticed, try shooting with a long lens – a 135mm prime, an 18-200mm zoom, or a 70-200mm zoom, for instance. As you’ve probably already guessed, the farther you are from your subject, the less likely they are to know that you’re taking pictures, and the more natural and relaxed they’ll act.

Depending on the environment, though, a long lens can be pretty noticeable, and it may actually make people feel uncomfortable (like they’re being spied on). So choose your lens widely, and if you are concerned about people’s reactions, consider picking your most compact zoom.

That way, you can get your candid shots from outside people’s personal space, you can go unnoticed, and you can maintain a feeling of intimacy in your compositions.

3. Kill the flash

two friends standing and laughing Candid photography tips and examples

Perhaps the most obvious way you can signal to another person that you’re photographing them? Using a flash (especially the flash on the top of your camera!). After all, there’s nothing like a blinding flash of light to get people’s attention and kill a moment.

So if possible, keep your flash off for candid shots. When you’re shooting in low light, instead of using flash, try boosting your ISO, opening up your aperture, or dropping your shutter speed.

You’ll get a brighter exposure, and you’ll avoid making your subject uncomfortable.

4. Wait for your subject to look away or drop their pose

Candid photography tips and examples

Capturing the perfect candid shot often requires a bit of patience and keen observation. When photographing subjects who are highly aware of your presence, such as during portrait sessions or events, it can be challenging to capture their genuine, natural expressions.

Here’s what you can do: Instead of hurriedly turning away when your subject notices you, simply give them a warm smile or act as though you’re adjusting your camera settings. You may keep their attention for a moment, but after a few beats, something magical will happen:

As they become absorbed in the flow of the activity around them, they’ll forget about your presence and start acting naturally once again. That’s when you seize the opportunity, swiftly raise your camera to your eye, and capture that spontaneous, unposed shot.

5. Take a lot of images

Candid photography tips and examples

Back in the film days, it was important to conserve your photos. But if you use a digital camera (and I’m guessing you do!), there’s no real need to hold back; instead, be aggressive with your shooting. Don’t be afraid to take many images of the same subject.

In fact, I’ve found that, when shooting a burst of images of a person, I can sometimes get some surprising and spontaneous shots that I’d never have captured otherwise.

So switch your camera to its continuous shooting mode (i.e., burst mode), and fire off several shots at once. You’ll significantly increase your chances of capturing an unexpectedly perfect candid image.

6. Position yourself strategically

While candid photography is all about capturing the spontaneity of a moment and getting a perfect shot during that split second of time, if you think ahead and anticipate what is about to unfold, you can increase your chances of success.

So at a wedding, get to the church early (or even go to the rehearsal) and think about what will happen during the ceremony. Where should you stand to capture each moment? Which way will people be facing? What will they be doing? What will the light be like?

If you ask these questions in advance, you won’t waste time running around and repositioning yourself when the action happens. And you’ll be in the perfect spot to capture candid moments when they do occur.

7. Shoot through store and restaurant windows

Candid photography tips and examples

If you’re eager to capture candid street photos but concerned about drawing attention, here’s a cool little technique: Shoot through windows of stores and restaurants. It’s a fantastic way to photograph without disturbing the natural flow of the scene.

Take a stroll through a bustling area in a nearby city, keeping an eye out for interesting subjects. As you walk, glance through the windows of establishments you pass by. Often, people inside are absorbed in their activities and don’t notice what’s happening outside, which gives you the perfect opportunity to discreetly capture candid moments.

Make sure your camera settings are adjusted to handle the lower lighting conditions indoors. When you spot a captivating subject worth photographing, swiftly raise your camera, seize the candid shot, and continue on your way!

8. Photograph people doing things

man with dog candid photography tips

Personally, I find that images of people doing things are much more interesting than images of people sitting around doing nothing. And they tend to feature more natural compositions, too.

For one, your subject will be focused on something that adds energy to a photo. It also adds context and an element of storytelling (plus, it’ll take the focus off of you!).

Timing is everything in candid photography, so wait until your subject is fully focused on their activity. This will inject a feeling of authenticity into your shots, where your subject is unaware and the viewer can look on unseen.

Note that your subject doesn’t need to be doing something especially involved or complex – they might be dancing, talking, playing a game, etc.

9. Get your subject to interact with the environment

If you’re doing a portrait photoshoot and you want to capture some candid images, it can be a challenge to make your subject feel relaxed and act natural, especially if you’ve spent the first half of the session taking posed shots. Fortunately, you can often speed the process along by encouraging your subject to look away from the camera and engage with their surroundings.

Imagine you’re in a picturesque park. Instead of simply instructing your subject to stand and smile, invite them to have some fun with the environment around them. Encourage them to scramble up a gentle slope, lean down to catch the scent of a blooming flower, or take a joyful run down a winding forest path.

If you’re shooting in an urban setting, suggest climbing a flight of steps, gazing up at stunning architectural wonders, or even waving to people passing by. The key is to inspire your subject to interact with their surroundings naturally.

By redirecting their focus from the camera to the environment, you’ll create a relaxed atmosphere where your subject can genuinely express themselves. As they engage with the surroundings, their gestures, expressions, and body language will become more authentic, resulting in captivating candid shots that truly reflect their personality.

Remember, the more your subject immerses themselves in the environment, the less self-conscious they’ll feel about being photographed!

10. Photograph people with people

candid photography tips man and woman dancing

When you photograph more than one person at a time, something very interesting happens:

You introduce a relationship into the photo. Even if the two (or more) people aren’t really interacting, you’ll still get increased depth and a sense of story.

Of course, the ideal candid compositions will have some interaction between your subjects, as that will add emotion to the shot – but even without interaction, you can still capture some stunning images.

11. Shoot from the hip

Candid photography tips and examples

Here’s a quick tip for shooting unnoticed, courtesy of street photographers:

Choose a relatively wide lens, such as a 35mm. Set your camera’s shutter to its quietest setting. Position the camera down low, either at chest height or at your hip.

And then, when your subject moves into position, fire off a burst of shots without raising the camera to your eye.

This technique can be very hit or miss, and you may want to think about zone focusing (where you prefocus your lens and use a narrow aperture for a deep depth of field). But when it works, it really works – your subject remains completely unaware of your presence, they don’t tense up or act unnatural, and you get your candid images.

12. Pretend to be photographing behind your subject

Candid photography tips and examples

If you’re out on the street and spot a fantastic subject you want to capture candidly, play the role of a tourist. Act as if you’re photographing the broader scene: the bustling street, the picturesque park, or the city skyline. Aim your camera in different directions as though you’re contemplating various expansive compositions.

By adopting this approach, your intended candid subject will often ignore you completely. And even if they do notice, they’ll likely assume you’re photographing something else and continue going about their business. It’s a clever way to blend in and capture those authentic moments without drawing unnecessary attention.

13. Change your perspective

man sitting on top of some bricks Candid photography tips and examples

Photos taken from standing height can look fine, and sure, there are plenty of great shots taken with the camera held in that eye-level area. But if you want to mix things up and capture some truly striking photos, why not change your perspective?

For instance, get down low and shoot upward, or find a nice vantage point and shoot downward. You can climb stairs, walk over bridges, crouch on the ground – whatever you need to do to get the photo (while staying unnoticed).

Also, if you do like the low-angle shot but feel uncomfortable crouching while doing candid photography (it is somewhat attention-grabbing, after all!), try shooting from the hip (as discussed above). While your shots may turn out crooked, it’s an interesting effect that some photographers like and can lend a sense of randomness and realness to a scene.

14. Watch your backgrounds

Candid photography tips and examples

When capturing candid photos, it’s easy to become hyper-focused on the people in the scene. However, it’s important to remember that while candid shots are all about the subject, the background plays a crucial role, too. A distracting or cluttered background can draw the viewer’s attention away from the subject and diminish the impact of the photo.

So before pressing the shutter, take a moment to assess the background. Ensure the backdrop features non-distracting elements, such as a stand of trees or a clean brick wall. And if your subject happens to be positioned in front of a problematic backdrop, don’t fret. Simply adjust your angle and position to find a better perspective!

Alternatively, you can also use a wide aperture to create a shallow depth of field, which will naturally blur out any distracting elements in the background. However, keep in mind that this technique works best when you are relatively close to your subject.

15. Frame images with foreground elements

Candid photography tips and examples

If you want to create more three-dimensional, layered compositions, I highly recommend composing with your subject as the focal point – but then including an element in the foreground, such as a tree, a person’s shoulder, the frame of a doorway, a window, etc.

Feel free to get creative. The point is to add a foreground element that can contribute context and depth to the shot, but you can have fun widening your aperture for out-of-focus foreground bokeh.

The ultimate goal is to create that sense of standing outside looking in. It’s a great complement to a candid moment, and when done well, can add a sense of mystery to the composition.

16. Take posed shots into candid territory

It may sound strange, but one of my favorite times to shoot candid images is when other photographers are taking formal ones.

Why? Well, during posed images, everyone is focused on the directing photographer, not you. So if, for instance, a wedding photographer is shooting a series of posed images, you can capture some wonderful candid moments simply by standing off to the side and taking a few images of your own.

I’d also recommend zooming in with a telephoto lens to capture more intimate scenes, and you might also try zooming right out to get shots of the subject plus the photographer.

By the way, if you’re the only photographer at an event or photoshoot, and you’re the one taking the posed shots, I’d recommend continuing to shoot after everyone thinks you’ve finished. It’s often these shots – captured moments after the posed images end – that look the best, because people relax, smile naturally, laugh, and look at each other.

A guide to candid photography: final words

Hopefully, you now feel much more confident as a candid photographer, and you’re ready to start taking some beautiful shots of your own! Whether you’re hoping to snap portraits that reveal the true essence of your subject, capture the magic of a wedding, or explore new destinations with your camera, candid photography opens up a world of possibilities.

Remember that candid photography is a powerful tool in your creative arsenal, allowing you to capture the raw, unfiltered moments that make life truly remarkable – so whenever you get the chance, go candid!

Now over to you:

What type of candid photography do you plan to try? Share your thoughts in the comments below!

Candid photography FAQ

What types of photos are candid?

Candid photos capture genuine and unposed moments of people in various settings, including everyday life, events, portraits, street scenes, and travel experiences.

Is it rude to take pictures without permission?

While the legality and cultural norms vary, it is generally considered respectful to seek permission before photographing someone, especially in situations where privacy or personal boundaries may be involved. However, candid photography can be done with consent.

Why do candid photos often appear more appealing?

Candid photos have a charm of authenticity, revealing genuine emotions, expressions, and interactions. They offer a glimpse into real-life moments, creating a sense of connection and storytelling that can be more captivating than posed images.

How do you take candid pictures in public?

To capture candid shots in public, blend into the surroundings and be discreet with your camera. Use a longer focal length lens to maintain distance and respect people’s privacy. Focus on capturing candid moments that don’t invade personal space.

What is candid vs portrait photography?

Candid photography focuses on capturing spontaneous and natural moments. Most portrait photography involves posed shots, though it is possible to create candid portraits.

The post Candid Photography: The Essential Guide (+ Tips and Examples) appeared first on Digital Photography School. It was authored by Darren Rowse.


it's from Digital Photography School https://ift.tt/CdOLbe3
via Darren Rowse