The post 12 Tips for Stunning Night Street Photography (+ FAQ) appeared first on Digital Photography School. It was authored by James Maher.

This article was updated in February 2024 with contributions from James Maher and Jaymes Dempsey.
I love to do street photography at night. The city is lit with a myriad of interesting and colorful light sources, such as lampposts, neon signs, store windows, car lights, and bare bulbs. People walk around in their favorite outfits. Scenes that seem bland by day turn ominous and fascinating after dark.
But capturing beautiful night street photography can be hard. You have to choose the right settings, contend with camera shake, find the perfect subjects, and more. It’s enough to give anyone a headache!
Fortunately, I’ve been doing street photography at night for many years. And over time, I’ve picked up plenty of tips, tricks, and nuggets of wisdom that’ll improve anyone’s street night shooting. I’ve tested different settings, I’ve determined how to handle nighttime lighting, and I’ve learned how to stay safe.
So to discover my top street night photography tips – and to learn how to capture gorgeous images even in the darkness – read on!
The best camera settings for night street photos
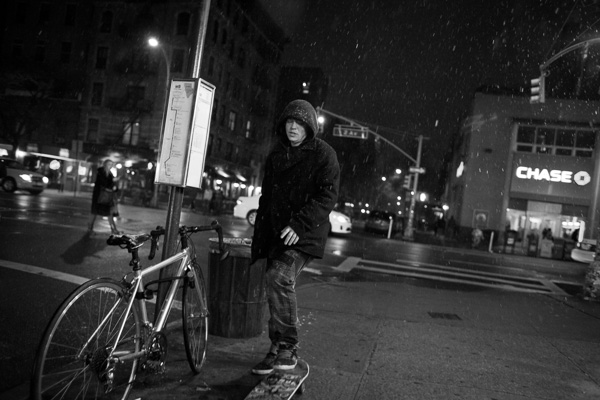
Capturing sharp street photos at night (or at any time, really!) is mostly about the shutter speed, so that’s where I’d like to start.
To freeze motion during the day, I prefer to use a shutter speed of 1/320s (with 1/160s as my lower threshold). But at night, this changes. In the brightest areas – lit by streetlights or car headlights – you can comfortably photograph at 1/250s, but most of the time, you’ll need to use a shutter speed between 1/60s and 1/160s. Otherwise, you’ll be forced to boost your ISO to ridiculous heights, and you’ll risk ruining your images with noise.
Note that when your shutter speed is set to 1/60s, you’ll need steady hands. (A lens or camera with image stabilization can help; fortunately, most decent mirrorless cameras these days do come with in-body image stabilization, and most lenses have it, too!) Note that, to photograph handheld at 1/60s, you need to stop your own motion completely. Fortunately, with some practice, this can be done – just make sure you’re always paying attention to your hand movements as you press the shutter button.
As for the best aperture setting for night street photography: The wider the aperture, the faster you can make your shutter speed (or the lower you can drop your ISO). It’s possible to shoot at f/4 in brighter areas at night, but if you can shoot at f/2.8, f/2, or even f/1.8, you’ll have a much easier time. In other words, the wider your aperture for night street photography, the better. (That said, wider apertures come with a major drawback: extremely shallow depth of field. Therefore, as I explain below, you’ll need to focus very carefully to avoid producing a slew of out-of-focus shots.)
Finally, you’ll need to raise your ISO to 1600, 3200, or even 6400. With modern digital cameras, you can photograph at high ISOs and come away with decent images, and while it’s always best to keep the ISO as low as possible, you just won’t manage to get well-exposed shots at night otherwise. (I personally shoot at ISO 3200, and I sometimes go to ISO 6400 in especially dark areas or when I’m photographing fast-moving subjects.) Plus, grainy shots at night can look surprisingly good; the grit adds to the aesthetic, especially if you convert to black and white.
What camera mode should you use? If you’re doing fast-paced shooting in a variety of different lighting scenarios (i.e., moving in and out of the street lights), Aperture Priority can work well – just set your camera to your widest aperture and highest tolerable ISO, then let it choose the shutter speed for you. (If the shutter speed drops below 1/60s, then you’ll either need to accept some blurriness, boost that ISO further, or shoot in an area with more light.)
And as for your method of focusing: Normally, zone focusing is a great method for street photography, but when using an ultra-wide aperture at night, you’ll end up missing a lot of images. You can try using manual focus to prefocus in a certain area if you can anticipate a shot in advance, but working with continuous AF and one of your camera’s tracking modes might be the better option, depending on your camera’s capability. (If you’re not sure what will work best, try to do some experimentation!)
Essential gear for nighttime street photography
The best nighttime street photography gear is broadly similar to daytime street photography gear in that you want your equipment to be lightweight, compact, and inconspicuous. That said, there are a few things to keep in mind when purchasing new equipment for those nighttime adventures:
Pick a camera with good high-ISO capabilities
Since you’ll often be shooting at ISO 3200, ISO 6400, and even beyond, it’s essential that you use a street photography camera that won’t ruin your shots with an explosion of noise. Consider investing in a compact full-frame camera or a top-notch APS-C model, and try to keep the megapixel count on the lower side, as ultra-high MP cameras tend to actually perform worse when shooting at high ISOs compared to the lower MP siblings (assuming the technology is from the same generation).
Low-light focusing capabilities are also very handy – many cameras struggle to acquire focus in the dark, while others are high performers in this area. If your camera can’t focus in near darkness, that’s not an absolute dealbreaker – you can focus manually or shoot in the streetlights – but it’ll certainly limit your flexibility.
Pick a lens with a wide maximum aperture
As I mentioned above, you’ll want to make sure you pick a compact lens for shooting the streets at night. But while most daytime street photography is shot at an aperture of around f/8, nighttime is a whole different ball game. You’ll need to widen your lens’s aperture to its maximum, which means that the wider the maximum aperture that’s offered by the lens, the better.
Therefore, I’d recommend grabbing a lens with a maximum aperture of at least f/2.8 (and f/1.8 or f/1.4 can be even better, assuming the models are still relatively compact).
It can also help to grab a slightly wider prime than you might be inclined to use otherwise, such as a 35mm, 28mm, or – if you’re interested in a more unique look – 24mm. Wider lenses are less prone to camera shake, and they’re also easier to use at night since the darkness and lack of activity results in fewer distractions throughout a broader scene.
Of course, you can still use a standard 50mm lens for nighttime street photography – a 50mm f/1.8, for instance, is great in nearly every street-photography scenario – but if you have the opportunity to go wide, I’d recommend at least testing it out!
10 tips for night street photography
Now that you understand the best settings and equipment for photographing the streets at night, let’s take a look at a few tips – for both beginners and advanced street shooters – to enhance your results.
1. Seek out light sources
Always pay attention to the main light sources in a scene. This is true no matter where or when you are photographing, but it becomes even more important at night. So instead of hunting for subjects, start by finding a beautiful light source or an area with good lighting, then wait around for something to happen.
Note that night street photography lighting can be anything: car headlights, streetlights, neon signs, window lighting, or even smartphone light. Simply look for noticeable illumination, then pay careful attention to how these light sources hit potential subjects. Adjust your angle until you get the lighting effect you want, then shoot away!
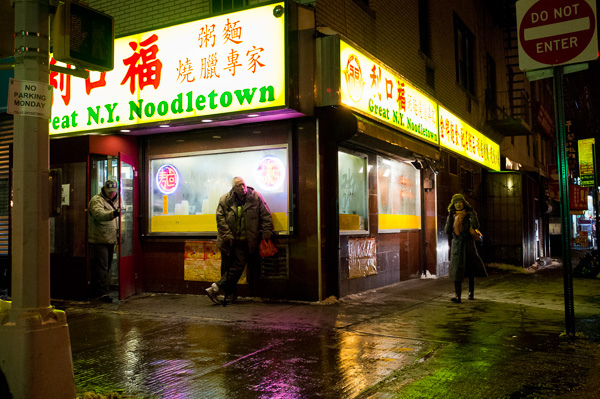
When I was photographing the streets of New York City, I found a beautiful restaurant with bright windows. I used the restaurant lighting to bring out detail in the passersby:
2. Take plenty of shots
Sometimes, street photographers like to use a more deliberate approach, capturing only a couple of images of each subject. This works fine during the day, especially if you can confidently nail the focus and exposure – but at night, it’s a recipe for a lot of failed images.
So instead of just taking one or two images of each subject or scene, when you’re out at night, push things a bit. Don’t be afraid to capture 5-10 shots of the same subject, and if you’re willing to sort through all the shots later, you might even consider using your camera’s burst mode to fire off dozens of shots in a few seconds.
The idea here is to simply maximize your chances of success. The more you shoot, the more likely you are to hit on that moment when your subject is moving slowly enough to stay sharp, even at 1/60s – and the more likely are you to nail the focus even with a razor-thin depth of field.
3. Photograph nightlife
Certain parts of the city – such as the business district – can empty out at night; they’ll make for a poor night street photography experience. Other areas, however, will get busier after sunset, and they’ll offer plenty of opportunities.
So seek out the nightlife and shoot it! You might consider doing some internet searches for bars and clubs in your area, then make sure you head on over as the night begins. Alternatively, if you’re after more formal-looking subjects, go for a walk near some upscale restaurants and see what you can find!
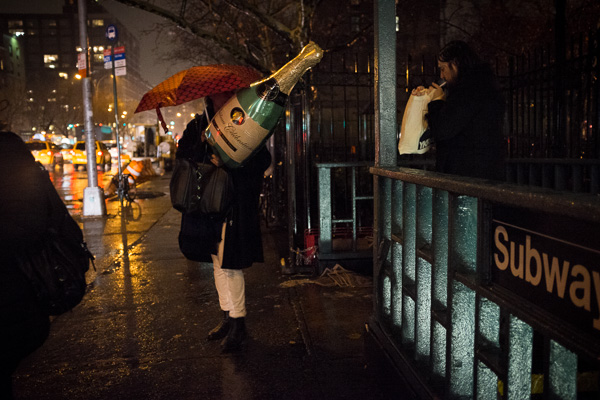
And don’t feel like you’re restricted to photographing people on the street outside clubs and restaurants. You can capture all sorts of stunning effects by shooting through windows (plus, if you’re feeling a bit nervous about photographing people, the window can act as a barrier and reduce your anxiety).
4. Alternate between getting close and stepping back
I’m a big proponent of Robert Capa’s advice that “if your photos aren’t good enough, you’re not close enough.” However, I often violate this rule at night.
You see, while I do try to get close to many of my subjects – and I encourage you to do the same – I also try to create compositions where the subjects are small aspects of the overall scene. At night, backgrounds can be much more beautiful than during the day, so it often pays to have people become the secondary element in the scene, rather than the primary focus.
This approach comes with a technical advantage: When your subjects are off in the distance, you won’t need to use a fast shutter speed to capture their motion. A nearby subject can be frozen at 1/125s or faster; a distant subject can often be photographed at 1/60s and turn out sharp, even if it’s on the move.
5. Experiment with a tripod for creative effects
When doing street night photography, it’s usually best to go handheld. After all, you never know what interesting things are about to happen, and you want to be able to react fast.
That said, it can be useful to bring along a tripod, especially if you’re interested in capturing some long-exposure street photography.
The idea here is to find a busy area, mount your camera on a tripod, then use a slow shutter speed to capture people in motion. You’ll need to experiment with different shutter speeds (1/8s is a good starting point), and you’ll need to shoot a lot of photos, but you’ll eventually end up with some gorgeous motion blur effects:
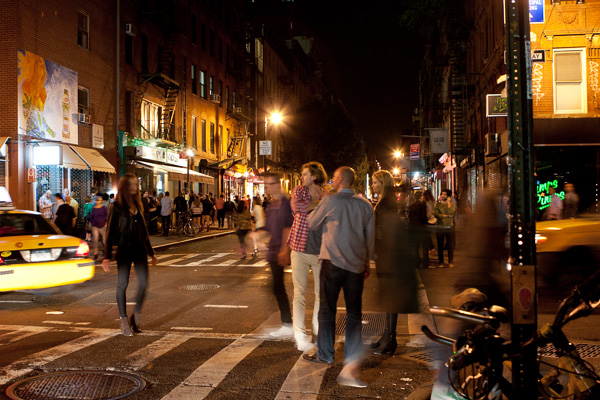
It took me a long time to capture the image displayed above; I wanted the people spread throughout the entire scene, and I also wanted an interesting foreground subject (in the end, I was satisfied by the pose of the woman in the street and the man looking at her).
6. Try working with a flash
Some street photographers love using a flash, while others hate it. Whether you decide to try flash at night is up to you; on the one hand, it’ll provide extra illumination so you can use a faster shutter speed, a narrower aperture, and a lower ISO. On the other hand, it’ll give a very intense deer-in-the-headlights look, plus it can lead to confrontation (people don’t like being flashed, especially in the dark!).
Personally, I prefer to work with the constraints of natural light, and I also get uncomfortable flashing strangers in dark settings. But if you feel confident enough to shoot with flash, then by all means, try it and see what you think. It can give a fantastic look when done well.
Note that you can have the flash do all the work lighting the scene (so that the foreground area turns out lit and the background is completely dark). But you can also set your camera to slightly underexpose the scene, then use the flash to add some fill light to your main subjects in the foreground.
7. Be careful when boosting the exposure
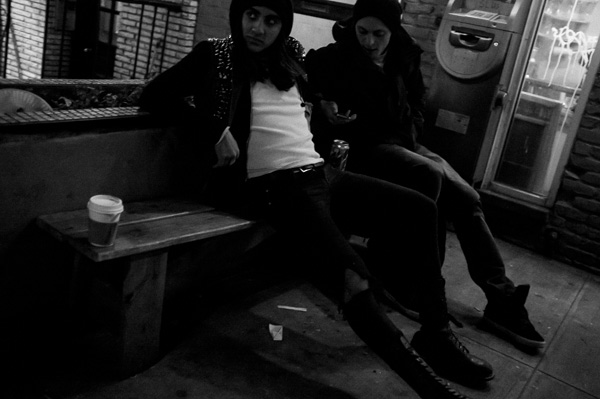
When photographing with a high ISO, it’s important to nail the exposure; that way, you’re not forced to increase the brightness when editing, which will exaggerate unpleasant noise effects.
That being said, you’ll occasionally run into situations where you accidentally underexpose a shot. And when this happens, you’ll have no choice but to raise the exposure when editing. Just make sure you do it carefully.
Here’s my recommendation: First, ignore the noise and get the exposure and look correct. If you have to raise the exposure a significant amount, the noise will be terrible, so you’ll need to apply some noise reduction.
There are many excellent noise reduction programs, but I like Lightroom’s built-in noise reduction. If the noise is still bad after applying the noise reduction algorithm, try bringing the image into Photoshop to add a very slight Gaussian blur.
At that point, I often use Lightroom’s grain settings to add texture back into the photo. The result looks much more pleasing to the eye than extreme digital noise, and it can hide some of the technical deficiencies of underexposed images. The photo will not look perfectly sharp, but it can still be beautiful.
8. Don’t be afraid of blur and imperfection
Most street photographers aim to get their photos as sharp as possible. Sharpness certainly isn’t a bad thing – but know that a photo can still look fantastic even if it isn’t incredibly crisp.
You see, when photographing at night, you don’t need to freeze motion perfectly to get a stunning result. Personally, I hold my day images to a higher standard than my night images. My day images need to look sharp, while my night photos simply need to be interesting and look good, even if they’re a little blurry in places.
Also, at shutter speeds from around 1/60s to 1/30s, it can be fun to shoot handheld. Your subjects will turn out somewhat sharp, yet there will be a little motion, too. It’s a great way to add a sense of energy to your compositions.
9. Let your night street photos look dark
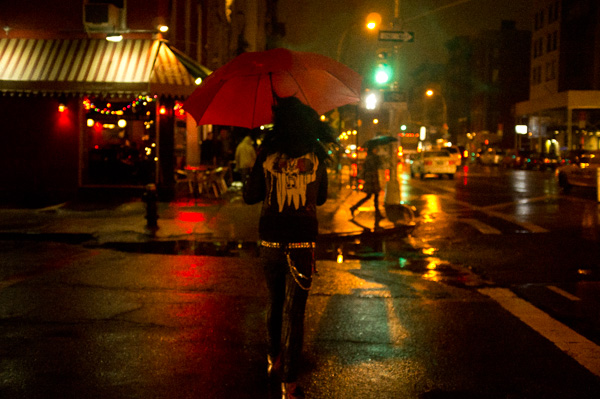
In my view, night shots should look like they were taken at night. They should be dark, with deep shadows and areas that are hard to see. When you look at the histogram of a night image, it should be skewed toward the far left, especially relative to your day images.
But when you point your camera toward a street scene at night, it’ll often overexpose the photo. The resulting file will look bright and you’ll be able to see plenty of detail, but the scene just won’t feel real. (You’ll also end up with blown-out streetlights and store windows.) In such cases, you’ll want to lower the exposure compensation on your camera slightly or – if you’re shooting in Manual mode – boost the shutter speed, narrow the aperture, or widen the ISO.
I do think that bright night images can look good. But dark, realistic night images are generally better, so carefully monitor the histogram and don’t be afraid to drop that exposure compensation as needed.
10. Shoot in bad weather
Venturing out into the night when the weather turns sour can be daunting. (I know this from personal experience!) Yet it’s precisely those conditions – snow, rain, fog, and sleet – that can transform an ordinary street scene into a photo brimming with atmosphere and emotion. Think snowflakes swirling under the glow of street lamps, or a foggy evening with dark figures moving in and out of buildings. These elements introduce a layer of complexity and mood that’s hard to replicate under clear skies.
That said, embracing bad weather does mean facing some challenges. Temperatures generally drop at night, and precipitation amplifies the risk of hypothermia; therefore, even street photography in the summer can be uncomfortable or even dangerous when the rain starts to pour. Plus, keeping your camera dry can be a hassle, and in worst-case scenarios, you may even damage your equipment.
Fortunately, with the proper preparation, you can (generally) prevent these problems. Dress warmly – think coats, hats, gloves – and use lots of layers to keep yourself comfortable. For your camera, a simple rain cover can be a lifesaver. I also recommend bringing a rocket blower (so you can rid your front lens element of water droplets) and a small towel (so you can wipe off your camera and lens barrel regularly). And whatever you do, don’t forget that lens hood; otherwise, the precipitation will quickly cover your lens and ruin your images.
One more thing: Shooting in bad weather at night is hard, and accepting that not every shot will be a masterpiece is part of the process. Night and adverse weather conditions can be unpredictable, but they also open the door to unique photographic opportunities. If you’re willing to take a lot of pictures, chances are you’ll snag at least a couple of keepers. It’s all about patience, perseverance, and a bit of an adventurous spirit!
11. Be careful
This tip is absolutely necessary, but it’s also very difficult to write about. You see, depending on where you’re shooting, heading out at night with a camera is not always the safest idea. On the other hand, many areas are safer than you might think at night, especially in the earlier evening.
Therefore, don’t be so afraid to shoot at night that you never head out, but also make sure that you stay safe. Travel light, keep your equipment to a minimum, and be careful about where you go. Make sure you pay attention to your surroundings, and if you start to feel uncomfortable, head in the other direction.
If you’re not sure whether you can safely photograph on the streets at night, do some research. I’d recommend messaging veteran street shooters in the area, though you can also look at general articles and statistics covering city crime rates.
Use your best judgment regarding who to photograph, and think about bringing a friend along. Don’t stay in one place for too long, and avoid putting down your gear to change lenses. Finally, if you desire greater peace of mind, insure your gear before you head out!
12. Focus on your editing skills
The challenging lighting conditions of night street photography often mean that your images will require a touch of post-processing to really shine – and that’s where your editing skills come into play. I highly recommend purchasing (or subscribing to) a dedicated photo-editing program; it’ll give you the tools you need to create pro-level images, and while the learning curve can be a bit significant at first, it won’t take you long to master the essential techniques.
When you’re just starting out, pay special attention to the white balance and the exposure. Tweak these elements until you get a natural, nice-looking result. Initially, you might find yourself sliding controls back and forth, experimenting until something clicks. That’s totally okay; in my experience, this trial-and-error phase is how you develop an eye for what works.
As you grow more comfortable with the tools at your disposal, you’ll begin to appreciate the power of subtle adjustments. You might even start to develop certain editing preferences, which you can bake into your own presets. (As an aside, creating presets can streamline the editing process, plus they can make it easier to achieve consistent results across your portfolio!)
But the journey doesn’t end there. Once you’ve mastered the basics, it’s time to play with more advanced techniques like color grading. This can add a stylistic flair to your images and really set your work apart. With practice, you’ll find that editing becomes a natural extension of your photography, and you can use it to express your unique perspective on the nighttime cityscape!
The benefits and drawbacks of photographing the streets at night
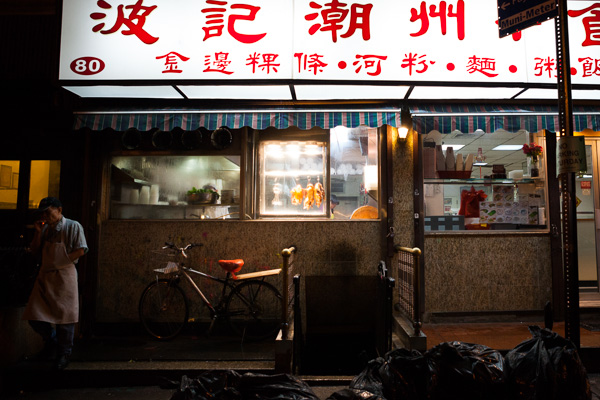
Nighttime street photography comes with several major benefits – in other words, there’s a reason for its popularity!
For one, the streets tend to be emptier at night, allowing you to isolate a subject or two without difficulty – this can make for more powerful minimalistic shots.
Photographing at nighttime with streetlights also adds a different mood to images, giving a sense of mystery, nostalgia, drama, and even horror, depending on how you approach your shots.
And budding street photographers – and even more accomplished shooters – sometimes struggle with fear or discomfort when photographing strangers. Working at night, however, lends a sense of distance and anonymity that makes for less anxiety.
Of course, night street photography comes with several significant challenges. Cameras rely on light to capture sharp, well-exposed images, and nighttime – as you are undoubtedly aware! – doesn’t offer much light. To address this, it’s important to have a real technical mastery of the camera; otherwise, you’ll end up with images that are blurry, grainy, or dark (or a combination of the three).
And as I emphasized above, photographing at night in certain areas can be genuinely dangerous. Obviously, this depends on the location, and it also depends on the approach you take. Below, I offer tips for taking proper safety precautions at night, but it really is important to keep this in mind so you don’t go in unprepared.
Tips for night street photography: final words
Well, there you have it:
Everything you need to know for stunning night street shots.
Getting beautiful street photos at night isn’t always easy. But if you remember these tips and you practice frequently, you’re bound to get some great images!
Do you have any street night photography tips you’d like to add? Which tip do you plan to follow first? Share your thoughts in the comments below!
Nighttime street photography FAQ
That really depends on the location and your approach. Nighttime street photography can be relatively safe, but there’s always a risk, so it pays to be cautious and take proper precautions.
I think so! The streets can look pretty magical at night and allow for a whole new type of image.
I’d recommend pushing your ISO as high as it can go without causing a ridiculous level of noise. You need a high ISO to achieve a reasonably fast shutter speed, plus noise doesn’t look that bad in nighttime shots.
Compact, lightweight cameras with larger sensors tend to work well for street shots at night.
The 50mm focal length is a street photography classic, but because the streets tend to be emptier at night, it’s often easy to shoot at 35mm or wider to achieve more unusual shots.
Table of contents
Street Photography
-
GENERAL
-
PREPARATION
-
SETTINGS
-
LIGHTING
-
COMPOSITION
-
GEAR
-
ADVANCED GUIDES
-
In the Dark: 10 Tips for Street Night Photography
- The best camera settings for night street photos
- Essential gear for nighttime street photography
- Pick a camera with good high-ISO capabilities
- Pick a lens with a wide maximum aperture
- 10 tips for night street photography
- 1. Seek out light sources
- 2. Take plenty of shots
- 3. Photograph nightlife
- 4. Alternate between getting close and stepping back
- 5. Experiment with a tripod for creative effects
- 6. Try working with a flash
- 7. Be careful when boosting the exposure
- 8. Don’t be afraid of blur and imperfection
- 9. Let your night street photos look dark
- 10. Shoot in bad weather
- 11. Be careful
- 12. Focus on your editing skills
- The benefits and drawbacks of photographing the streets at night
- Tips for night street photography: final words
- Nighttime street photography FAQ
- The best camera settings for night street photos
- Essential gear for nighttime street photography
- Pick a camera with good high-ISO capabilities
- Pick a lens with a wide maximum aperture
- 10 tips for night street photography
- 1. Seek out light sources
- 2. Take plenty of shots
- 3. Photograph nightlife
- 4. Alternate between getting close and stepping back
- 5. Experiment with a tripod for creative effects
- 6. Try working with a flash
- 7. Be careful when boosting the exposure
- 8. Don’t be afraid of blur and imperfection
- 9. Let your night street photos look dark
- 10. Shoot in bad weather
- 11. Be careful
- 12. Focus on your editing skills
- The benefits and drawbacks of photographing the streets at night
- Tips for night street photography: final words
- Nighttime street photography FAQ
-
CREATIVE TECHNIQUES
-
POST-PROCESSING
-
BUSINESS
-
INSPIRATION
-
OPINION
The post 12 Tips for Stunning Night Street Photography (+ FAQ) appeared first on Digital Photography School. It was authored by James Maher.
it's from Digital Photography School https://ift.tt/wuBsjAE
via James Maher