Mar 3, 2024

[Photography] How to Capture Amazing Bird Photography Compositions

The post How to Capture Amazing Bird Photography Compositions appeared first on Digital Photography School. It was authored by Jaymes Dempsey.

How to compose amazing bird photos

I first fell in love with bird photography when I was thirteen years old. I didn’t have any fancy equipment, just a little point-and-shoot camera that I had received for my birthday, and my first images – taken during a summer family vacation and featuring seagulls on the beach – were abysmal for a variety of reasons: the light was poor, the exposures were off, the birds were blurry, and the compositions were uninspiring.

But while I soon learned to deal with my lighting and camera settings issues, creating compelling bird photography compositions was a more frustrating problem. To a beginner like myself, learning to compose good images – that is, mastering the art of framing each scene and positioning its constituent elements in a way that felt right – seemed difficult to grasp.

It’s been over a decade since I first started taking composition seriously. Since then, I’ve learned a lot, and I’m happy to share that the problem of composing outstanding bird photos isn’t anywhere near as difficult as it might seem. Yes, developing your sense of composition is a gradual process, but there are plenty of tips and techniques you can use to start capturing high-level bird images right away.

That’s what I offer in this article: my best advice for crafting avian images with outstanding compositions, developed and clarified over 13+ years as a passionate bird photographer. These are the techniques I wish I had known when I first got started, and I’m confident they’ll set you on a path to success.

Sound good? Let’s dive right in.

1. Emphasize your main subject

Bird photography composition tips

The main subject in a photo is the thing that matters most in the image – the thing that draws you to the scene in the first place, the thing that you want to show the viewer. And the first step toward good compositions is to identify and then emphasize that main subject.

So as you approach a new scene, ask yourself: What matters most to me here? What do I want to show the viewer? And then make every compositional decision in pursuit of that goal.

Not every photo has a clear main subject (e.g., a landscape might feature all sorts of equally interesting plants, trees, mountains, etc.), but in bird photography, nearly every image features one (or more) birds as the main subject.

Therefore, you must do what you can to ensure that the bird stands out in the frame. You must do what you can to ensure everything else in the photo emphasizes and enhances the bird.

So how do you do that?

A few simple ways, starting with:

2. Simplify the entire composition

Bird photography composition tips

If your composition is chaotic, then the viewer is going to get lost. And that’s absolutely not what you want.

Instead, aim to simplify the composition as much as possible. The best compositions tend to include a bird and a background. That’s it.

While it’s possible to create beautiful shots by including additional birds or interesting features (e.g., shells, flowers), I recommend avoiding that as much as possible, especially when you’re starting out. These mess up compositions more often than they enhance them.

Also, in the interest of simplicity: If there’s anything in the frame that’s distracting, get rid of it. Make sure there are no branches behind the bird. Make sure there’s nothing in the background that dominates the frame or draws the eye. That’s how you’ll keep your bird photography compositions beautiful!

And speaking of backgrounds:

3. Aim for a uniform, simple background that makes the bird pop

If you want beautiful bird photography compositions, then you need a beautiful background. What does this involve?

First, the best bird photography backgrounds are simple. They’re also uniform. Like this:

Bird photography composition tips

Notice how the background is a nice uniform color.

It keeps the attention on the bird. It doesn’t distract.

To create a background like this, you want to start by ensuring a large separation between the bird and the background. One trick is to get down low, on the bird’s level; this will cause the ground behind the bird to fall away, creating a more distant background.

You should also make sure you use a decently wide aperture, such as f/5.6 or f/6.3 (the particulars depend on the size of your bird, because you don’t want to accidentally make parts of the bird soft!).

Finally, you should ensure that the background doesn’t include small bursts of color that catch the eye. Before you take a shot, look behind your bird, and ask yourself: Will anything in the background dominate the frame? Will anything pull the viewer away from the bird?

If the answer is “Yes,” then you should consider moving slightly to the left or right so that you’re no longer stuck with a distracting background.

4. Use the rule of thirds to position the bird (or the bird’s eye)

Now that you know how to capture beautiful backgrounds, it’s time to look at your main subject and how to position it.

Generally speaking, you’ll have a single bird in your photos. And you need to position this bird carefully.

You don’t want to put it smack-dab in the middle of the frame. That’s a recipe for a boring, static composition.

Instead, I recommend you place the bird so that its eye falls along a rule of thirds power point.

What are the rule of thirds power points? They’re simply points that sit a third of the way into the frame, both vertically and horizontally. The eye in this photo, for instance, falls along a power point:

Bird photography composition tips

It’s a third of the way down, and a third of the way from the left.

The rule of thirds is misnamed; it’s a guideline, not a hard-and-fast rule. You don’t have to follow it obsessively. But it’s a great way to keep the frame balanced while also ensuring that each shot feels dynamic!

5. Point the bird into the frame to add movement

I’ve talked about positioning your main subject using the rule of thirds, but there’s another aspect to positioning that you should always, always consider:

The direction the bird is pointing.

You see, most bird photos have some empty space in the frame. And when they do, you want to point the bird into the empty space, rather than away from it, like this:

Bird photography composition tips

By making sure the bird is looking into the empty space, it adds a sense of completeness to the shot, and it also adds a sense of motion. The viewer’s eye follows the bird’s line of sight, and everything feels satisfying. (This is sometimes referred to as the rule of space.)

Whereas if you point the bird out of the frame, the whole shot feels tense. The viewer wants to know what’s outside the frame, and there’s no resolution in sight.

That’s why bird photographers love to point the bird into the frame! It’s a great way to keep the image satisfying and engaging.

However, as with the rule of thirds, it’s important to remember that this is a guideline, not a fixed rule; you can certainly capture well-composed bird images without following this technique (in fact, many of the images in this article actually break this rule…).

6. Capture the bird in a creative pose for increased interest

Now, when it comes to bird photography, you can capture birds in a normal standing pose. And that’ll get you some nice photos.

But sometimes that just isn’t enough.

If you want to create truly creative bird photography, you often need to go beyond the simple standing pose and capture the bird doing something interesting.

Preening birds, for instance, look really interesting. They appear wonderfully tranquil as they clean their feathers:

Bird photography composition tips

Birds that are sleeping also give off a sense of peace that I love.

You can also go for action shots: Birds feeding, for instance, can create a lot of interest. You can capture photos of birds that are about to catch food, are currently catching food, or have just caught food. (Think of a bird with a huge fish in its mouth. It’s guaranteed to add interest!)

You can also go for shots of birds fighting or, as is a common bird photography practice, shots of birds flying. Photographing birds in flight can be a challenge, but it can be very rewarding, too!

So whenever possible, don’t just take a standard bird photo. Go beyond this. Make something unique!

7. Fill the frame

Bird photography composition tips

One of the most difficult parts of bird photography is actually getting close to willing subjects, and it’s the reason that many shooters invest in expensive super-telephoto lenses that reach 500mm, 600mm, and more.

But even with a long lens, you’ll still have to work to capture close-up bird photos; that’s why many beginners end up capturing shots that show distant birds that are tiny in the frame.

However, as I mentioned above, you always want to make sure you emphasize the main subject of each photo – and if the bird is just a small speck in the frame, it certainly won’t be emphasized.

Therefore, I encourage you to always aim for a frame-filling bird image. Of course, you can create beautiful shots that include both the bird and its surrounding environment, but those images require ultra-flattering backgrounds that complement the bird even when in focus. It’s often much more effective to fill the frame with the bird and cut out any background distractions in the process.

There are a number of ways to ensure frame-filling bird compositions. You can use blinds, you can learn to stalk birds, you can learn bird behavior and lie in wait, you can get a super-telephoto lens, or you can frequent areas where birds are relatively tame. You’ll often find yourself using several of these approaches in combination (as I mentioned above, even a super-telephoto lens often isn’t enough to get frame-filling bird shots!).

One caveat: As you aim for frame-filling photos, always keep the bird’s welfare in mind. Don’t distress the bird in pursuit of your shot; it’s just not worth it.

A quick guide to amazing bird photography compositions: final words

You should now have a sense of the best ways to capture beautiful bird photography compositions.

And remember:

Getting amazing compositions doesn’t have to be hard. Just keep in mind the tips I’ve shared, do a bit of practicing with some nearby subjects, and you’ll be taking stunning photos in no time at all!

Now over to you:

Have other tips for gorgeous bird photography compositions that I missed? Share them in the comments below!

Table of contents

Bird Photography

The post How to Capture Amazing Bird Photography Compositions appeared first on Digital Photography School. It was authored by Jaymes Dempsey.


it's from Digital Photography School https://ift.tt/L0hdjnF
via Jaymes Dempsey

Mar 2, 2024

[Photography] The Ultimate Guide to Architectural Photography

The post The Ultimate Guide to Architectural Photography appeared first on Digital Photography School. It was authored by Simon Bond.

How to capture amazing photos of architecture

Architectural photography allows you to capture and showcase a wide variety of structural marvels, from humble everyday buildings to soaring skyscrapers and cathedrals. But doing justice to each new structure can be a challenge, and that’s where this article comes in handy!

Below, I share everything you need to know to go from beginner to expert, including:

  • Essential architectural photography gear
  • How to work with light for the best results
  • Creative techniques (including infrared and refraction photography) to capture unique photos of buildings
  • How to level up your architectural compositions with a few simple adjustments
  • Much more!

So if you’re ready to start taking architectural photos like a pro, then let’s dive right in!

What is architectural photography? A simple definition

How to photograph architecture

Architectural photography, at its most basic, is about capturing buildings and other structures – generally in a way that is both aesthetically pleasing and accurate to their forms.

It encompasses a wide range of subjects, from the breathtaking buildings designed by world-renowned architects to the simple yet meaningful designs of vernacular (i.e., everyday) architecture. In other words, architectural photography is not just about photographing high-profile buildings; it’s about capturing structures of all kinds: towering skyscrapers, soaring cathedrals, suburban houses, and even solitary garden sheds.

How to photograph architecture

Before I delve into tips and techniques, I want to touch on two very different branches of architectural photography: commercial and fine art. Commercial architectural photographers produce images for real estate listings, architectural firms, and businesses. Their work is instrumental in marketing properties and designs.

On the other hand, fine art architectural photography is more about the photographer’s vision and interpretation of the architecture. It explores the aesthetic, historical, and conceptual aspects of buildings and often aims to evoke emotions or convey deeper meanings.

How to photograph architecture

Regardless of the focus, architectural photography relies on a variety of tools – including composition, perspective, and lighting – to create compelling images. Of course, as with all forms of photography, gear does make a difference, so that’s where I’ll start:

The essential gear for an architectural photographer

You don’t need to spend a ridiculous amount of money on gear to excel in architectural photography, but certain equipment will make a big difference. Here’s what I recommend:

First, you’ll want access to a reliable interchangeable lens camera. While the brand and model aren’t hugely important, I do encourage you to choose a camera that offers decent high-ISO performance (in case you’re shooting in a space where tripods aren’t permitted; see below!).

Next, you’ll want to own at least one wide-angle lens, which will allow you to capture an expansive view of your subject even when space is limited. Zoom lenses are great for their versatility, but prime lenses can be more budget-friendly.

Now, you can do all of your architectural shooting with wide-angle glass, but for capturing intricate details or parts of a building from a distance, a telephoto lens, such as a 70-200mm zoom, can come in handy.

If you get really passionate about shooting architectural images, you may want to invest in a tilt-shift lens – which will help you control perspective distortion – but there aren’t many options and you can make these adjustments in post-processing, so you’ll want to think long and hard before grabbing one of these models.

How to photograph architecture

Third, a sturdy tripod is practically a must-have for architectural photography. Not only will a tripod stabilize your camera while you capture long exposures in low-light interiors, but it’ll also free you up to create striking shots at night. And a tripod, while cumbersome, will also improve your sense of composition; it’ll force you to slow down when shooting, which will make your framing and angle decisions more deliberate.

One final suggestion: a remote release can enhance your architectural photography by eliminating camera shake caused by manually pressing the shutter button. (That said, you can get the same effect by using your camera’s self-timer, so if you don’t own a remote and don’t want to buy one, that’s okay!)

How to work with light to enhance your images

How to photograph architecture

Unlike other photography genres where you can manipulate light sources directly, architectural photography often requires working with available light. Therefore, if you want great shots of architecture, it’s crucial to understand the nuances of natural light!

I want to emphasize, however, that there isn’t a one-size-fits-all type of light for shooting architecture; the key is to discern how different lighting conditions can complement specific architectural subjects and match your specific aims as a photographer.

For instance, photographing architecture on an overcast day can yield images rich in detail with soft, evenly distributed light. This flat and directionless light minimizes harsh shadows and highlights. As a result, it’s ideal for capturing the true colors and details of buildings. It’s particularly effective for highlighting the intricacy of architectural designs without the distraction of strong contrast.

How to photograph architecture

Another option is midday light. While it’s often avoided in other photography genres due to its harshness, the overhead sun can accentuate the graphic qualities of buildings. The strong light creates deep shadows and pronounced lines, producing photos that emphasize form over detail.

How to photograph architecture

(Pro tip: Converting these images to black and white can often enhance the graphic impact even further, so if you’ve captured some architectural shots at midday, it’s always worth trying a quick B&W conversion!)

Next, you have the golden hours, which occur just after sunrise and just before sunset and offer a magical quality of light that is warm and directional. This lighting is perfect for adding depth and dimension to architectural subjects – it casts long shadows that highlight details and create a real sense of volume.

How to photograph architecture

But when shooting with golden-hour light, you’ll want to pay careful attention to the light’s direction. Front lighting will illuminate building exteriors directly, showcasing details and colors. Side lighting, on the other hand, does a great job of emphasizing the three-dimensionality of the architecture, while backlighting often creates a dramatic silhouette effect, emphasizing the outline and form of the building – but at the expense of detail.

Finally, after the sun sets, the blue hour presents plenty of additional opportunities for the enterprising architectural photographer. The soft, cool tones of the blue hour give an ethereal effect, while artificial lights from street lamps and buildings add warmth and depth. Of course, you’ll definitely need a tripod to shoot blue-hour architectural photos, and you may even need to lower your shutter speed to 15 seconds and beyond, but the results can be outstanding!

How to photograph architecture

9 handy architectural photography tips

Looking for additional advice to improve your photos of architecture? I’ve got you covered! Below, I share plenty of tips and tricks to help you capture eye-catching and creative shots, starting with:

1. Explore different perspectives for breathtaking compositions

Architectural photography beginners tend to shoot from eye level – and while you can capture decent images with this approach, you can often enhance your photos by trying out a different perspective.

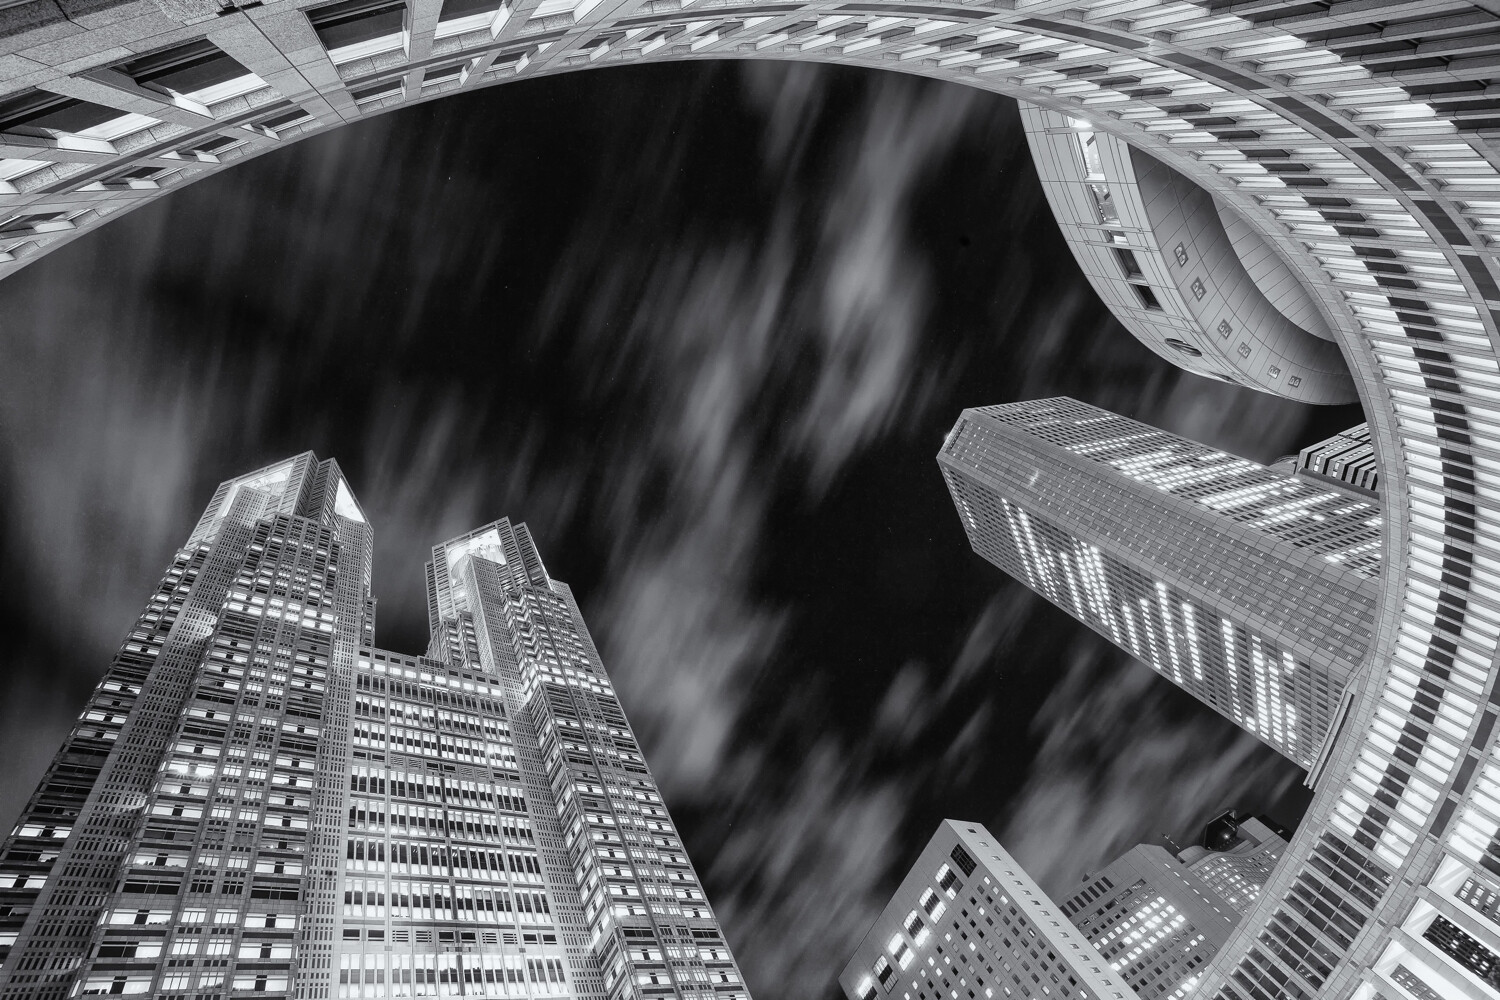
For instance, you can get down low and point your camera upward for a worm’s-eye view. It’ll let you incorporate plenty of beautiful sky into your composition, and if you use a wide-angle lens, you’ll make buildings appear unimaginably large (even foreboding).

Personally, I like a worm’s-eye view for photographing taller structures. It’s also a great way to emphasize interesting ceiling features when shooting building interiors, though make sure you use your wide-angle lens for the best results.

The Ultimate Guide to Architectural Photography

You can also create interesting architectural photos by using a bird’s-eye view, where you shoot down from high above. To pull off this perspective, you need to find a way to get above your subjects, and in certain cases, it can be pretty tough. Some serious architectural photographers work with drones or from planes, but if you’re not ready to take that step, you can get similar results by shooting smaller buildings from the top of a parking garage or observation deck.

2. Try infrared photography for a unique effect

Infrared architectural photography isn’t the most popular technique on the block, but when done right, it can look incredible. It’s a great way to make your architectural shots stand out:

The Ultimate Guide to Architectural Photography

Now, this style of photography does work much better outdoors and in places with vegetation. I don’t recommend using infrared techniques to photograph, say, church interiors – at least not at first. But infrared works great on exteriors, and it has the potential to turn a standard scene into a stunning dreamscape.

How can you create the infrared look? You have a few options. You can use an infrared filter, which works but will often require very long exposure times. Alternatively, you can pay to have your camera converted for infrared photography; this is the most reliable method, but bear in mind that the converted camera will only shoot in infrared – you can’t switch back and forth between infrared and non-infrared imaging. A third option is to create the effect in post-processing.

Personally, I’d recommend you start with an infrared filter or use the post-processing method. Then, if you like your initial results, consider paying to have a camera converted. That way, you can have tons of infrared photography fun!

3. Paint light for breathtaking architectural photography

I’m a huge fan of light painting; it’s easy to do, it’s fun, and you can use it to capture mind-blowing effects:

The Ultimate Guide to Architectural Photography

The idea is to set up a long-exposure image – for this, you’ll need a tripod and a remote release – then shine a light on or around the architectural subject. You will need to work at night (otherwise the light won’t show up), and you can get very different effects by varying the lighting instrument and the lighting intensity.

Note that the painted light will often become a compositional element in and of itself. Like an actual painter, you’ll need to carefully position your “brush-strokes” to give maximum effect; try using the light to form a leading line or even to frame the architecture (I used the latter technique in the image above!).

Here are a few light-painting tools you should consider:

  • A flashlight is your simplest option. You can use it to create patterns (by moving the flashlight in front of the camera), or you can use it to light up a section of the architecture you wish to photograph. (For especially interesting results, try adding colorful gels in front of the beam!)
  • A light source on a string can look great, plus it can get you some extra height (always useful when working with tall buildings!). I recommend tying your light source – such as a glow stick – to the string, then spinning it through the air while taking photos. But remember to position the resulting light strategically in the frame.
  • An LED light stick is a more sophisticated method of light painting. Certain light sticks actually allow you to program colors and patterns; you can wave a programmed stick around your subject to create glowing shapes, flags, and more. With light sticks, the sky is the limit!

4. Kinetic light painting

Kinetic light painting is like the standard light-painting techniques I shared above, but with a twist:

Instead of moving the light source, you move the camera.

It can be pretty experimental, and not all locations are suited to this style. But if you put in enough time and effort, you’ll eventually come away with some amazing photos.

The Ultimate Guide to Architectural Photography

How does kinetic light painting work? There are two main techniques (both of which require a tripod and a remote release):

  • Zoom burst. For a zoom-burst effect, you’ll need to set up your camera, dial in a long shutter speed, then zoom your lens before the image is complete. I’d recommend using a 24-70mm lens (you need plenty of focal length flexibility), though kit lenses work great for this, too. In my experience, the zoom-burst technique works well with tall buildings that are lit up by lots of interior building lights.
  • Camera rotation. To pull off this technique, you’ll need to use a long shutter speed, then rotate your camera around the tripod head as you shoot. That’s how I captured the image featured above; I dialed in a long exposure, I triggered the shutter, then I rotated the camera, stopping every so often for a sharper view of the building. I especially like to use the camera-rotation technique when shooting up at tall architecture.

5. Use a crystal ball for stunning refraction effects

It may be unorthodox, but photographing with a crystal ball can give you some wild results!

Here, you simply shoot through a glass ball and rely on the refraction to create a very cool look:

The Ultimate Guide to Architectural Photography

Note that buildings will appear upside-down in the crystal ball, so you’ll either need to compose with that in mind, or flip the image in post-processing (that’s what I did for the photo above!).

Pro tip: Don’t rely purely on the crystal ball to capture a great image. Instead, make sure you carefully choose your subject and create a great composition – then let the amazing effect act as the icing on the cake!

6. Don’t forget about the architectural details

How to photograph architecture

Most architectural photographers try to capture an entire building – or even an entire skyline – in a single image.

But if you really want to tell the story of the architecture, it often helps to zoom in on the details. Bring a longer lens, and when you’re done capturing the grander scene, switch on over. (I’d recommend a 70-200mm lens, which will offer plenty of flexibility; you can capture larger details at 70mm, then zoom in to 200mm to highlight intricate elements.)

Note that architectural detail photos don’t have to stand on their own. For instance, you can combine wider images with a few detail shots to tell the story of an entire structure.

So the next time you head out to photograph architecture, keep an eye out for interesting details! I recommend looking for lines and curves (like arches in a church), ornate decorations on walls, and patterns in the roofing.

Also, pay careful attention to the lighting, especially if you’re photographing building exteriors. Different sun positions will emphasize or deemphasize certain elements, so by working at the right time of day, you can get the precise effect you’re after.

The Ultimate Guide to Architectural Photography

7. Use blending to nail your exposures

Cameras are capable of capturing a limited tonal range, which means that, when faced with a dark interior and bright windows, or a dark building and a bright sunset, your camera will overexpose the bright areas and/or underexpose the dark areas.

Unfortunately, overexposure and underexposure look terrible, and in the worst cases, you won’t be able to fix the issue in post-processing. So what do you do?

I recommend you use an exposure blending technique, which is easier than it sounds. Set your camera on a tripod, then capture several images at different exposures. The convention is to capture three shots – one exposing for the dark areas, one exposing for the bright areas, and one exposing for the midtones – though you may need to capture more images if the scene is unusually contrasty.

Finally, blend the different exposures together in a program such as Lightroom or Photoshop (most post-processing software can do this for you automatically!). You’ll end up with an image full of beautiful shadow and highlight detail:

The Ultimate Guide to Architectural Photography

8. Look for contrast

Contrast is a great way to improve your architectural photography – because by incorporating contrast into your shots, you can create lots of eye-catching interest.

Now, “contrast” is a broad term, and you can apply it in several different ways (all of which look amazing!).

First, you can look for tonal contrast – that is, contrasting light and shadow. You’ll often find this on bright, sunny days. The sun will highlight certain parts of a building and hide others, creating an interesting graphic effect. (This is a great way to enhance your abstract architectural photos, by the way!)

You can also look for color contrast. Here, a color wheel is often helpful, and it will display pairs of contrasting (opposite) colors: green and red, purple and yellow, blue and orange. While it can be tough to find architecture featuring contrasting colors, you can always position yourself so that one colorful building is juxtaposed with another colorful building.

Finally, you can look for the contrast offered by the subjects themselves. You might shoot an old and a new building side by side, you might capture an old building surrounded by new buildings (such as a church surrounded by modern skyscrapers), or you might photograph architecture surrounded by nature to illustrate the relationship between nature and culture!

How to photograph architecture

9. Use framing to level up your compositions

Framing is a classic compositional technique, and it works great for photographing architecture.

The idea is simple: Find an interesting building, then frame it with elements in the foreground, such as another building, a doorway, fencing wire, or tree branches.

The tough part is finding a frame, but if you’re familiar with common framing devices, you’ll often be able to look around and spot one instantly. And if you can’t find a frame, don’t fret; you can always introduce one by holding something in front of the camera, like a handful of flowers.

How to photograph architecture

By the way, you don’t necessarily need to start by finding a building and only then add a frame. You can do the reverse: first find an interesting frame, such as an archway. Then move your camera around to see what you can fit within it!

How to do architectural photography: final words

If you’ve made it this far, you’re ready to capture some beautiful architectural photos of your own.

You know the essential gear, you know how to work with light, and you know how to capture powerful photos that combine composition and a touch of creative flair.

So get out with your camera! Find some buildings! And use these tips and techniques to create stunning shots.

Now over to you:

Do you have any architectural photography advice that I missed? Share your thoughts in the comments below!

Table of contents

Architectural Photography

The post The Ultimate Guide to Architectural Photography appeared first on Digital Photography School. It was authored by Simon Bond.


it's from Digital Photography School https://ift.tt/e95ZW6A
via Simon Bond

Mar 1, 2024

[Photography] dPS Bi-Weekly Photo Challenge: Electric

The post dPS Bi-Weekly Photo Challenge: Electric appeared first on Digital Photography School. It was authored by Sime.

‘Electric’ is a pretty broad theme, and we’re leaving it to you to interpret it as you would like. Under my drone photo below (bzzzt, fly during a storm, sure, why not!) I’ve conjured up a list of ideas you could explore over the next two weeks of the challenge, for your photograph.

One photo for this challenge, make sure you use the dPS challenge tags in your post, wherever you choose to post your photograph. (details at the end of this post)

dPS Bi-Weekly Photo Challenge: Electric

My photo above was two exposures from my Mavic 3 drone, was a heck of a light show! Below I’ve given you a whole list of ideas – have fun!

  1. Neon Signs: Capture the vibrant colors and glowing lights of neon signs in urban areas, which often give off an electric vibe.
  2. Lightning: Try your hand at capturing the dramatic beauty of lightning strikes during a thunderstorm. This could require patience and timing but can result in stunning shots.
  3. Urban Nightscapes: Photograph cityscapes at night, focusing on the interplay of artificial lights from buildings, street lamps, and vehicles to create an electrifying atmosphere.
  4. Light Trails: Experiment with long exposure photography to capture light trails created by moving vehicles or other sources of light, such as fireworks or sparklers.
  5. Technology: Showcase the sleek and futuristic designs of electronic gadgets, devices, or machinery. Close-up shots of circuit boards, wires, or glowing screens can convey the idea of electricity at work.
  6. Energy Production: Visit power plants, wind farms, or solar panel installations to document the generation of electricity through various sources. This could involve capturing the scale and machinery involved in energy production.
  7. Electric Vehicles: Focus on the emerging trend of electric vehicles, capturing their sleek designs, charging stations, or the futuristic feel of driving one.
  8. Electric Wildlife: Photograph animals or insects that produce electricity, such as electric eels or certain species of fish and insects. These shots could highlight the unique adaptations of these creatures.
  9. Light Painting: Get creative with light painting techniques, using flashlights or other light sources to “paint” shapes or patterns in the dark, creating an electrifying effect.
  10. Abstract Patterns: Look for abstract patterns and textures that resemble electrical currents or sparks, such as patterns in water reflections or patterns created by light passing through glass or prisms.

Make sure you include the hashtags #dPSWeeklyChallenge and #dPSElectric in your post, here in the comments or over on social media. You can tag us on Facebook, Instagram or Twitter!

Find all of our previous weekly challenges here.

Simply upload your shot into the comment field (look for the little camera icon in the Disqus comments section) and they’ll get embedded for us all to see or if you’d prefer, upload them to your favourite photo-sharing site and leave the link to them. Show me your best images in this week’s challenge. Sometimes it takes a while for an image to appear so be patient and try not to post the same image twice.

Share in the dPS Facebook Group

You can also share your images in the dPS Facebook group as the challenge is posted there each week as well.

The post dPS Bi-Weekly Photo Challenge: Electric appeared first on Digital Photography School. It was authored by Sime.


it's from Digital Photography School https://ift.tt/dQetOZy
via Sime