Oct 29, 2024

[Photography] Beauty Dish Photography: The Essential Guide (+ 5 Lighting Setups)

The post Beauty Dish Photography: The Essential Guide (+ 5 Lighting Setups) appeared first on Digital Photography School. It was authored by Gary Detonnancourt.

Beauty dish photography (+ 5 lighting setups)

The beauty dish is one of my absolute favorite light modifiers – but it can be intimidating for beginners, and can even confuse serious portrait shooters.

That’s why, in this article, I share everything you need to know about beauty dish photography, from the lighting basics all the way to my favorite setups. I also explain when it makes sense to use a beauty dish versus a softbox, so if you’re not sure which way to go, I should be able to help you out.

Let’s get started!

What is a beauty dish?

A beauty dish is a circular lighting modifier with an opaque center, like this:

beauty dish example

Like most lighting modifiers, you can combine a beauty dish with a studio strobe or speedlight. Note that a beauty dish blocks light in the center of the strobe and reflects it around the entire dish; this ensures a relatively hard, focused beam of light, though it’s softer than, say, a scrim, a softbox, or an umbrella. Beauty dishes are generally reserved for portraits, for reasons I explain in the next section.

You can buy beauty dishes for most lights, and they’re usually less expensive than other modifiers – but if you don’t want to spend extra money, consider creating a DIY beauty dish (many plans exist online, and I’ve actually made them out of aluminum turkey pans!).

Why are beauty dishes useful?

Beauty dishes are popular in the fashion industry, generally for head-and-shoulders portraits that highlight makeup and hair. Because beauty dish lighting is relatively hard, you can sculpt the subject’s face and show texture in their skin, but without straying into bare-flash territory. Plus, the light falloff is quite rapid, which allows you to emphasize facial features and deemphasize surroundings.

Also, beauty dishes produce stunning catchlights in the eyes (beautiful, circular highlights that draw the viewer into the portrait), and they produce nice shadows under the jaw line.

Beauty dishes are versatile, too; you can change the quality of the light by selecting a dish with a silver or white inner surface (the white surface will reduce specular highlights on the subject’s face). You can also control the spill of light with a grid and further soften the light by adding a sock over the front, like this:

beauty dish with a sock

Beauty dish vs softbox: which should you use?

If you’re just getting started with studio portrait photography, you might be struggling to decide between a beauty dish and a softbox. While both these lighting modifiers work great, they do come with several significant differences, so it’s worth carefully considering your options.

As I explained above, beauty dishes are primarily used for portrait photography, especially fashion. So if you’re hoping to shoot still life photos, product photos, or even studio pet photos in addition to standard portrait shots, a softbox is the better buy.

Softboxes are also great for achieving a softer, flattering look – so they’re perfect if you’re hoping to get that “diffused window” effect that portrait photographers love.

Plus, you can buy huge softboxes, which are great for group shots (beauty dishes vary in size, but they never go that big).

On the other hand, the beauty dish look is harder and sculpted, so if you want intense portraits, a beauty dish will serve you well.

Beauty dish photography: getting started

So you’ve decided to use a beauty dish – and maybe even purchased one. What now? How should you proceed?

First, I’d suggest you only use a beauty dish setup on clients or models with very good skin, because the harder lighting can show off imperfections like wrinkles and blemishes. It’s also helpful to find a good makeup and hair artist since you’ll likely be showing off the subject’s face in detail.

(Pro tip: If you want to use a makeup artist but aren’t ready to pay for this service, offer them a trade: makeup in return for professional images, which they can use to expand their portfolios.)

beauty dish portrait

As for the technical details: I’d recommend a lens in the 85-200mm range so you can zoom in for tight headshots. In general, it makes sense to use an aperture of around f/8 to f/11 and an ISO of 100, then adjust the lighting power to achieve the right exposure. I would also recommend using a boom arm, which will help you put the beauty dish in just the right spot without getting in the way of your shot (though beginners can certainly get started with a conventional light stand).

The beauty dish will give you very nice light on your subject’s face, so get that set up first. Then go ahead and add additional lights, if you have them: a rim light behind your subject, a hair light above your subject, and/or a background light to separate the subject from the background.

Below, I share five specific beauty dish lighting setups to get you taking gorgeous images in no time at all:

1. One light with a reflector

This setup, also known as clamshell lighting, is the most typical way to do a beauty-dish photo. Start by positioning your beauty dish right above the subject’s face and point it down slightly, so the center of the dish is aimed at the subject’s forehead, right between the eyes.

The dish should be close enough to your subject to produce soft light, generally within two to four feet. When you set this up, make sure you can see catchlights in the top of your subject’s eyes (try taking a test shot or two and zooming in on your LCD).

Next, add a reflector under the chin to bounce light back up into the subject’s face. This will help minimize shadows under the chin and will add a catchlight at the bottom of the eyes. Note that you’ll need to put your camera between the beauty dish and the reflector, which might take a bit of finesse. Also, to adjust the amount of fill light, you’ll need to push the reflector closer or pull it away.

Some photographers like to add black cards on either side of the subject to create shadows on the sides of the face, but this is optional. And for a more sophisticated effect, try adding a background light or a rim light to make your subject stand out.

Beautydish 1 2 Beautydish 2 2

2. Two lights in a clamshell pattern

This lighting setup is similar to the clamshell pattern I shared above, except you use a strobe in place of the reflector. So add your beauty dish above the subject pointing down, then position the strobe below the subject pointing up.

What’s the benefit of this setup versus number one? A strobe lets you control the fill light power, which makes filling in shadows much easier. I prefer to use a strip box as fill (set one or two stops darker than the main light).

Beautydish 7b Beautydish 8

3. Add a sock over the beauty dish

A sock is a piece of diffusion material that looks like a shower cap (see the image in the Why are beauty dishes useful section above), and it goes directly over the beauty dish. This softens the light on the subject’s face, and if you are getting shiny spots, it will reduce the specularity of the light.

While a naked beauty dish produces sculpted light, a sock will produce a creamy look with less skin texture, like this:

black and white portrait taken with a beauty dish

Note that the goal here is to create either of the clamshell setups I shared above, but with the added sock.

4. Add a grid to the beauty dish

Here’s another method of modifying the beauty dish clamshell setups:

Set your beauty dish above the subject, then add a grid, as shown below.

beauty dish with a grid

The grid will focus the beam into more of a spotlight pattern, which can be used to create some interesting effects. Just make sure the grid is pointed directly at the subject, or the light pattern will not strike the face correctly. (The easiest way to check this? Ask the subject if they can see directly through the grid to the light source.)

5. Head outdoors

The beauty dish is a great portable light modifier because it’s more compact than a softbox, and it won’t catch the wind like an umbrella.

Depending on the power of your lights, you can use a beauty dish as a main light or fill light. Feel free to use the straight-down positioning I recommended above, though you can also set it up at a 45-degree angle, like you might use a softbox.

When the light conditions are warm – such as around sunrise or sunset – you may want to add a color temperature orange gel over the beauty dish to help blend the strobe with the sunlight.

woman in the water outdoor beauty dish photography

Beauty dish photography: final words

Hopefully, you can now confidently use a beauty dish. They’re powerful lighting tools, and the effect is amazing.

So if you haven’t already, go out and buy (or make!) a beauty dish. And then do a photoshoot! I guarantee you’ll get some beautiful shots.

Now over to you:

How do you plan to use a beauty dish in your next photoshoot? Which beauty dish do you plan to buy? Share your thoughts in the comments below!

woman with beauty dish lighting

Table of contents

Portrait Photography

The post Beauty Dish Photography: The Essential Guide (+ 5 Lighting Setups) appeared first on Digital Photography School. It was authored by Gary Detonnancourt.


it's from Digital Photography School https://ift.tt/ugfciCG
via Gary Detonnancourt

Oct 23, 2024

[Photography] Side Lighting in Photography: A Comprehensive Guide

The post Side Lighting in Photography: A Comprehensive Guide appeared first on Digital Photography School. It was authored by Kevin Landwer-Johan.

a guide to side lighting in photography

Side lighting adds atmosphere and can provide a wonderful sense of depth in your photos. But what actually is side lighting? And how can you work with side lighting for the best possible results?

In this article, we’ll take a detailed look at side lighting. I’ll show you how to use it, I’ll explain when it works, and I’ll offer plenty of tips and examples to jump-start your own side lighting photography.

Let’s dive right in!

What is side lighting in photography?

early morning side lighting on a landscape
Early morning side lighting.

As the name suggests, side lighting illuminates your subject from one side. That’s basically all there is to it; it’s simply light that comes from the side of your subject (as opposed to behind or in front of the subject).

Of course, while this seems pretty straightforward, not all side-lit photos look the same. There’s plenty of opportunity for variation. The light can come from directly beside your subject – at a 90-degree angle from the camera lens – or it can come at a 45-degree angle in front of your subject, a 45-degree angle behind your subject, etc. The light can be hard or soft. It can be natural or artificial. It can be ambient or added. What matters is the general direction of the light.

Now, if the light comes from off to the side and strikes your subject, it will naturally create a shadow. Specifically, the side of the subject facing away from the light will be darkened relative to the side of the subject facing toward the light. Depending on the light’s characteristics, this could mean that the shaded side of your subject contains little-to-no visible detail. 

For instance, when a subject is illuminated from one side by a bright, hard light source, the dark side will often fall into deep shadow. This is especially pronounced when there’s very little reflected or ambient light:

portrait of a senior man with side lighting

When should you use side light?

Side lighting is great when you want to emphasize texture or add a sense of depth to an image. 

If you photograph a flat, textured surface with front lighting, you’ll produce an image of the flat surface without any real depth – the surface will look smooth. But if you photograph the same textured surface with a light positioned at a low angle and off to one side, the texture will become apparent. Why? Because the viewer will see the shadows created by the side light!

In a similar way, lighting a building from the front can make it appear very two-dimensional. If you wait until the sun moves off to one side, the result will have far more depth. Once again, this is largely due to the shadows created by side lighting.

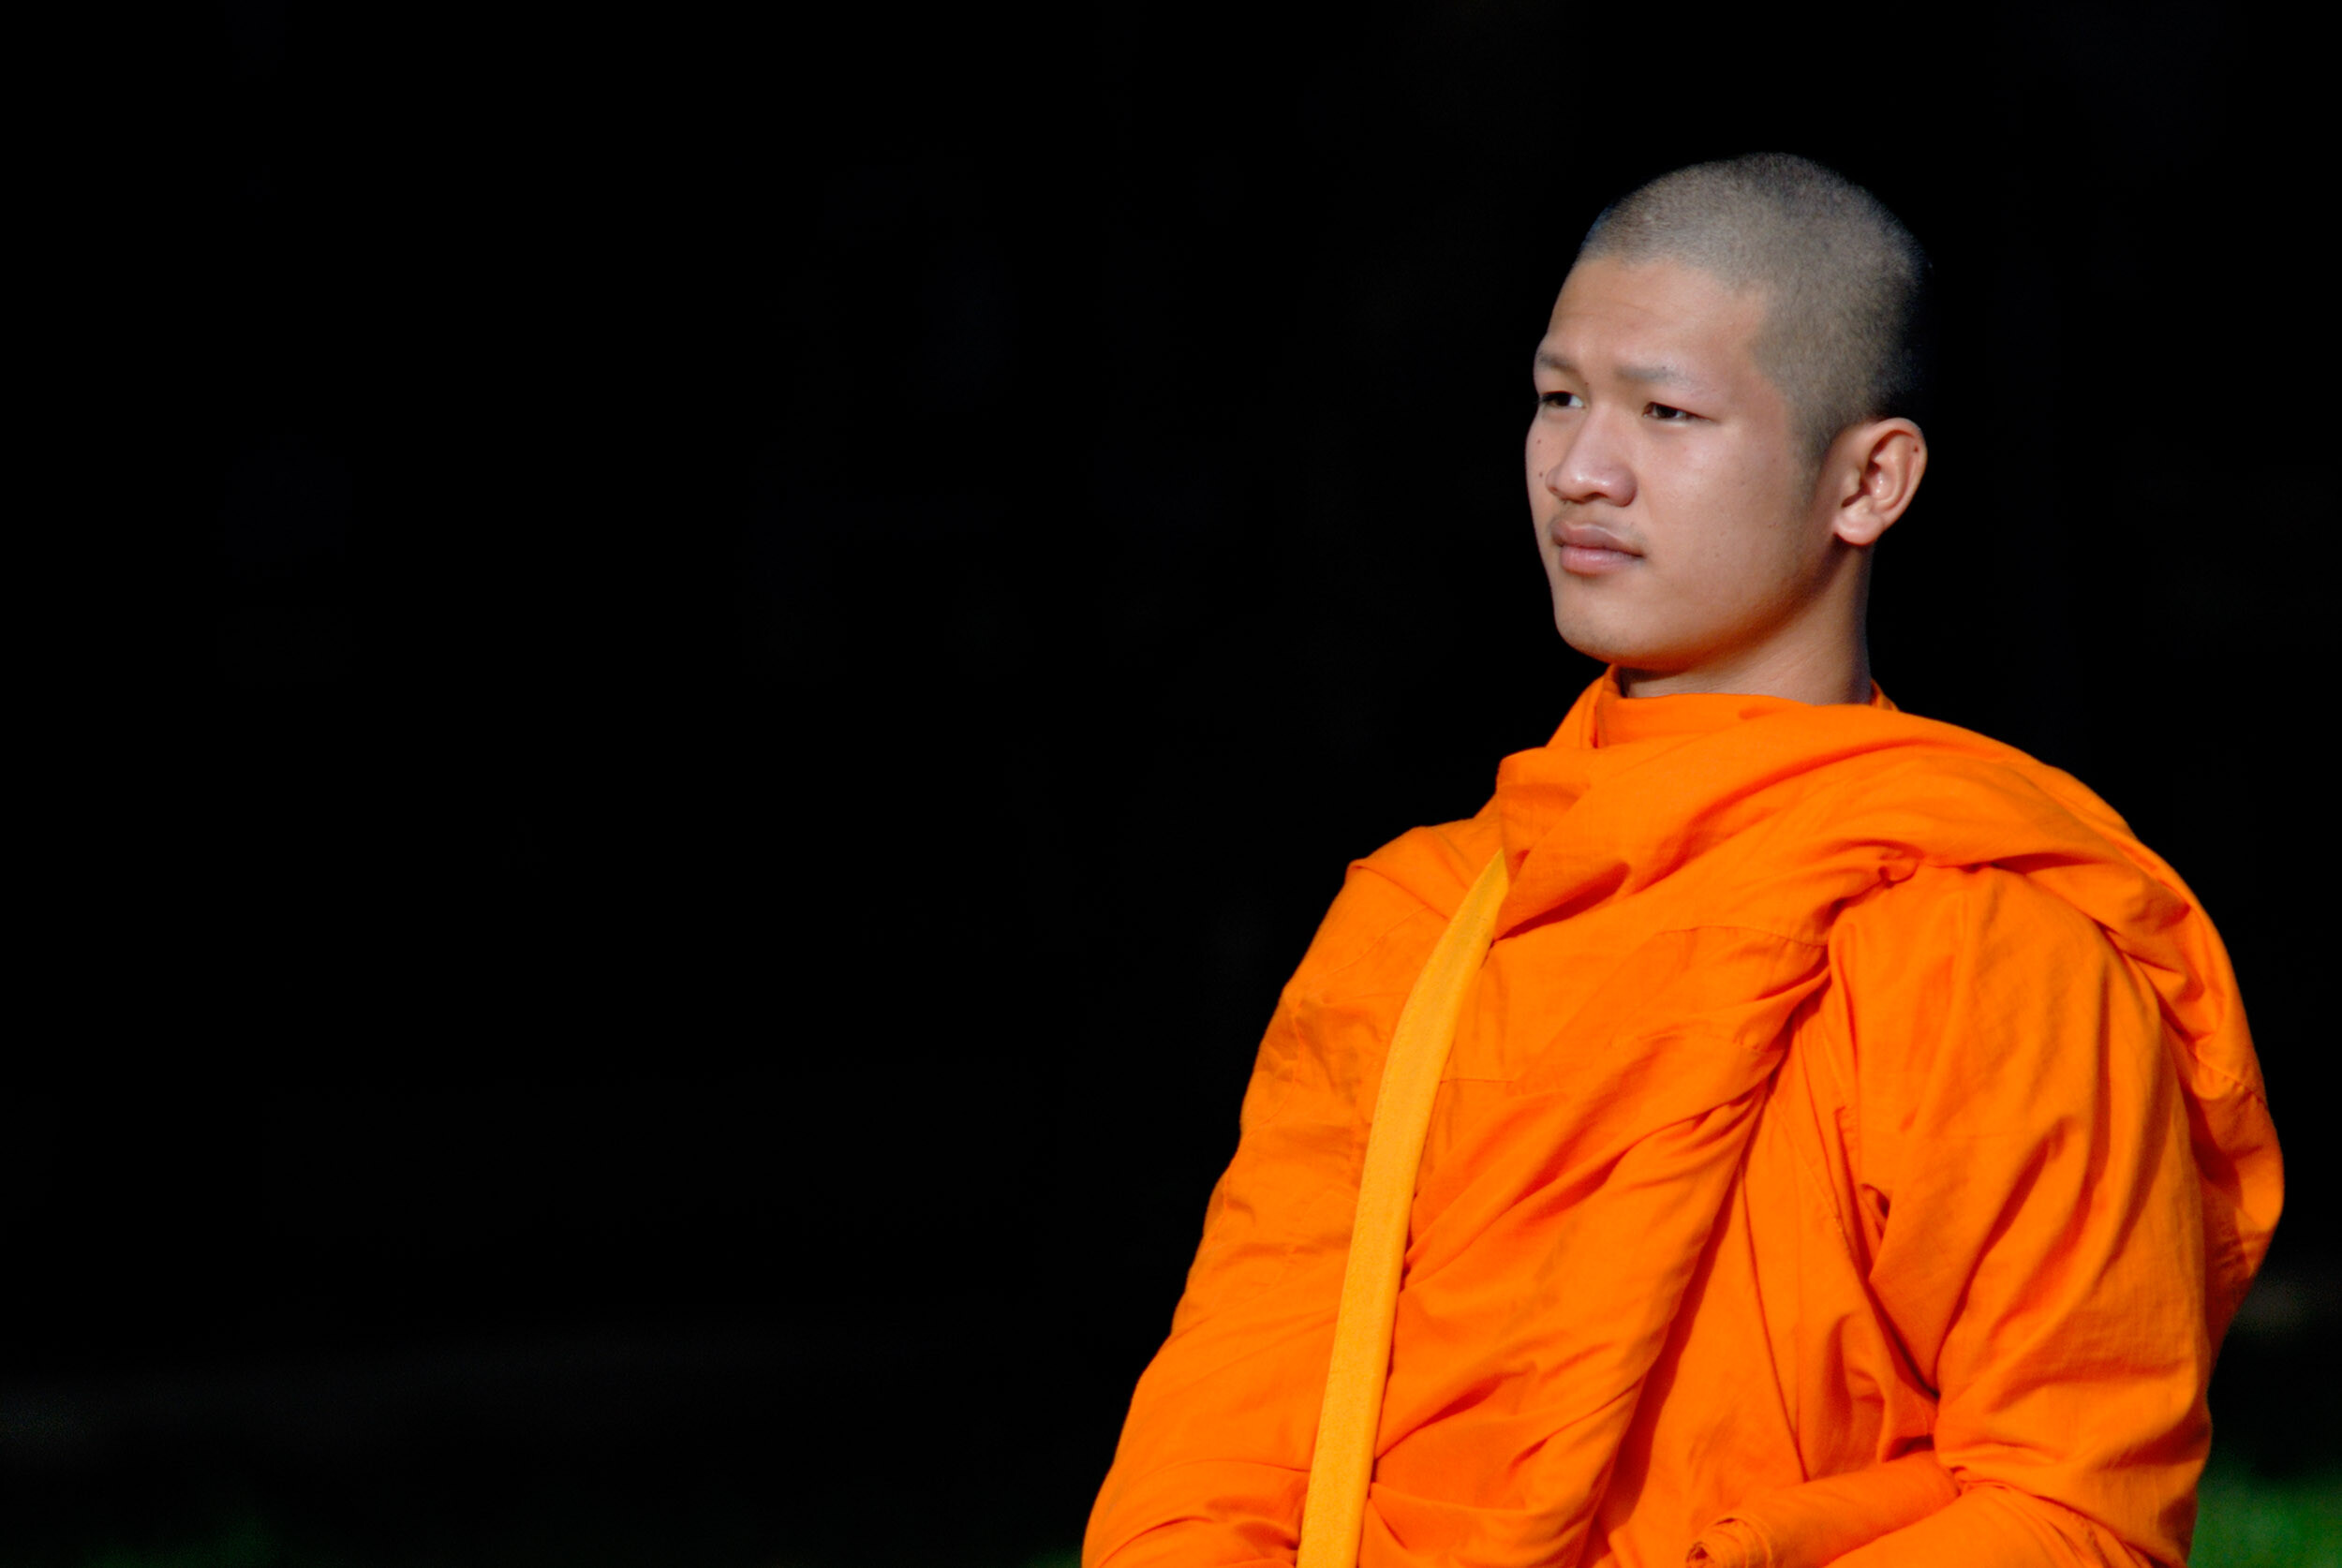
monk with side light on a dark background

Side lighting a portrait often heightens a sense of emotion. The shadow adds drama to the subject’s face, and it highlights shapes and wrinkles far more than a flat front light ever could.

During the golden hour, the sun is low in the sky, so it offers some amazing side light. Simply position your subject so the sun illuminates it from one side; the shapes made by the shadows can then be used to add interest to your compositions.

welder with blue side light

Getting started with side light: the basics

To make the best use of side light in photography, you must be able to control the position of the light and/or your subject. (If you don’t have control over either of these elements, you’ll have to be patient and wait for the sun to move into the right spot.)

If you decide to use artificial lighting, simply grab a flash or a continuous light source, then move it off to your subject’s side. Remember that you have a wide range of options. As I emphasized above, side light does not need to be at a 90-degree angle to your lens! A 60-degree angle, a 45-degree angle, or even a 30-degree angle will all produce effective side lighting. Each position will, however, create a unique look, so you’ll need to carefully select a lighting angle based on your interests.

In other words, you can put the light source off to the side and slightly in front of your subject for a brighter, less dramatic effect, or you can put the light source off to the side and slightly behind your subject for an ultra-dramatic, shadowy look. Another option is to create a true split-light effect by positioning the light source directly to the side of your subject – so that one half of the subject is brightly lit while the other half is shrouded in shadow.

Pro tip: When you’re just getting started with side lighting, continuous lights are easier to use. They’ll let you see the exact effect created by the light before you take a photo, whereas the effect of an off-camera flash can really only be evaluated after you press the shutter button.

With continuous lighting, you can experiment constantly with different looks, and you won’t need to capture dozens of test shots. You can move the light around and watch how the shadows change, which will quickly give you a good understanding of the effects of side lighting.

close up of steam train engine for side lighting photography

Now, if you’re working with natural or ambient light, then you probably won’t be able to control the light source’s direction. But all is not lost! To achieve side light, you simply need to move your subject instead. Position your subject so that the light is hitting it from the side, then capture plenty of beautiful images!

Note: When you’re taking side-lit portraits, you may want to angle your subject so a little of the light spills past the nose. This creates the beautiful and moody Rembrandt effect; a small triangle of light will appear on the far cheek, while the rest of the face remains in shadow.

When you’re photographing something you can’t move, like a tree or a building, you’ll have to wait until the sun is in the right place in the sky. (Sometimes, you’ll need to come back at a different time of year!) Sun-tracking apps can be very helpful!

landscape with a river and mountains with side lighting

Side Light vs front light vs backlight

The beauty of side light comes from the combination, or balance, of shadows and light. But if you use front light or backlight, this combination will be very limited (or even nonexistent); direct front light, for instance, creates no obvious shadows, while direct backlight ensures that your entire subject is shrouded in shadow.

Thanks to the mix of light and shadow, side light produces more of a three-dimensional effect than either backlight or front light. The shadows provide an illusion of depth, and the result looks wonderfully real.

So if you want to faithfully reproduce a three-dimensional subject, side lighting is generally best. I’d also recommend using side lighting when working with flat subjects, especially if those subjects are highly reflective. If you position a flat subject, like a painting, so the light is directly in front of it (and behind your camera), you’ll inevitably capture an unpleasant glare effect – but if you move the light to the side, you’ll reduce the risk of glare (plus you’ll capture the subject’s texture while you’re at it!).

woman walking in the rain with a large pan on her head
Backlighting makes subjects appear flat.

Backlighting leaves the front of your subject in shadow and dark in relation to the background. To capture a well-exposed subject, you’ll often need to blow out the background – which tends to look very upbeat and even airy. Alternatively, you can expose for the background and let the subject turn into a silhouette, which will produce an entirely different mood. Both of these approaches make for interesting images, but neither will produce the mysterious atmosphere that makes side lighting special.

As for front light: It tends to create photos that lack drama. The direct angle lights all parts of the subject evenly, and while the resulting images feature plenty of detail, they won’t offer much mood or atmosphere.

close up portrait of a man
Front lighting also makes a subject look flatter than side lighting.

Advanced tips and techniques for side lighting in photography

The key to creating powerful side-lit photos is the shadows, so it’s important you manage these carefully. Ask yourself: How dark do I want my shadows to be? Do I want a high-contrast look? This will depend on the ambient lighting, but it can also be controlled by the use of reflectors and other lights.

When you want deep shadows that create lots of mystery, it’s best to use only a single light source. The more additional lights you include (or even the more ambient light you allow into the scene), the lighter the shadows will appear.

The level of contrast in your photo also helps influence the atmosphere. The darker the shadows, the more they hide details. This can help add a moodier feel to a photo. Adding a second (fill) light to soften the shadows, on the other hand, creates more of a gentle feel. Carefully controlling the fill light brightness can make or break your photos.

Also, adding a side light to a subject can help separate it from the background. With the main light off to one side, more light can fall on your subject – and if you set your exposure to produce a detailed subject, the background may turn out a little underexposed (or very underexposed). This will help separate the subject and background and add more depth to your images.

dummy on the road side with side lighting and fill flash.
Adding a fill light softens the shadows.

Side lighting in photography: final words

When it’s managed well, side light can produce very interesting and moody results.

As with any kind of lighting, make sure you carefully expose your subject, and make sure you spend plenty of time adjusting the strength of the main light in relation to other lights and reflectors. The intensity of the shadows will contribute to the overall mood of the pictures.

So the next time you’re setting up for a photoshoot, take some time to do side light photography. Observe where the shadows are falling. Experiment with both light and subject positioning. This will help you get the light and shadow balance just right – and you’ll produce the mood you want to create.

What do you think of side lighting? Will you use it in your photos? Share your thoughts in the comments below!

The post Side Lighting in Photography: A Comprehensive Guide appeared first on Digital Photography School. It was authored by Kevin Landwer-Johan.


it's from Digital Photography School https://ift.tt/W0UHx6n
via Kevin Landwer-Johan