Nov 8, 2024

[Photography] Keep Your Camera Safe While Traveling: 13 Essential Tips

The post Keep Your Camera Safe While Traveling: 13 Essential Tips appeared first on Digital Photography School. It was authored by Peter West Carey.

Keep your gear safe while traveling

Photographing the wide world can be thrilling, but it’s also not without its dangers. Whether you’re strolling down the streets of Paris or trekking the mountains of Nepal, the threat of losing your cherished (and costly) gear to theft is real. And let’s face it: Losing your gear doesn’t just hurt your wallet. A moment of bad luck could throw your entire trip thrown off track – unless you take proper precautions.

As an experienced globetrotter and shutterbug, I’ve picked up a few tricks along the way to safeguard my gear, and I’m here to share them with you. These tips aren’t some magic shield, but they’re practical, easy to follow, and can significantly lessen the odds of you facing a camera catastrophe. Even better, they’ll provide you with a backup plan in case you do hit a bump in the road.

Ready to confidently capture the world without constantly worrying about your gear? Let’s dive right in!

1. Trust your instincts

Keep your gear safe while traveling

When it comes to traveling safely with your gear, the first and most crucial step is to trust your gut. I can’t emphasize this enough. It doesn’t matter whether you tend to worry or not; your intuition is your primary defense mechanism, and it’s essential to listen to it.

Sometimes, your worries might seem overly paranoid, but there could be instances where you’re subconsciously (or consciously) picking up on potential dangers. Do you really want to take that risk when you’re far away from home?

So if you start feeling uncomfortable or sensing something isn’t right, don’t ignore it. Take action to regain your sense of security. Pack away your gear or leave the area if necessary, and prioritize your peace of mind and safety.

2. Opt for a discreet bag

Keep your gear safe while traveling

Especially if you’re traveling through rough areas, consider using an old bag to carry your camera and gear. While I haven’t done this myself, I think it’s an excellent idea in the right circumstances. The key is for the bag to appear worn-in and inconspicuous, not falling apart.

Additionally, avoid drawing attention to your bag as a camera bag. Opt for an everyday pack that doesn’t scream “Camera!” Thieves often target individuals with flashy new camera bags, making them vulnerable. By using a more general-looking bag (especially one that’s seen better days!) you’re less likely to be a potential target.

3. Tone down your gear and appearance

If you have a new bag that clearly looks like it’s meant for a camera and swapping it out isn’t feasible, try toning it down. Give the bag a slightly worn and dirty look. I understand that it may not be fun to treat your brand-new camera backpack this way, but it can significantly decrease its appeal to potential thieves.

A pristine new bag sends a message that you may have money and are likely an infrequent traveler, making you a more appealing target. On the other hand, a well-traveled and modest-looking bag lowers the chances of becoming a victim.

Similarly, consider your appearance and dress accordingly. You don’t need to go to the extremes of buying local clothes or blending in entirely, but at least observe how others dress in the area and make some adjustments. Avoid wearing flashy or luxurious outfits that might attract unnecessary attention. The goal is to be a less enticing target, and making a few simple changes can go a long way!

4. Always keep one eye on your surroundings

Keep your gear safe while traveling

When you’re out shooting, always keep your non-shooting eye open and remain vigilant. While it’s easy to get absorbed in capturing the perfect shot, it’s essential not to get overly distracted, especially in crowded areas. While the chance of someone snatching your camera is slim, it’s better to be cautious and prepared. Thieves might also target your day bag or purse, so stay aware.

I find it helpful to use the reflection on my camera’s LCD display to check what’s happening behind me. By holding the camera up to my eye and then pulling back slightly, I can pan around while maintaining visual awareness of my surroundings. This simple technique adds an extra layer of safety to my photography experience, and I certainly encourage you to try it for yourself.

And let’s not forget the obvious: never leave your gear unattended in public spaces, even for a short moment. Avoid placing your backpack outside the bathroom or turning away from your tripod-mounted camera, even if you’re desperate. Those are the actions that can lead to unfortunate outcomes!

5. Rely on the buddy system

Keep your gear safe while traveling

If you’re fortunate enough to be traveling with a friend, take advantage of the buddy system for photography just as you would for other travel situations. Even if you’re used to solo adventures, a companion can enhance your experience with great company and camaraderie as well as added safety.

Perfecting a system where one person shoots while the other keeps an eye out takes practice, but it’s highly beneficial in crowded environments and busy city streets. Traveling with non-photography friends can be great too; it reduces arguments about who gets to shoot next!

Plus, even if both of you plan to photograph non-stop, traveling with a companion offers significant safety advantages, especially for nighttime outings. It’s a smart choice, and if you know of anyone who might want to accompany you on an upcoming trip, consider inviting them along.

6. Rotate your memory cards

Modern memory cards boast impressive storage capacities, but you shouldn’t fall for the “bigger is better” trap. Putting all your precious photos on a single card is risky. Instead, swap your memory cards often and distribute them strategically, especially if you’re concerned about theft.

Also, if you don’t have a backup solution like a laptop or external drive (more on that in the next section!), consider storing some cards in unlikely places. After filling a card with fantastic shots, take the card out and secure it in a well-hidden money belt. Then, when you get back to your room, hide it in a drawer or in your clothing. (Of course, make sure you don’t forget it when you leave!) Don’t worry about your cards getting out of order; your home computer software can sort the images by capture time later.

7. Make a backup every night

Keep your gear safe while traveling

Safety doesn’t end when you head back to your accommodations for the night! I highly recommend bringing along an external hard drive. Then, at the end of each day, you can take a moment to back up all your photos.

When you head out the next morning, you can leave the drive in your room, and you can carry the cards in your camera bag. That way, even if something happens to one set of photos, the other will likely remain safe.

Any standard HDD can work for this, though I’d recommend at least 1 TB of storage as a starting point (you can go larger or smaller based on your trip’s length and shooting habits). Nowadays, spacious drives are affordable and reasonably fast, so they’re perfect for backing up your shots.

For extra security, consider keeping a second hard drive with another copy of your shots or explore cloud backup options. The key is to find the solution that suits you best and ensures you have multiple copies of your valuable images.

Besides safeguarding your photos, this backup-first approach can also provide some protection against corrupted memory cards and alleviate worries about running out of card space during extended trips.

8. Wear your bag safely

Your bag’s position can make a significant difference in ensuring your gear’s safety. In crowded places like markets, consider wearing your camera bag against your stomach rather than on your back. It might look a bit unusual, but it adds an extra layer of security.

If you’re using a backpack, wear it over both shoulders. Ensure that all compartments are zipped up, and if possible, invest in a bag with zipper locks to deter easy access while you’re on the move.

9. Take multiple cameras (but only carry one)

Keep your gear safe while traveling

While the feasibility of this tip depends on the space you have available, carrying backup gear can be a smart move in case your main camera or lens gets stolen.

For instance, you could bring a main camera along with a backup camera or a selection of prime lenses alongside a backup zoom. Keep the backup gear safely stored in your room and head out with your primary equipment. If the worst happens and your gear is stolen or lost, you can always go back to your accommodations and switch to the backup.

Plus, having spare equipment not only provides peace of mind but can also save your trip from being ruined by gear mishaps like drops or water damage.

10. Use a safety net or a hard case

When you’re out exploring during your travels, it’s natural to worry about the safety of your valuable photography gear left behind in your room. To provide you with peace of mind, there are some essential travel safety devices you can consider.

One option is a wire mesh safety net offered by companies like PacSafe. These nets are designed to enclose your bag and fasten it to a secure object. You can place your non-essential gear in a smaller bag, add the wire net, and secure it to something solid, though you will need a fixed object for this purpose. While it’s important to note that determined professionals might still be able to break through these nets with the right tools, they’ll certainly serve as a deterrent for opportunistic thieves.

Another reliable choice is to use a hard case for your gear, such as those made by Pelican Cases. These cases are constructed from tough plastic and come with loops to accommodate standard padlocks or cable locks, allowing you to fasten the case to a solid object.

These hard cases are water- and dust-proof, and will ensure your gear stays clean and dry during your travels. They’re also particularly handy when you need to check your gear at the airport.

However, it’s worth noting that hard cases are bulkier than regular backpacks, so carrying them around all day definitely isn’t a good idea (in other words, you’ll want to bring a more portable camera bag, too). Some cases do offer wheels and pull handles to improve ease of use.

11. Use a safe

Keep your gear safe while traveling

Some accommodations, including hotels and hostels, offer a main safe that guests can use. Take advantage of this amenity and store any non-essential gear – though do consider taking a photograph of the items you’re handing over in the presence of a staff member. This is similar to counting and getting a receipt for cash you deposit for safekeeping. If the establishment doesn’t provide a receipt, having the photo will serve as your insurance, confirming what you handed over.

Additionally, some hotels provide mini-safes in the rooms, which can be quite useful. These mini-safes aren’t big enough to fit an entire gear bag, but they can accommodate items like lenses, memory cards, hard drives, and small laptops, making them a great option for securing your gear during your daily adventures. They can also come in handy at night if you feel your accommodation is located in a less secure area.

12. Keep a record of your gear

Before embarking on your trip, take the time to create a detailed list of all your photography gear, including the serial and model numbers. Make a couple of copies of this information and store them in a safe place. In the event that your gear is stolen and later recovered, having a list of serial numbers will be crucial for identifying and claiming it as your own. It’s also a good idea to take a picture of your gear before you leave as an additional reference.

On a related note, if you plan to check your camera bag or case at the airport, consider placing an electronic tag in one of the pockets. Not only can this tag be helpful in case the airline misplaces your bag, but it can also alleviate anxiety when you leave expensive gear behind in your room (you can regularly check the tag’s location when you’re out and about!).

13. Keep your gear insured

Keep your gear safe while traveling

Don’t overlook the importance of insurance for your photography gear – it’s a small price to pay compared to the cost of replacing expensive equipment! Investing in gear insurance can be a serious stress-reliever.

In the event of a theft, many insurance policies cover the replacement cost of your gear, allowing you to buy new items. Some insurance options even reimburse you for rental equipment if your gear is stolen during your journey. Additionally, gear insurance can safeguard you against accidental damage, which is always a possibility when you’re on the go.

So if you’re concerned about the safety of your camera equipment while traveling, securing an insurance policy can be a wise decision. It ensures you can focus on capturing beautiful moments without worrying about all the unpleasant what-ifs.

How to keep your camera safe while traveling: final words

Keep your gear safe while traveling

Keeping your precious gear safe during your travels is of utmost importance, but with a few practical precautions, you can significantly reduce the risk of any unfortunate mishaps.

Whether you’re jet-setting to far-off lands or exploring local gems, always stay vigilant and aware of your surroundings. Trust your instincts, and if something doesn’t feel right, don’t hesitate before leaving the area. And consider taking out a gear insurance policy. It’ll cost far less than the price of replacement equipment, and it’ll offer greater peace of mind, too.

Remember, utilizing safety measures like wire mesh safety nets and hard cases can add an extra layer of protection to your equipment, while you can always use the hotel safe or the mini-safe provided in your room to store non-essential gear securely.

So enjoy your travels, and capture some amazing photos!

Now over to you:

How do you plan to keep your gear safe while traveling? Share your thoughts in the comments below!

Table of contents

Travel Photography

The post Keep Your Camera Safe While Traveling: 13 Essential Tips appeared first on Digital Photography School. It was authored by Peter West Carey.


it's from Digital Photography School https://ift.tt/0TbAtp1
via Peter West Carey

[Photography] How to Use a Graphics Tablet to Edit Photos: 10 Powerful Tips

The post How to Use a Graphics Tablet to Edit Photos: 10 Powerful Tips appeared first on Digital Photography School. It was authored by John McIntire.

using-a-graphics-tablet-for-photo-editing

Photo editing is simpler than ever thanks to the power of a graphics tablet! Explore our top 10 tips to level up your skills.

If you’re just getting started with post-processing and retouching, you’re probably using a mouse and keyboard combo. You can get by with this setup, sure. But when the tasks become more intricate, the precision required can make the process pretty tedious.

That’s where a graphics tablet, like those from Wacom, comes into play. With a tablet, you can gain a whole new level of control and precision. You might even find that your editing workflow gets a significant speed boost.

Using a graphics tablet for photo editing can be pretty intuitive. Unfortunately, you might stumble a bit when it comes to the subtler aspects – but don’t fret, because this article will arm you with handy tips to help you unlock your tablet’s full potential.

Let’s dive right in!

1. Set up your tablet carefully

Using a graphics tablet for retouching photos.

Your first order of business? Setting up your graphics tablet the right way.

While many devices come with a plug-and-play feature and seem to work as soon as you plug them in, for graphics tablets, that’s not the whole story.

Truth be told, you might be able to use the pen, but the full functionality of your tablet isn’t unlocked until you install and configure the necessary software. Make sure to install all relevant drivers for your tablet, and if it comes with a software suite, explore all the options to optimize it to your liking.

Your tablet might seem fully functional without any software, but trust me: If you don’t want to miss out on any features, installing the provided software is crucial.

Over time, your preferences may evolve. If you feel that something could be improved, dive back into the software settings. There might be a solution to your issue just a few clicks away.

How to Use a Graphics Tablet to Edit Photos: 10 Powerful Tips
A lot of tablets will seem to work without any software installed, but such users are missing out on a lot of features.

2. Program those shortcut buttons

Once the basic setup is done, it’s time to turn your attention to the shortcut buttons.

The number of programmable buttons on your graphics tablet can vary based on the model. The budget-friendly ones might have only a few, while the pricier ones could be dotted with buttons.

How to customize these buttons is completely up to you. A smart approach is to reflect on your usual photo-editing workflow. What actions do you perform the most? Which of these could be executed more conveniently with a simple button click?

Once you’ve figured that out, setting up the buttons to suit your preferences is a breeze.

How to Use a Graphics Tablet to Edit Photos: 10 Powerful Tips
You have full control over how your shortcut buttons are set up. Use these in any way that suits your work!

Remember, you have complete control over your shortcut button configurations. Make them work for you, not the other way around.

I’ll be honest, I don’t find myself using the shortcut buttons all that much. The only one I find handy is for rotating the canvas. You might feel the same, and that’s perfectly okay. Don’t feel pressured to use something that doesn’t mesh with your style or needs.

3. Learn keyboard shortcuts

Keyboard shortcuts while using a graphics tablet make a powerful combo.
Even with a tablet, you can still use the keyboard a lot when you work in Photoshop. Be sure to memorize any keyboard shortcuts that are relevant to you.

Even when you have a graphics tablet at your disposal, the keyboard remains a crucial partner in crime, especially when you want to speed up your workflow with quick keyboard shortcuts. Make it a point to read through each and every shortcut offered by your favorite editing program, write down the most useful ones, and ideally commit them to memory.

You might be wondering: If you have a graphics tablet for photo editing that features a handful of programmable buttons, why are keyboard shortcuts necessary at all?

Whether you work in the world of Lightroom, Photoshop, or other editing software, there’s such a rich array of features that it’s impossible to map all their functionality onto a few buttons. This is why it’s worth your while to program a few buttons, then spend time learning as many keyboard shortcuts as you can – particularly the ones that align with your usual editing workflow.

Admittedly, using a stylus in one hand and tapping keyboard shortcuts with the other might seem a little odd to begin with. But go ahead and persevere; you’ll soon find that it’s not as daunting as it first appears.

4. Understand the magic of “undo”

Among all the keyboard shortcuts at your disposal, there’s one you likely lean on more than any other. That’s the “undo” function, which reverses your last action and can be accessed by hitting Ctrl+z (or Cmd+z)

A pen enables you to make precise strokes, but just like sketching, not every stroke will turn out exactly as you want on the first go. There’s absolutely no harm in hitting “undo” repeatedly until you achieve the result you’re after. So get familiar with the Ctrl+z (or Cmd+z) and Ctrl+Alt+z (or Cmd+Alt+z) shortcuts.

If it makes your life easier, you could even set up this function as a shortcut button on your tablet.

5. Customize your brush settings

When you bring a graphics tablet into your photo editing journey, you also unlock some nifty features in Photoshop that were previously off-limits.

The brush settings – and more specifically, the pen pressure settings – are arguably the most impactful of these. By activating these, you gain the ability to control the brush pressure simply by varying how hard you press down on the tablet.

For instance, if you have the “Always Use Pressure for Size” option selected, your brush size will vary in accordance with the force you apply with the pen.

If you’re using the opacity option, a light touch will result in a low-opacity brush stroke. Activate both settings, and the effects become compounded.

Mastering the pressure settings is, in my opinion, one of the most powerful advantages of using a graphics tablet for photo editing. In fact, in isolation, these settings provide a compelling case for using a tablet if you’re still unsure. My advice? Get well-acquainted with these settings – they will shape your graphics tablet editing experience.

How to Use a Graphics Tablet to Edit Photos: 10 Powerful Tips
Taking control of the pressure settings is one of the most powerful aspects of using a graphics tablet for photo editing.

6. Try tilting brushes

Don’t be surprised if you find yourself rarely using tilt-sensitive brushes for photo retouching. But, hey, they’re there, so why not get acquainted with them? You don’t want to accidentally stumble onto these tools and suspect a malfunction in your tablet.

A charcoal pencil brush, for instance, reacts based on how you position your pen. All the lines you see below were crafted simply by altering the pen’s hold, all while keeping the pressure settings at zero:

Using a graphics tablet unlocks features in Photoshop that are otherwise unavailable.

In other words, these tilt-sensitive brushes change their shape and texture based on your pen hold, mimicking how an artist varies their brush or pencil strokes. It’s a playful feature to experiment with. If you manage to incorporate it into your photo editing process, well, that’s quite a bonus!

7. Explore digital art tutorials

Using a graphics tablet for retouching can feel both intuitive and bafflingly counterintuitive. If you have some art experience, you’ll likely find it easier to adapt. But if you’re like me – with zero art background – do yourself a favor and spend some time watching digital painting tutorials.

The most beneficial types of tutorials to seek out include:

  • Drawing lines: These exercises are about mastering control over your stylus and familiarizing yourself with your tablet’s pressure sensitivity. They’ll help you make more precise movements, ultimately enhancing the quality of your output. Watching these tutorials and practicing line drawing will boost your confidence and experience with your tablet.
  • Rendering: Digital painting tutorials that focus on painting with values can be highly useful, especially when you want to apply techniques like dodging and burning. These methods will improve your blending skills and encourage more controlled adjustments.
Follow digital painting tutorials to get better at using a graphics tablet.
Following tutorials that teach you how to practice making lines and other marks will help you gain confidence and experience!

8. Practice with your graphics tablet stylus

You’ve watched the tutorials. Great! Now, it’s time to roll up your sleeves and get your hands dirty.

Set up a blank canvas and work on those brush strokes using different pressure settings. This is the key to mastering your tablet quickly.

Similarly, it’s essential that you practice blending values, especially if you plan to incorporate certain retouching techniques into your workflow. Practice relentlessly, both within and beyond the scope of retouching.

Bottom line: Don’t stop at watching the tutorials. Practice fervently, and make it a point to revisit these exercises periodically. Regular practice is your golden ticket to becoming proficient with your tablet.

Practice using a graphics tablet as often as possible.
Don’t just follow the tutorials once. Practice a lot at first, then make it a point to practice some more at regular intervals.

9. Warm up before you start

This one is entirely optional, but if you’re feeling stiff and not getting the results you want, you can borrow another technique from traditional artists and do some warm-up exercises.

You don’t need anything fancy here. Just fire up Photoshop, open a blank canvas, and spend a few minutes – say two or three – honing your line work and rendering, or any other skill you plan to use in your editing session. Simple yet effective!

10. Practice, practice, practice!

How to Use a Graphics Tablet to Edit Photos: 10 Powerful Tips

How do you truly master your graphics tablet? The answer’s as old as time: practice! And then practice some more.

Every skill in life demands repetition and patience, and using a graphics tablet is no different. The more you use it, the better you’ll get. So don’t hold back. Dive in and start racking up those hours. The early hiccups you encounter will soon be a thing of the past.

How to use a graphics tablet for editing: final words

There you go: 10 nuggets of wisdom to guide your journey into the world of photo editing with a graphics tablet. I didn’t share anything too complex, but you’ve hopefully found a tip or two to help you get off to a good start.

So remember the advice I’ve offered, set up that tablet, and have fun. A graphic tablet genuinely can revolutionize your editing workflow; you just have to be open to it!

Now over to you:

Do you have any additional tips or tricks for using a graphics tablet? Share your thoughts in the comments below!

The post How to Use a Graphics Tablet to Edit Photos: 10 Powerful Tips appeared first on Digital Photography School. It was authored by John McIntire.


it's from Digital Photography School https://ift.tt/cjNGsx5
via John McIntire

Nov 5, 2024

[Photography] 5 Lightroom Tips and Tricks (to Revolutionize Your Editing)

The post 5 Lightroom Tips and Tricks (to Revolutionize Your Editing) appeared first on Digital Photography School. It was authored by Kunal Malhotra.

tips for better editing in Lightroom

Looking for Lightroom tips and tricks to improve your workflow, increase your speed, and enhance your edits? You’ve come to the right place.

I’ve been using Lightroom for over a decade, and in this article, I share my top advice for amazing results, including:

  • The panel that everyone should use for beautiful, artistic edits
  • An easy way to apply complex edits at high speeds
  • The best tools for creating fine-tuned, professional effects

Let’s do this!

1. Create color harmonies using the HSL panel

If you’ve never worked with the Lightroom HSL panel, then you’re in for a treat. It’s a little option hidden underneath the Tone Curve that looks like this:

Lightroom tips HSL panel

The panel works by targeting different colors independently. You can choose to tweak only the reds in an image; you can brighten only the greens; you can desaturate only the blues. You simply pick the corresponding color slider, then make the necessary adjustments.

Note that the HSL panel lets you adjust colors in three specific ways. You can:

  1. Change color hues. You can make the reds more orange, the purples more pink, or the blues more green.
  2. Change color saturation. You can make the blues more faded or the reds more intense.
  3. Change color luminance. You can brighten up the greens, darken down the blues, or brighten up the yellows.
Lightroom tips HSL panel

When you’re just starting out, I’d recommend simply experimenting with the different sliders until you get an effect that you like, but here are a few ideas to try:

  • Remove all the cool colors from an image for a warm, cinematic look
  • Saturate the color of the main subject while desaturating the colors in the background
  • Push several different colors in the same direction for a simpler color palette (and a more harmonious result)

This image, for instance, features a warm color palette (which can be achieved by desaturating blues, greens, and magentas:

people walking at sunset

2. Try the automatic slider adjustments

Sometimes, it can be hard to know how to start (or continue) a Lightroom edit.

In such cases, I recommend a simple little trick:

Hold down the Shift key, then double click on the sliders in the Basic panel. Lightroom will analyze your image, then apply adjustments automatically.

Lightroom Basic sliders

No, the edits won’t always be perfect, but they often look nice – and if you hate the result, you can always double-click on the slider name to set it back to zero. Plus, you can always use the automatic settings as starting points, then edit from there.

By the way, if you want to see all of Lightroom’s automatic edits at once, just click the Auto button above the Exposure slider:

Lightroom Auto option

It’ll instantly adjust the sliders in the Basic panel!

Now, these automatic adjustments don’t work for all Lightroom sliders. They won’t work outside the Basic panel, and they won’t work on the Texture, Clarity, and Dehaze sliders.

But you can use it to automatically adjust the white balance, the exposure, the contrast, and even the saturation – so why not give it a try and see what you think?

3. Use the clipping masks (or the clipping warnings)

Clipping refers to a loss of detail in the highlights and/or the shadows of an image – and in general, clipping is pretty bad.

Unfortunately, it can be difficult to tell whether you’re actually clipping details while editing, and it’s possible to exacerbate clipping issues by pushing your sliders too far without realizing it. You can always keep an eye on the histogram, but it can be difficult to interpret, especially for beginners.

Fortunately, Lightroom has a solution: The clipping masks, which clearly indicate clipping in real-time.

Before you adjust the Exposure, Highlights, Shadows, Whites, or Blacks slider, simply hold down the Alt/Opt key. Then, when you increase or decrease the sliders, you’ll see a white or a black overlay, like this:

Lightroom tips clipping masks

A mask that reveals zero clipping will be all white or all black. But a mask that shows some clipping will change colors over the problem areas:

(Note that, when adjusting the Blacks or the Shadows, clipping is indicated as color on white. On the other hand, when adjusting the Exposure, the Whites, or the Highlights, clipping is indicated as color on black.)

As long as you have no clipping, you’re good to go – but as soon as you start to see a loss of detail, you’ll want to dial back the intensity of your edits. Make sense?

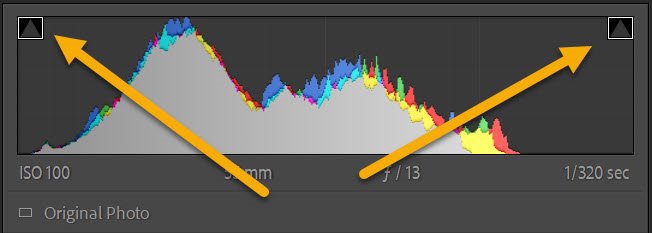
One more quick Lightroom tip: If you want to identify clipping but you don’t want to spend time looking at the masks, you can always click the arrows at the top of the histogram:

Lightroom clipping indicators

This will activate the clipping indicators, which will cause clipped shadows to turn blue and clipped highlights to turn red:

Lightroom clipping indicators

4. Use the copy-paste shortcut to speed up your workflow

Say you’re editing a large volume of photos from an event, a wedding, or a portrait photoshoot. You need to move through the photos quickly, so you don’t want to edit each file individually.

You could create presets, but each one takes time to produce, and if the presets are photoshoot-specific, you may never use them again.

Instead, why not use Lightroom’s copy-paste option?

You see, after you edit an image, you can always select Edit>Copy (or press Ctrl/Cmd+C). A window will pop up, asking you which settings you want to copy:

Lightroom copy settings

Then, once you’ve chosen the relevant settings, select your to-be-edited photos, then choose Edit>Paste (or press Ctrl/Cmd+V).

The settings from your original photo will be pasted onto the selected images, and your editing work will be done!

This can be a great way to handle complex photoshoots. For instance, if you captured images in multiple types of light, you might edit the first front-lit image, copy the settings, and paste them across all the remaining frontlit images. You could do the same for the backlit images, the shaded images, and so on – and if you require even more control over your results, you can make slight adjustments to your settings as you go, then copy again and paste as required.

I do have one recommendation, though:

Even if you think you’ve done a successful copy-paste job, quickly go through the edited images and make sure everything looks okay. You don’t want to send images to a client, only to realize that you cropped all the files by accident!

5. Use Lightroom’s local adjustment tools

Lightroom offers a handful local adjustment options – referred to as masking tools – and they are insanely powerful. You can find them toward the top of the editing panels, just underneath the histogram:

Local adjustment tools

Unlike global adjustments, which affect the entire image, local adjustments only change a portion of a file.

So while you can brighten up an entire image using the Exposure slider, you can brighten up just the foreground using a local adjustment; while you can sharpen the entire image using Lightroom’s Detail sliders, you can sharpen only the main subject using a local adjustment. They’re a great way to create fine-grained, detailed edits that add depth, enhance color, and push the viewer’s eye toward the main subject.

I like to use local adjustments for all sorts of things, but here are a few ideas:

  • Use a Radial Gradient to add a vignette (i.e., a darkening effect) around the edges of the frame
  • Use a Radial Gradient to boost the exposure of the main subject
  • Use a Linear Gradient to decrease the exposure and increase the contrast in the sky
  • Use a Linear Gradient to darken the foreground
Linear Gradient on the foreground Lightroom tips
Here, a Linear Gradient is being applied to the image foreground.

Really, when it comes to local adjustments, the sky is the limit. Feel free to use the suggestions I provided above, but also make sure you experiment. That way, you’ll get a deep sense of how the masking tools work and what they can do for your photos!

Lightroom tips and tricks: final words

Well, there you have it:

Five tips to take your Lightroom editing to the next level.

So try out these suggestions. See how you like them. And let us know in the comments how they work out!

The post 5 Lightroom Tips and Tricks (to Revolutionize Your Editing) appeared first on Digital Photography School. It was authored by Kunal Malhotra.


it's from Digital Photography School https://ift.tt/oaKnF1g
via Kunal Malhotra