Aug 27, 2025

[Photography] Horse Photography: 10 Tips for Amazing Equine Images

The post Horse Photography: 10 Tips for Amazing Equine Images appeared first on Digital Photography School. It was authored by Lea Hawkins.

A guide to beautiful horse photography

Horses are not just beautiful and intelligent creatures; they can be the subjects of some truly breathtaking photographs. And horse photography – which is all about capturing the grace and majesty of these animals – is intensely rewarding.

Yet photographing horses can present certain challenges. Horses are free-spirited, plus they can be easily spooked. Add to that the technical expertise required to photograph a horse in action, such as racing or jumping, and you might start to feel more than a bit overwhelmed.

But don’t worry! Even a beginner can learn to take great horse photos; they just need an experienced guide. I’ve done plenty of horse photography, and I’ve also spent plenty of time learning from trainers and owners. In this article, I share it all: how to capture beautiful horse portraits, how to create stunning horse race photos, and even how to effectively photograph events like show jumping.

Ready to create some gorgeous horse images? Let’s dive right in!

1. Be careful
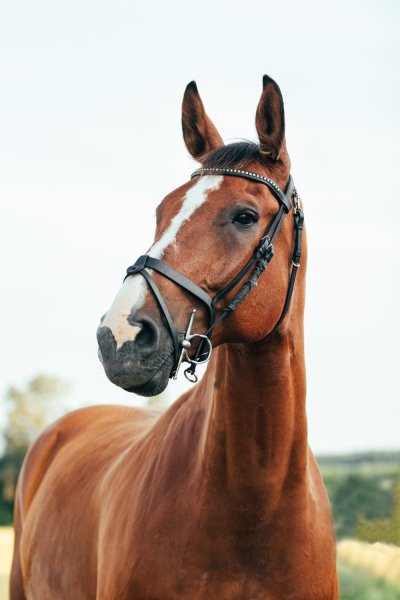
Horse photography

Approaching a horse with a camera is not always straightforward. While some horses may be exceedingly gentle, others can be unpredictable or even aggressive. A single kick from a horse can cause serious injuries, so caution is essential.

Never stand behind a horse or catch them by surprise. Sudden movements or even wearing bright colors can startle them. It’s essential to be aware of the horse’s presence and ensure they know where you are.

Before diving into the photography session, have a chat with the owner or handler about the horse’s personality. Is the horse flighty or bitey? Have they ever seen a camera before? Understanding these aspects can help you approach with caution.

Flash photography is generally a no-no around horses unless you’re sure they are used to it. A flash could endanger not just you but also the horse and the handler. I advise avoiding it as much as possible.

2. Learn the horse’s language

Horse photography

Horses communicate through their ears, leg stance, and head movements. This language is understood by horse owners and trainers, but it might be new to you. Spend some time researching horse body language before your first shoot. You’ll want to understand how the horse is feeling to predict their behavior and avoid danger.

Horse owners often prefer certain positioning of ears, legs, and heads. For example, pinned-back ears signify an unhappy horse, while relaxed, forward ears can mean the horse is content. Understanding this language will not only keep you safe but also ensure you capture shots that the owners will love.

If you’re familiar with this equine language, you’ll have a better sense of what the owners want, and your photo shoot will be more successful. So invest a little time in this unique aspect of horse photography; it’s well worth it!

3. Start with an introduction

Horse photography

Photographing horses isn’t about jumping right in with your camera. It requires a delicate approach. When you first meet the horse, it’s essential to create a calm environment.

Let the handler introduce you if the horse is calm enough. Allow the horse to approach you, sniff the camera, and become familiar with your presence. Talk softly and move slowly; a gentle pat might be welcomed if the handler deems it appropriate.

Are you unsure how the horse will react to the sounds of your camera? Organize a few test shots with the handler. Ensuring that everyone is in a safe position during these test shots is vital. If the horse reacts negatively, a sudden buck or kick can be dangerous.

If your camera has a silent shooting mode, this is a great time to use it. But remember, “silent” doesn’t always mean entirely noiseless. Test it out to gauge the horse’s reaction.

4. Choose the right lens for horse photography

Horse photography

Selecting the right lens is a critical decision in horse photography. It can be influenced by various factors, including the horse’s temperament and the type of shots you’re aiming for.

If you’re doing a portrait session and the horse is comfortable with you getting close, a wide-to-standard zoom lens, like a 24-70mm with a maximum aperture of f/2.8, can be a great choice. With it, you can capture wide-angle shots or zoom in for tighter images.

A 50mm or 85mm prime lens is also a fantastic option. These lenses often offer quality at an affordable price, with a wide aperture like f/1.8 for beautiful background blur.

When photographing from the sidelines or with a skittish horse, a longer telephoto lens is a must. A 70-200mm lens will allow you to capture detailed images from a distance.

Sometimes, having a good telephoto zoom handy, even with a more approachable horse, can enhance your shots. It allows you to get those close-up details without invading the horse’s personal space.

5. Dial in the right horse photography settings

Horse photography

Setting your camera correctly is fundamental. Using Auto mode won’t do justice to these magnificent creatures; instead, you’ll likely end up with blurry shots.

Shutter Priority, Aperture Priority, or Manual mode are your friends here. A fast shutter speed is essential – a minimum of 1/250s for general horse photography. If the horse is moving quickly, even faster speeds like 1/500s or 1/1000s are necessary.

Don’t be afraid to boost your ISO if you need to ensure a good exposure. Modern cameras handle high ISO quite well, but test your camera to know your limits.

A wide aperture, such as f/2.8 or f/4, can be valuable, especially in low-light conditions. But remember, a wider aperture narrows the window of sharpness. You’ll need to focus with precision, making sure the horse’s eyes and head are in sharp focus.

Getting the settings right will allow you to capture the horse’s grace and energy, adding depth and emotion to your photographs. It’s a combination of understanding the horse’s behavior and using your camera’s capabilities to their fullest potential. It’s not about having the most expensive gear, but about knowing how to use what you have to create stunning images.

6. Photograph the tender moments

Horse photography

Connecting with a horse is a magical experience. Capturing that connection between horse and rider in your lens? Even more so. Every horse owner has a bond with their companion that is unique, personal, and full of emotion. As a photographer, your mission is to capture that bond, that shared love, in a way that transcends the physical frame.

Take a moment to observe. Notice the horse and its owner, their interactions, their unspoken communication. Look for the soft moments, the shared glances, the loving gestures. It’s in these fleeting moments that the true essence of their relationship lies. Patience is key here, and waiting for these tender moments can often reward you with the most touching and powerful images.

An integral part of this process involves integrating the rider into your photoshoot. It’s essential for you to keep them engaged, keep them relaxed. Encourage them to interact with their horse naturally, as they would when no one is watching. These candid shots often result in the most authentic images, brimming with raw emotions and moments of connection. Remember, horse lovers are often just as excited to be part of the shoot as they are to have their equine companions photographed.

7. Don’t forget about the details

Horse photography

Horse photography is not just about the whole animal, but also about capturing the individual details that make each horse unique. These can range from the gleaming shine in their coat to the distinct patterns of their markings, the flowing mane, the softness in their eyes, and so much more.

I always find it useful to have a chat with the owner before I start clicking away. Get to know the horse through their eyes, understand what makes their horse special to them. They might have a fondness for certain features – the curve of the horse’s neck, the unique color of their eyes, the way their mane catches the light. Your job as a photographer is to capture these personal favorites in the best light possible.

Use your lens wisely for these detail shots. A telephoto lens works great if you want to maintain a safe distance, especially if the horse is a little skittish. However, with a calm and friendly horse, feel free to move closer and use a standard lens. Experiment with varying your aperture to create a range of effects, from an overall sharp image to a focused shot with a beautifully blurred background.

8. Take your time

Horse photography

A crucial tip for successful horse photography, which I can’t emphasize enough, is to take your time. Spend a day, if possible, with the horse and the owner. Get to know them, understand their dynamics, build a rapport. Patience and understanding go a long way in establishing trust, which in turn helps capture the best possible images.

Observe the horse’s habits, their likes and dislikes. Maybe they love a particular spot in the paddock, or they jump around gleefully after a good run. Keeping these nuances in mind will help you anticipate their actions and be prepared for spontaneous shots.

Slowing down also allows you to notice the small but significant details of the environment around you – interesting backgrounds, shifting light patterns, shadows, and reflections. All these elements can add depth and context to your photographs, turning a good picture into a great one.

Don’t rush the process. Horse photography, like all good things in life, takes time. It requires patience, practice, and a keen eye for detail. But rest assured, the results will be worth your effort.

9. Use similar techniques to photograph equine events

Horse photography

Photographing equine events like show jumping has its own challenges, but many of the principles remain the same. Finding a safe spot is crucial, and one where the horse can see you from a distance. Always stay put and never move towards the horse and rider, and remember, using flash is a big no-no. Checking with any officials before you start is also a smart move.

To capture both horse and rider in mid-jump – a favorite of horse riders – you’ll likely need a shutter speed around 1/650s to 1/800s. By setting your camera to continuous release (burst) mode, you can press the shutter just as the horse lifts off, increasing your chances of getting the perfect shot.

Focusing can be tricky, so you’ll need to be extra attentive. Prefocusing in advance where you know the horse will be is an option, but I find using your camera’s AF tracking to follow the horse generally better. It lets you shoot a variety of images as the horse moves in different directions, giving you a range of dynamic shots to choose from.

10. Work fast for horse race photography

Horse photography

Horse racing is a thrilling sport, and capturing it in a photograph requires a special touch. Horses at top speeds are incredibly fast, so I’d recommend the fastest shutter speed the light will allow. Use your camera’s continuous shooting mode, and don’t hesitate to take hundreds of shots. Among the failures and near-duplicates, you’ll find those magical moments that make it all worth it.

Getting close to the finish line at smaller race meets can make for breathtaking photos, but you’ll need permission. Assure the officials that you don’t use flash and that you understand how easily horses can be spooked. Your diligence can grant you access to some unique vantage points.

Here’s a pro tip: try panning shots during the races. It captures the sense of movement and speed, giving your photos an artistic flair. Lower your shutter speed to around 1/30s and move your camera along with your subject as you fire the shutter. If done right, you’ll end up with a sharp horse and rider against a stunning blur of motion in the background.

This technique might take a few tries to master, but the resulting images can be truly spectacular. Combining both standard and panning shots during horse races can provide you with an exciting and varied portfolio of images, each illustrating a different aspect of the race!

Horse photography tips: final words

From understanding a horse’s personality and body language to choosing the right lens and settings, we’ve explored essential tips and techniques so you can capture beautiful images of horses.

Remember to approach each photo session with care and patience; with some perseverance, you’ll capture plenty of horse photos you can be proud of – whether it’s a tender moment between rider and horse, or the thrilling speed of a race.

Now it’s your turn to grab a camera and explore the world of equine photography. Happy shooting, and have fun!

Over to you:

Which of these horse photography tips do you plan to use first? Do you have any advice of your own that we missed? Share your thoughts in the comments below!

Table of contents

Pet Photography

The post Horse Photography: 10 Tips for Amazing Equine Images appeared first on Digital Photography School. It was authored by Lea Hawkins.


it's from Digital Photography School https://ift.tt/8jy2rDK
via Lea Hawkins

Aug 26, 2025

[Photography] 6 Still Life Photography Mistakes (And How to Fix Them)

The post 6 Still Life Photography Mistakes (And How to Fix Them) appeared first on Digital Photography School. It was authored by Rika Guite.

common still life photography mistakes (and how to fix them)

Are you struggling to capture stunning still life photos? You’ve come to the right place.

In this article, I share the six biggest still life photography mistakes – and I explain how to correct them, so that, no matter your level of experience, you can get outstanding results. Specifically, I discuss:

So if you’re ready to take your still life shots to the next level, then let’s get started!

1. Using improper lighting

What’s the very first rule of still life photography?

Your subject needs to be well-lit.

still life photography mistakes

A poorly lit subject will look terrible, no matter the composition and camera settings you choose – while a well-lit subject will often look great, even if you struggle to get the framing and settings correct.

Start by ensuring you have enough light. Personally, I like natural lighting in still life photos; it’s bright, it’s strong, and it can be very, very soft. (For the most flattering natural lighting, try shooting during the golden hours or on days with heavy clouds.)

If you’re working indoors, it often pays to bring along some artificial lighting. Studio strobes are great for more serious setups, but if portability or price is a concern, several flashes plus a few light stands will do a great job.

You can also work with window light. On cloudy days, you’ll get a gorgeous soft effect near large windows. And if the sun is high in the sky, you can always drape a sheet over the window and get a beautiful light diffusion effect.

Pay careful attention to the direction of the light, too. Direct front light rarely looks good in still life photography; it’s too bold and too flat. Instead, I recommend sidelight, which will add plenty of depth and dimension to your subjects. Another option is partial backlighting (and you can always try this as part of a two-light setup, with one light providing sidelight and the other providing partial backlighting).

Here’s an image that I captured using partial backlighting:

still life photography mistakes

And here’s a second image, which features strong backlighting from the right-hand corner:

still life photography mistakes

Really, I’d encourage you to experiment with many light sources and directions. If you’re not getting a great shot, try another angle or test a new light modifier. You never know what you’ll create!

2. Including a distracting background

Still life photography is all about the subject…

…but the background matters, too! A good background can help emphasize the main foreground subject, or – in the best images – complement the subject for an amazing result. But a bad background can draw attention away from the subject and prevent the viewer from appreciating its beauty.

So before you take a single photo, evaluate the background. Look for distractions in the form of lines, shapes, or even colors. Then do what you can to eliminate them completely.

Yes, you can take care of some distractions during post-processing. But the more you handle these issues in-camera, the less time you’ll spend in the editing room, and the more time you have to shoot! (Plus, not all distractions are editable.)

If you do notice distracting background elements, the best method is often to change your angle until the offending areas are gone. But you can also try placing handpainted or assembled backdrops behind the subject or moving your subject to an entirely new location.

still life photography mistakes

What makes a great still life photography background? I’d encourage you to choose a plain stretch of color, such as a white or gray wall. A bit of texture can add a nice touch, but don’t go overboard (too much texture will draw the eye away from the subject!). And if you can’t find the right kind of wall, that’s okay; just cover it up with some white posterboard!

One more tip: If you’re shooting flat lays, make sure you spend extra time picking a background. White poster can work great, but consider using black poster for a moody look, or a blue, red, or yellow poster for extra pop.

3. Working without a tripod

Still life photography is often done indoors, when the light is (relatively) low.

And unless you’re using flashes or strobes, you’ll need to drop the shutter speed for a balanced exposure – often to 1/60s or below.

If you try to shoot handheld at 1/60s, a lot of your shots will turn out frustratingly blurry, which is why a tripod is essential. Yes, tripods can be cumbersome and slow to work with, but they’re necessary and are used by most serious still life photographers.

In fact, even still life shooters who work with strong artificial lights generally still keep their camera mounted on a tripod. Why? For one, the tripod helps maintain the composition even as they adjust different elements and light positions. And the tripod maintains the camera position for focus stacking (which is often necessary for sharp close-up still life photography).

So make sure you grab a sturdy tripod. And use it whenever you can.

By the way, if you find that you’re often working in low light, I’d encourage you to buy a wireless remote. That way, you can trigger the camera shutter without hitting the shutter button (which can produce blur-inducing camera shake). A solid alternative is your camera’s two-second timer, but constantly waiting for a two-second interval can get annoying, especially if you’re firing off multiple shots in succession.

4. Forgetting to carefully compose

still life photography mistakes

If you want great still life photos, then you must compose carefully. In fact, when I do still life photography, I often spend many long minutes adding in items, tweaking the composition, and nudging different elements in different directions.

While still life composition is a complex subject, here are a few handy tips:

  • Fill the frame with your main subject
  • Include plenty of negative space to let the subject breathe
  • Experiment with different angles for unique results
  • Use the rule of thirds to position your main subject
  • Don’t forget about the rule of odds, which encourages you to include an odd number of similar elements (e.g., three flowers, five books, one vase)

If you’re struggling to create a compelling composition, I’d really encourage you to spend time just playing around with each setup. Move your main subject to the right or the left, add supporting objects in front or behind, and take constant test shots.

Another helpful tip is to find some still life photos that you like (paintings work fine, too), and study the compositions. Note how the objects are arranged in relation to one another. See if you can identify any rules or guidelines you can apply to your own work.

5. Not experimenting with each setup

still life photography mistakes

This still life mistake is a simple one, but it can make a huge difference to your photos.

You see, most beginner still life photographers set up their lighting, create their arrangement, and then…shoot. The whole process is streamlined, fast, and efficient.

But while you can get decent images using the above method, if you want to really take your photos to the next level, then you must spend time experimenting.

Go ahead and create your first arrangement. Take a few photos.

But then mix it up. Try adjusting the position of your lights. Change your composition. Go minimalist by adding in extra negative space, or add in additional objects for a more chaotic effect.

After I’ve captured my first setup, I like to “randomize” the scene. I’ll take all my objects and mix them around. Or I’ll add a new background, or I’ll use different lighting, or I’ll change my camera angle.

In other words: I experiment! That way, I end up with plenty of unique images (and I learn a lot in the process).

6. Choosing the wrong lens

Many photographers don’t realize this, but the lens you choose can dramatically affect the feel of a still life image.

A wide-angle lens will tend to push subjects apart from one another for a breathy, expansive feel; a standard lens will portray subjects naturally, the way the eye sees; and a telephoto lens will compress subjects and enhance background bokeh.

Which type of lens is best for still life photography? That depends on the effect you’re after! A wide-angle lens is great for capturing in-your-face still life shots, while a telephoto lens will give the viewer a bit more distance (literally and figuratively). Standard lenses tend to be more neutral in their effect, and they’ll do a great job of rendering subjects as they appear in real life.

But while you can capture great still life shots with any lens, many still life photographers gravitate toward standard and short-telephoto options. These lenses are perfect for capturing well-proportioned, natural images. And they do a great job of creating stunning shallow depth of field effects, too:

still life photography mistakes

If you’re struggling to visualize the difference between wide-angle, standard, and telephoto lenses, then I’d urge you to create a still life setup, then try out each focal length. Carefully review the results, paying careful attention to the relationship between different objects as well as distortion effects. Ask yourself: How does each focal length render the scene? When would each effect look good?

Over time, you’ll learn to “see” in different focal lengths, and you’ll be able to choose the right focal length with very little effort.

Still life photography mistakes: final words

Now that you’ve finished this article, you know the six most common mistakes made by still life photographers – and you know how to fix them, too!

So memorize these mistakes. Evaluate your photography. Make the necessary changes. And watch as your photos improve!

Which of these still life mistakes are you making? How will you fix them? Share your thoughts in the comments below!

The post 6 Still Life Photography Mistakes (And How to Fix Them) appeared first on Digital Photography School. It was authored by Rika Guite.


it's from Digital Photography School https://ift.tt/qjEebI7
via Rika Guite

Aug 25, 2025

[Photography] 10 Essential Tips for Low Light Photography

The post 10 Essential Tips for Low Light Photography appeared first on Digital Photography School. It was authored by Sime.

Shooting in low light can be both exciting and frustrating. While the mood and atmosphere of dimly lit scenes can create stunning results, the lack of available light poses technical challenges like noise, blur, and loss of detail. With the right approach, though, you can turn those challenges into creative opportunities. Here are ten practical ideas to help you make the most of low light conditions.


1. Use a Wide Aperture

Open your lens as wide as it will go (f/1.8, f/2.8, etc.). A wide aperture allows more light to reach your sensor, helping you shoot at faster shutter speeds. As a bonus, you’ll get beautifully shallow depth of field, perfect for portraits or isolating your subject against a dark background.

10 Essential Tips for Low Light Photography

2. Raise Your ISO (Within Reason)

Modern cameras handle high ISO settings far better than they used to. Don’t be afraid to push ISO 1600, 3200, or even higher if needed. While higher ISO introduces noise, it’s often better than having a blurry photo from too slow a shutter speed.

10 Essential Tips for Low Light Photography

3. Slow Down Your Shutter

If your subject is still, experiment with longer exposures. A tripod becomes essential here—letting you capture moody nightscapes, star trails, or light trails from passing cars without shake. For handheld shots, try not to go slower than the reciprocal of your focal length (e.g., 1/50s with a 50mm lens).

10 Essential Tips for Low Light Photography

4. Stabilise Your Camera

Tripods are the obvious choice, but even leaning against a wall, bracing your elbows, or resting the camera on a table can reduce shake. For an extra edge, use your camera’s self-timer or remote shutter release to avoid nudging it when you press the button.

10 Essential Tips for Low Light Photography

5. Shoot in RAW

Low light often means tricky exposure and odd colour casts. Shooting in RAW gives you maximum flexibility in post-processing—recovering shadow detail, reducing noise, and correcting white balance far more effectively than JPEGs allow.


6. Use Available Light Creatively

Street lamps, neon signs, candles, or even the glow of a phone screen can all become beautiful light sources. Instead of fighting the low light, embrace it and use those unique tones and contrasts to enhance the atmosphere of your shot.

This is a bad (quality, but good..) example, I only had my phone with me, but I loved the way the light sorta of played down onto the scene, wish I’d had a camera and tripod with me!

10 Essential Tips for Low Light Photography

7. Experiment with Motion Blur

Not every low light image needs to be tack-sharp. Try deliberately introducing blur to capture movement—like people walking, cars passing, or waves crashing. This can turn a technical limitation into an artistic advantage.


8. Mind Your Focus

Autofocus can struggle in the dark. Switch to manual focus if your camera keeps hunting. Use focus peaking (if available) or zoom in on live view to nail sharpness, especially for static subjects like cityscapes or astrophotography.


9. Add Light When You Can

Sometimes, the solution is simply more light. A small LED panel, a phone torch, or bouncing flash off a wall or ceiling can make all the difference. Even subtle fill light can bring out detail without ruining the mood.


10. Embrace the Noise

Finally, don’t get hung up on having perfectly clean images. A little grain can add texture and character, especially in black-and-white. Think of it as the digital equivalent of film grain—it often enhances the story your photo tells.


Final Thoughts

Low light photography is less about overcoming darkness and more about learning to work with it. By combining technical adjustments with creative intent, you can capture images that are dramatic, atmospheric, and full of mood.

JUST GET OUT AND SHOOT ?? ?

— Simon

The post 10 Essential Tips for Low Light Photography appeared first on Digital Photography School. It was authored by Sime.


it's from Digital Photography School https://ift.tt/pwl3fKo
via Sime

Aug 24, 2025

[Photography] Introducing the Godox AD400 Pro II Studio Light

The post Introducing the Godox AD400 Pro II Studio Light appeared first on Digital Photography School. It was authored by Sime.

The team at Godox have released the version two of their well loved AD400 Pro series of portable studio lights, or as they like to call them, the All-in-One Outdoor Flash.

Introducing the Godox AD400 Pro II Studio Light

400 Ws & 1/8000 Ws HSS ?

With 400 Ws of output and up to 460 full-power flashes per charge, the AD400ProII delivers sustained, studio-grade performance on location. High-speed sync up to 1/8000 Ws lets you freeze action and balance flash in bright conditions. Whether you’re shooting high-dynamic sports or ultra-short exposures in daylight, every detail comes through with stunning clarity.

Introducing the Godox AD400 Pro II Studio Light

Ultra-Fast Freeze Mode

The AD400ProII can freeze even the quickest motions with an ultra-short flash duration of up to 1/27770 second (t0.1). This lets you capture razor-sharp images of flying water droplets, speeding vehicles, or any fast-moving subject. Coupled with a lightning-fast recycle time (as quick as 0.01 s), the AD400Pro II keeps pace with your creativity without missing a beat.

Introducing the Godox AD400 Pro II Studio Light

1/512 Fine Power Control

AD400 Pro II offers 10 power settings from 1/512 to full power, allowing pinpoint adjustment of flash output for consistent, repeatable exposures.

Introducing the Godox AD400 Pro II Studio Light

30?W Bi-Color Modeling Lamp

The built-in 30?W bi-color LED offers Constant mode for manual brightness (10?%–100?%) and color temperature (2800?K–6000?K), plus Prop mode, where brightness follows flash output. Stable, flicker-free illumination also doubles as a continuous video light.

Introducing the Godox AD400 Pro II Studio Light

2.4?GHz Wireless X System

Equipped with Godox’s 2.4?GHz Wireless X system, the AD400ProII ensures fast and stable multi-light communication. With the X3 trigger, one-tap sync connects all units instantly—no manual group or channel setup needed. It also works seamlessly with Xpro II, X2T, X1, and other X-series transmitters. For expanded triggering options, the USB-C port supports the optional FR433 433?MHz receiver.

Introducing the Godox AD400 Pro II Studio Light

Group Indicator Lights

16 distinct lights assign each group a unique color, so you can identify and adjust any unit at a glance—even in low light or from a distance. Just select the group’s color on screen and tweak power or sync settings instantly, keeping your shoot running smoothly.

Introducing the Godox AD400 Pro II Studio Light

Intuitive Color Display & Controls

Adjust settings instantly using the bright, full-color TFT display, where all key functions are laid out clearly and intuitively. A single press-and-hold of the modeling-lamp button toggles the lamp on or off, putting control at your fingertips and speeding up your workflow.

Introducing the Godox AD400 Pro II Studio Light

Universal Modifier Compatibility

The AD400ProII features both a Godox mount and an included Bowens adapter. Swap between them to use a wider range of modifiers from either ecosystem, unlocking more creative versatility.
*Bowens adapter installs without blocking the Godox mount.

Introducing the Godox AD400 Pro II Studio Light

And much more! You can head over to the Godox website for the full list of features.

Learn more about the Godox AD400ProII on their website here.

The post Introducing the Godox AD400 Pro II Studio Light appeared first on Digital Photography School. It was authored by Sime.


it's from Digital Photography School https://ift.tt/ChTg2jE
via Sime

Aug 14, 2025

[Photography] Insta360’s Antigravity A1 8K 360º Drone Takes off!

The post Insta360’s Antigravity A1 8K 360º Drone Takes off! appeared first on Digital Photography School. It was authored by Sime.

A quick press release for those of you that like to take to the skies! (I know I do) but this time, we’re talking about a 360 camera!

The team at Insta360’s new independent drone brand, Antigravity, have unveiled their new drone the Antigravity A1, the world’s first drone with built-in 8K 360 capture. That sounds impressive and like a whole lot of memory card is going to be needed! ?

Key Features

  • 8K 360 capture with top-and-bottom lens configuration.
  • 360 immersive live view and head tracking via the Vision goggles.
  • Invisible drone effect through advanced image stitching.
  • Intuitive point-to-fly controls with the Grip controller.
  • Never miss a shot with easy post-flight reframing and editing.
  • Compact and lightweight at 249g for license-free flying in most countries and regions.
  • Safety features including return-to-home and a payload detection system.

This is also the first product from Antigravity, the new drone brand incubated by Insta360 in collaboration with third parties. A1 combines immersive flight in 360 degrees, an exceptionally accessible flying experience, and limitless creative possibilities.

The Antigravity A1 uses a dual-lens 360° camera to capture its surroundings in every direction. Its advanced stitching technology seamlessly removes the drone from both live view and recorded footage, delivering an immersive, distraction-free experience that puts pilots right inside the scene.

Insta360's Antigravity A1 8K 360º Drone Takes off!

With every angle recorded in ultra-sharp 8K, pilots no longer need to worry about framing shots mid-flight. Instead, they can reframe their footage freely during editing—making flying simpler and reducing the chance of missing key moments. In post, creators can export in any aspect ratio without sacrificing quality and experiment with effects like Tiny Planet or horizon flips. Those familiar with the Insta360 X Series will feel right at home shooting and editing 360° footage with the Antigravity A1.

“The Antigravity A1 is unlike anything we’ve ever brought to market, and it’s poised to transform drone flight in multiple ways,” says Max Richter, Co-Founder and VP of Marketing at Insta360. “It makes immersive drone flying accessible to more people, while giving both hobbyists and professionals a powerful new way to capture and share their stories.”

Insta360's Antigravity A1 8K 360º Drone Takes off!

You can find the full release over on the Insta360 blog, we hope to get hold of one to test for you dPS drone pilots!

The post Insta360’s Antigravity A1 8K 360º Drone Takes off! appeared first on Digital Photography School. It was authored by Sime.


it's from Digital Photography School https://ift.tt/JEiag7b
via Sime

Aug 7, 2025

[Photography] Landscape Photography for Beginners: A Comprehensive Guide

The post Landscape Photography for Beginners: A Comprehensive Guide appeared first on Digital Photography School. It was authored by Barry J Brady.

Landscape photography for beginners

Reading back over a handful of our Landscape Photography articles and thought I’d re-share this gem with a couple of thoughts:

These days, landscape photography isn’t just about having the fanciest gear — it’s more about how you see and respond to the world around you. Photographers like William Patino talk about getting out there with an open mind, letting the light and weather guide what you shoot instead of sticking to a strict plan. (From an article I read on another great photo blog) And YouTubers like Mark Denney often remind us that developing your creative eye matters more than chasing the latest camera upgrade. (No, really) It’s all about learning to see great shots in everyday moments.

At the same time, new tools and techniques are making it easier than ever to get creative. Long exposures (especially with ND filters) are super popular for making water look smooth or capturing movement in the clouds — and shooting in RAW format gives you more freedom when editing later. There’s also a big push lately to play with composition. Sure, classics like the rule of thirds and golden hour are still gold, but people are experimenting more — using angles, layers, and even ideas from art and science to create more interesting shots. So don’t be afraid to try new things!

Updated 7 August, 2025. ??

Landscape photography is an amazing activity filled with excitement, beauty, exhilaration, and so much more. And in my view, landscape photography isn’t especially difficult – but it does require dedication, passion, and a bit of knowledge.

In this article, I offer my best tips for beginner landscape photography. I explain how to find the best subjects, how to choose the right gear, and how to handle your camera settings in the field; in fact, you can think of this as a mini landscape photography crash course covering all the basics.

So if you’re a landscape photography newbie and you want to know how to get started, or you’re not sure if landscape photography is right for you but you’re interested in exploring the genre, then keep on reading!

1. Start by researching potential locations

Beautiful landscape photography generally starts with a beautiful subject. Depending on where you live, you may have to drive a fair distance to find some great landscape scenes, or you may be lucky enough to have a few stunning vistas a few miles away.

Regardless, I encourage you to spend some time researching every potential location before heading out. That way, you can optimize your time in the field, and you rarely get stuck hunting for a nice composition while the light fades.

Beginner landscape photography

Before visiting a new location, I often do a bit of googling. I’ll do a search like “landscape scene + [my location]” and browse the Google Image results. Even if you just want to shoot nearby and think you know the area, it’s generally worth doing a quick search; sometimes, you’ll encounter a gorgeous scene that you didn’t know was in the area!

Anyway, use Google Image photos to compile a list of possible shooting locations. (If you don’t find much on Google, you can also check out 500px, Instagram, or even Flickr, all of which feature plenty of great landscape photography!)

It’s also important to keep in mind your shooting requirements and preferences. Do you want to capture a sunrise? A sunset? A mountain? A reflecting pool? A forest? While it’s great to keep a list of all possible locations in an area – and it’s always handy to have backups in case a location doesn’t work out – I’d recommend prioritizing certain areas based on your interests.

Beginner landscape photography

Once you’ve identified several great locations, you may think you’re ready to head out and shoot, but I’d recommend opening an app like PhotoPills or The Photographer’s Ephemeris. Drop a pin on your potential shooting location, then check the sun positions, the moon positions, and any other relevant information. Then time your photoshoot to coincide with the perfect conditions!

(What conditions are best for landscape photography? That’s what I discuss in my next beginner landscape photography tip!)

2. Shoot in the right light

It’s technically possible to capture great landscape shots at any time of day, but most landscape shooters like dramatic colors and soft light – which is why it’s generally best to photograph at sunrise and sunset.

Sunrise and sunset are known as the golden hours because they offer such beautiful, warm light. Unfortunately, the incredible light doesn’t last for very long, so it pays to arrive at least a half hour (or more) before the light show begins; that way, you’ll have plenty of time to select a composition and set up your camera.

Beginner landscape photography

Once you’re out in the field, you should pay careful attention to the direction of the light. Side light – which comes from off to the side of the camera – is a great way to produce photos with three-dimensionality and lots of texture, though backlight can create dramatic results, especially if the sky features a glorious sunrise or sunset.

And speaking of glorious skies: If possible, try to photograph on days when the sky features enough cloud cover to produce eye-catching colors, but not so much cloud cover that everything looks gray and drab.

One more landscape photography lighting tip: While the golden hours work great for most locations, you can also capture beautiful shots during the blue hour – that is, the brief window just before sunrise and just after sunset, when the light turns soft, ethereal, and (as the name suggests) cool. Because of the limited light, blue hour photography is more technically demanding than golden hour photography, but as long as you use a tripod and take steps to prevent camera shake, you can create some gorgeous photos.

3. Choose the right beginner landscape photography gear

Landscape photography is a gear-intensive genre. Sure, you can produce decent landscape shots using only a kit-lens-equipped setup or even just a smartphone, but if you want stunning, printable images that feature plenty of detail and incredible tonal range, you’ll want to purchase a few specific items of equipment.

Of course, you can’t shoot landscapes without a camera, so that’s where I’d start. You may already own a decent model, but if not, I’d recommend purchasing some sort of interchangeable lens camera that offers a decent number of megapixels (20+ MP is pretty standard nowadays and should be sufficient for large prints). There are plenty of great mirrorless and DSLR models for landscape photography, and they’ll all do a very solid job.

Beginner landscape photography

You’ll also want a decently wide lens with sufficiently sharp glass. A kit lens (i.e., the lens that comes bundled with most beginner cameras) can work, but if you want better landscape optics, look for a wide-angle zoom or even a wide-angle prime or two.

Next, you’ll need a tripod, and unless you’re really not sure whether this whole landscape photography thing is for you, I’d encourage you to really invest in a sturdy product. Most landscape photography scenarios – such as golden hour and blue hour – offer minimal light, which will force you to slow down your shutter speed. And a slow shutter speed will produce lots of blur – unless your camera has rock-solid support in the form of a tripod.

Tripods can be expensive, but it’s important to remember that a good tripod can make a huge difference. Also, a solid tripod will last a long time, so you won’t need to replace it anytime soon.

Fourth, you’ll need a remote trigger, which will allow you to trip the camera shutter without actually pressing the shutter button. (Why is this necessary? Pressing the shutter button will produce camera shake, which will cause blur, even if your camera is mounted on a tripod.)

When I was a beginner landscape photographer, I took a while to buy a remote release. Then, once I had one, I wondered why I took so long to get it! Remote releases don’t cost very much, but they’ll help keep your photos sharp, which is essential.

Finally, it’s worth mentioning a few landscape photography filters. Graduated neutral density filters allow you to capture a bright sky and a dark foreground in a single frame – though these days, many landscape shooters rely on HDR exposure blending to achieve the same result.

Then there are polarizing filters, which will reduce reflections on wet rocks, lakes, waves, and foliage. They’re great if you plan to shoot a lot of water and forest photos, but they’re not absolutely essential, so it’s up to you whether you want to invest. And neutral density filters block out the light so you can lengthen your shutter speed to produce beautiful long-exposure effects. While you won’t need one of these right away, they’re certainly worth keeping in mind for the future!

4. Choose the right settings

Once you have the right gear, know how to find good locations, and are familiar with different types of light, you’ll need to understand key landscape photography settings.

Unfortunately, there are no formulas for creating perfect shots – each new scenario should be evaluated on a case-by-case basis – but I can offer some handy guidelines.

Beginner landscape photography

First, you’ll generally want everything in your scene to be in focus. I’d encourage you to switch your camera to Manual mode, then dial in an aperture setting of at least f/8 (and potentially f/11 or even f/16 if the scene features a lot of depth). Then focus your lens about a third of the way into the landscape scene to approximate the hyperfocal distance and maximize sharpness.

(It can help to initially use your camera’s autofocus, then switch your lens to focus manually once you’ve set focus correctly. That way, you don’t need to worry about your camera refocusing as you make adjustments to your settings.)

Once your aperture has been set, you’ll want to choose your ISO. An ultra-low ISO is basically always best; I’d recommend setting your ISO to 100 (or your camera’s lowest native setting) and keeping it there. That way you can avoid unpleasant digital noise effects and retain as much detail and dynamic range as possible.

Beginner landscape photography

Next, you’ll need to set your shutter speed. Since you’ll have already dialed in an aperture and an ISO, you should simply choose a shutter speed that produces a good exposure. Depending on the light levels, you may need to drop your exposure to a couple of seconds (or more) to get a good shot, and that’s okay. In fact, lengthy shutter speeds can produce beautiful long-exposure effects; water turns soft and silky, while clouds stretch out across the sky.

Note that if your shutter speed is too long for your tastes (for instance, you want to capture blowing trees or crashing waves in sharp detail), you can widen your aperture or raise your ISO, but do so sparingly – such adjustments come with a cost!

One final settings tip: Make sure that you set your camera to capture RAW files, not JPEGs. RAW files are bigger and require processing, but they retain far more detail and are easier to edit, so it’s essential that you shoot in RAW.

5. Review and post-process your landscape photos

Once you return from a shoot, download your images and peek at the results. You’ll want to purchase some form of editing software (I recommend Adobe Lightroom Classic), and you should use it to organize your images. Put the successful photos in one folder, put the unsuccessful photos in another folder, and choose your absolute best shots from the “Successful” file to be edited. (You may find that you’ll shoot 100 images and only a couple are worthy of editing, and that’s okay!)

Editing might seem difficult, but it mostly just involves a lot of experimentation. My best advice is to take your time and test out each effect. Make sure you adjust the white balance to neutralize any problematic color casts, fiddle with different exposure and tonal sliders to bring out plenty of detail, and try boosting the colors and contrast to add a bit of punch.

Beginner landscape photography

Note that if you come up with an editing effect that you like, you can generally save it as a preset so you can use it again and again (though the specifics will depend on your editing program).

And if you struggle at first to edit your landscape photos, don’t worry. You’ll quickly become familiar with the different effects, and before you know it, you’ll be adjusting those editing sliders like a pro.

Landscape photography for beginners: final words

Landscape photography is incredibly satisfying, and with the right approach, the rewards are often unreal. Of course, you have no control over the weather or the light, and the conditions won’t always work out – but when they do, you’ll feel exhilarated!

At the end of the day, the most important tip is to take your time. Don’t rush the process, and don’t pack up until you’re certain you cannot get a better shot. Always go out and have fun. Even if the light doesn’t play along or the weather isn’t what you hoped for, you can use an outing as a practice session. Pretty soon, you’ll be capturing those breathtaking scenes with ease!

What type of landscape photography do you plan to shoot? Share your thoughts in the comments below!

The post Landscape Photography for Beginners: A Comprehensive Guide appeared first on Digital Photography School. It was authored by Barry J Brady.


it's from Digital Photography School https://ift.tt/ZsvKJb3
via Barry J Brady