Nov 26, 2021

[Photography] dPS Weekly Photo Challenge – Perfectly aligned

The post dPS Weekly Photo Challenge – Perfectly aligned appeared first on Digital Photography School. It was authored by Sime.

This week your weekly challenge photography theme is “Perfectly aligned” by our dPS Facebook group member Sharon WIlliams.

Use the hashtag #dPSPerfectlyAligned if you’re sharing on social media.
Share your photograph in the comments below if you don’t use social media. (Here’s how)

Perfectly aligned? The sun? Lines on a road? Kids artwork on a wall (I’m running late this week, that’s all I’ve got – BUT – I will find something during the week!)

dPS Weekly Photo Challenge – Perfectly aligned
Perfectly Individual | Perfectly Aligned

There are a whole list of articles HERE that may have a plethora of inspo in them, for you. Take a look and see what you come up with!

Find all of our previous weekly challenges here.


The post dPS Weekly Photo Challenge – Perfectly aligned appeared first on Digital Photography School. It was authored by Sime.


it's from Digital Photography School https://ift.tt/3xoeDm8
via Sime

[Photography] Vibrance vs Saturation in Photography: The Essential Guide

The post Vibrance vs Saturation in Photography: The Essential Guide appeared first on Digital Photography School. It was authored by Elizabeth Halford.

vibrance vs saturation: a guide

What is vibrance? What is saturation? And when should (or shouldn’t) you use these post-processing tools to enhance your photos?

Vibrance versus saturation can be a confusing topic, one that causes a major headache for Lightroom beginners. But it doesn’t have to be complicated, and in this article, we break it all down for you.

Specifically, you’ll discover:

  • An easy-to-understand vibrance definition
  • An easy-to-understand saturation definition
  • Plenty of visual examples showing how these adjustments affect your photos
  • A quick guide explaining when to use one (or both) tools

So if you finally want to learn the difference between these two editing tools, then read on!

What is saturation?

Saturation simply boosts the intensity of all the colors in a photo. It intensifies the greens, it intensifies the reds, it intensifies the yellows, it intensifies the oranges, and more.

Here’s an image with no added saturation:

boat on the water saturation

And here’s the same image, but with the saturation cranked up to 100:

heavily saturated image of a boat on the water

(It’s an extreme example, and it looks horrible, I know. It’s just for illustration purposes.)

Now, pretty much every post-processing program includes a Saturation slider. Here it is in Lightroom Classic:

Saturation slider in Lightroom

And boosting the saturation is as simple as pushing the Saturation slider upward. (You’re also free to drop the saturation, which will turn your photo black and white.)

What is vibrance?

Vibrance is often referred to as “smart saturation,” because it intensifies colors – but it does so more selectively. Specifically, vibrance boosts colors that are more muted. And it mostly ignores warmer colors (yellows, oranges, and reds), while prioritizing cooler colors (blues and greens).

Here’s the image featured above, once again with no adjustments:

boat on the water

And here’s the same image, but with the vibrance pushed to 100:

boat on the water with lots of vibrance

Note that the greens of the water and the blues in the mountains and sky become insanely intense, while the yellows and oranges in the mountain and the boat are only boosted slightly.

Here, Lightroom is trying to avoid skin tones; vibrance lets you increase the colors of an image without creating unnatural, oversaturated portraits. That’s why portrait photographers are big fans of vibrance, and why vibrance is often more useful than saturation, especially when people are in the frame.

Here’s the Vibrance slider in Lightroom Classic:

Vibrance slider in Lightroom

Vibrance vs saturation: what you should know (+ examples)

At this point, you should be roughly familiar with the differences between vibrance and saturation (in Lightroom and otherwise): Saturation boosts all the colors, while vibrance boosts muted colors and cooler colors, not skin tones.

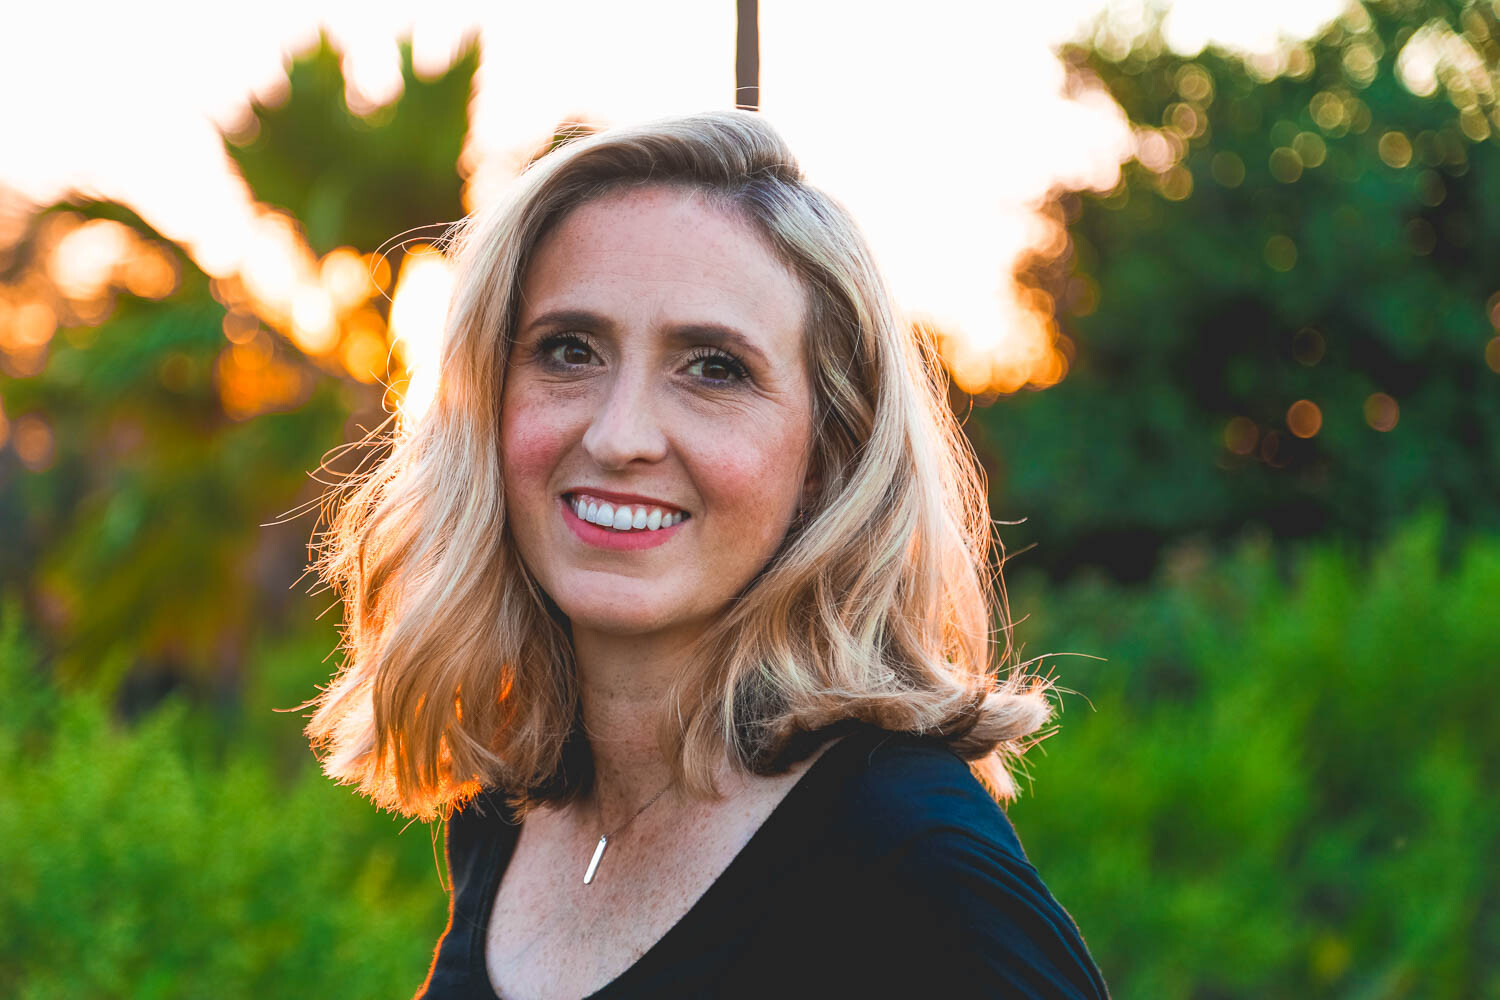
But I’d like to offer a few more examples to make the effect even clearer. First, a standard portrait with rather subdued colors:

portrait of a woman at sunset

Then the same portrait, but with the Lightroom Saturation slider pushed to 100:

highly saturated portrait of a woman at sunset

Finally, the same portrait, but with the Saturation slider set to 0 and the Vibrance slider pushed to 100:

woman at sunset with lots of vibrance

As you can see, the oversaturated version looks unpleasant and garish, while the vibrance-adjusted version is significantly more palatable. I would never recommend boosting the Saturation slider or the Vibrance slider to 100, but you could push the Vibrance slider to 35 or so and get a nice result:

more subtly edited portrait of a woman

Here’s another image, which features both a person and a landscape:

woman sitting on a rock overlooking a lake

Based on what you learned above, you might expect +100 Saturation to create crazy skin tones, and you’d be right:

woman sitting on a rock overlooking a lake with lots of saturation

The sky and the lake are boosted, too, of course, but not on the same level.

And then we have another version, set to +100 Vibrance:

woman sitting on a rock overlooking a lake with lots of vibrance

Interestingly, while the skin tones are more muted, the sky and water actually appear more saturated than in the oversaturated version above – so if you’d prefer to intensify cool tones over warm tones, vibrance is the better bet.

When (and how) should you use saturation on a photo?

In general, I recommend you use saturation subtly. Yes, it’s a nice way to make your photos pop, but it’s very easy to go too far – and end up with a garish, even nauseating, result.

So when you’re faced with a new image, try boosting the saturation in increments of +5 and see how it looks. You’ll rarely need to go over +20 or so (and if you do increase the saturation beyond +20, pause and consider before continuing; try hitting the “\” key to see the before and after version).

I often subtly boost the saturation on images full of bright colors, especially if those images don’t include people (remember, saturation really intensifies skin tones!). So if I’m editing a nice landscape, a sunset, or a flower close-up, the Saturation slider is often my go-to tool.

However, if my photo includes people, I’ll often focus on vibrance instead, as I explain in the next section.

When (and how) should you use vibrance on a photo?

Vibrance is great for photos with people – as you know, it prevents oversaturated skin tones – so whenever you’re editing a portrait, I’d recommend increasing the vibrance.

You can also use the Vibrance slider when faced with more subtle landscape and flower images. Maybe you want to add a bit of pop while keeping the intensity to a minimum; if so, vibrance will serve you well.

Still, you should apply vibrance carefully. Don’t boost it all at once, and feel free to use the method I recommended for saturation adjustments, where you increase the slider by increments of +5 each time.

Vibrance plus saturation: the experimental method

While it’s useful to know what saturation and vibrance mean, most photographers don’t know exactly what they want to do to a photo in Lightroom before they do it.

Which is where a more experimental method of boosting colors comes into play.

Instead of thinking carefully about vibrance and saturation, it’s often a good idea to simply test the waters. First, boost the Vibrance slider and see what happens. If the result looks bad, drop it back down.

Then boost the Saturation slider and see what happens. Work in small increments, of course, and monitor your photo. When you reach a result that you like, keep it.

In fact, many photographers work this way. Sometimes, they end up using both vibrance and saturation together for a great edit. Other times, they end up dialing in negative saturation (i.e., desaturation) or negative vibrance to get the look they’re after.

So don’t be shy – go where your eye takes you!

Vibrance vs saturation: final words

Now that you’ve finished this article, you know what vibrance means, what saturation means, and why you might want to use one editing tool over the other.

Plus, you know how to approach an image for the best possible results.

So find an image or two, then test out your Vibrance and Saturation sliders. See what you get. And have fun!

Now over to you:

What do you think about vibrance and saturation? Which do you prefer? Share your thoughts in the comments below!

The post Vibrance vs Saturation in Photography: The Essential Guide appeared first on Digital Photography School. It was authored by Elizabeth Halford.


it's from Digital Photography School https://ift.tt/3DZfyfo
via Elizabeth Halford

Nov 25, 2021

[Photography] 7 Macro Food Photography Tips (for Eye-Catching Shots!)

The post 7 Macro Food Photography Tips (for Eye-Catching Shots!) appeared first on Digital Photography School. It was authored by Rick Ohnsman.

macro food photography tips for beautiful results

When your objective is to communicate that your subject is tasty and delicious, macro food photography might be just the technique you need. And sometimes, it’s not so much about the appeal to the palate as it is about capturing the interesting colors, textures, and patterns of a food subject. An extreme macro of food might not even clearly identify the subject – instead, it might simply be interesting as an abstract.

Whatever your intent, let’s explore the tools and techniques you can use for gorgeous macro food photos.

To begin: macro or close-up?

In the purest sense of the term, a “macro” photo renders the subject at a 1:1 ratio. That is to say, the actual size of the object is perfectly represented on the camera sensor. With a full-frame camera, that’s about 24mm x 36mm. A U.S. quarter will fill the frame from top to bottom at that size (or if we’re doing food photography, an average-sized grape).

true macro photo of a quarter
If your full-frame camera and lens can produce this shot – with a U.S. quarter filling the frame from top to bottom uncropped – you can achieve a true macro photo.

But is that the size we want to represent the food we photograph? If we are shooting tiny food objects like peppercorns, we might want to be in much tighter. If our food subject is a cupcake, we might want to include the whole delicious item, which would not technically be a macro photo.

macro food photos of apples close up versus macro
The shot at left is a close-up while the one at right is a macro. What matters is the story you want to tell about your subject.

Does it matter? No. What you intend to communicate is what should dictate how closely you shoot food, what you include and crop out, and whether you are making macro or just close-up photos. For the purpose of this article, I may use the term “macro,” but I’m really referring to any close-up rendition of a food subject.

pepper close-up photos
How tight you shoot is more a function of what it is you intend to communicate. The top shot is interesting, but we may not even recognize the subjects as peppercorns. In the second shot, the spoon gives some clue as to the size of the objects. The third shot tells more of a story and might be used to advertise peppered crackers.

1. Get the right equipment

You can do macro food photography with almost any camera, and you can even do an admirable job with many phone cameras. If you want to get more serious, however, you should probably use a decent DSLR or mirrorless camera with interchangeable lens capabilities. A true macro lens, one allowing 1:1 representations, as discussed above, will also prove useful. Remember that most macro lenses will also let you shoot from farther distances if needed.

Want to do macro photography but don’t want to spend hundreds of dollars on a dedicated macro lens? Combining extension tubes with standard lenses can get you much closer to your subject; you might even try the reverse-lens macro technique.

Any kind of serious macro work requires a tripod. Camera movement is magnified when you are shooting very close to your subject, and so keeping your camera rock-steady is critical to getting sharp photos. Extreme detail is what will make your macro food photography stand out from the rest, and you should do everything in your power to achieve tack-sharp results, even if it means purchasing a solid, sturdy tripod for in-studio use.

Other equipment can be useful for macro photography, especially if you intend to get ultra close. Items such as focusing rails, bellows, and specialized lighting may be things you’ll add to your kit in time, but probably aren’t as necessary for most macro food photography (especially as a beginner).

apple still life and peppercorn still life
What’s the objective? Often food photography is about marketing a product.

2. Identify (and style) the “hero” object

Your first task will be to determine the food object you’ll be shooting. That will dictate many things: your lens choice, your lighting needs, your supporting elements, your background, etc. After you decide on the subject, you will want to pick out the very best representative as your “model.”

In the professional food photography world, this is called the hero. While the photographer may set the scene, position the lights, and get everything else ready, they will likely have a “stand-in” for the subject. Meanwhile, a food stylist prepares the “hero” object, much as hair stylists and make-up artists ready a fashion model.

Say you’re doing a shoot for a McDonald’s hamburger. The food stylist will pick just the right bun, condiments, tomato, lettuce, cheese, pickle, and whatever else goes on the burger. They might place each sesame seed on the bun individually with tweezers and brush the burger with oil to give it just the right glisten. They might take a blow torch to the cheese for just the right amount of meltiness. High-end food stylists are artists in their own right. The “hero,” when ready to be placed on the set, might not even be edible – but it’ll sure look good.

You probably don’t have a food stylist to do these kinds of things, but even so, do what you can to pick out the very best subjects for your shot. Your objective is the same as a professional stylist: to make the food look as delicious as possible. This is especially crucial with tight macro food photography. A blemish on an apple, an overripe berry, or a speck of anything that doesn’t belong there will force you to do significant retouching or might make the shot unusable altogether. Pick the best representative for your hero subject and learn some food styling tricks as you go along.

fruit close up
Sometimes, your macro food photography might be less about making a yummy-looking food shot and more about capturing the interesting colors, patterns, and details of a food subject. Don’t be afraid to experiment and have fun!

3. Set the scene to complement the “hero” object

A movie set director carefully chooses what props to include in a scene – and you, as a food photographer, will also need to decide what props and background items to add to your photos. With macro and close-up photography, you’ll be shooting tight and your depth of field will likely be limited. Keeping your set simple so that the “hero” food object is the main focus is usually the best option.

Additional objects you decide to include in the scene should enhance the “story” and support whatever it is you’re trying to communicate. Backgrounds can be simple: a plate for the food object, a board, or maybe some colored cloth or paper. Think about how the colors, textures, and patterns of background objects will help enhance your subject.

cupcake close-up
The props, the plates, the backgrounds, and how the colors of your scene coordinate should all be key food photography considerations.

With any kind of photography, composition is king. How you position elements in the frame so the viewer’s eye moves to the main subject is critical. Therefore, compositional techniques like the rule of thirds, leading lines, symmetry and patterns, natural frames, and choice of aspect ratio are very important. Consider the rule of odds when making a photo with multiple objects.

Camera angle is also very important in food photography. Do you want to shoot from table level, perhaps to emphasize the size of the food, a 45-degree angle as a diner might view their plate, or do what is called a “flat lay,” a shot from directly above? Think about this, and if in doubt, make shots from various angles.

dinner on a plate
This is a 45-degree “diner’s view” angle. I happened to be the diner and made the shot with my LG V30 cellphone just before I ate my subject. I know I’m not the only one out there who takes pictures of their dinner!

4. Carefully light your macro food subjects

Photographers doing studio portrait photography spend lots of time learning how to light their models. Think of your food subjects as models, too, and learn how to light them to highlight their best qualities. Here are some basics to think about:

  • Lighting types. Will you use natural daylight or artificial lights? If you go the artificial route, will you use tungsten, fluorescent, LED, or flash? Remember that each of these lighting types will have different color temperatures and you will need to correctly white balance your shot to keep the food looking natural and appetizing.
  • Start with daylight. Often the easiest and best lighting for food photography is natural light. Place your food subject near a window and then fill in shadow areas with reflectors.
  • Consider the lighting angle. Do you want to use three-point lighting like you might do in portraiture? Side light? Backlight? Rarely will you want to light directly from the front, as this will usually make your subject look flat and uninteresting. Side light can help bring out the texture of your subject, and for some food subjects, especially food that is translucent, backlighting can be dramatic.
  • Use lighting modifiers. You may want to soften the shadows in your shot with softboxes or lighting scrims. This can be useful when your food object is shiny and produces specular highlights. Fill cards can be used to reflect light back onto a subject, lighting “flags” can be placed to block light from select areas of your subject, and devices like snoots can be used to restrict light to very specific parts of your subject.
  • Specialized lighting instruments. One real advantage of lighting in macro food photography is that you are dealing with a small area and not much light is usually required. Small-lighting instruments like LED flashlights can often work well. Sometimes, when the camera is in close proximity to the subject, your biggest challenge will be to stop the camera from blocking the light. Many macro photographers favor ring lights, which can help evenly distribute light around a small subject and soften shadows.
fruit with water
Thinly-sliced foods that are translucent can be backlit and make for some colorful and interesting subjects.
LED lighting for macro food photography
You needn’t buy fancy lights to get started with macro food photography. These cheap hardware-store LED flashlights have worked well for many of my shots.

5. Use the right setup and settings

Here’s a list of things to consider when setting up your camera for macro food photography:

  • Work on a tripod. This bears repeating. Thanks to the limited depth of field and magnified motion when doing macro work, keeping the camera rock-steady via a tripod is mandatory.
  • Use Manual mode. Taking full control of aperture, shutter speed, and ISO will help you better control your exposure and depth of field. It is also a useful way to maintain shot-to-shot consistency. Once you determine the proper settings, you can then concentrate on subtle tweaks to your composition while knowing the exposure will remain consistent.
  • Turn off image stabilization. Be sure lens and camera image stabilization is off. If you’re working on a tripod, this technology won’t help and might even hurt.
  • Use Live View. Most newer cameras have the ability to display a live preview of an image on the LCD screen. This is a good way to shoot, especially if your camera has a flip-out LCD screen; you can visualize your composition, rather than needing to peek through the viewfinder. It will also help minimize the movement you’d create by touching the camera. Another option, if you can set it up, is tethering your camera to a computer. Viewing your composition live on a large monitor or even a laptop screen is a great way to visualize your shot.
  • Use a remote release. Eliminating camera movement when you make the shot is important, so if you can trip the shutter without touching the camera, you’re bound to get sharper results. Another option is to use your camera’s two-second timer. The camera will wait two seconds to take the photo, enough time for any vibrations to die down.
  • Pay attention to the plane of focus. When making tight macro shots, depth of field is minimal. Try to keep key objects at an equal distance from the camera; that way, everything stays as sharp as possible. Think of the camera sensor as one plane and the objects in the shot as another – then try to keep those planes parallel.
  • Use your depth of field preview button. Most cameras have a button that, when pressed, will stop down the lens to its set aperture and will thus display what’ll be in focus when you shoot. This will greatly aid you in determining the perfect aperture for your desired depth of field.
  • Learn how to position your focus point. By default, if you simply point and shoot, your camera will typically choose the center focus point. But what if the object you want in sharp focus is not in the center of your composition? (If you are using the rule of thirds, then it won’t be!) Learn how to reposition your focus points so the camera focuses where you want it to.
food close-ups
The colors, patterns, textures, and details of food are often more than enough to make for an interesting image.
  • Use manual focus. You can disregard the previous point if you turn off autofocus. It wasn’t so long ago that cameras didn’t have autofocus and photographers did just fine without it. Most macro food photography is done with static subjects in a controlled situation where fast focusing isn’t necessary. So take full control and set focus exactly where you want it to be.
  • Use your base ISO. The lowest ISO setting on your camera is the one that will produce the least noise in your images. Typically, you will raise the ISO if there’s not enough light to get the aperture/shutter speed settings you’d like. But in macro food photography, you will usually control the light. If there doesn’t seem to be enough, add more. If this isn’t an option, then slow down your shutter and make a longer exposure. With a static subject (and your camera on a tripod), nothing should blur, even if your exposure time is a few seconds. Stick with ISO 100 (or whatever the lowest setting is for your camera) whenever you can.
  • Work the triangle. I’m referring to the exposure triangle, a foundational photography concept that is crucial to understand if you are to become a skilled photographer. In macro food photography, of the three triangle settings – aperture, shutter speed, and ISO – you will usually be most concerned with aperture, which controls your depth of field. So start by determining what you’d like your aperture to be. We just said to try to leave your ISO at base level, usually ISO 100. What remains is the shutter speed, and with static subjects, that shouldn’t really matter. Leave your ISO at 100, set your aperture for the desired depth of field, and then adjust your shutter speed to whatever you need for a proper exposure. Simple, right?
blueberry macro photography
The blueberries weren’t going to move and I was shooting on a tripod, so an 8-second exposure was not a problem. It also gave me time for a little light painting with a small flashlight.

6. Experiment with food in motion and special effects

I just said that shutter speed usually won’t matter with a static subject, and that is true. But what if your food subject isn’t static? What if you want to create some drama with a food object in motion?

The photos below might give you ideas of how you can create interesting food photography images with some creative camera and lighting work. Read the captions for insight into how these photos were taken.

falling food
A brightly lit white card served as the background for the raspberry shot, and a 1/1000s shutter speed froze the motion. The strobe-mode of a flash was key to the multi-image look of the falling pepper shot.
splashing food
These shots were “flash-frozen;” that is to say, it was the high speed of the flash, not the (often lengthy) shutter speed, that froze the action.
food dropped into water
Bright sun was the key to getting sufficient light for the 1/2000s-1/3200s shutter speeds that froze the motion in these shots.

7. Don’t forget to edit your macro food photography!

You’re no doubt familiar with photographers who preach the importance of “getting your image right in camera.” I wholeheartedly agree that getting the best exposure you can, composing so you don’t have to crop, working to get perfect white balance, and doing everything you can to produce an image that won’t need editing is a worthy goal.

But it’s a goal that you’ll rarely achieve, especially with macro food photography.

First, your RAW image (and you are shooting in RAW, I hope?) will need at least some processing. More importantly, there are the fine nuances of lighting, white balance, sharpness, and many other things you can control with editing but you simply can’t control with your initial shot.

Second, as careful as you might be, tiny details, like specks of dust, crumbs, blemishes on fruits and vegetables, stray hairs, and all kinds of other things will inevitably show up in your shot. You can remove these things with skilled editing.

Lastly, a good editor can help highlight areas where more attention is needed, darken or blur areas where less attention is needed, give more pop to an image with contrast, clarity, saturation, or sharpness adjustments, and perform all kinds of other enhancements.

An editing session should never be a rescue mission to save a poorly executed shot, but can and should take a good shot to the next level.

cracker close up
There’s more editing here than might meet the eye. The white balance was adjusted, highlights and shadows tuned, areas were dodged and burned, and the background made more blue than the initial shot. There were also some crumbs to clean up. Expect to do some editing to your macro food photography if you want to give it that extra polish.

Macro food photography tips: final words

fizzy orange in water

Maybe you are mostly a landscape photographer, or you do portraits, sports, action, travel, or some other genre of photography. Even so, learning other skills will help you grow as a photographer. Food subjects are as close as your pantry, garden, or refrigerator, your studio can be the kitchen counter, and your lighting can be what comes in the window.

If you don’t want to spring for a dedicated macro lens, buy some extension tubes or try the reverse lens technique. Macro food photography is a lot of fun, and – bonus! – you can often eat your subject when you’re done.

almonds and spoon food macro photography
Go nuts and make some interesting macro food photos!

The post 7 Macro Food Photography Tips (for Eye-Catching Shots!) appeared first on Digital Photography School. It was authored by Rick Ohnsman.


it's from Digital Photography School https://ift.tt/3nOgugK
via Rick Ohnsman

Nov 23, 2021

[Photography] The Best Black Friday Deals for Photographers in 2021

The post The Best Black Friday Deals for Photographers in 2021 appeared first on Digital Photography School. It was authored by Jaymes Dempsey.

the best Black Friday deals for photographers in 2021

If you’re looking for the best Black Friday deals for photographers, then you’ve come to the right place.

We’ve put together a huge collection of discounts, including incredible savings on cameras, lenses, photography courses, photo editing software, presets, and more. Note that we’ve also included some affiliate links, which we use to promote our trusted partners. While we receive a commission for products purchased through these links, this is at no cost to you, and it has not biased our recommendations; our goal really is to share the best Black Friday discounts!

Bottom line: If you want to level up your photography, then you need to take advantage of these deals while they’re still available. So without further ado, let’s look at the current best Black Friday deals in 2021!

You can click below to go directly to the product category you’re interested in:

  1. Special Deals, Ebooks, and Courses
  2. Cameras
  3. Lenses
  4. Software and Presets

Special Deals, Ebooks, and Courses

Black Friday is an amazing time for photography learners of all stripes, from beginners to professionals. Why? Because the best photography education companies in the world offer major discounts on training materials, courses, and ebooks. Here are a few of our favorite deals:

Photzy Action Cards (88% Off)

Do you want to get better at photography – but without all the difficult book learning, the trial and error, and the thousands of wasted photo opportunities?

It seems impossible, but it’s not – once you have access to Photzy’s world-class Action Cards. 

Photzy action cards

You see, the Action Card set is designed to streamline the photography learning process. Instead of lengthy theoretical books, you get 65 succinct Cards, and each one breaks down a key photography concept in a simple, practical, easy-to-understand way. 

Interested in macro photography? There’s a card for that, which explains the equipment you need to get started, plus it offers up tips, example photos, and even a handful of “Action Assignments” that’ll help you cement your skills. Love landscape photography? There’s a card for that, too, and it’ll get you capturing stunning scenics in no time at all.

In fact, Photzy has cleverly organized the Action Cards into two sets: 

  • The Genre set, so you can quickly tackle each and every photography subject that interests you
  • The Composition set, so you can develop your compositional skills and start taking pro-level images, fast

It’s a great product, and it’s basically a full photography education rolled into one easy-to-digest pack of cards, so it rightfully costs several hundred dollars ($325, to be exact). But for Black Friday, you can grab the cards at 88% off, for just $39.

So grab the Action Cards here – and become a better photographer!

Secrets to Tack-Sharp Images, by Brent Mail (77% Off)

Are you tired of taking blurry photos? Do you wish you could capture sharp, crisp, clear images every time you hit the shutter button?

Then check out Brent Mail’s top-quality ebook, which shares everything you need to know for tack-sharp results.

Secrets to Tack-Sharp Images eBook

Brent identifies the 12 focus mistakes that are causing you image-quality problems – then he shows you exactly how to fix them, in simple, easy-to-undersand language. 

You don’t have to spend hours wading through unnecessary content, either; the book is short and to the point, with four simple chapters (totaling just under 30 pages).

Normally, the book costs $39 – but for Black Friday, you can buy it for just $9 (and you get several handy bonuses, too!), so click here to grab your copy!

Photzy Snap Cards (93% Off)

Have you ever been out taking photos and wished you could have your training materials open in front of you? Or better yet, have you wished for a photography expert to be standing next to you, giving you advice as you choose your settings and press the shutter button?

Thanks to Photzy’s Snap Cards: Essentials, it’s possible.

Photzy snap cards Black Friday deal for photographers

Because the Snap Cards are designed by experts to do exactly that:

Tell you what you need to know about photography – when you need to know it. Not when you’re sitting in your room reading about photography, but when you’re actually out in the field taking pictures.

The Snap Cards consist of 20 printable cheat sheets, including plenty of key information about:

  • working with your camera
  • creating perfect exposures
  • arranging perfect compositions
  • photographing people
  • capturing beautiful night photos
  • and much more!

They’re easy to read, they offer quick solutions in the field, and they’re wildly effective. But don’t take our word for it; here’s what Snap Card customers have said about this one-of-a-kind product:

  • “I was a little worried whether there’d be enough useful information on the cards…but I was pleasantly surprised. They are extremely useful. I’ve printed out different sets and they now live in my bag!” – Amy W.
  • “The cards were truly a blessing to me as I could take my time and peruse them at my own pace while I played with the camera as I was reading through them…Your cards covered many “basic” ideas such as how the exposure triangle works together, yet you also gently covered intermediate topics and even branched into some advanced topics without leaving me on the fringe. Thank you.” – Charlie E.
  • “A very comprehensive way to understand photography concepts.” – Alitza A.

Normally, the Snap Cards cost $100 USD.

But for a limited time, you can grab the Photzy Snap Cards at an insanely low price:

Just $7 (or less than $1 per card).

So make sure you grab the Snap Cards at this ultra-discounted price while you still can. Because the deal certainly won’t last!

Click here to get the Snap Cards at 93% off, right now.

The Travel Photography Course, Plus Photo-Editing Training for Lightroom (80% Off)

Most of us like to take snapshots while traveling…

…and they’re just that: snapshots. They’re not powerful, they’re not eye-catching, and they’re certainly not evocative. 

But in Mitchell Kanashkevich’s Travel Photography Course, you’ll learn to enhance your travel photos – so that the next time you take a trip, you bring back photos that belong in magazines like National Geographic (and they’re guaranteed to impress your friends and family, too!).

The Travel Photography Course

The video course covers all the travel photography essentials in just under 4 hours, including composition, settings, mood, and photo editing. And you’ll be learning from the best; Mitchell Kanashkevich has been named a 2015 Travel Photographer of the Year, plus he’s been published in countless books and magazines. 

Normally, the course costs $129.97, but for Black Friday, you can grab it for only $49.95. It even comes with a free second product, Light-Based Presets & Photo-Editing Training for Lightroom, which packs 43 presets and 4 hours of Lightroom training into a helpful bundle.

So if you’re interested in travel photography, Lightroom presets, and/or Lightroom, go ahead and buy this package at 80% off!

A Modern Approach to Photographic Composition, by Contrastly (50% Off)

What’s the difference between a beautiful photo and a blah photo? Often, it’s the composition: the specific arrangement of elements in the photo that achieve a balanced (or imabalanced) effect. 

Unfortunately, learning to compose like a pro can be pretty darn challenging – unless you have an outstanding teacher, that is!

Enter A Modern Approach to Photographic Composition, straight from the experts at Contrastly. The ebook promises to get you composing beautiful photos in no time at all, thanks to its 90 pages of carefully explained tips, tricks, and secrets. And it includes plenty of stunning example images and beautiful diagrams, so the learning never gets boring.

A Modern Approach to Photographic Composition eBook

Normally, you can grab the book for $29 – but for a limited time only, A Modern Approach to Photographic Composition is available at over 50% off, for just $14.

So if you’d like to start taking beautifully composed photos, or if you ever struggle with composition, I highly recommend you check it out.

Understanding Your Camera Video Course, by Phil Steele (40% Off)

If you’re just getting started with photography, you’re probably feeling insanely overwhelmed – by all the buttons, the knobs, the dials, and the confusing concepts (exposure compensation, anyone?).

Of course, you could take the slow approach: read your camera manual, play around with your equipment, and see what happens.

Or if you prefer the faster, easier, all-around more helpful route, check out Phil Steele’s Understanding Your Camera course, which explains everything you need to know to get up and running. In only a few hours, you’ll discover the secrets to beautiful, well-exposed images; you’ll learn how to balance aperture, shutter speed, and ISO for artistic results; you’ll learn how to set the proper white balance in camera; and you’ll learn to focus like a pro.

Understanding Your Camera video course Black Friday for photographers

It’s simple, it’s quick, and it’s infinitely more satisfying – plus, for the next few days, it’s 40% off, at just $59 (instead of the usual $99). Check it out here!

All Access Pass to the Photzy Photography Training Guide Vault (95% Off)

Are you a beginner looking to improve your photography skills? Then you’re going to love Photzy’s Photography Training Guide Vault, which contains literally dozens of ebooks, covering topics such as:

  • Getting to know your DSLR
  • How to get off Auto mode
  • How to master editing in Lightroom and Photoshop
  • How to work with light
  • Ideas for creative photos
  • How to capture beautiful portraits
  • How to capture beautiful landscapes
  • So much more!
Photzy Training Guide Vault

For the beginner photographer, these materials are gold (and they certainly offer plenty of instruction for intermediate and even advanced photographers, too).

In total, the Photzy Vault costs $1829. But for Black Friday, you can purchase an all-access pass for just $69 per year or $12 per month. Get it here!

Lightroom Mastery, by Contrastly (50% Off)

If you’re hoping to create stunning images, then editing is essential. After all, editing is how you take a decent photo and turn it into a masterpiece.

The problem? Learning to edit is overwhelming, and many photographers give up before getting anywhere at all. They never manage to make their photos shine. 

Fortunately, there’s an easy way forward:

Contrastly’s Lightroom Mastery ebook, which gives you everything you need to start editing your photos in Lightroom Classic, one of the best photo editors for beginners, enthusiasts, and even pros.

Lightroom Mastery eBook

Learn from professional photographer Adam Welch, who takes you through the ins-and-outs of Lightroom, from adjusting tones and making colors pop to improving sharpness, using presets, and more. There are over 300 pages of expert content – and by the time you’ve finished, you’ll be a bona fide Lightroom pro.

Under normal circumstances, Lightroom Mastery costs $39. But right now, you can purchase your copy for just $19 (at over 50% savings!).

Photoshop Basics for Photographers Video Course, by Phil Steele (40% Off)

Photoshop is, quite possibly, the most powerful photo editing program on the planet. You can use it to revolutionize your photography – by creating complex color grades, adding cool artistic effects, removing distracting objects from the background, and lots more.

It’s also ridiculously hard to learn, so the majority of photographers stop before they’ve ever really started.

Happily, there is a solution:

Phil Steele’s Photoshop Basics course, which offers a comprehensive yet easy-to-understand overview of Photoshop. In three hours, Phil takes you through all the PS essentials, from the interface and layer-based editing to layer masks, sharpening, portrait retouching, and beyond. You’ll even learn to prepare images for social media – so after you create a breathtaking image, you can immediately share it.

Photoshop Basics for Photographers video course

Normally, the course goes for a reasonable $69, but over the next few days, you pay just $39 for complete access.

7 Mastering Photography Ebooks, by the Creative Photographer (46% Off)

If you want to improve your photography fast, then check out this excellent Black Friday deal from the Creative Photographer, which offers 7 first-rate ebooks at $7 each (just $49 in total). 

Each book includes plenty of tips, tricks, and secrets for beginner, intermediate, and even advanced photographers, covering camera operations, lens use, exposure techniques, composition, and more.

Mastering Photography eBooks discounts

And if only a few of the books interest you, no need to worry; you can select individual books at just $7 each, for a perfect custom bundle of photography education.

The deal only lasts until the end of the month, however, so get these ebooks while you still can!

Secrets of Successful Event Photography Video Course, by Phil Steele (40% Off)

Do you want to capture gorgeous photos of events? Do you want to come home from weddings, birthday parties, holiday parties, and even concerts – with a memory card full of outstanding images?

Event photography isn’t the easiest photography genre out there, but with Secrets of Successful Event Photography, you’re in good hands. The video course expertly guides you through the rocky terrain of event shooting, including:

  • How to capture sharp photos in low-light environments
  • How to work with flash for beautifully lit images
  • How to capture stunning candid portraits
  • How to pick the proper gear for pro-level shots
  • Much more!
Secrets of Successful Event Photography

It doesn’t matter whether you’re a beginner, an intermediate shooter, or even an advanced photographer; Secrets of Successful Event Photography has something for everyone, thanks to the careful instruction of Phil Steele and Julie Kremen, both highly successful event photographers with over 25 years of combined experience.

So grab the course and learn to become a top-notch event photographer! It’s currently available for $89 versus the usual $147.

Cameras and Camera Bundles

Black Friday always features an outstanding set of camera deals, and this year is no exception.

While there are too many great camera discounts to list, here are a few that we think you’ll really love (and for more, check out Amazon’s Camera, Photo, and Video section).

Canon EOS RP With 24-105mm Lens (14% Off on Amazon)

The Canon EOS RP is Canon’s cheapest full-frame mirrorless camera, but don’t let that fool you; it can go toe-to-toe with models that cost far more, thanks to its powerful sensor (26 MP), fully articulating screen, and 4K video capabilities.

Canon EOS RP With 24-105mm lens

For those who are thinking of going full-frame but aren’t sure where to start, the EOS RP is a perfect choice. Alternatively, if you’re a Canon user ready to make the jump to mirrorless, this bundle is a great way to go; you get the powerful EOS RP, plus the ultra-useful 24-105mm lens, which can handle all kinds of shooting, from street photography to landscape photography to walkaround photography and more.

So grab the Canon EOS RP plus the 24-105mm f/4-7.1 while it’s still on sale, because you can get it for an ultra-low $1199 on Amazon!

Canon EOS R With 24-105mm Lens (10% Off on Amazon)

If you’re after a top-notch full-frame camera at an unbeatable price, then check out the Canon EOS R, which features an outstanding 30 MP sensor, beautiful low-light performance, and excellent ergonomics, including a robust grip and a touchscreen.

The EOS R may not be as flashy as the (newer and more expensive) EOS R5 and R6, but it’s certainly capable of pro-level portrait, landscape, and street images, not to mention decent videography, thanks to its 4K/30p recording and a fully articulating screen.

And the included 24-105mm lens offers a wide focal length range for photographers of all stripes; it’s perfect for casual walkaround photography to serious travel shooting and more.

Normally, this EOS R kit goes for $2099 on Amazon – but you can currently grab it for just $1899.

Nikon Z6 (20% Off on Amazon)

The Nikon Z6 may not be the newest mirrorless camera on the block – it’s since been succeeded by the Z6 II – yet it still offers excellent value for money, thanks to a class-leading sensor, along with a tough body and outstanding ergonomics.

Nikon Z6 camera body Black Friday deal

Low-light performance is jaw-droppingly good, so you can use the Z6 for beautiful night photos, indoor event shots, and even astrophotography. And if you like to record video, you’ll appreciate the high-quality 4K/30p footage and in-body image stabilization (though you may wish for a fully articulating touchscreen, which is conspicuously absent).

The Z6 is compatible with a slew of incredible lenses, including Nikon’s ever-expanding Z lineup and, via the relatively inexpensive FTZ adapter, Nikon’s huge array of top-notch F-mount glass.

Usually, the Z6 goes for $1997, but you can currently grab it for just $1597 on Amazon.

Nikon Z50 Plus the 16-50mm and 50-250mm Lenses (11% Off on Amazon)

The Z50 is a user-friendly, high-performing APS-C mirrorless model from Nikon, perfect for photography beginners, casual photographers, and Nikon DSLR users looking to upgrade.

Nikon Z50

While the Nikon Z50 doesn’t include any real standout features, you get a very respectable 20 MP sensor, 4K video, a tilting touchscreen, and decently fast shooting speeds.

And the bundle also includes two highly useful lenses: the 16-50mm, perfect for sweeping landscapes and wider portrait photography, and the 50-250mm, great for tighter portraits, action photography, and the occasional street shot.

Grab the Nikon Z50 plus the 16-50mm and 50-250mm lenses for just $1197 on Amazon, down from its usual $1347 price.

Sony a7 III With 28-70mm Lens Bundle (9% Off on Amazon)

The a7 III is one of Sony’s most popular professional cameras, combining outstanding low-light capabilities, in-body image stabilization, class-leading autofocus, a 24 MP sensor, and 4K recording capabilities into one ultra-powerful package.

If you’re looking for a standout full-frame mirrorless camera that can do just about anything, the Sony a7 III is a great choice – and this discounted bundle includes all you need to get your photography off the ground: a 28-70mm lens, perfect for portraits, landscapes, street photography, and casual shooting, a 32 GB memory card, an extra battery, a handful of filters, and more.

It’s currently available for just $1998 (versus the usual $2198).

Sony a7R IV (14% Off on Amazon)

The Sony a7R IV is a resolution monster, packing 61 megapixels into a gorgeously crafted full-frame sensor; it also boasts a stunning electronic viewfinder, excellent autofocus, and a line of class-leading lenses (see our lens discount section below!).

Sony a7R IV

If you’re a landscape or commercial photographer in need of mind-blowing detail, then the Sony a7R IV is the perfect pick, especially at its current discounted price of $2998, versus its normal $3499.

Fujifilm X-T3 With 16-80mm Lens (20% Off on Amazon)

Despite its age, the Fujifilm X-T3 is one of the best APS-C cameras to debut in recent years; Fujifilm managed to combine a beautiful design, a great shooting experience, excellent autofocus, and blazing-fast shooting speeds for a do-it-all camera that you won’t be able to put down.

If you’ve never tried a Fujifilm camera before, you’re in for a treat. Yes, the X-T3 is geared toward serious photographers and hybrid shooters, but in truth, it doesn’t matter if you’re a beginner, an enthusiast, or a professional – as long as you’re a fan of the retro design, then you’re going to love this model, not to mention the outstanding 16-80mm lens.

This Fujifilm X-T3 bundle normally sells for $2000 – but you can currently purchase it, with the excellent 16-80mm f/4 kit lens, for just $1599 on Amazon.

Olympus OM-D E-M5 Mark III With 14-150mm Lens (39% Off on Amazon)

The OM-D E-M5 Mark III is one of Olympus’s most eye-catching mirrorless cameras, packing beautiful images and 4K video into a small yet robust body. It’s perfect for photographers aiming to upgrade from their point-and-shoot models, as well as anyone looking for an affordable entry-level mirrorless option.

Olympus OM-D E-M5 Mark III camera

And thanks to the articulating screen plus the in-body image stabilization, the E-M5 Mark III is also an excellent choice for vloggers and hybrid shooters.

This discounted kit includes the versatile – and impressively small – 14-150mm f/4-5.6 II lens, which can shoot landscapes, wildlife, and everything in between.

So if you want a nice little camera that packs quite the punch, give this E-M5 Mark III bundle a try. It’s currently selling at 39% off, which puts the price at just $1099 on Amazon.

Lenses

These are some of the best Black Friday lens deals that you’ll come across:

For Canon

For Sony

For Nikon

For Fujifilm

For Micro Four Thirds

Software and Presets

Every year, the Black Friday deals on editing software and presets seem to get better and better. Check out the incredibly low prices on these powerful products:

Skylum’s Luminar Neo (45% Off)

If you’re looking for a beginner-friendly photo editor that’s insanely powerful, then I highly recommend you check out Luminar Neo, which will debut this winter but is currently available for preorder. Luminar Neo promises to be Skylum’s greatest program to date, packing all the standard editing features you’d expect, plus plenty of AI-powered extras.

Luminar Neo depth of field mapping

For instance, Luminar Neo includes the all-new Relight AI, which analyzes and adjusts scene lighting for unprecedented flexibility when editing backlit landscapes, shaded portraits, and other poorly lit subjects. You’ll also gain access to AI Power Lines Removal and AI Sensor Dust Removal, so you can clone out power lines and dust spots with zero work, as well as Portrait Background Removal, so you can transform bland portraits into unique artistic masterpieces.

In addition to Luminar Neo’s new tools, you can expect AI offerings included in past Luminar programs, such as Sky Replacement AI (so you can quickly replace skies for more dramatic results), Atmosphere AI (so you can add fog and haze into your photos), and Face AI (so you can enhance portraits with a few easy adjustments).

Luminar Neo normally costs $99, but the Black Friday discount knocks the price down to $59 for a two-seat lifetime license – plus, you get an additional $5 off the price, thanks to our special dPS discount (just make sure to use our link below!).

So click here to grab Luminar Neo for just $54!

The Complete Lightroom Presets Bundle, by Contrastly (50% Off)

Want to give your photos a stunning professional look with a single click?

That’s where the Complete Lightroom Presets Bundle comes in handy, which packs literally every preset you could ever need. (And when I say “every preset, ” I’m not exaggerating; the product includes a breathtaking 1450+ presets, far and away the most I’ve seen in a single package.)

Contrastly Lightroom presets

The presets cover a huge number of genres and styles, including:

  • Film simulations
  • Portrait presets
  • Landscape presets
  • Wedding presets
  • Dramatic presets
  • Noir presets
  • So much more!

These presets would normally cost you $99 – but for a limited time, Contrastly is offering the entire bundle for just $49. Buy it before the deal disappears!

Adobe Creative Cloud (40% Off)

We all know Adobe’s products, but did you know that you can currently purchase Lightroom, Photoshop, and all the other Adobe CC apps for 40% off, at just $29.99 per month?

The deal includes both versions of Lightroom – CC and Classic – as well as Photoshop CC, plus Adobe’s industry-standard video editing apps, graphic design apps, and more. 

Adobe Lightroom

If you’ve been on the fence about going all-in with an Adobe subscription, then now is the time to do it. Lightroom Classic and Lightroom CC are better than ever, thanks to the new masking updates, and Photoshop is on another level entirely. Plus, the video apps you’ll get as part of your Creative Cloud subscription are perfect for vloggers, YouTubers, and videographers. 

So start taking your photos – and videos – to the next level, today. Click here to get your Adobe CC subscription at 40% off!

Capture One Pro (20% Off)

If you’re looking for an advanced program that offers image organization and image editing capabilities beyond even Lightroom, then Capture One is the software for you. Yes, there’s quite a learning curve, but for those after maximum post-processing power, it’s undoubtedly worth the effort. 

For instance, Capture One takes color editing to a whole new level, offering all the standard color grading and HSL adjustments plus an Advanced Color Editor that allows you to make granular changes to skin tones and other colors in your scene. 

Capture One editing tools

There’s also Capture One’s session-based workflow option, where you organize images by photoshoot rather than genre. It’s the perfect way to approach image organization when working with a high volume of clients, which is why I highly recommend portrait and event photographers try Capture One, especially if Lightroom feels too restrictive.

Capture One 21 is the current version of the software. But Capture One 22 is on its way and will be available for all subscribers (though Capture One 21 license holders will need to purchase a second license to access Capture One 22).

Normally, you can purchase a Capture One subscription for $179 per year. However, for Black Friday week only, the subscription price is down to $143 – so if you’re after an advanced photo editor that’ll really level up your image organization and editing, then click here to get your Capture One discount!

ON1 Photo RAW 2022 (25% Off)

ON1 Photo RAW is an easy-to-use, feature-packed alternative to Adobe Lightroom Classic, combining streamlined image organization with pretty much all of Lightroom’s editing functionality and sporting a beautiful interface to boot.

And with the latest version of the software, ON1 Photo RAW 2022, you get unprecedented editing flexibility, thanks to ON1’s No Noise AI, which is “the best noise reduction software for photography” (or so ON1 claims!), as well as Sky Swap AI for automatic sky masking and replacement.

ON1 Photo RAW 2022

There are die-hard Lightroom fans out there who refuse to consider ON1 Photo RAW, but the software is genuinely great and surpasses Lightroom on a number of fronts. Plus, ON1 Photo RAW 2022 is a pleasure to use; it just feels right, thanks to ON1’s focus on user experience.

Normally ON1 Photo RAW costs $99.99 for a one-time license, and now – thanks to Black Friday – it’s just $74.99. So click here for the deal!

The Best Black Friday Deals for Photographers: Final Words

Well, there you have it:

Our favorite Black Friday deals for photographers in 2021, including training materials, camera gear, software, and more.

I encourage you to grab these great discounts as soon as possible. While there are plenty of amazing deals, they won’t stick around for long. Pretty soon, Black Friday will be over and prices will go back to normal.

So take advantage of these deals while you still can!

Know of any fantastic Black Friday deals for photographers that we missed? Share them in the comments below!

The post The Best Black Friday Deals for Photographers in 2021 appeared first on Digital Photography School. It was authored by Jaymes Dempsey.


it's from Digital Photography School https://ift.tt/3q2OBR5
via Jaymes Dempsey