Earlier this week, Sigma announced that three lenses will soon be available for Nikon Z-mount cameras: The 56mm f/1.4 DC DN Contemporary, the 30mm f/1.4 DC DN Contemporary, and the 16mm f/1.4 DC DN Contemporary.
While the lenses have not been specifically designed for the Nikon lineup – you can already grab EF-M mount, X mount, Micro Four Thirds mount, L-mount, and E-mount versions – they are the first Sigma lenses available for Z-mount cameras, and the three units will undoubtedly provide Sigma’s usual optical excellence at a very reasonable price. Note the “DC” designation, which indicates that the lenses will be optimized for Nikon’s APS-C cameras, not Nikon’s full-frame models.
The 56mm f/1.4 DC DN Contemporary caters to hobbyist portrait shooters; with Nikon’s 1.5x crop factor, the lens offers a handy 84mm focal length equivalent, perfect for headshots, half-body photos, and even full-body shots (in scenarios with plenty of space). Thanks to the f/1.4 maximum aperture, you can expect gorgeous background bokeh, not to mention outstanding low-light performance that’ll ensure you can shoot indoors and at night without issue. In fact, thanks to its wide aperture, the 56mm f/1.4 is also a great option for casual event photography or even night street shooting, and when paired with the right camera, you’ll get very impressive AF.
Then there’s the 30mm f/1.4 DC DN Contemporary, which boasts a 45mm focal length equivalent on Nikon crop-sensor cameras – perfect for wider portraits, events, travel, and everyday walkaround photography. While the new Z-mount lens won’t quite reach that Nifty-Fifty sweet spot, it’s ideal for beginner and intermediate shooters looking to upgrade from a basic kit lens setup. I’ve used the 30mm f/1.4 myself (the Sony E-mount version), and I was pleasantly surprised by how lightweight and compact it was; it can easily slip into a pocket, a purse, or a camera bag, and you’ll hardly even notice it’s there. The optics are very nice, too, and with the f/1.4 maximum aperture, it’s an easy model to recommend to hobbyists of all stripes.
Finally, Sigma unveiled the 16mm f/1.4 DC DN Contemporary for Nikon Z-mount models, a slightly more specialized model that should find plenty of interest among astrophotographers, landscape photographers, and architectural photographers. Crop-sensor astrophotography shooters will love the ultra-wide maximum aperture, while the 16mm focal length (which matches a 24mm focal length on crop-sensor cameras) is ideal for scenic shooting. If you’re a Z-mount photographer just delving into the world of wide-angle photography, it’s an outstanding pick.
Unfortunately, we don’t have expected ship dates for the three lenses listed above. The press release does claim the three lenses “will be simultaneously released in Z mount,” though when that will be is anyone’s guess.
On the other hand, we do have expected prices (based on Sigma’s already-released non-Nikon versions of the lenses). The Sigma 56mm f/1.4 will likely cost $479, the Sigma 30mm f/1.4 will likely cost $339, and the Sigma 16mm f/1.4 will likely cost $449; you may also have the option to purchase the three models together for $1267. All in all, the prices are exceptionally reasonable, making the lenses top choices for anyone seeking a blend of image quality, low-light performance, and portability.
Now over to you:
What do you think of these lenses from Sigma? Will you be interested in purchasing any of them? Share your thoughts in the comments below!
We’re coming out the end of summer here in Melbourne, so ice, unless I’m making an early arvo iced coffee, is hard to come by – that said, this week your challenge is to depict ice, however you like, lit however you like, as creatively as possible for the weekly challenge.
Use the hashtags #dPSWeeklyChallenge and #dPSIceChallenge when you share your photo on social media.
For those that were wondering, here’s how I used ice, today…. (It was a warm one)
You can use ice blocks or ice packs or an icy glare or… You choose! Look forward to checking out this week’s photographs!
Water photography offers dozens – even hundreds – of creative possibilities. It may seem simple, but water is an amazing photographic subject that’ll allow you to capture gorgeous shots using a variety of techniques.
What’s the best way to capture our favorite liquid in all its glory? In this article, I share nine inspiring ideas for photographing water, including a wide range of options that cover macro photography, landscape photography, and more. So if you’re struggling for inspiration or you simply aren’t sure how to get started, then you’ve come to the right place.
Let’s dive right in!
1. Water droplet photography
Water droplet photography is all about – you guessed it! – photographing droplets, generally so they’re frozen in midair or splashing down into a pool of liquid:
It’s a popular technique that you can experiment with at home, so it’s a great idea to try if you’re stuck inside for the day. Note that it is a form of macro photography – so you’ll want to grab your closest-focusing lens or a dedicated macro lens if you have one – and you’ll be photographing water droplets as they fall into a tub of water. Due to the motion of the falling droplets, the best results are generally achieved with off-camera flash.
A key consideration here is the background; I’d recommend placing solid colors behind the droplets, though you can also experiment with various objects or printed designs. Be aware that the background will generally be refracted in the droplets, which can add another level of interest to your images!
2. Long-exposure waterscapes
Long-exposure photography is an incredibly popular landscape shooting technique, and for good reason: It creates photos that are breathtakingly beautiful, plus they often evoke lots of emotion (especially when converted to black and white!). So why not take some long-exposure water photos of your own?
Head out to the coast or even a local river or lake and see what you can do! A good tripod is essential here, and an ND filter can help, especially if you plan to shoot during the day. I encourage you to experiment with different shutter speeds, but here are a few starting points:
Capture water’s motion. Exposures of 1/2s to 1s in length will beautifully capture the water’s movement. This works great when photographing waves moving along a beach.
Silk water. Water cascading down a waterfall can be made to look silky smooth with exposures between 1s and 2s.
Flat seascapes. If you want to make the ocean look motionless and perfectly flat, try adding an ND filter and shooting for 10s or longer.
For this next image, I used a shutter speed of 1/3s to show motion without losing the texture of the waves:
The long-exposure approach really is a great way to produce outstanding photos, especially when you’re photographing a rocky coastline. A quick (but essential) tip: If you do photograph along a coast, take care of yourself and your camera gear. Accidents can happen, and it’s also important that you pay attention to the tide times so you don’t get caught by the rising water.
Another quick tip? Watch the waves for around 30 minutes before you start photographing. Waves always come in cycles, and each cycle includes some larger waves. You need to know where these larger waves will land before you get too close to the water’s edge!
3. Freezing objects
It may not be the most conventional water photography idea, but that makes it fun! By freezing objects in blocks of ice, you can create unique still-life photos that present inanimate objects in creative ways.
As ice is transparent, you’ll be able to see your object inside the ice, although good lighting will be needed to make the photo come to life.
Start by freezing your chosen object (you’ll want to do this in layers – where you add more water over time – so you get a nice, even freeze). Then use a light source such as a spotlight or a strobe to give a stunning backlit effect! A macro lens can be a big help here, though you can also use an alternative macro technique, such as close-up filters.
This idea well for many objects, but I personally prefer to photograph things you’d find in the sea, like fish and seashells:
4. Photographing in the rain
Most photographers avoid photographing in the rain out of concern that it’ll damage their cameras. This is a valid worry, but with the right precautions you can keep your gear safe and capture some amazing photos. There are several options for protecting your camera from the rain; for instance, you can buy a rain cover, which won’t cost too much but will generally do a great job of keeping away the water. Another option is to use a simple plastic bag secured around your camera and lens with a rubber band.
Rain can add a lot of mood to a street or travel photo scene, and shots of people with umbrellas always look great. Note that it’s often difficult to see the rain as it falls; try photographing against the light to make the droplets more visible.
5. Photograph oil and water
This one’s a great idea for some indoor photographic fun! Adding oil to water is an excellent way to create interesting patterns and shapes in the liquid, which you can then use to create stunningly abstract images. Here’s how it works:
Add water and oil to a glass container with a transparent base.
Set the container across two piles of books (so there’s a gap below the container).
Initially, the oil will make a large bubble and won’t mix with the water. To create smaller oil bubbles, add liquid soap and mix the solution.
Below the glass container, add a background image; this will add color to your photos. You can use anything here, but solid colors are nice, as are gradients and even rainbows.
Use a macro lens to focus on an area of oil; the more circular the shape, the better.
Use a strong spotlight or a strobe to light your photo. (You can shoot using natural light, but you’ll need to work by a window to ensure a sufficiently fast shutter speed.)
When you find an interesting pattern in the mixture, take a shot!
6. Water droplets on glass
This water photo idea uses refraction to create a fun effect:
Here’s what you do:
Find a clear piece of glass; the pane from a picture frame will work well.
Create two piles of books and place the glass over the piles. Make sure there is a gap so you can photograph through the middle.
Smear some windscreen rain repellent on the glass. This hydrophobic substance will make the water droplets more circular. Once you’ve added the repellent, allow it to dry for a few minutes.
Add the water to the glass surface. If you want to be precise, you can use a water dropper. Alternatively, you can use a water spray bottle.
Place a background image beneath the glass. I’d recommend choosing a printed design that will create an interesting refraction inside the droplets.
Use a macro lens to manually focus on an area of glass that has some interesting water drops.
Use an externally triggered strobe to light up the image behind the glass.
Take your photo! For my water droplet images, I generally use an aperture of f/9, a shutter speed of 1/60s, and an ISO of 200.
7. Reflections
Water can provide some amazing reflections. So pick a nice calm day and head to your nearest reflecting pool! (Alternatively, you can head out after the rain and photograph some puddles.) Here are a few quick tips:
Photograph on calm days; otherwise, the wind will ripple the water and ruin the reflection. Note that larger bodies of water – such as ponds or lakes – will also create beautiful reflections, though these need to be visited on days when there is no wind at all so the lake is perfectly still and calm.
Change your angle and position. The closer you get to the water, the more detailed the reflection. Experiment with changing your angle if you want to introduce alternative elements into the composition.
Polarize the light. A circular polarizing filter will make the reflection stronger or weaker as you desire. See what happens when you twist the polarizer!
8. Try splash photography
Water can look incredible when it bounces off of something or something plunges into it, but capturing the splash is a real technical challenge. The splash needs a fast shutter speed to freeze it in the air, so you’ll need bright ambient light or a strobe.
You can do splash photography in a few different ways. One option is to drop objects into a tank or even a glass filled with water, then fire your shutter just as the subject impacts the liquid. I’d recommend using a strobe (and you can vary the angle for different lighting effects).
Another option is to throw water at an object and fire your shutter as it glances off. If you can catch the moment of impact, you may end up with a great photo. This is the more difficult method of the two, but it’s also more unique; the choice is yours!
9. Try underwater photography
Underwater photography may be difficult and gear-intensive, but if you have a passion for photographing sea life, it’s definitely worth it! You can capture beautiful coral reefs, stunning fish, gorgeous sea turtles, stretches of stunning blue-green water, and so much more. It’s a great option for the casual snorkeler or scuba diver, and it can also be worth pursuing in a serious capacity.
You will need to invest in (expensive) housing for your camera, as well as a light source that can be taken down to the ocean floor. An alternative is to purchase a camera designed specifically for underwater use, though the results may not be quite as good.
Photographing with a model can also be fun underwater; you can create all sorts of ethereal images!
Water photography ideas: final words
As you can see, there are plenty of amazing options for water photography. Hopefully, you’re now feeling inspired, and you’re ready to go capture some gorgeous water droplets, splash shots, underwater scenes, and more.
So grab your camera. Find some water. And have fun!
Now over to you:
Which water photography idea do you plan to try? Share your thoughts (and images) in the comments below!
Do your images need that magical touch of sparkles and glitter? Are you looking for an easy way to add a bit of flair to your shots? You’re in the right place.
In this article, I explain everything you need to know to create a sparkle effect in Photoshop. I show you how to make the sparkles, how to add a glow to them, and how to save them as overlays and brushes (so you can use them whenever you like!).
Ready to create some stunning sparkles? Let’s do this!
What is a sparkle effect in Photoshop?
A sparkle effect features one or more twinkly points of light, which can range from highly realistic to cartoonish and cutesy.
You can use the sparkle effect to add a twinkle to someone’s smile or eyes; you might also add a sparkle to a diamond or metallic object. Another popular edit is to add a starburst to lights or the sun.
The sparkle effect is also a great way to add some magic to your images. Whether your goal is to turn a branch into a magic wand or to add a magical light to an open book, this effect will help you out!
How to create a sparkle effect in Photoshop: step by step
There are two ways to apply a sparkle effect in Photoshop.
First, you can use an overlay, which is a quick way to add many sparkles across the entire image or to a specific area (like the top half of the composition, for example).
Second, you can create a brush. This allows you to apply one or more sparkles in a controlled way. You’ll have to add them manually each and every time you want to produce the effect, though.
Below, I explain how to work with both methods. The one you use is your choice!
Method 1: Create a sparkle overlay
An overlay is a layer that you can apply to any picture. Once you’ve created your sparkle overlay, you can quickly and easily add the effect to your files.
Step 1: Set up your document
Start by creating a new document. It can be any size, though since the point of an overlay is to have an asset you can use on any file, pick a size that roughly matches the dimensions of your photos.
Choose black as the background color, and click Create.
Step 2: Turn the background layer into a Smart Object
Smart Objects allow you to modify filters (known as Smart Filters) after they’ve been applied. The sparkle effect does require a filter, so it’s good practice to start by turning your layer into a Smart Object before you get started creating.
To do this, simply right-click on your background layer and select Convert to Smart Object in the menu.
Step 3: Add some noise
Select Filter>Noise>Add Noise. Once the dialog box appears, use the slider to determine how dense you want the noise to be. Since you turned the layer into a Smart Object, you’ll be able to come back and adjust it, so don’t worry too much about getting it exactly right.
Make sure you have the noise set to Uniform and Monochromatic. Then click OK.
Step 4: Adjust using Levels
Now it’s time to modify the noise. Start by adding a Levels adjustment layer (select Layer>New Adjustment Layer>Levels).
In the Levels histogram, use the handles to adjust the contrast. It’s generally good to make some of the noise disappear by deepening the blacks.
You can also try moving the midtones to the right and the highlights to the left. There isn’t a specific formula; just experiment and see what you can come up with. Since you’re working on a layer, you can always modify the Levels adjustment later if there’s something you don’t like.
Step 5: Add a Sponge filter
You’ll need to further modify the effect with a Sponge filter. Go to Filters>Filter Gallery>Sponge, and use the sliders to adjust the effect to your liking. Click OK.
Step 6: Add a Brightness/Contrast adjustment layer
Next, you’ll want to make adjustments using a Brightness/Contrast layer. Go ahead and select Layer>New Adjustment Layer>Brightness/Contrast.
You can use the same values I use (shown in the image above), but it’s better that you move the sliders until you like how the file looks.
Step 7: Create a new merged layer
At this point, you have created the basic sparkles, and in a moment, I’ll show you how to add a glow effect. Note that, if you want your overlay to have more or fewer sparkles, this is the time to go back to the Noise filter and make adjustments. You can also modify your adjustment layers to achieve slightly different looks.
Once you’re satisfied, create a new layer that contains your existing sparkles. You can press Shift+Alt/Opt+Ctrl/Cmd+E, or you can add a new blank layer and select Image>Apply Image, choose Merge, and click OK.
Step 8: Remove the background and add some motion blur
I’d recommend turning off the visibility of the other layers so you’re only viewing your merged (topmost) layer. Use the Color Range tool (Select>Color Range) to select the black portions of the file, then press the backspace key to delete it.
Now you should only see the sparkles. Duplicate the layer by dragging it to the Plus sign at the bottom of the Layer panel. Then choose Filter>Blur>Motion Blur.
In the dialog box, choose the direction of the blur and the distance. (Experimentation can be helpful here, or you can use the settings displayed in the image above). If you’re struggling to see the effect, you can add a Solid Color adjustment layer underneath your sparkle layers.
Repeat the previous step a few more times, changing the direction and distance of the blur as you go. The idea is to ensure that each sparkle glows in a star shape.
Step 9: Finish up and save the overlay
Merge the Sparkle layers together and delete all the other layers. Make sure you save it as PNG; otherwise, it will save with a white background and the sparkles will be lost.
And that’s it! Now you have an overlay that you can use to apply sparkles to any photo.
Method 2: Create a sparkle brush
Another way to create a sparkle effect is with a brush – which, once created, can be used to paint sparkles onto anything you like.
Note that, in order to create a sparkle brush, you’ll need to follow Steps 1-7 in Method 1 (above). Then continue:
Step 1: Select a few sparkles
From your existing overlay, choose a cluster of sparkles that you like. You can use a single sparkle, but using a cluster will help you create multiple brushes with zero extra effort, so it’s more efficient.
Select your sparkle cluster using the Lasso tool. Then copy it onto a new document.
Step 2: Add the glow
Duplicate your main layer and add motion blur (see Step 8, above). You will do this four times, taking care to change the direction of the blur to create a starburst effect.
Feel free to experiment with different levels and directions of blur!
Step 3: Invert the layer
Next, merge all the sparkle layers by selecting Layers>Flatten Image.
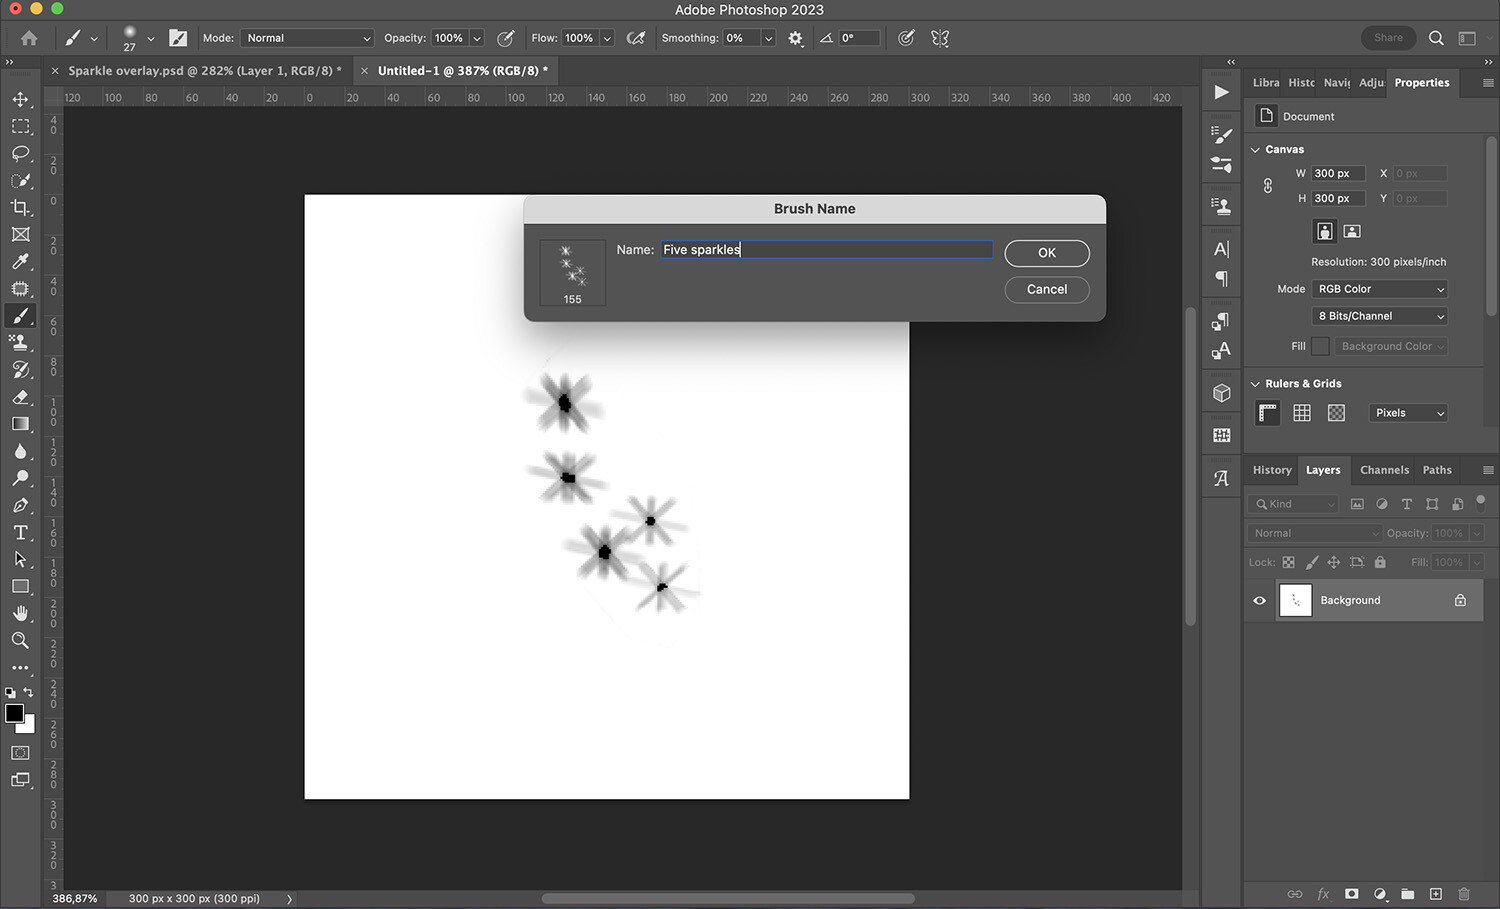
Then choose Image>Adjustments>Invert. Instead of seeing a black background with white sparkles, you should see a white background with black sparkles:
Step 4: Save the brush
At this point, you have a sparkle brush, which you can save by selecting Edit>Define Brush Preset. In the dialog box, type a name for your brush, then click OK.
But you can save additional brush tips by making different selections. For example, you can select just two sparkles and save the selection as another preset. Then you can select three sparkles and save the selection again. (This is why I recommended you use a cluster of sparkles! Now you’ll have a bunch of sparkle brushes to choose from.)
Step 5: Modify the brush properties
You’ve created a brush tip, so if you apply a single click to an image, you’ll get a sparkle. But if you apply a brush stroke to an image, it’ll hardly look like many sparkles – just a smudge!
To get a better effect, you must change the properties of the brush. In the Brush Settings panel, start by going to Shape Dynamics. Choose Control>Fade if you use a mouse or Control>Pen Pressure if you use a tablet.
I added a blue layer so I could see the brush strokes more clearly.
Now drag the Minimum Diameter slider until you like how the brush looks. (You can see a preview at the bottom of the panel, or you can try out the brush on the canvas.)
Go to Scattering in the Brush Settings panel. Here, check the Both Axes option and move the various sliders until you’re satisfied with the results.
Once you like the effect, save it as a brush preset by going to the hamburger menu and choosing New Brush Preset.
That’s it! Every time you open a photo or a document, you’ll have these brushes available to create a sparkle effect in Photoshop.
Sparkle effect step-by-step example
In this section, I explain how you can add the sparkle effect in Photoshop using the tools you’ve built. Before we dive in, make sure you’ve opened the image to which you’d like to apply the effect; for this example, I’m using a photo of a candle.
Step 1: Choose the right color
First, choose the color of your sparkles by clicking on the swatches to open the color picker. You can choose any color you like, though I’m going to sample the yellow from the candle flame:
Step 2: Grab your brush
Add a new blank layer by selecting Layer>New>Layer. This is where you’ll paint the sparkles.
Activate the Brush tool; you can either press the letter B on your keyboard or click on the Brush icon in the toolbox. Choose the sparkle brush you created previously, and adjust the size until you have a result you like.
Step 3: Paint on your sparkles
Now you can add your sparkles! I wanted to create a sparkle trail that went around the candle, so I painted on the layer with my yellow brush, then I used a layer mask to hide part of the trail (that way, the trail appears to pass behind the candle):
Step 4: Add your sparkle overlay
You don’t have to stop there – you can add the sparkle overlay you created, too! Just g to File>Place Embedded. Then select the PNG file you created and apply it to the image.
Make sure to adjust it to fit the picture using the Free Transform tool.
For a more authentic final result, I’ve added a graded layer mask so the effect fades toward the top. I’ve also added a color clipping mask to match the yellow color from the first sparkles:
How to create a sparkle effect in Photoshop: final words
I hope you had fun adding a magical touch to your images with a sparkle effect! Yes, there are a lot of steps involved, no matter the approach you use – but the good thing is that you only have to do it once. Once you’ve created your overlay or your brush, all you have to do is apply the effect to your image and customize it as needed.
So enjoy working with your overlays and brushes. Make some magical edits!
Now over to you:
How do you plan to use the sparkle effect? Share your thoughts in the comments below!
Looking for the best travel tripod for your next photo adventure? You’ve come to the right place.
In this article, I share my top 10 tripod recommendations, including options for every shooting style, budget, and level of experience. So whether you’re a beginner looking for your first portable tripod or a serious travel shooter in need of a high-quality tripod to take on lengthy trips, we’ve got you covered.
Let’s dive right in, starting with my number one pick:
If budget is a key consideration, the Manfrotto Befree Advanced Twist Camera Tripod is a great choice; it offers plenty of impressive features, yet it’s currently on sale for just over $150 (and it normally costs just $225).
This travel tripod is portable and compact with a fluid head and twist-closure locking system. It’s ideal for pretty much every travel photography situation, including street scenes, night shots, and landscapes. The carbon fiber build makes it easy to transport, and the three independent head controls clamp the camera quickly and precisely, allowing for quick use and effective panning. Use it to capture stunning motion-blur shots of bikers and cars whizzing by, then lock the head in place to capture a gorgeous vista.
The Manfrotto Befree is just under 16 in (40 cm) when closed, but it can be extended to nearly 5 ft (1.5 m), perfect for capturing those elevated travel shots. And the center column allows you to adjust the tripod height incrementally as needed, which can come in handy when fine-tuning your compositions.
Whether you’re having a staycation or are heading to far-away lands, you’ll enjoy using the Gitzo GT1545T Series 1 Traveler, an impressively rugged pro-level travel tripod that works great even when photographing in tough conditions, such as wind, rain, and rushing water.
The Traveler features a portable, four-section design with an Arca-type ball head, short center column, and shoulder strap. It weighs just 3.2 lb (1.45 kg), which is ideal for long days of shooting; you can carry it for hours without issue – yet it’s capable of supporting 22 lb (10 kg) of weight, so you can easily use it to stabilize your mirrorless or DSLR camera, even with a mounted 135mm or 200mm lens.
At the end of the day, the Traveler is one of the most solid travel tripods on the market, though it does come with a hefty price tag. I really only recommend it for serious shooters, though advanced amateurs who want to invest in a high-level support system should also give it a look.
The Benro MeFOTO RoadTrip Pro Aluminium isn’t very pricy, yet it’s an excellent travel tripod thanks to the sturdy, lightweight design and excellent ergonomics.
The MeFOTO RoadTrip Pro offers rock-solid support to help you blur water and capture star trails, and while it’s made of aluminum (which often makes for heavy products), it weighs just over 3.5 lb (1.65 kg) for easy transportation. You can strap it to your camera backpack or carry it over your shoulder during long hikes, and you shouldn’t experience any discomfort along the way.
The five-section legs extend over 5 ft (155 cm), and they even offer a reverse-fold length of just 15.7 in (40 cm), so you can easily carry the tripod inside a bag or suitcase. The ball head can be locked for accurate panoramic shooting, which often comes in handy when photographing landscapes.
Seeking a solid travel tripod that won’t break the bank? The K&F Concept D254C1 is a top-notch model that can handle all of your travel photography needs, especially if you’re a beginner or hobbyist shooter on a budget, or someone simply looking for a lightweight model to use on occasion.
With a variable working height of 21 in (53 cm) to 63 in (160 cm), the D254C1 allows you to capture a range of photographs, from low-angle landscapes to elevated architectural shots. And for those situations where a tripod is a bit too cumbersome, it converts to a lightweight monopod (or, if you need one, a walking stick!).
The 22 lb (10 kg) load capacity can support heavy cameras and lenses, while the 28mm metal ball head can achieve many angles and even high-quality panoramic shots. You’ll pay less than $150, and given the quality, it’s a real bargain!
Looking for a top-notch travel tripod that offers plenty of height and impressive stability? Then check out the MeFOTO GlobeTrotter, a carbon fiber tripod featuring strong and durable twist-lock legs, a rock-solid base, and – for added flexibility – five-section legs.
The GlobeTrotter extends to a maximum height of 64 in (163 cm), which is ideal for taller photographers and those seeking a uniquely high-angle perspective, and it folds down to a diminutive 16 in (41 cm). In other words, you should have no problem getting sharp shots at any height, nor should you struggle to pack the tripod in your suitcase or camera bag.
The included ball head offers highly accurate panning, plus the tripod looks great (it comes in a range of colors, including silver). Other advantages include the 26 lb (12 kg) load capacity, which means you can mount your heavy DSLR and use the tripod all day long, and the lightweight body, which is perfect for lengthy photo adventures. The price is on the higher side, but the package includes the legs and a very nice head, not to mention a handy case that you can use on your travels!
If you want a cheap, surprisingly lightweight aluminum tripod for travel photography, the Manfrotto Compact Action may be the perfect pick.
The Compact Action may not look like much, but it’s an indispensable tripod for any circumstance; it’s one of the best travel tripods for beginners, and I highly recommend it for anyone just getting started with travel shooting. In addition to the legs, it offers a decent, easy-to-use head, and it can extend plenty high for taller shooters.
The Compact Action’s biggest drawback is the load capacity: It can only handle camera rigs up to 6.6 lb (3 kg), but as long as you’re working with smaller cameras and/or lenses – such as an APS-C mirrorless camera and a kit zoom – you should be just fine.
Leo 2.0 – from the 3 Legged Thing Pro range – is a good travel tripod for hobbyists and even more serious photographers: It’s powerful, versatile, and compact, yet it won’t break the bank. It also looks extremely cool, featuring a metallic silver finish with orange accents (or, if you prefer, a mix of gray and bronze).
The Leo 2.0 offers a range of working heights from 4.9 in (12.5 cm) to a very nice 54 in (1.38 m). If you enjoy capturing sweeping landscapes from a low angle, the Leo 2.0 offers just what you need, while taller photographers will appreciate the impressive maximum height and the handy center column.
This tripod only weighs 3.4 lb (1.52 kg), yet it can hold up to 20 times its weight, so you shouldn’t have a problem capturing sharp images no matter your camera setup.
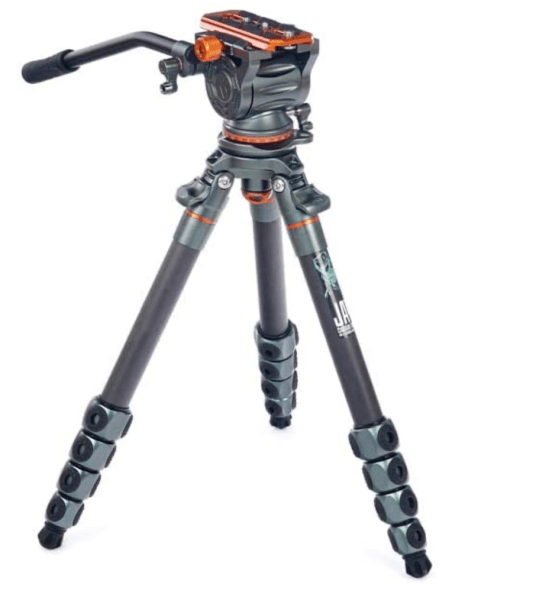
If you want to invest in a long-lasting tripod, then check out the Legends Jay, a carbon fiber tripod from the highly acclaimed 3 Legged Thing brand.
This adjustable leveling-base tripod is built with travel photography in mind and is well-suited to wildlife photography, landscape photography, and even videography. It comes with three detachable legs and works well on all terrains, so you should have no problem shooting in the wilderness, on a beach, in water – you name it!
Thanks to the carbon fiber design, the tripod weighs just 3.1 lb (1.4 kg) and supports up to a whopping 30.9 lb (14 kg) of camera gear. Even full-frame DSLR users should be just fine (and with a 70-200mm f/2.8, too). Plus, the Legends Jay is impressively compact and can easily be transported inside a camera bag or cabin luggage.
Note that the product linked above does not include a head. You’ll need to buy this separately, or you can grab it as part of a (very pricey) Legends Jay kit.
The Sirui Compact Traveler 5CX may not be flashy, but it’s impressively flexible and costs just over $100, which makes it one of the cheapest models on our list and another great option for beginners.
We love the lightweight design: The Compact Traveler clocks in at just over 1.5 lb (0.72 kg), which is ideal for photographers hoping to work all day with a tripod on hand. And despite the weight, this tripod can handle a 13 lb (6 kg) camera setup, so you can confidently use it with full-frame DSLRs and even (some) telephoto lenses.
The Compact Traveler boasts a working height range of 3.5 in (8.9 cm) to 52 in (132 cm). It’s highly portable, not to mention durable, and it can be used to shoot everything from macro scenes to cityscapes and low-light landscapes. While it isn’t quite as rugged or stable as options like the Gitzo Traveler, it’ll certainly get the job done!
The Vanguard Veo may be the last option on this list, but don’t let that fool you; it’s an outstanding travel tripod, one that can easily handle long trips and offers a winning combination of price and performance.
The strong carbon fiber material, lightweight design, and high-quality ball head make the Vanguard Veo a wonderful tripod for capturing architecture, landscapes, and even wildlife. Plus, the Veo features an excellent 17.6 lb (8 kg) load capacity, extends to 61 in (155 cm), and folds down to 16 in (41 cm).
And the tripod comes with a few bonuses, too, including a leg that converts to a monopod, a plate with a built-in smartphone adapter, and a Bluetooth remote control that is perfect for vlogging. The price tag isn’t low, but it’s not especially high, either, so it’s a good option for folks who are looking to invest in a solid model without spending an exorbitant amount of money.
Best travel tripods: final words
The market is saturated with tripods, but a few rise above the rest. Hopefully, now that you’ve finished this article, you know which travel tripod is best for your needs – and you’re ready to head out on a travel photo adventure!
So pick a tripod, pack it up, and get ready to have tons of fun!
Now over to you:
Which travel tripod do you plan to buy? What will you use it for? Share your thoughts in the comments below!