Jun 26, 2023

[Photography] How to Take Group Photos: 18 Essential Tips

The post How to Take Group Photos: 18 Essential Tips appeared first on Digital Photography School. It was authored by Darren Rowse.

How to capture great group photos

Want to take group photos that everyone will love? Our expert advice on angles, clothing, settings, and more will help you nail the perfect shot.

Capturing top-notch group photos can be a real challenge – unless you know the right approach. In this article, I dive deep into the world of group photography, and I share my best advice, including:

  • How to pose the group like a pro
  • How to keep everyone sharp and in focus
  • A simple trick to capture everyone in the group looking their best
  • How to pick the perfect group photo location
  • Much, much more!

Whether you’re a seasoned pro or just starting out, these 18 tips will help you level up your game and create the kind of group portraits you can be proud of. So grab your camera and prepare to become a group-snapping master!

1. Prepare ahead of time

how to take group photos three women

There is nothing that will make group photo subjects turn on you faster than you not being prepared. People don’t like to be kept waiting, so plan ahead.

Here’s what I recommend you do several hours (or days) before the photo:

  • Scope out the location of your shot beforehand
  • Think about how you will pose people and frame your shot

Then, a few minutes before the photo:

  • Make sure everyone you want in the shot knows that you want them in the shot
  • Make sure your camera is on and has charged batteries

2. Carefully choose the location

group posing on a mountain

The group photo location is important for a number of reasons.

First, it can give the photo context. For example, a shot of a sports team on their playing field says more than a shot of the team in front of a brick wall.

Second, the location can help emphasize your group – or it can draw the eye. To make the group stand out, you’ll need a location with no distractions.

So choose a place where your group will fit, where there is enough light for the shot, and where there are no distracting surroundings. Also, avoid setting up a group shot directly in front of a window where the light from your flash might reflect back in an unpleasant way.

3. Use a wide-angle lens

If you want to capture stunning group photos that include everyone from your best friends to your entire extended family, choosing the right lens is essential.

Forget about telephoto lenses or standard lenses that zoom in too far, limiting your ability to include everyone. Instead, opt for a wide-angle lens, which provides a more expansive perspective and ensures that every smiling face is captured in the shot. If you’re using a standard smartphone camera, you’re in luck, as most of them come equipped with a wide-angle lens or offer it as part of their camera array.

For those using more advanced cameras like DSLRs or mirrorless models with interchangeable lenses, make sure to pick a lens in the 14-35mm range. This will provide a wide focal length that keeps all your subjects comfortably within the frame. Note that many standard kit lenses that come with these cameras offer wide-angle capabilities and can do a fantastic job of capturing your group photos.

4. Try to coordinate the group’s clothing

How to Take Group Photos: 18 Essential Tips

Have you ever seen a group photo where everyone’s outfits clashed or one person stood out like a sore thumb? It’s not the best look, right? That’s why coordinating clothing for group photos can make a big difference in how your images turn out.

Now, I know it’s not always possible to have everyone wear matching outfits or go for a full-on uniform look. But whenever you have the opportunity to coordinate the clothing, I highly recommend taking it!

The key is to aim for a cohesive and harmonious visual appeal. Avoid busy patterns, flashy designs, or overly bright colors that could distract from the main focus – your beautiful group. Instead, opt for solid colors and more subdued tones that complement each other.

Think of it this way: You want the clothing choices to work together, like different instruments playing in harmony. It’s not about everyone wearing the same exact outfit (although that can create a striking effect!). Rather, it’s about ensuring that no single person stands out too much and that the colors play well with each other.

Consider suggesting a theme or color palette for the group. You can ask your subjects to work around earth tones, cool blues and purples, or warm reds and yellows. This way, even if they’re wearing different clothes, the overall visual impact will be cohesive and pleasing to the eye.

Remember, clothing coordination is just one aspect of capturing a great group photo, but it can make a remarkable difference. So, take a little extra time to discuss clothing choices with your subjects before the shoot. When everyone looks well-coordinated and stylish, it adds an extra touch of professionalism and unity to your group photos.

5. Take multiple shots

Sometimes, it’s tough to get everyone looking just right at the exact same time.

That’s why I highly recommend you take multiple photos quickly; I often switch my camera to continuous shooting mode and photograph in short bursts. The first shot is often no good – but the shot or two directly after gives a group that looks less posed and more relaxed.

On a related note, shoot some frames before everyone is ready. Sometimes, the organization of a group shot can be quite comical and image-worthy (as people tell each other where to go and jostle for position).

kids in a group waving

Also, mix up the framing of your shots a little. If you have a zoom lens, try capturing some shots at a wide focal length and some shots that are more tightly framed.

6. Get in close

Try to get as close as you can to the group you’re photographing (without cutting out group members, of course!). The closer you can get, the more detail you’ll capture in their faces – something that can really elevate a shot.

If your group is small, step in and take some head and shoulder shots. Another effective technique is to get everyone to lean in; that way, you can move even closer without cutting out subjects. You might also try moving everyone out of a one-line formation and placing some people in front and behind.

7. Pose the group

how to take group photos people in uniforms looking up

In most cases, your group will pose itself pretty naturally (after all, we’ve all been in a group shot at some point). Tall people will go to the back, short people to the front. But there are other things you can do to improve the photo’s composition:

  • If the event is centered around one or two people (like a wedding or a birthday), make the hosts the focal point by putting them right in the middle of the group (you can add variation by taking some shots of everyone looking at the camera and other shots of everyone looking at the person/couple).
  • For formal group photos, put taller members toward the back center of the shot, with shorter people along the edges.
  • Try not to make the group too deep (i.e., keep the distance between the front line of people and the back line of people as small as you can). This will help keep everyone in focus. If the composition does end up being deep, use a narrow aperture.
  • Tell everyone to raise their chins a little; they’ll thank you later when they see the shot without any double chins!

8. Do some candid group photos

women posing in a bathtub

Group photos don’t always have to be stiff and posed. In fact, some of the most memorable shots come from capturing candid moments. So, let loose and have some fun with your group photography!

When you’re starting your group session, it’s great to begin with some traditional posed shots to ensure you have those classic portraits. Once you have those in the bag, it’s time to mix things up a bit.

Instead of directing your subjects to pose, encourage them to interact naturally with each other. Tell jokes, share stories, or ask them to engage in an activity together. These genuine interactions will bring out their personalities and create authentic moments that make the photo come alive.

The key to capturing candid group photos is to be ready for those spontaneous moments. Keep your camera at the ready, observing the group dynamics and anticipating when those magic moments might happen. It might take a bit of patience, but the results will be worth it.

Don’t worry if your subjects feel a bit self-conscious at first. Once they get absorbed in their conversations or activities, they’ll forget about the camera, and that’s when the magic happens. People laughing, sharing a genuine embrace, or lost in conversation – these are the moments that truly reflect the bond within the group.

If you want to encourage even more interaction, give your subjects a specific task or activity. It could be something simple like asking them to sing a song, play a game, or even guess each other’s favorite things. These activities not only help them relax but also create opportunities for unique and spontaneous shots.

Remember, candid group photos bring out the joy and authenticity of the moment. They capture the true essence of the group’s dynamic, making the photo more engaging and relatable.

So, embrace the unexpected, encourage laughter, and let your group be themselves.

9. Time your group shot well

girls on a hill

Carefully pick the moment for your photo. Try to choose a time that works with what is happening at the gathering. I find it best to do a group shot when people are already close together and when there is a lull in the proceedings.

The start of an event can be a good time to shoot; everyone is together, they all look their best, and if there is alcohol involved, it hasn’t significantly affected the group yet.

10. Think about the light

group in the ocean

In order to get enough detail in the final shot, you need to have sufficient light. The way you should do this varies from situation to situation – but consider using a flash if the group is small enough and you are close enough for it to take effect, especially if the main source of light is coming from behind the group.

If it’s a bright, sunny day and the sun is low in the sky, try not to face your subjects toward the light – otherwise, you’ll end up with a collection of squinting faces.

11. Use the right aperture

Capturing group portraits with everyone in sharp focus can be a challenge, especially when you have multiple rows of subjects. But fear not! With the right understanding of depth of field and the appropriate camera settings, you can achieve stunning group photos where every face shines through.

Depth of field refers to the range of distance in an image that appears acceptably sharp. To ensure everyone in your group photo remains in focus, you need to control your lens’s depth of field. The key is to use a narrower aperture, which means selecting a higher f-stop value.

Here’s how it works. When you set a higher f-stop, such as f/8, it creates a larger depth of field. This means that a larger area in front of and behind your focused point will be in sharp focus. By doing this, you’ll be able to keep all your subjects, whether they’re in the front row or the back row, beautifully sharp.

However, it’s important to note that narrowing the aperture reduces the amount of light hitting the camera sensor. In bright outdoor conditions, this won’t be a problem. But if you’re shooting in lower light or indoors, you might need to compensate for the reduced light by using a tripod to keep your camera steady or adjusting other camera settings accordingly.

12. Watch the edges of the frame

How to Take Group Photos: 18 Essential Tips

When you’re taking pictures of a big group, it’s easy to get so focused on the people in the middle that you forget about the ones on the edges! That’s why it’s important to check the edges of your frame before snapping the shot.

Take a quick look on the right and left sides of the frame to make sure nobody’s been cut off. If you see any missing heads or limbs, just step back a bit or zoom out your lens a touch. And if you can’t do either of those, try repositioning the group to get them closer together.

While you’re at it, don’t forget to check the bottom of the frame too. If you’re doing a full-body shot, you don’t want to chop off anybody’s feet!

Remember, paying attention to the image edges ensures that everyone is included in the photo, making for a more complete and satisfying group shot.

13. Take control

how to take group photos girls in a line

I’ve been in a number of group photos where the photographer almost lost control of their subjects. It happened for two reasons:

  1. They weren’t quick enough.
  2. They didn’t communicate well with the group.

When shooting a group photo, it’s important to keep talking, let the group know what you want them to do, motivate them to smile, tell them that they look great, and make clear how long you’ll need them for.

It’s also important to give your subjects a reason to pose for the photograph (and to listen to you). At a wedding, you might motivate people by saying “The happy couple has asked me to get some group shots.” At a sporting event, you could say, “Let’s take a group photo to celebrate our win.” When you give people a reason to pose, you’ll find they are much more willing to stand for a few minutes while you snap photos.

Here’s another very useful line to use with a group: “If you can see the camera, then it can see you.” This one is key if you want to be able to see each person’s face in the final image.

If there are other photographers, just wait until they’ve all finished their shots, then get the attention of the full group. Otherwise, you’ll get everyone looking in different directions.

Of course, you don’t want to be a dictator when posing your group – otherwise, your group shots will include some very angry expressions. The best photographers know how to get people’s attention and communicate what they want, while also keeping people relaxed and having fun.

14. Get up high when photographing large groups

Large groups of people can be very difficult to photograph. Even with careful staggering and tiering, you’ll struggle to fit everyone into the shot.

One solution is to elevate yourself. If I’m photographing a wedding and the couple wants one big group shot, I’ll arrange for a ladder to be present, or I’ll find some other way to get up high (I’ve even climbed up onto church roofs!). A high vantage point lets you fit a lot of people into the frame while still remaining quite close to the group. It also gives an interesting perspective, especially if you’re using a nice, wide focal length.

15. Use a tripod

kids posing for a group photo

There are a number of reasons why tripods are great for group photography.

First, a tripod communicates your seriousness and can help get the group’s attention (it’s amazing what a professional-looking setup can do!).

Second, a tripod gives you more freedom to pose your subjects. Simply set your camera on a tripod, set the exposure, and set the focus. Then guide your subjects through different poses – and when everything looks just right, you can quickly press the shutter button!

16. Bring a remote release

If you want to be part of your group photos or take shots for clients without being stuck behind the camera, using a remote release is the way to go. This handy device lets you trigger your camera shutter from a distance, giving you the freedom to join in the photo while ensuring a steady shot.

A remote release is a small gadget that fits right in the palm of your hand. It connects wirelessly or via a cable to your camera, allowing you to snap the picture without physically touching the camera. It’s a game-changer for capturing group shots with ease.

Imagine this: you gather everyone, carefully pose them, and then effortlessly join them in the frame. With a remote release, you simply stand among your group, press the button on the remote, and voila! The camera captures the perfect moment without any blurriness caused by camera shake.

Sure, you could use the self-timer function on your camera, but let’s be honest, it’s not the most convenient option. You have to set the timer, run into position, and then repeat the process for every shot. It can be a bit of a hassle, especially if you want to capture multiple group photos or spontaneous moments.

By using a remote release, you eliminate the need for rushing back and forth. You can relax, focus on your group, and be present in the moment while capturing fantastic group photos effortlessly.

17. Use an assistant

If you have a very large group, an assistant can be super helpful. For one, they can get the group organized – tell people when to come, where to stand, etc.

An assistant is also incredibly handy if you are taking multiple group shots (like at a wedding when you’re photographing different configurations of a family). In such a case, I often ask the couple to provide me with a family member or a friend who can ensure we have everyone we need in each shot.

Having a family member act as your assistant ensures you don’t miss anyone (assuming they’re related to members of the group). Plus, the group will be familiar with them and will therefore respond well when the “assistant” orders them around.

18. Smile

business group photo

Yes, you should smile! During a group session, there’s nothing worse than a grumpy, stressed-out photographer. Have fun and enjoy the process of getting your shots, and you’ll find the group will, too.

In fact, after photographing a wedding, I usually come home with an incredibly sore face from all the smiling I’ve done! I find the best way to get the couple and their family to relax and smile is to smile at them. It really does work.

How to take good group photos: final words

Well, there you have it! We’ve covered a whole bunch of tips and tricks to help you nail those group photos like a pro – so whether you’re using a fancy mirrorless camera, a trusty smartphone, or anything in between, I hope you’ve found some valuable nuggets of wisdom here.

Next time you gather folks for a group shot, don’t be afraid to get creative. Play with different angles, experiment with poses, and let everyone’s personality shine through. Pay attention to your settings and the arrangement of the group, but encourage laughter, embrace the unexpected, and capture a few of those wonderful candid interactions.

Oh, and let’s not forget the power of coordination! A splash of color, a hint of theme, or even matching outfits can add that extra touch of unity and visual appeal to your group photos.

Go forth and capture some amazing images!

Now over to you:

Do you have any group photo tips that we missed? Share your thoughts in the comments below! Also, if you enjoyed this article, subscribe to the dPS newsletter!

Group photography FAQ

How do you take group photos on your phone?

Taking group photos with your phone is super convenient! Start by using the wide-angle lens on your smartphone camera. Make sure everyone is posed nicely, then frame the shot to include everyone in the frame. Set the focus on the front row, and when you’re ready, simply tap the shutter button to capture the photo.

What are the best camera settings for a group photo?

The ideal camera settings for a group photo may vary depending on the lighting conditions, but here’s a good starting point: Use a low ISO setting, around 100, to minimize noise. Opt for a reasonably fast shutter speed, such as 1/250s, to avoid motion blur. Finally, select a fairly narrow aperture, like f/8, to ensure that most, if not all, of your subjects are in focus.

How do you take group pictures with everyone in focus?

To ensure everyone is in focus, it’s important to use a narrow aperture. Choose a higher f-stop value, like f/8, rather than a low f-stop value, which would create a shallow depth of field. By using a narrower aperture, you’ll increase the depth of field, allowing more of your subjects to remain in focus.

What’s the best lens for group shots?

When it comes to group shots, wide-angle lenses are your best bet. They allow you to capture a larger field of view, making it easier to include everyone in the frame. Look for a lens in the wide-angle range, and keep in mind that wider is generally better. However, be cautious with ultra-wide lenses to avoid excessive distortion.

How can I be in my own group photo?

If you want to be in your own group photo, there are a couple of options. One way is to use a remote release, which lets you trigger the camera from a distance after you’ve positioned yourself with the group. Another option is to use the self-timer function on your camera. Set a short delay, like 2 or 10 seconds, then quickly join the group before the camera takes the shot. Just be prepared to move swiftly!

The post How to Take Group Photos: 18 Essential Tips appeared first on Digital Photography School. It was authored by Darren Rowse.


it's from Digital Photography School https://ift.tt/YP8D4dv
via Darren Rowse

Jun 25, 2023

[Photography] Car Photography: 18 Tips for Breathtaking Images ( Examples)

The post Car Photography: 18 Tips for Breathtaking Images (+ Examples) appeared first on Digital Photography School. It was authored by Desmond Louw.

Tips for gorgeous car photography

Looking to elevate your car photography? Prepare to learn the secrets of the pros.

There’s something undeniably magical about cars. The sleek curves, the gleaming paint jobs, the raw power under the hood, not to mention the amazing features and utility; it’s no wonder that so many folks are passionate about – or even obsessed with – automobiles.

But for car photographers, the situation is a little more complex. Automotive photography is exhilarating, but it also comes with a host of challenges: Cars are reflective, they’re fast-moving, and they can easily blend in with both urban and rural backdrops.

Fortunately, as a professional car photographer, I’ve spent hundreds of hours behind the camera, and along the way, I’ve developed powerful techniques that essentially guarantee top-notch shots. In this article, I share 18 practical tips, including:

  • How to capture breathtaking images of moving cars
  • The best lighting for car photoshoots
  • Plenty of ideas for amazing car pictures
  • Common car photography mistakes to look out for
  • Much, much more!

Whether you’re an aspiring car photographer or a seasoned pro looking to enhance your skills, this article is your roadmap to success. So grab your gear, buckle up, and prepare for a wild ride!

1. Spend some time researching each car

Tips for gorgeous car photography

Every car has a story to tell, and as a car photographer, it’s your job to unveil that story through your lens. Of course, you can’t tell a story if you’re unfamiliar with its details, so in the days leading up to each shoot, take the time to research the car you’ll be photographing

Start by digging into the car’s unique features and selling points. Look for advertisements or brochures that highlight these key aspects. Familiarize yourself with what makes that particular model stand out from the crowd.

Once you have a solid understanding of your subject, be sure to keep all the key information in mind during the actual photoshoot. Capture photos that draw the viewer’s attention to the standout features you researched. If the car is known for its lightning-fast speed, think about creating some dynamic shots that incorporate motion blur. For a car with a sleek design, emphasize those lines and curves by getting up close.

Tips for gorgeous car photography

But don’t stop with individual car research. Expand your knowledge beyond specific models; if you aren’t already a car enthusiast, work to become one. Familiarize yourself with essential specifications, understand how different features work, and learn to speak the language of the automotive world. This not only helps you communicate better with car owners during your photoshoots but also boosts your confidence and credibility as a photographer.

2. Pick the right car photography gear

Capturing breathtaking car images requires having the right gear in your arsenal. Think of your camera and lenses as your trusty companions on this photographic adventure. While certain types of car photography may demand more specialized equipment, in general, you’ll need a powerful mirrorless camera or DSLR and lenses covering a range of wide-angle and standard focal lengths.

When it comes to cameras, any modern mirrorless camera or DSLR can do a commendable job of capturing stationary car exteriors. However, to freeze the action and create sharp shots, you’ll need a camera with fast autofocus and high continuous shooting speeds. Look for models that can handle at least 10 frames per second, giving you the ability to capture every exhilarating moment.

For optimal image quality, consider cameras with full-frame or APS-C sensors, providing solid high ISO capabilities. This ensures that you can capture detailed shots of car interiors without worrying about excessive noise ruining the image.

Tips for gorgeous car photography

Now, let’s talk lenses. You can opt for a selection of fast prime lenses covering focal lengths from around 24mm to 85mm. These primes offer excellent image quality and versatility in various shooting scenarios. Alternatively, a 24-70mm f/2.8 zoom lens provides convenience and flexibility, allowing you to adapt to different situations without constantly swapping lenses.

If you plan on delving into night-time car photography, consider adding a tripod to your gear collection. It enables you to capture stunning long-exposure shots that showcase both the car and the surrounding elements, like mesmerizing light trails or the gentle flow of water.

With the right gear in hand, you’ll be fully equipped to unleash your creative vision and capture striking car images that leave viewers in awe. Remember, investing in quality gear can significantly elevate the impact of your photography.

3. Shoot at the right time of day

The most common mistake people make when shooting cars? Heading out during the middle of the day, when the light is harsh, unflattering, and just all-around bad. It’s a surefire way to end up with poor automobile shots, and it certainly isn’t going to impress your clients.

Instead, the best time to do car photography is a few minutes after sunset (or a few minutes before sunrise). The light is soft, there’s no direct sun, and you can capture a beautiful, almost ethereal, effect. Use a tripod – the light won’t be particularly strong, so a remote release is also a good idea – and get that perfect soft light on the paint.

Note that you can also shoot cars during the golden hours – an hour or two before sunset and an hour or two after sunrise – but be careful; the more direct the lighting, the harder it is to create a flattering image. For close-up images, consider using a reflector to deal with pesky shadows.

Another option is to work on overcast days – the clouds do a good job of diffusing the light – but since the weather is difficult to predict, this isn’t really something you want to bank on. Instead, work close to sunrise and sunset whenever possible!

This photo was taken a few minutes before sunrise:

Car photography BMW M135i

4. Match your camera settings to the scenario

In the exhilarating world of car photography, there’s no one-size-fits-all when it comes to camera settings. It all depends on the situation, the desired effect, and the story you want to tell through your images. So, buckle up as we dive into the art of experimenting with different settings to capture breathtaking car shots.

When you’re aiming to freeze the action and keep the car tack-sharp, crank up that shutter speed to at least 1/1000s or higher. This might require widening the lens aperture or increasing the ISO, depending on the lighting conditions. To maintain exposure control without worrying about unexpected light changes, Aperture Priority or Shutter Priority mode will be your trusty companions.

Tips for gorgeous car photography

Interior shots, on the other hand, call for a delicate balance. You’ll want to keep the shutter speed relatively low to maintain sharpness, but also fast enough to prevent blurring. Boosting the ISO slightly and widening the aperture will come in handy here. And don’t forget to steady yourself against the car to avoid any unwanted camera shake.

When capturing motionless cars in all their stationary glory, Manual mode is your go-to. Set your ISO to its base value, select the aperture that suits your desired depth of field, and then fine-tune the shutter speed to achieve the perfect exposure. Remember, these settings are not set in stone! Feel free to mix it up, play with wider or narrower apertures, and explore the creative possibilities.

Tips for gorgeous car photography

In this ever-evolving journey of car photography, experimentation is key. Don’t be afraid to push the boundaries, step out of your comfort zone, and discover new settings that bring your car images to life.

5. Confidently seek out new cars to photograph

Let’s face it, unless you’re already drowning in client requests, the cars won’t come knocking on your door, begging for their portraits to be taken. But fear not, my fellow photographers, because I’ve got some ingenious strategies to help you uncover your next gem.

Start close to home. Reach out to friends and family who own eye-catching rides and kindly ask if you can photograph their prized wheels. Not only will this give you a chance to practice your skills, but it’ll also help you build a portfolio that’ll attract larger opportunities down the road. Put your heart and soul into those shots, and let them become the bait that lures in even more impressive catches.

Tips for gorgeous car photography

Once you’ve mastered the basics and have a solid repertoire of awe-inspiring images, it’s time to spread your wings and approach strangers. Picture this: you spot a breathtaking car on the street, your heart races, and you can’t resist the urge to capture its essence. Summon your courage, stride over with confidence, and pay the owner a genuine compliment. Politely inquire if they’d allow you to photograph their automotive beauty. You’d be surprised how often people are willing to say yes, especially when you present yourself as a consummate professional armed with business cards and a dazzling website showcasing your automotive masterpieces.

Car shows are another goldmine for encountering passionate car lovers and finding an abundance of subjects in a single location. Join the automotive congregation, armed with your camera and a keen eye for detail. Strike up conversations, make connections, and let your enthusiasm for cars shine through. The more you put yourself out there, the more doors will swing open, leading you to coveted opportunities and remarkable vehicles begging to be immortalized through your lens.

6. Be on the lookout for reflections

If you’re after professional car photos, you must carefully control what reflects in the car. One of the most important things you want to show in your car pictures is the design lines, yet reflections can spoil these lines very quickly. So before you capture a single photo, have a look around you, then look closely at the car and see what reflects off its surface.

You see, a car (especially a new, shiny one) is like a mirror. So if you shoot with buildings or trees in front of the car, they’ll reflect off its surface and appear in your photos. Instead, aim to have an open space behind you, like a field or an ocean. If you’re stuck in a location with busy surroundings, you can always try to change your perspective; by getting down low, you may be able to get rid of the distractions and instead come away with a sky reflection in the car (which looks way better; see the image at the end of this section).

Pro tip: Be very careful not to include your own reflection in the photo. If you’re struggling, it’s best to put the camera on a tripod, set the self-timer, and move out of the shot. Just look at this photo I took of a dark, shiny BMW 428i; behind me was nothing except the horizon. In fact, you can clearly see the horizon reflecting in the car:

Car photography tips BMW428i

7. Work each car from a variety of angles

In the exciting realm of car photography, it’s crucial to approach each subject with a fresh perspective. Instead of settling for shots from a single direction, let your creative instincts take the wheel and explore the full range of angles. Capturing a car’s essence requires a well-rounded approach that encapsulates its unique details and character. While the temptation to focus solely on the front or profile shots may be strong, don’t limit yourself—there’s a whole world of possibilities waiting to be discovered.

Tips for gorgeous car photography

Consider the captivating three-quarters angle, which can add a touch of intrigue and showcase the car’s sleek lines. Experiment with capturing the rear of the car, revealing its distinctive features and personality from a different viewpoint. Play with vantage points by elevating your position, whether it’s from a ladder, balcony, or even a parking garage, to provide a fresh perspective. And don’t be afraid to get low, allowing the car to loom powerfully in the frame, commanding attention and conveying a sense of strength.

Tips for gorgeous car photography

Keep in mind that not every shot will be a winner, but by exploring a variety of angles, you open yourself up to the possibility of capturing outstanding images that truly showcase the car’s allure. It’s all about finding the perfect balance between creativity and technical skill, ensuring that each angle enhances the narrative you want to convey.

8. Don’t forget to capture interior images

Tips for gorgeous car photography

In the electrifying world of car photography, it’s easy to become captivated by the mesmerizing exteriors of these four-wheeled beauties. But, hold your horses, my fellow photographers! Don’t let the allure of sleek curves and shining paint distract you from a crucial aspect of the automotive experience—the interior. Yes, my friends, it’s time to venture inside the cabin and capture the soul of the car from within.

Picture this: the supple leather seats beckoning you to sink into their embrace, the polished dashboard gleaming under the warm glow of ambient light, and the intricate details of the steering wheel waiting to be admired. These elements hold the key to telling a complete story, showcasing not just the external aesthetics but also the essence of comfort, luxury, and performance that lie within.

When it comes to photographing car interiors, a few pointers will set you on the right track. First, ensure that your client understands the significance of these shots, especially if they intend to use the images for listings or advertisements. Encourage them to prep the car by giving it a thorough interior clean and tidying up any loose items.

Car interiors can be notoriously challenging to capture due to their relatively dim nature. Seek out opportunities to park the car in well-lit areas or position it strategically to allow natural light to flood through the windows, illuminating the space with a touch of magic. If needed, don’t shy away from adjusting your camera settings, such as cranking up the ISO or lowering the shutter speed, to maintain sharpness while capturing the cozy ambiance.

9. Take driving shots

Here’s one of my favorite tips for creative car photography:

Shoot the car out of another moving car. (Please be super careful when doing this; make sure that both you and your camera are well-secured before even thinking about taking a photo.)

A moving car shot looks gorgeous, plus it conveys a beautiful sense of motion. This Audi S3 was shot before sunset; it was driving at 70 km/h (43 mph), and I used a shutter speed of 1/125s:

car driving along the road

Unfortunately, you can’t just hop into your car, zoom along, and take some photos out the window. Instead, you’ll need to carefully select your speed, position, and settings. Here are my recommendations:

  • Get a driver, so that you’re in the passenger seat and free to concentrate on the photo shoot
  • Secure your camera to the inside of the car or your body using a strap
  • The two cars should match speeds, with your car slightly ahead and in the adjacent lane; 60 km/h (37 mph) is a good starting point, as you’ll get some nice movement on the road and on the wheels, but you won’t be going so fast the shoot becomes difficult
  • Set your camera to its continuous shooting mode and set your shutter speed to 1/100s or so. A little blur is good, as it communicates movement. You can even decrease the shutter speed further, though this will decrease your ratio of keepers to duds.
  • Shoot on low-traffic roads. You do not want to frustrate or distract other drivers with your photo shoot.

Because this type of shot involves so many (literally) moving parts, you’re going to come away with plenty of failed images. But if you use burst mode, you experiment with different shutter speeds, and you put in the hours, you’ll start to capture some genuinely stunning photos.

10. Pay attention to the color of the car

Different types of paint react differently to changing light. I know I said that you should avoid direct sunlight, and it is true, but you’ll occasionally find colors that handle direct sunlight really well.

Just look at this baby blue Beetle shot in the middle of the day:

Beetles on gravel

So don’t be afraid to experiment with different lighting conditions. And always review your shots carefully afterward, making mental (or physical) notes about the color and how it looks.

Pro tip: If you want to jumpstart your understanding of lighting and car colors, head to a parking lot at different times of the day, then go around and (discreetly) take photos of cars. Obviously, you should use good judgment and be careful; don’t do a full car photo shoot while the owner stands and watches, and look out for cars driving around that might accidentally run you over.

11. Choose your background carefully

Tips for gorgeous car photography

A beautiful background adds that perfect finishing touch to a car photo, while a bad and/or distracting background can instantly ruin the shot.

What counts as a good background? Anything non-distracting. Ideally, it should emphasize the main subject and even complement the car (and suit the theme).

Bad backgrounds, on the other hand, are distracting, they draw the eye, and they don’t make sense given the car color, shape, or theme. For instance, dustbins, power lines, and other cars can kill a picture. You can remove these in Photoshop sometimes, but it’s best to avoid them in the first place (plus, it’ll save you time in the long run).

For this Aston Martin shot, I used a simple background. The yellow paint matches the car’s color:

Car photography aston martin

12. Make sure the car is looking its best

In car photography, the condition of your subject is nothing short of crucial. Nobody wants to see a snapshot of a car covered in dirt, scratches, and dents, so before you start snapping away, it’s important to ensure your subject looks its absolute best.

Tips for gorgeous car photography

First things first, encourage the car owners to give their prized possessions a thorough wash before the photoshoot. A clean exterior will make those paint jobs pop and ensure a captivating visual experience.

Now, we must acknowledge that some issues may require more than just soap and water. Those pesky dents and imperfections can be trickier to handle. If you find yourself facing a less-than-perfect car, fear not! Strategically adjust your framing to avoid highlighting problem areas and instead focus on the car’s best features. Don’t let a few dings ruin the show.

And hey, let’s not forget about the magic of post-processing! With the right tools in hand, you can digitally transform your car into a flawless masterpiece. I encourage you to use programs like Photoshop to remove blemishes, but remember that every editing step will take extra time behind the computer, so it’s always best to get things right in the field.

13. Capture a mix of wide and close-up car photos

To truly showcase the essence of a car, you need to bring versatility to your photography game. Don’t limit yourself to just wide shots or close-ups—embrace the power of both! Wide-angle shots are like a sweeping vista, setting the stage and capturing the car in its environment. They allow you to paint a vivid picture of the scene, with the car as the charismatic protagonist. Think of it as the opening shot of a blockbuster movie, setting the tone and building anticipation.

Tips for gorgeous car photography

On the other hand, close-up shots are all about the details—the intricacies that make each car unique. Zoom in on the sleek lines, the shiny chrome accents, and the finely crafted interior. Show off the stitching on the seats, the texture of the dashboard, and the gleam of the polished surfaces. These close-ups create an intimate connection with the viewer, inviting them to appreciate the craftsmanship and artistry that goes into every automobile.

Tips for gorgeous car photography

By incorporating a mix of wide and close-up shots, you’ll weave a compelling visual narrative that brings the car to life. It’s like telling a story through your lens, capturing the grandeur and the subtleties, leaving your audience in awe. So, equip yourself with lenses covering a range of focal lengths and explore the full spectrum of possibilities.

14. Pan for motion blur

I’ve already talked about shooting cars from a moving car. But if you want a beautiful motion blur effect and you don’t like the idea of photographing out a moving car window, why not try panning instead?

Simply stand next to the road and let the car drive past you. Follow the car with your lens in one smooth action and set the shutter speed to 1/125s. You will be amazed by how easy this is!

Of course, you’ll end up with plenty of failed shots, but the good ones will make it all worthwhile (and you can maximize the number of good images by using your camera’s burst mode and firing off a series of shots with every attempt). Also, you can try this technique after dark for some very interesting night car photography results.

This Ferrari was shot at 1/125s at 200mm. The car was driving roughly 37 mph (60 km/h):

red ferrari moving

15. Let the car interact with nature

Here’s another way to capture a photo that speaks to the viewer:

Don’t just park the car in a parking lot or along a road and snap some shots. Instead, make the car interact with its surroundings.

Examples of this could be a car creating dust or a 4×4 driving over an obstacle. Look at this Chevrolet Trailblazer climbing over a rock:

trailblazer wide-angle lens

The car/rock combination emphasizes the ruggedness of the Trailblazer. Plus, by using a wide-angle lens and shooting from down low, I made the car loom, like it’s the king of the mountains.

Here’s another example, this one of a G-Class AMG drifting on loose sand:

car moving across sand

Don’t you just love the movement it conveys? The whole photo is packed with energy.

16. Keep your images dynamic (even when the car is stopped)

In the realm of car photography, we often associate dynamism with shots of cars in motion, where the adrenaline is pumping and the excitement is palpable. But what about those moments when the car is at rest, waiting to unleash its power? Fear not, my fellow photographers, for there are ways to inject life and energy into your images, even when the wheels have come to a halt.

One trick in your arsenal is to approach your stationary subject from an angle. By tilting your perspective, you introduce a sense of movement and flow to the composition. Let the lines of the car lead the viewer’s eye on a visual journey, creating a dynamic path that draws them deeper into the frame.

Consider leaving space in front of the car, a breathing room that invites the imagination to fill the void with anticipation. This open expanse hints at the car’s potential to surge forward, igniting the thrill of speed and adventure in the viewer’s mind. It’s a visual cue that stirs excitement, even in stillness.

For the adventurous souls among us, going ultra-wide can yield captivating results. By incorporating the car as a prominent foreground element against a breathtaking landscape, you capture the essence of wanderlust and freedom. The juxtaposition of the stationary car against the vast expanse of nature adds a touch of awe-inspiring grandeur to your images.

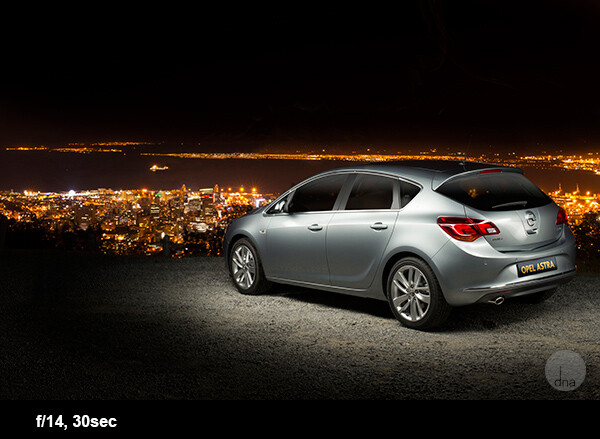
Car photography tips Opel Astra light painting
This is an Opel Astra shot next to Table Mountain with Cape Town in the background.

Remember, my friends, dynamism is not limited to motion alone. It’s about infusing every frame with energy, intrigue, and a hint of the extraordinary.

17. Shoot at night

Tips for gorgeous car photography

Night car photography might sound daunting, but you will be amazed by how easy and awesome it is! The biggest secret here is to find a spot where it’s completely dark; any streetlights or even a full moon could make life tricky.

Once you’ve found the right spot, set up your camera on a tripod. Set your ISO to 100, the shutter speed to 30 seconds, and the aperture to f/9.

When the shutter opens, take a strong constant light source and walk around the car, “painting” it with the light. A normal household flashlight works for this.

There are no rules here. Paint the car in different ways to get different effects, and you will be blown away by the results! Here’s an example of this technique:

Dodge Charger with the skyline of Detroit City
This is a Dodge Charger with the skyline of Detroit in the background. The photo took me no longer than five minutes to set up and capture.

18. Enhance your automotive photos with post-processing

Editing is an essential step that elevates your car photography to pro-level status. It’s your opportunity to fine-tune colors, accentuate details, and bring out the full potential of your shots.

Begin with the basics. Adjust the white balance to ensure accurate colors and make those hues pop. Tweak the exposure to find the perfect balance between shadows and highlights, revealing every intricate detail of the car. And don’t forget about minor color adjustments to enhance the overall mood and atmosphere.

Tips for gorgeous car photography

But we can go even further. Cloning and healing tools are your secret weapons to eliminate any imperfections that might distract the viewer’s eye. Smooth out blemishes, scratches, or even unwanted reflections for a flawless finish. Additionally, consider adding a subtle vignette to draw the viewer’s focus toward the car and create a captivating visual experience.

As your skills progress, it’s time to explore more advanced techniques. Color grading allows you to unify the scene and evoke a specific mood, giving your images a refined and cohesive look. Dodge and burn selectively to add dimensionality, making the car truly come alive in three-dimensional glory.

Remember, there’s no one-size-fits-all approach to editing. Let your creativity run wild and try new ideas. Experimentation is key to discovering your unique editing style that sets your car photos apart from the rest. So, embrace the power of post-processing and unlock the full potential of your car images!

By harnessing the potential of post-processing, you’ll unleash the true beauty and impact of your car photography.

Tips for taking better photos of cars: final words

Well, there you have it! We’ve reached the finish line of our car photography journey – and now, armed with these practical tips, you’re ready to unleash your inner automotive artist and capture breathtaking car shots.

Remember that while automotive photography often seems difficult, even a beginner can get great results thanks to a few handy tricks of the trade. Make sure to choose the right lighting, do your research, choose your gear and settings carefully, and work each car from every angle. Then, once you’re done shooting, be sure to put plenty of time into post-processing so your photos really shine.

So find a worthy subject, then get out there and start practicing! Amazing car photos await!

Do you have any additional car photography tips or favorite images you’ve taken of cars? Share them in the comments below!

Authorship note: This article was originally written by Desmond Louw. In June 2023, the text and images were updated by the dPS Managing Editor, Jaymes Dempsey.

The post Car Photography: 18 Tips for Breathtaking Images (+ Examples) appeared first on Digital Photography School. It was authored by Desmond Louw.


it's from Digital Photography School https://ift.tt/WSt5gMf
via Desmond Louw

Jun 23, 2023

[Photography] dPS Bi-Weekly Photo Challenge Golden Hour Landscapes

The post dPS Bi-Weekly Photo Challenge – Golden Hour Landscapes appeared first on Digital Photography School. It was authored by Sime.

This week, and next, your job is to go out and capture a golden hour landscape shot – if the only landscape you have is a city street – so be it! – you can make it ‘golden hour urban landscape’ if you need to.

The golden hour. Even if you haven’t been doing landscape photography for very long, you’ve undoubtedly heard the term thrown around. As photographers, we’re in the business of capturing light, and it rarely gets better than the soft, golden rays of the early morning or late afternoon sun….[read the full article on our blog]

Make sure you include the hashtags #dPSWeeklyChallenge and #dPSGoldenHourLandscapes in your post, here in the comments or over on social media. You can tag us on Facebook, Instagram or Twitter!

Find all of our previous weekly challenges here.

Simply upload your shot into the comment field (look for the little camera icon in the Disqus comments section) and they’ll get embedded for us all to see or if you’d prefer, upload them to your favourite photo-sharing site and leave the link to them. Show me your best images in this week’s challenge. Sometimes it takes a while for an image to appear so be patient and try not to post the same image twice.

Share in the dPS Facebook Group

You can also share your images in the dPS Facebook group as the challenge is posted there each week as well.

dPS Bi-Weekly Photo Challenge – Golden Hour Landscapes

The post dPS Bi-Weekly Photo Challenge – Golden Hour Landscapes appeared first on Digital Photography School. It was authored by Sime.


it's from Digital Photography School https://ift.tt/XYGBd14
via Sime

[Photography] Generative Fill in Photoshop: The Essential Guide

The post Generative Fill in Photoshop: The Essential Guide appeared first on Digital Photography School. It was authored by Ana Mireles.

A guide to Generative Fill in Photoshop

Have you heard about the new Generative Fill tool in Photoshop? It’s given professional and amateur photographers quite a lot to talk about, and for good reason; thanks to Generative Fill, you can create realistic digital art using simple text prompts.

So don’t stay out of the conversation! Give Generative Fill a go so you can understand the potential and limitations of this new tool.

And if you’re worried about getting started, don’t be. In this article, I’ll tell you everything you need to know to get the tool up and running, plus I’ll give you some examples and tips so you can make the most out of the Generative Fill feature.

Let’s dive right in!

What is Photoshop’s Generative Fill feature?

Photoshop Generative Fill

Generative Fill is a new text-to-image tool that’s available in Photoshop Beta. Type a word or a sentence, and the tool will generate a digital representation of what you wrote.

Not only does Generative Fill produce content on command, but it also matches the lighting and perspective of the existing photo for a much more realistic result.

Generative Fill can also create content without a text prompt. If you don’t prompt the tool and instead leave it blank, it will use information from the surrounding area to generate new pixels, which can be very useful if you want to remove (and replace) a portion of your photo or extend an existing image.

When is Generative Fill useful?

Photoshop Generative Fill

Generative Fill offers four main features: Removing objects, adding objects, creating backgrounds, and expanding images. So when do these options come in handy?

For one, the tool is perfect if you want to create a digital background – anything from artistic bokeh to a landscape with mountains.

It’s also useful if you want to extend an existing photo to fit a specific format or if you need more space to improve the composition.

Generative Fill can also be helpful if you accidentally cut off an important element when photographing; you can use it to recreate the missing part of your subject (and expand the surrounding area).

It’s also a great way to add props or incorporate elements that are missing from the picture. Say you’re taking a photo of a cheesecake with strawberry jelly. Maybe strawberries aren’t in season, but a few strawberries would be the perfect prop to style your photo – so you just add them in with Generative Fill!

Finally, you can generate an entire work of art using just Generative Fill. The tool doesn’t need an existing image to work; you can start with a blank canvas, fire up Generative Fill, and use it until your photo is complete.

How to use Generative Fill: step by step

Now that you’re familiar with the basics, let’s take a look at how you can start using Generative Fill!

Step 1: Download Photoshop Beta

Photoshop Generative Fill

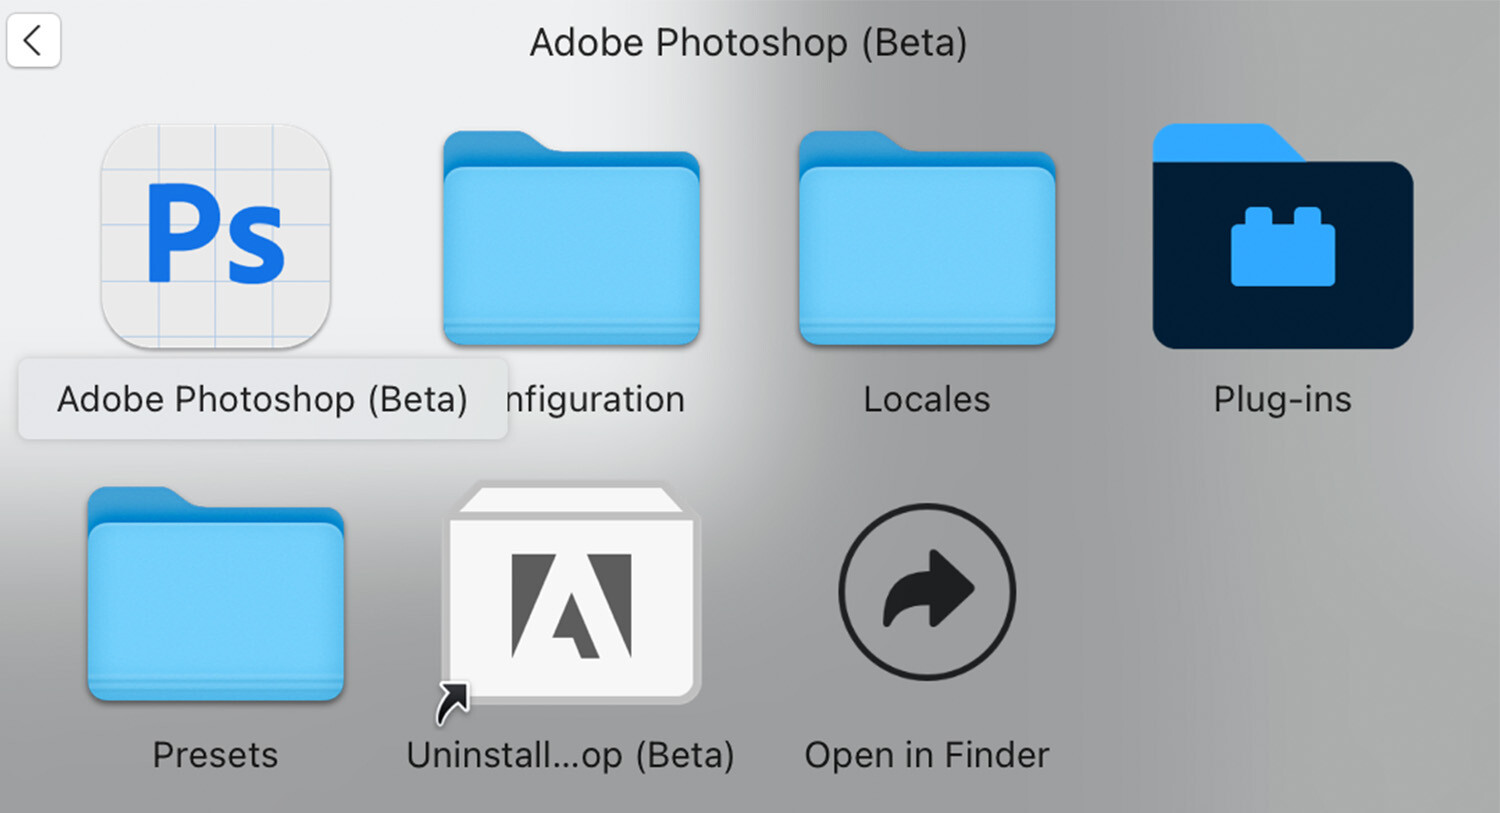
At the time of writing, Adobe hasn’t added the Generative Fill tool to its standard Photoshop program. Instead, to work with it, you need the Beta version of Photoshop (which is a different app that can be downloaded from the Creative Cloud app).

So open the Creative Cloud application on your computer. Then find the Beta apps and install Adobe Photoshop (Beta).

Step 2: Open an image

Photoshop Generative Fill

Now that you have Photoshop Beta on your computer, go ahead and launch it. Simply click on the Photoshop Beta shortcut (its icon is a blue Ps on a white squared paper).

If you’ve spent time working in Photoshop, Photoshop Beta won’t feel much different. If you want to start a project from scratch, choose New File on the left-hand side. Then input the size and resolution, or choose one of the existing templates and click Create.

If you want to enhance an existing photo, choose Open, then browse until you find the file you’re after. You can also select Lightroom photos if you want to fetch one of your images saved in your Lightroom catalog.

Step 3: Make a selection and open Generative Fill

At this point, you should have an image (or a blank canvas) open in Photoshop.

So make a selection on the area where you want to apply the Generative Fill feature. If you’re creating a background, for instance, you would select the entire canvas. If you’re adding some birds to a landscape, you’d simply select the small area of sky where you’d like the birds to appear.

Note that you can create your selection using any of the selection tools offered in the standard version of Photoshop.

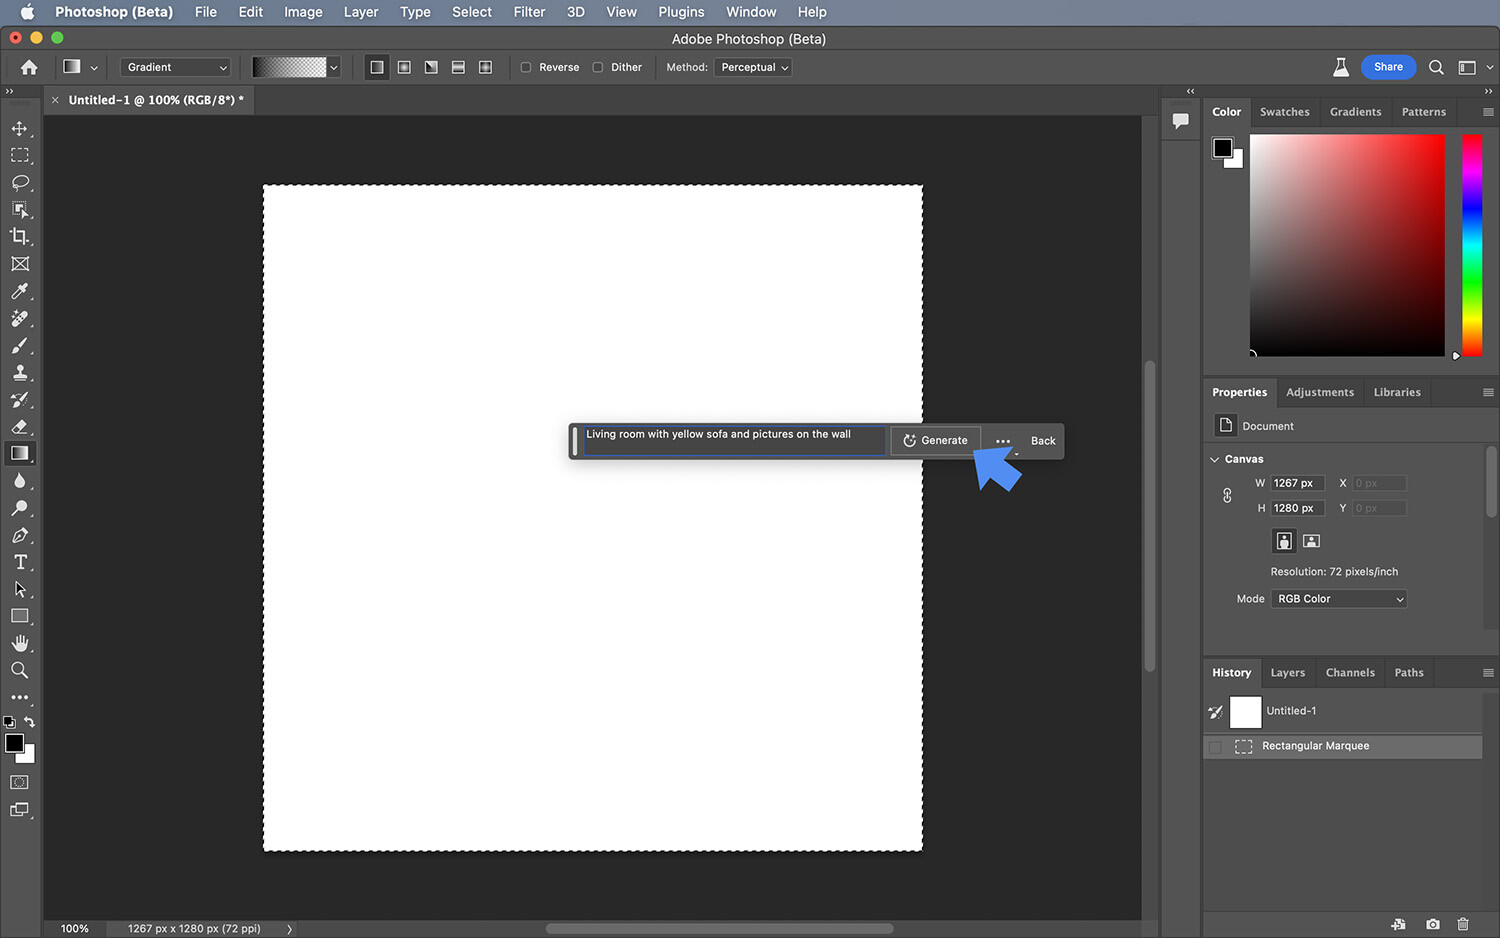
Once you’ve made a selection, the floating taskbar will change, and you’ll see the Generative Fill option on the left-hand side.

Photoshop Generative Fill

(If you can’t see the bar, you can enable it by going to Window>Contextual Bar. You can alternatively access the Generative Fill tool from the Edit menu.)

Step 4: Add your text prompt

Click on the Generative Fill option and type whatever you want to create. At the moment, it only works in English.

You can also click on Generative Fill but leave it blank; this will prompt Photoshop to create whatever it wants. Then click Generate or press the Enter key on your keyboard.

Photoshop Generative Fill

Step 5: Choose from the results

Photoshop uses each prompt to generate three variations. To see these options, go to the Properties panel and click on each thumbnail. Choose the one that you like best, and you’re done!

Photoshop Generative Fill

Generative Fill in action: a hands-on example

In this section, I take you through the process of enhancing an image with Generative Fill. I’ve specifically chosen a somewhat boring flower photo, and I give you the exact steps I used to make it far more interesting (while also extending the background).

You can see the original image on the left as well as my enhanced image on the right:

Photoshop Generative Fill

Step 1: Add a subject

Photoshop Generative Fill

When I took this flower photo, I was actually trying to photograph a bee, but it flew away before I could fire the shutter. So my first move will be to add a bee back in.

I’m going to select a piece of the petal, then simply type “bee” in the Generative Fill field, click Generate, and the bee will appear!

Step 2: Fill the background to improve the composition

Now that I have the subject I wanted, I need to fix the composition. The background takes up a lot of the frame, but it’s rather boring.

To fix this, I’ll add some bushes and flowers. I’ll use the Lasso tool to select the area underneath the flower since I don’t have to be very precise, then type “bushes and flowers” into the text field. Once I click Generate, here’s what I’ll get:

Photoshop Generative Fill

Notice how the flowers and bushes match the depth of field in my original image – pretty cool, right? (Also, remember that you get three variations for each Generated element; I’m choosing the third variation because it looks better than the others.)

Step 3: Extend the background

Photoshop Generative Fill

I’ve decided I want the picture in a landscape format, so I’m going to extend the canvas size. (This is simple to do using the Crop tool – you can just drag the edges. Alternatively, you can select Image>Canvas Size.)

Next, I’m going to select the empty areas. In this case, it’s easier to do it with the Rectangular Marquee tool. Make sure you include part of the image in the selection to give the Generative Fill tool enough information to continue the background coherently.

Click on Generative Fill to activate the tool, but leave the text field blank. Click Generate and choose the best variation.

Step 4: Fine-tune the background

I’ve extended the background realistically, but I really feel like it needs some more interesting elements. I’m going to add a lens flare on the left side by selecting the relevant area and typing “lens flare” into the prompt.

And for a finishing touch, I’m going to add some more plants on the right side where the empty branches are now:

Photoshop Generative Fill

For comparison’s sake, here’s the original and the enhanced image once again:

Photoshop Generative Fill

A few quick tips for using Generative Fill

The Generative Fill feature is still in Photoshop Beta, so it’s not perfect – yet. Here are a few tips to get better results:

1. Include pixels in the selection

Photoshop Generative Fill

In most cases, it’s important to create selections as precise as possible. You don’t want to include anything from the surrounding areas when you’re compositing or masking.

But when you’re using Generative Fill, forget about all that! This AI tool benefits from having some data to work with – so including pixels in the selections from the surrounding areas will yield better results. This is especially true if you’re extending the background or merging images.

2. Be as precise as you can with your text prompts

Photoshop Generative Fill

Whenever you’re typing a text prompt in the Generative Fill field, be as specific as possible. For instance, instead of typing “beach sunset,” type “sun setting in the background of a sandy beach with ocean waves crashing on the wharf.” And instead of just typing “flower,” type “blooming red rose” and so on. This will save you a lot of time by generating images that fit your creative vision more precisely.

This only works, of course, if you have something clear in mind. Otherwise, you may appreciate the tool’s randomness, and you can be deliberately vague just to see what you get.

3. Build upon the original variation

Photoshop Generative Fill

If you type in a prompt and you don’t get a perfect result, don’t be discouraged. In fact, Generative Fill is very rarely flawless (at least at this stage of the tool’s development).

So instead of starting over with a new text prompt or simply quitting the project, build on the best variation you have.

Let’s say you want to generate a portrait of a woman. Maybe the hair doesn’t look the way you imagined – you wanted short curls, but you got long, straight locks instead. Simply select the hair, then type in a new prompt instead of trying to generate an entirely new portrait from scratch.

The same goes for the obvious errors. Generative Fill still has problems with fingers and teeth, plus it can also create patterns or include random pixels that don’t fit. In such cases, you can select the area and try a new text prompt, or you can try it without a prompt. (If you do the latter, it’ll work as a content-aware fill tool and correct the issue.)

Generative Fill in Photoshop: final words

Generative Fill is a powerful method of enhancing your photos, and it’s likely only the beginning. However, before I sign off, I’d like to mention one more thing: legalities.

It’s quite complicated to talk about the legal implications of AI usage in photography at this point. However, there’s one thing that’s very clear when using this new Photoshop feature: It can’t be applied to your commercial work. This and other important considerations are stated in the Adobe Generative AI Beta User Guidelines, so I encourage you to check them out!

Now over to you:

Now that you know how to work the Generative Fill tool, let us know what you use it for! Share with us your images, and let us know if you have any other tips for better results!

The post Generative Fill in Photoshop: The Essential Guide appeared first on Digital Photography School. It was authored by Ana Mireles.


it's from Digital Photography School https://ift.tt/oI9ZJ6x
via Ana Mireles