Oct 23, 2024

[Photography] Side Lighting in Photography: A Comprehensive Guide

The post Side Lighting in Photography: A Comprehensive Guide appeared first on Digital Photography School. It was authored by Kevin Landwer-Johan.

a guide to side lighting in photography

Side lighting adds atmosphere and can provide a wonderful sense of depth in your photos. But what actually is side lighting? And how can you work with side lighting for the best possible results?

In this article, we’ll take a detailed look at side lighting. I’ll show you how to use it, I’ll explain when it works, and I’ll offer plenty of tips and examples to jump-start your own side lighting photography.

Let’s dive right in!

What is side lighting in photography?

early morning side lighting on a landscape
Early morning side lighting.

As the name suggests, side lighting illuminates your subject from one side. That’s basically all there is to it; it’s simply light that comes from the side of your subject (as opposed to behind or in front of the subject).

Of course, while this seems pretty straightforward, not all side-lit photos look the same. There’s plenty of opportunity for variation. The light can come from directly beside your subject – at a 90-degree angle from the camera lens – or it can come at a 45-degree angle in front of your subject, a 45-degree angle behind your subject, etc. The light can be hard or soft. It can be natural or artificial. It can be ambient or added. What matters is the general direction of the light.

Now, if the light comes from off to the side and strikes your subject, it will naturally create a shadow. Specifically, the side of the subject facing away from the light will be darkened relative to the side of the subject facing toward the light. Depending on the light’s characteristics, this could mean that the shaded side of your subject contains little-to-no visible detail. 

For instance, when a subject is illuminated from one side by a bright, hard light source, the dark side will often fall into deep shadow. This is especially pronounced when there’s very little reflected or ambient light:

portrait of a senior man with side lighting

When should you use side light?

Side lighting is great when you want to emphasize texture or add a sense of depth to an image. 

If you photograph a flat, textured surface with front lighting, you’ll produce an image of the flat surface without any real depth – the surface will look smooth. But if you photograph the same textured surface with a light positioned at a low angle and off to one side, the texture will become apparent. Why? Because the viewer will see the shadows created by the side light!

In a similar way, lighting a building from the front can make it appear very two-dimensional. If you wait until the sun moves off to one side, the result will have far more depth. Once again, this is largely due to the shadows created by side lighting.
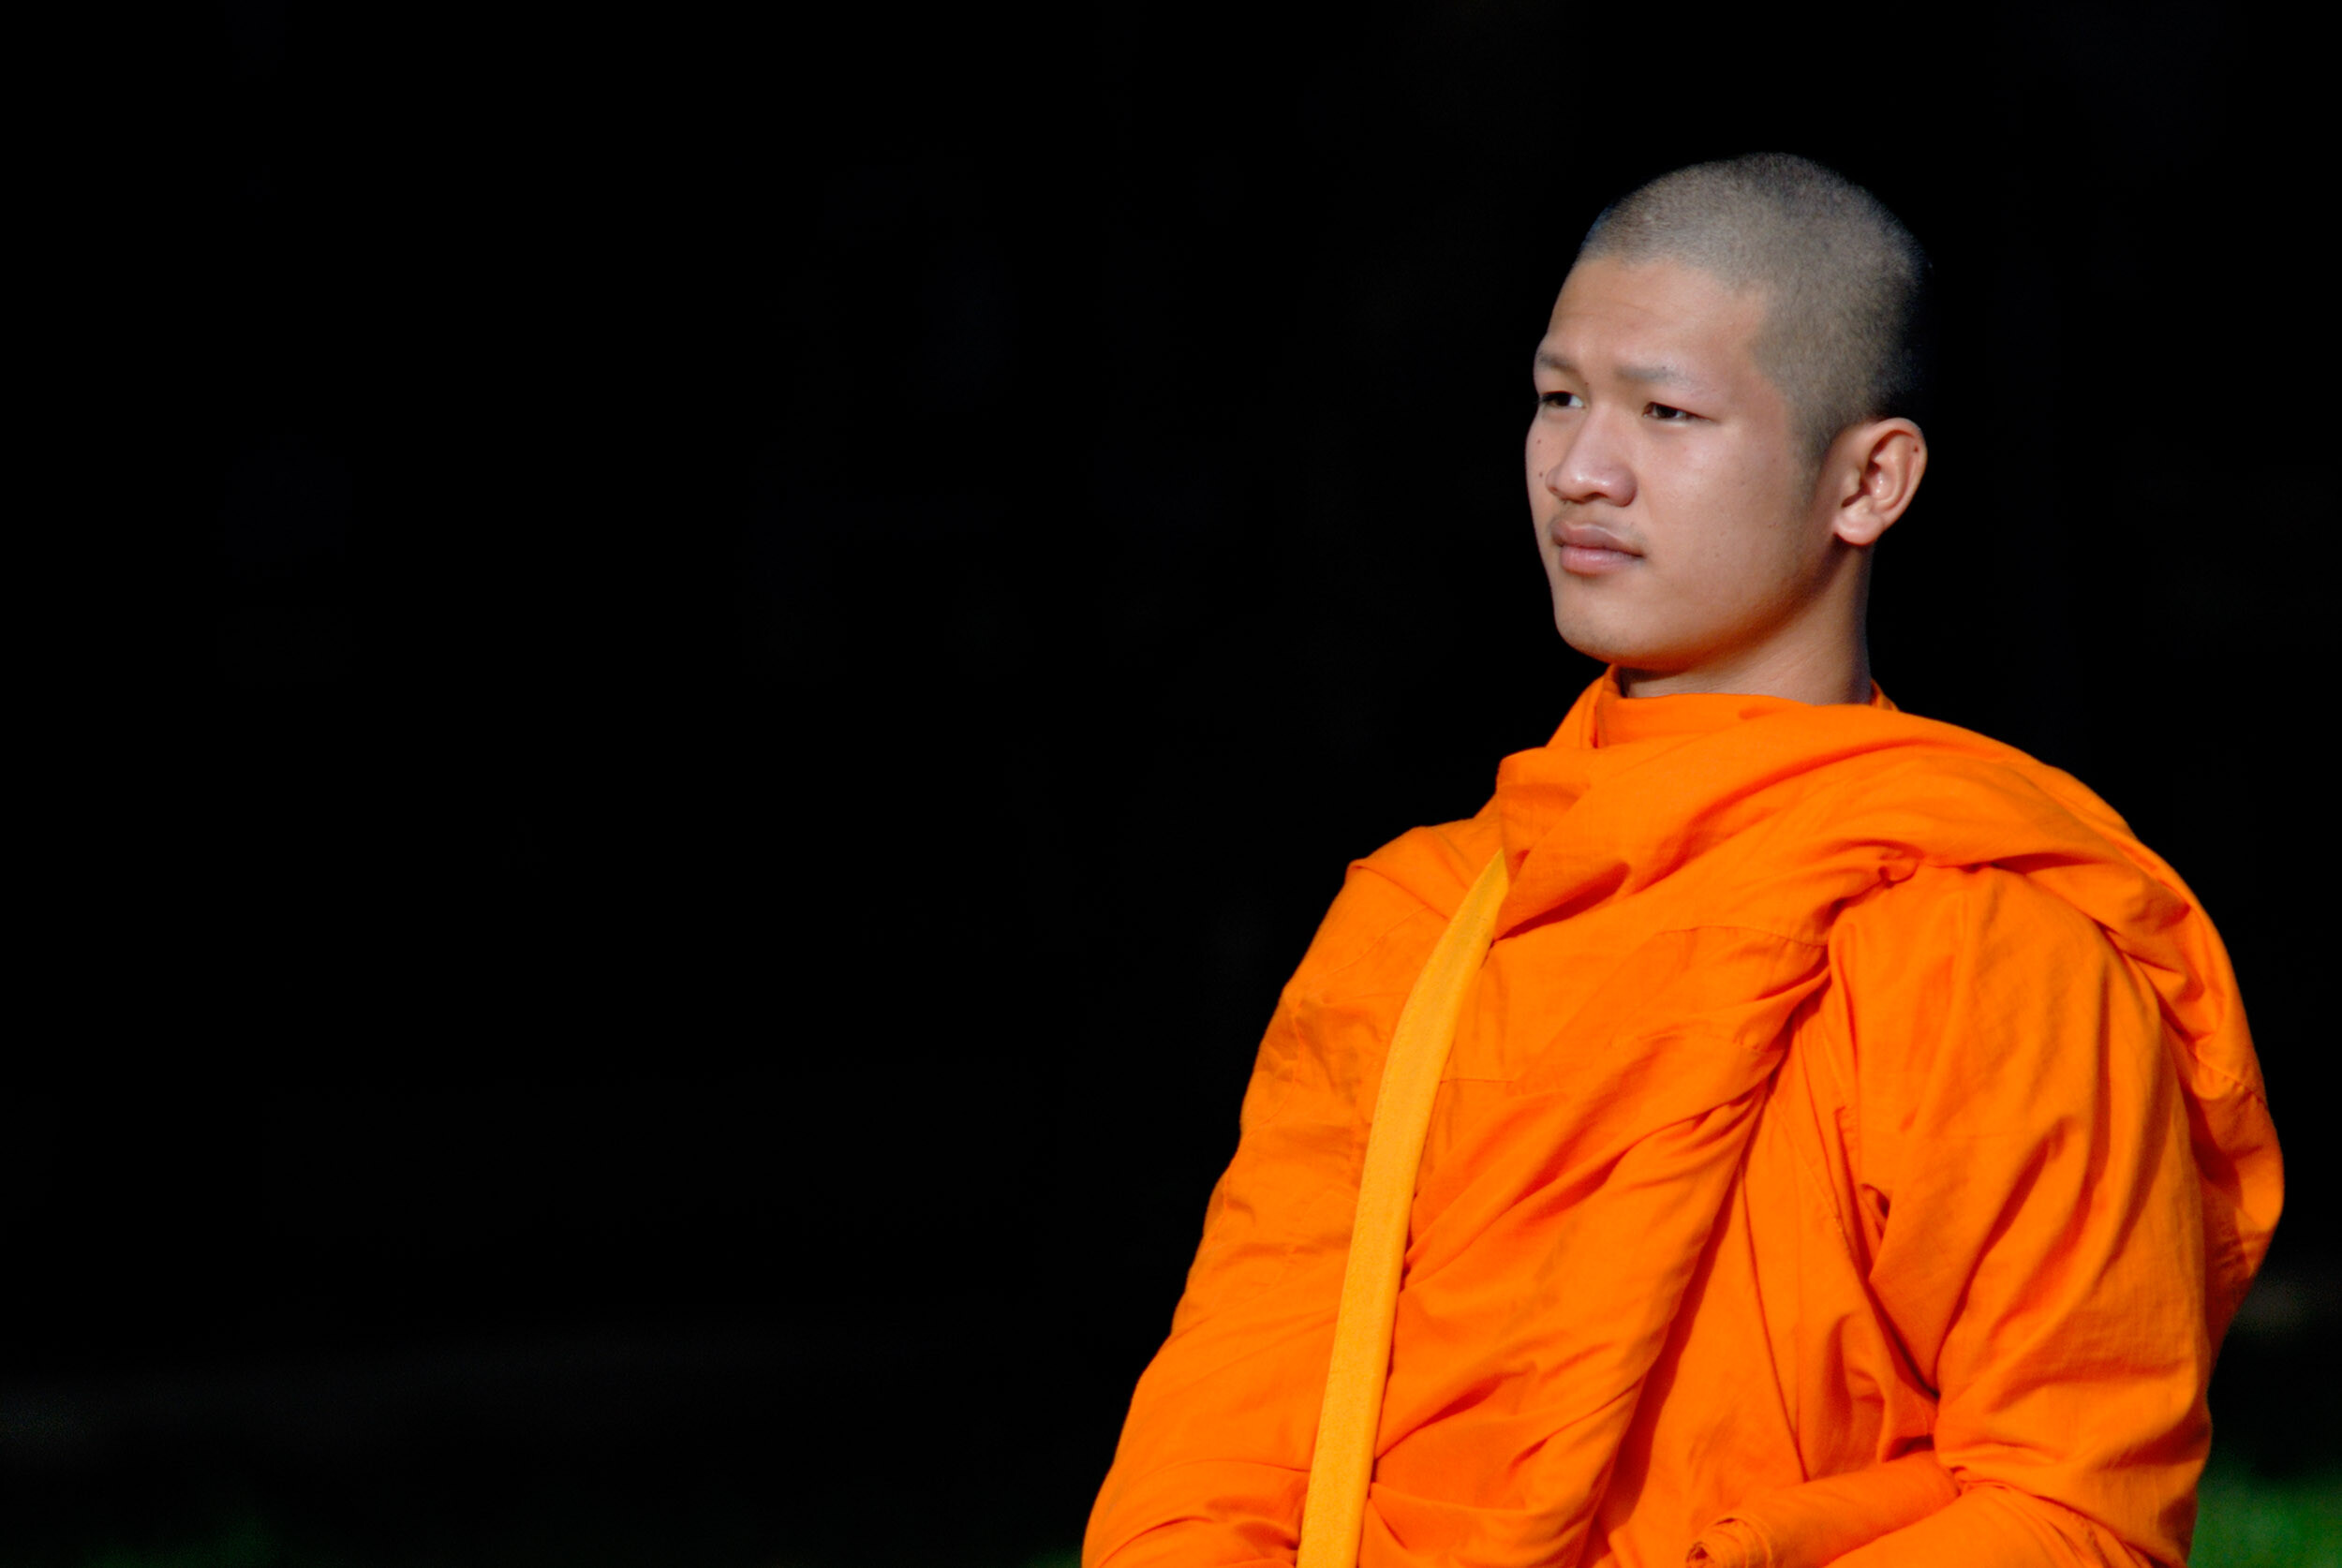
monk with side light on a dark background

Side lighting a portrait often heightens a sense of emotion. The shadow adds drama to the subject’s face, and it highlights shapes and wrinkles far more than a flat front light ever could.

During the golden hour, the sun is low in the sky, so it offers some amazing side light. Simply position your subject so the sun illuminates it from one side; the shapes made by the shadows can then be used to add interest to your compositions.

welder with blue side light

Getting started with side light: the basics

To make the best use of side light in photography, you must be able to control the position of the light and/or your subject. (If you don’t have control over either of these elements, you’ll have to be patient and wait for the sun to move into the right spot.)

If you decide to use artificial lighting, simply grab a flash or a continuous light source, then move it off to your subject’s side. Remember that you have a wide range of options. As I emphasized above, side light does not need to be at a 90-degree angle to your lens! A 60-degree angle, a 45-degree angle, or even a 30-degree angle will all produce effective side lighting. Each position will, however, create a unique look, so you’ll need to carefully select a lighting angle based on your interests.

In other words, you can put the light source off to the side and slightly in front of your subject for a brighter, less dramatic effect, or you can put the light source off to the side and slightly behind your subject for an ultra-dramatic, shadowy look. Another option is to create a true split-light effect by positioning the light source directly to the side of your subject – so that one half of the subject is brightly lit while the other half is shrouded in shadow.

Pro tip: When you’re just getting started with side lighting, continuous lights are easier to use. They’ll let you see the exact effect created by the light before you take a photo, whereas the effect of an off-camera flash can really only be evaluated after you press the shutter button.

With continuous lighting, you can experiment constantly with different looks, and you won’t need to capture dozens of test shots. You can move the light around and watch how the shadows change, which will quickly give you a good understanding of the effects of side lighting.

close up of steam train engine for side lighting photography

Now, if you’re working with natural or ambient light, then you probably won’t be able to control the light source’s direction. But all is not lost! To achieve side light, you simply need to move your subject instead. Position your subject so that the light is hitting it from the side, then capture plenty of beautiful images!

Note: When you’re taking side-lit portraits, you may want to angle your subject so a little of the light spills past the nose. This creates the beautiful and moody Rembrandt effect; a small triangle of light will appear on the far cheek, while the rest of the face remains in shadow.

When you’re photographing something you can’t move, like a tree or a building, you’ll have to wait until the sun is in the right place in the sky. (Sometimes, you’ll need to come back at a different time of year!) Sun-tracking apps can be very helpful!

landscape with a river and mountains with side lighting

Side Light vs front light vs backlight

The beauty of side light comes from the combination, or balance, of shadows and light. But if you use front light or backlight, this combination will be very limited (or even nonexistent); direct front light, for instance, creates no obvious shadows, while direct backlight ensures that your entire subject is shrouded in shadow.

Thanks to the mix of light and shadow, side light produces more of a three-dimensional effect than either backlight or front light. The shadows provide an illusion of depth, and the result looks wonderfully real.

So if you want to faithfully reproduce a three-dimensional subject, side lighting is generally best. I’d also recommend using side lighting when working with flat subjects, especially if those subjects are highly reflective. If you position a flat subject, like a painting, so the light is directly in front of it (and behind your camera), you’ll inevitably capture an unpleasant glare effect – but if you move the light to the side, you’ll reduce the risk of glare (plus you’ll capture the subject’s texture while you’re at it!).

woman walking in the rain with a large pan on her head
Backlighting makes subjects appear flat.

Backlighting leaves the front of your subject in shadow and dark in relation to the background. To capture a well-exposed subject, you’ll often need to blow out the background – which tends to look very upbeat and even airy. Alternatively, you can expose for the background and let the subject turn into a silhouette, which will produce an entirely different mood. Both of these approaches make for interesting images, but neither will produce the mysterious atmosphere that makes side lighting special.

As for front light: It tends to create photos that lack drama. The direct angle lights all parts of the subject evenly, and while the resulting images feature plenty of detail, they won’t offer much mood or atmosphere.

close up portrait of a man
Front lighting also makes a subject look flatter than side lighting.

Advanced tips and techniques for side lighting in photography

The key to creating powerful side-lit photos is the shadows, so it’s important you manage these carefully. Ask yourself: How dark do I want my shadows to be? Do I want a high-contrast look? This will depend on the ambient lighting, but it can also be controlled by the use of reflectors and other lights.

When you want deep shadows that create lots of mystery, it’s best to use only a single light source. The more additional lights you include (or even the more ambient light you allow into the scene), the lighter the shadows will appear.

The level of contrast in your photo also helps influence the atmosphere. The darker the shadows, the more they hide details. This can help add a moodier feel to a photo. Adding a second (fill) light to soften the shadows, on the other hand, creates more of a gentle feel. Carefully controlling the fill light brightness can make or break your photos.

Also, adding a side light to a subject can help separate it from the background. With the main light off to one side, more light can fall on your subject – and if you set your exposure to produce a detailed subject, the background may turn out a little underexposed (or very underexposed). This will help separate the subject and background and add more depth to your images.

dummy on the road side with side lighting and fill flash.
Adding a fill light softens the shadows.

Side lighting in photography: final words

When it’s managed well, side light can produce very interesting and moody results.

As with any kind of lighting, make sure you carefully expose your subject, and make sure you spend plenty of time adjusting the strength of the main light in relation to other lights and reflectors. The intensity of the shadows will contribute to the overall mood of the pictures.

So the next time you’re setting up for a photoshoot, take some time to do side light photography. Observe where the shadows are falling. Experiment with both light and subject positioning. This will help you get the light and shadow balance just right – and you’ll produce the mood you want to create.

What do you think of side lighting? Will you use it in your photos? Share your thoughts in the comments below!

The post Side Lighting in Photography: A Comprehensive Guide appeared first on Digital Photography School. It was authored by Kevin Landwer-Johan.


it's from Digital Photography School https://ift.tt/W0UHx6n
via Kevin Landwer-Johan

[Photography] Magnifying Glass Photography: A Quick Guide

The post Magnifying Glass Photography: A Quick Guide appeared first on Digital Photography School. It was authored by Megan Kennedy.

A guide to magnifying glass photography

Magnifying glass photography is a great way to capture unique and creative photos – but how does it work? And how can you get the best results?

In this article, I explain everything you need to know about capturing eye-catching photos with a magnifying glass, including:

  • What magnifying glass photography actually is
  • A step-by-step approach for great shots
  • A handy list of ideas to inspire you
  • And more!

So if you’re ready to have plenty of fun, then let’s dive right in, starting with:

What is magnifying glass photography?

As the name suggests, magnifying glass photography is a technique that uses a magnifying glass along with a standard camera and lens setup. The magnifying glass goes between the lens and the subject to create all sorts of interesting creative effects.

Magnifying glass photography

For instance, you can use a magnifying glass to:

  • Enlarge the subject
  • Produce optical distortion
  • Highlight compelling details

In a sense, a magnifying glass can act as a budget macro lens, though the resulting photos tend to be a lot wackier than what a conventional macro lens might create! What’s nice about magnifying glasses is that they’re very cheap and many folks may already have them lying around the house, so they’re ultra-accessible. Plus, they offer endless opportunities for creative photos!

Magnifying glass photography: a step-by-step approach

In this section, I share my approach to beautiful magnifying glass shots. Note that, for the purposes of this tutorial, I’ve chosen to photograph flowers. They’re colorful, interesting, and don’t move around, so they make good subjects for this technique. (And once you can create great images using inanimate objects, you can always move on to more animate subject matter later!)

Required materials

  • A camera
  • A magnifying glass
  • An interesting subject
  • A cleaning cloth
  • A tripod (optional)

You can use any type of camera to create beautiful magnifying glass photos; while a high-end mirrorless model will work great, you can also use a smartphone.

Also, if you want to increase your versatility, it’s a good idea to purchase a few magnifying glasses of varying sizes. Larger models work better if you want to create subject-focused images that don’t include the magnifying glass in the frame, but smaller models can also work well, especially if you’re looking to get creative.

Finally, a tripod can be helpful for a number of reasons: It’ll keep your camera stable while you hold the magnifying glass, and if you’re working indoors and in low light, it can prevent blur due to camera shake.

Magnifying glass photography

Step 1: Set up your camera and clean the magnifying glass

Start by turning on your camera and – if its lenses are interchangeable – mounting a lens in the 50mm-105mm range. (If the lens is too short, you may struggle to get the magnifying glass edges out of the frame, and if the lens is too long, it may be a bit unwieldy.)

If you have a tripod, you’ll want to extend the legs to sitting or standing height. Place the camera atop it.

I’d also encourage you to clean the magnifying glass with your cloth. (A lens wipe also works.) It’s important to remember that the glass in your average, run-of-the-mill magnifying glass is far less impressive than the glass inside your camera, so it’s good to always clean the glass element before use. That way, you can maximize image sharpness. (However, don’t worry if you don’t get pin-sharp images; the softness can actually add to the overall effect!)

Magnifying glass photography

Step 2: Find a subject and position it near your camera

For this example, I’m using flowers as my subject, but you can use pretty much anything: toys, food, electronics, books, or even people. I do recommend you choose a subject with plenty of detail; the more detail that’s present in the subject, the more the magnifying glass has to highlight!

Once you have a subject, adjust your camera’s position until the camera and the subject are close. (You may need to adjust the tripod legs, and it’s a good idea to prop your subject up on a table or other stable surface.) Your autofocus will likely get confused by the magnifying glass, so set your lens to focus manually.

Step 3: Position the magnifying glass

Next, hold the magnifying glass over the front of your camera lens with your hand and look through the camera viewfinder. The image will probably be extremely out of focus, so you’ll need to either adjust the lens’s focus or move the magnifying glass forward and backward between the camera and the subject. This can be tricky, but I encourage you to persevere.

The goal is to find a sweet spot where part or all of the image looks sharp, but don’t be too picky. It’s important to be open to how the magnifying glass alters the photograph!

Magnifying glass photography

Step 4: Adjust your settings and take a photo

Once you get an effect you like, go ahead and press that shutter button! But pay attention to your camera settings, and keep in mind that the extra layer of glass between the camera and the subject will cut down on the amount of light that actually reaches the sensor.

Therefore, you may need to lower your shutter speed or raise your ISO until you get a reasonable result. You can also adjust the exposure compensation if your image turns out too dark or too light, and you should definitely experiment with the depth of field by adjusting the aperture, too. (A shallow depth of field can work great if you’re hoping to produce abstract photos!)

Step 5: Experiment!

At this point, you know the mechanics; you just need to experiment. In my experience, constant testing makes for the best photos!

For instance, once you get a feel for photographing your subject through a single magnifying glass, why not try taping two magnifying glasses together for greater magnification? Or why not move from inanimate to animate objects and try photographing a person or pet? Or why not try moving the magnifying glass ultra-close or ultra-far from the subject? Even the slightest adjustment of the setup can render some unique results, so take the time to experiment and have fun!

Magnifying glass photography
To create this image, I taped two magnifying glasses together.

Magnifying glass photography ideas

As I emphasized in the previous sections, you can capture beautiful magnifying glass shots of pretty much anything, but here are a few easy ideas that use materials from around the house!

You might photograph flowers (either real or artificial) and position the magnifying glass far enough from the lens that it appears as a blur in the composition:

Magnifying glass photography

You might also experiment with a black-and-white conversion, which will highlight the shape and form of your subject and emphasize the ethereal effects created by the magnifying glass:

Magnifying glass photography

You can also use a shallow depth of field to create a beautiful abstract photo (with plenty of gorgeous background blur):

Magnifying glass photography

Another idea is to capture a self-portrait. Set up your camera, then hold the magnifying glass in front of your face. It may take a lot of tweaking to get it right, but the results will be worth it! (If a self-portrait is too difficult, you could try photographing a friend or family member.)

Magnifying glass photography

Finally, try to photograph some animals or insects! You’ll need to be fast, but you can certainly create some unusual images:

Magnifying glass photography

Magnifying glass photography: final words

Well, there you have it:

Step-by-step instructions for capturing beautiful magnifying glass photos.

So grab that magnifying glass, find a fun subject, and get started. Pretty soon, you’ll have a whole portfolio of creative shots!

What do you plan to photograph? Do you have any additional ideas? Share your thoughts in the comments below!

The post Magnifying Glass Photography: A Quick Guide appeared first on Digital Photography School. It was authored by Megan Kennedy.


it's from Digital Photography School https://ift.tt/8KIP7Sk
via Megan Kennedy

[Photography] The 25 Best Travel Photography Quotes

The post The 25 Best Travel Photography Quotes appeared first on Digital Photography School. It was authored by Jeremy Flint.

The best quotes for travel photographers

Looking for travel photography quotes that’ll instruct, motivate, and inspire?

In this article, I share my top 25 favorite quotes for travel photographers of all stripes, including beginners, hobbyists, and even professionals. I’ve tried to include a mix of sources, so while some of the quoted photographers are classic travel shooters, others are much more contemporary.

I encourage you to read each quote carefully. Think about what it means. Then pick your favorites, write them down (or memorize them!), and try to apply them to your own photography on a regular basis.

So without further ado, let’s take a look at the best travel photography quotes in 2024, starting with some absolute classics.

1.“The whole point of taking pictures is so that you don’t have to explain things in words.” – Elliott Erwitt

Magnum photographer Elliott Erwitt notes that a photo can offer a visual for a subject that can’t (or shouldn’t) be explained. In essence, an image can provide description when words fail; it can also lead to better reactions, emotions, and thoughts.

The best travel photography quotes

2. “A picture is worth a thousand words.” – Frederick Barnard

This classic quote was reportedly first used by Frederick R. Barnard in Printer’s Ink magazine way back in 1921. Barnard was arguing that graphics can tell a story as effectively as descriptive text, and as admirers of National Geographic know, that’s still true today.

3. “You can always take a great photo – no matter what the conditions.” – Steve Davey

This quote comes from Travel Photography, a comprehensive guide written by Steve Davey, master of the craft. Davey is suggesting that while a photoshoot might not quite live up to your expectations, you can always achieve a unique image (even if it’s not a fine-art print destined for the wall).

4. “Travel photography is really a way of life: a way of traveling” – Steve Davey

This is another classic from Steve Davey; here, he’s speaking to the way that travel photography trips involve spending most of your time capturing places and experiencing new cultures. Getting out there to see and embrace the world is all part of the life of a travel photographer!

The best travel photography quotes

5. “Travel and photography have always been intertwined. I think we have such a brief amount of time in this world that I can’t think of a better use of it than to travel, to photograph the world, to experience life in different places. To me, there’s nothing more important than that.” – Steve McCurry

This quote, from photography legend Steve McCurry, highlights the very essence of travel photography. At root, it’s about experiencing the world and capturing its unique and wonderful elements.

6. “Being in the right place at the right time is, of course, the prime essential of all photography.” – David Noton

Noton’s statement simply highlights the importance of being there – after searching and finding a location to photograph and capturing the scene when the light is right. The location could be anywhere: A familiar place that you’ve captured before, a landscape in a far-off land, or some unexplored local area.

The best travel photography quotes

7. “Never stop looking. No matter where you are, there are good photographs.” – Art Wolfe

You don’t need to trek to the ends of the earth to create a special travel photo. All you need is a bit of luck; some magical light or even a rainbow can transform a boring, local landscape into a breathtaking scene.

Additional quotes for travel photographers

Need additional inspiration? Here are a few additional travel photography quotes to get those creative juices flowing:

8. “Most of the information we now get is through television and is mutilated. Photography offers the opportunity to spend much more time on a topic. It’s a relatively cheaper medium and can allow a photographer really to live in another place, show another reality, get closer to the truth.” – Sebastiao Salgado

9. “A traveler seeks engagement with the local people and culture, while a sightseer just checks off sights in the guidebook. A sightseeing photographer stands apart from the culture, snapping pictures at a distance. A travel photographer becomes involved with his or her surroundings and the people; the resulting pictures become more intimate.” – Jim Richardson

The best travel photography quotes

10. “Having a camera around your neck gives you a good excuse to be nosy.” – Martin Parr

11. “The earth is art; the photographer is only a witness.” – Yann Arthus-Bertrand

12. “My life is shaped by the urgent need to wander and observe, and my camera is my passport.” – Steve McCurry

13. “There are no rules for good photographs, there are only good photographs.” – Ansel Adams

14. “Don’t shoot what it looks like. Shoot what it feels like.” – David Allan Harvey

15. “Photography isn’t about just pushing that button. It’s about the experience of being there.” – Don McCullin

16. “If I go to a place, it’s not to record what is going on only. It’s to try and have a picture which concretizes a situation in one glance and which has the strong relations of shapes. And when I go to a country, well, I’m hoping always to get that one picture about which people will say, “Ah, this is true. You felt it right.” – Henri Cartier-Bresson

17. “The most valuable things in life are a man’s memories. And they are priceless.” – Andre Kertesz

18. “My favorite thing is to go where I’ve never been.” – Diane Arbus

19. “Sometimes I arrive just when God’s ready to have someone click the shutter.” – Ansel Adams

20. “I think of myself as an explorer who has spent his life on a long voyage of discovery.” – Paul Strand

The best travel photography quotes

Timeless one-liners

In this final section, I share a handful of oft-repeated quotes. While they generally don’t have a clear author, they’re certainly relevant to travel photographers!

21. “Take only pictures, leave only footprints.”

22. “Always say yes to new adventures.”

23. “Only going places that spark joy.”

24. “Keep calm and travel on.”

25. “Life is not meant to be in one place.”

The best travel photography quotes: final words

Whether you’re just starting out in travel photography or are a seasoned pro, I hope you found some of the quotes in this article useful. The next time you’re about to head out on a trip or you hit a creative rut, remember these quotes – and let them guide you in your photography!

Now over to you:

Which of these quotes is your favorite? Do you have any additional travel photography quotes that you love? Share your thoughts in the comments below!

The post The 25 Best Travel Photography Quotes appeared first on Digital Photography School. It was authored by Jeremy Flint.


it's from Digital Photography School https://ift.tt/gtRIyhk
via Jeremy Flint

[Photography] Photographing Men: 7 Tips for Male Portrait Photography

The post Photographing Men: 7 Tips for Male Portrait Photography appeared first on Digital Photography School. It was authored by Karen Quist.

How to photograph men (tips and techniques)

Photographing men – or conducting couple or group photoshoots that include men – isn’t especially difficult, yet many beginner portrait photographers struggle to capture nice, clean, high-quality male portraits.

I’ve done my fair share of male photoshoots, and in this article, I share my best tips and tricks for great shots, including:

  • How to create flattering male poses
  • How to keep men engaged in the photography process
  • How to get the best results when retouching your portraits
  • Much more!

So if you have an upcoming session with a man, or you’re simply looking to level up your skills, read on!

1. Include him in the consultation process

How to photograph men

One of the most common complaints I encounter on portrait photography forums is that men tend to be very reluctant when involved in family photoshoots. They turn up to the family shoot looking like it’s the last place on earth they want to be, and their crankiness is infectious. Pretty soon, everyone is annoyed, and it makes your job of capturing all those joyful family connections close to impossible.

I confess that this was also one of my bugbears – until I realized a problem. You see, I was often leaving male partners out of the consultation process. And in every grumpy dad case I encountered, I mistakenly assumed that the woman I spoke with during the consultation would communicate everything to their partner and communicate any concerns their partner might have.

Following a major light-bulb moment, I started to include men in the consultations, and it made a world of difference. As it turned out, my male clients just wanted to be heard! The more you engage with men before the shoot, the more comfortable they will be when you’re wielding a camera, and the better the photos will turn out. (This applies whether you’re photographing a paying client, the guy next door, or your brother.)

So before you conduct a photoshoot that involves a man, talk with him. Ask him if he has any features he’s sensitive about (a prominent nose, a double chin, acne scarring, and a bit of a tummy are common sensitive areas). Allow him to express his insecurities without feeling silly, and reassure him that you can work around these via posing, camera angles, lighting, and post-processing.

Ask him what kind of clothes he feels good in, and make sure he understands how these may work for or against him in photographs. Tread gently; if it’s a family session, there’s a good chance his partner is already on his case.

How to photograph men

Finally, if a man makes the effort to dress well for your photoshoot, show him the same respect by paying attention to detail in the editing process. Zoom in close and check for stray hairs his razor may have missed, loose threads, and even smudges left by a child’s fingers.

2. Find purpose and meaning

Before conducting your session, as the man why he wants the photos taken. If it’s an individual portrait, what is he using it for? If it’s for professional purposes, what kind of work does he do? What kind of look does he want? Then tailor your compositions accordingly.

If he’s a passionate kite-surfing instructor, he may not appreciate a moody black-and-white portrait; instead, he’s much more likely to want an image full of color and action. On the other hand, a budding author may love the black-and-white look!

If you’re doing a family shoot, ask him questions about the family. It sounds like a no-brainer, but you’d be surprised at how often this important step is missed. What does the family like to do together? What is special about his partner? What does he love most about his child or grandchild? Dig deep, and listen to his answers. You’ll appreciate what he reveals, and you can incorporate the insights into your photos.

The image below shows dad with my eldest daughter, and it’s one of my personal favorites. He told me he loves the fact that, even though she is a teenager, she still takes his hand or his arm when they go for walks together through the forest near his home. I like how the arch of the trees frames them. To me, it suggests they are walking toward the future together.

How to photograph men

The man in the photos below told me that he marvels at the smallness of his new daughter’s hands and feet. Like many young dads, he is at a very busy stage in his professional life. Often his baby is asleep by the time he gets home at night, so he cherishes the quiet moments they get to spend together.

How to photograph men

The photo below features two cousins. They played together as children but have lived on separate continents since their families emigrated from their native country when they were young. I was astonished by how similar their gestures and body language were despite having lived apart for most of their lives, and I wanted to capture that in a photograph. The ocean is symbolic in this photo; though it usually separates them, when I pressed the shutter, they were both on the same side of it.

How to photograph men

3. Give him something to lean against or sit on

Regardless of the amount of time you spend preparing, many men are profoundly uncomfortable in front of a camera, especially at the start of a shoot. And if your subject feels uncomfortable, that will come through in the photos, resulting in stiff, awkward, less-than-optimal shots.

So start by asking your subject how they feel in front of the camera. Observe their body language, too, as you take your first few shots. If your subject does seem awkward just standing, ask them to lean against a vertical surface such as a wall, fence, lamppost, or car. It will help them feel anchored and will allow them to angle their body without looking unnatural.

How to photograph men

Another option is to find something for them to sit on, like a chair, a bench, or even a rock. You’ll be surprised by how easily it helps your subject relax.

4. Minimize a double chin, a prominent nose, or heavy jowls

Men often have certain features they prefer to deemphasize. It’s important to ask them about this in the consultation process; encourage them to be honest, and ensure that they feel safe sharing these insecurities with you. Often, the list will include double chins, prominent noses, and heavy jowls, so you should take steps to minimize these in your photos.

One way to hide a double chin is to shoot from above eye level with your subject leaning slightly forward. If he’s seated, ask him to rest his forearms on his thighs and angle his knees 45° away from you.

You can also use lighting to your advantage. Strong, directional light can visually slim a face or a torso – it’s a trick that often comes in handy!

The photo on the left was shot from below eye level (the subject was taller than me and was standing) with light falling on both sides of his face. But the photo on the right, where my subject was seated and leaning forward with their head angled away from the camera, is more flattering. Note how strong light reflected off a wall in the late afternoon casts his neck and the left side of his face into shadow.

How to photograph men

5. Give him something to do with his hands

When people are facing a camera with their arms hanging down at their sides, they suddenly become self-conscious. “What should I do with my hands?” they ask. And they’re onto something: Dangly hands generally don’t look good! So what do you do?

Instead of letting the hands hang awkwardly, ask him to put one or both hands in his pockets or loop his thumb over his belt. If he’s sitting, have him interlink his fingers or clasp his hands together. If you’re doing a family photoshoot, have him hold a baby or clasp a child’s hand.

How to photograph men

You might also consider adding props (depending on the type of male photoshoots you’re conducting). For instance, your subject could hold a book (if he’s an author), a guitar (if he’s a musician), or even an umbrella (if you’re going for a moodier image).

6. Pay attention to the little details

Details such as eyes, lips, and hands help tell a story, and they often depict the connections between people. Of course, you should make sure to get all the wider shots – but don’t forget to zoom in every so often (a close-focusing lens is a big help here) and capture the details, even if they don’t seem like showstopping portrait material.

Hands are a personal favorite of mine. They’re a powerful expression of emotional connection and tenderness, and because of their size, men’s hands are often visually striking when placed side by side with the hands of children.

The portrait below shows a tender and playful moment between father and daughter. His hand is large next to hers, and she smiles as he kisses milk froth from her fingertips.

How to photograph men

7. Don’t forget about retouching

Let’s face it: Cameras can be brutal. They do a great job of capturing all those little imperfections the naked eye generally doesn’t see, and they hold it in a static image for the eye to contemplate.

In some styles of male portraiture, this is actually useful. Elderly men with craggy faces are popular subjects for travel photographers and photojournalists. However, wrinkles and blemishes are not something you want to highlight in family photos or corporate headshots, so it’s important that you spend some time removing or minimizing these items in the editing room.

Men will give you hints during the consultation and the shoot. If he cracks jokes such as, “Can you Photoshop me to make me look 10 years younger?” or “Can you make me look like George Clooney?” he’s probably only half-kidding. Just because he’s a man doesn’t mean he’s okay with acne or out-of-place nose hairs.

Now, when it comes to editing, much will depend on your personal style. While I’m not a fan of heavily edited portraits, I still follow a careful Lightroom workflow. With men, I use the Brush tool to soften skin, but the effect is always subtle (his skin probably shouldn’t appear softer than a woman’s or child’s skin in the same photo).

How to photograph men

When it comes to blemishes, my rule of thumb is to remove anything that is temporary. Pimples, scratches, stray hairs – if it’s going to be gone from his face in a couple of weeks, I’ll remove it from his face in the post-processing stage. But unless the client specifically asked me to, I wouldn’t remove a mole or a birthmark.

How to photograph men: final words

Photographing men is a very broad and complex subject, but I hope that this article offered plenty of techniques you can use in your next male photoshoot.

Just remember to include your subjects in the consultation process, think about the meaning of each session, and pay attention to the details. Pretty soon, you’ll be capturing some breathtaking images!

Now over to you:

Which of these male portrait photoshoot tips do you plan to use first? Do you have any tips of your own? Share your thoughts in the comments below!

The post Photographing Men: 7 Tips for Male Portrait Photography appeared first on Digital Photography School. It was authored by Karen Quist.


it's from Digital Photography School https://ift.tt/8sk0KSD
via Karen Quist