Jun 30, 2015

[Photography] 5 Tips That Will Make Your Food Photos Stand out from the Crowd

1 Cornish Game Hen

Food photography may be more popular now than ever before. The blogosphere is exploding with pictures of food, and social media sites like Pinterest and Instagram are flooding you with never-ending streams of food photos 24/7. Creating food images that stand out in this massive sea of content is a difficult task. Here are five tips to help you get your food photos noticed.

#1 Don’t be afraid of shadows

Shadows make a scene look realistic, give your food texture, and create mood, so don’t hesitate to make them part of your food photo. To create nice, dark shadows let your light fall onto your food either from the back or the side at a fairly low angle, from just a little bit above the surface of your set. Use reflectors sparingly, or not at all. Reflectors bounce light back into the areas of your photo that your light source doesn’t reach, in other words, into the shadows. So to keep the shadows dark, don’t reflect the light.

1 Salted Caramel Candy

In the salted caramel candy photo above my light was falling onto the set from the back at a low angle and I didn’t use any reflectors.

#2 Imply action

Action makes your viewers feel as if they are part of your scene; that kind of engagement is always a good thing. Action can be literal, such as a hand holding a hamburger or pouring syrup over a stack of pancakes, but there are other (and actually easier) ways for you to suggest that something is happening in your photo. One example is a glass of freshly poured beer. Your viewers likely know that the lifespan of the foam top on a beer is only a minute, so seeing a fresh beer tells them that someone must have just been at the scene to pour it.

2 BBQ Ribs

#3 Point your lens up at food that is tall and stacked

Shooting up from slightly below the food is an unusual angle for food photography; but it can create really compelling images of tall items such as cakes, and things that are stacked, like burgers or, as in the example below, shards of toffee. The food will be towering above the viewer which makes it look big and impressive. Needless to say this angle doesn’t work for flat food, so don’t shoot a pizza with this method.

3 Toffee

#4 Create visual contrast

Contrast comes in many varieties and helps make your food photo look interesting. You can create contrast by incorporating different shapes into your photo, such as round and rectangular (or square). You can also create contrast by including colors in your photo that are on opposite sides of the color wheel (complementary), like red and green, or blue and orange. The lettuce cup photo below illustrates both of these concepts, the square dish contrasts the round lettuce cups and the red sauce provides contrast to the green lettuce.

4 Lettuce Cups

#5 Leave negative space in the image

Don’t feel that you have to fill every square inch of the frame with food or props. A little negative (empty) space gives the food room to breathe, and will keep your viewers from getting overwhelmed and feeling claustrophobic. There are no hard and fast rules that dictate where to leave negative space in a food photo but the rule of thirds is always a good place to start. Imagine your photo dissected into thirds, both vertically and horizontally, and place your subject on or near one of the four points where those lines intersect. Leave the rest of your photo empty and take a test shot. Does the scene look good to you or is it too barren? If it looks like it’s missing something, add more elements to the frame, one by one and along the imaginary lines that dissect your frame, until you have a composition that looks pleasing to you. That’s how I went about composing the Thai curry ingredients shot below.

5 Thai Curry Ingredients

I hope these tips give you some new ideas for your food photography. If you have any others please share them in the comments below.

The post 5 Tips That Will Make Your Food Photos Stand out from the Crowd by Nicole Branan appeared first on Digital Photography School.


it's from Digital Photography School http://ift.tt/1RResSX
via Nicole Branan

[Photography] Writer’s Favorite Lens: Olympus Zuiko 12-40mm f/2.8

One of the primary reasons I built my mirrorless kit with Olympus gear, was their wide array of high quality lenses. From fast primes to convenient zooms, they have all of the important focal lengths covered. It wasn’t until I picked up the Olympus Zuiko 12-40mm f/2.8 however that I really experienced the true potential of this micro four thirds system. Since purchasing the lens a few months ago, it has rarely left my camera body. Not only are the optics incredible, but it features many surprising benefits. Here are some of the main reasons it has become my favorite lens.

Image Quality

The Olympus 12-40mm has an effective focal length of 24-80mm making it extremely versatile. This fits my needs well, as I shoot a wide variety of subjects. With a constant aperture of f/2.8, it’s possible to shoot wide open throughout the entire range. Unlike other kit lenses, there is no need to stop down for optimal performance. Results are stellar wide open, with no noticeable chromatic aberration or diffraction. This makes it a workhorse for low light work, whether indoors or out.

From corner to corner, the 12-40mm is the sharpest lens I’ve ever owned. That makes it invaluable for landscape and travel work, particularly when great depth of field and critical focus is desired. I have done side by side comparisons with DSLRs and pro lenses, and to my eye, the Olympus lens is sharper. Granted, these were not scientific tests, but for me, a real world study is perhaps more valuable than any static chart. While many zoom lenses compromise clarity for convenience, this lens has the rare combination of both.

Size and Cost

When compared with the equivalent offering for DSLRs, a number of additional benefits are revealed. For example, the Canon 24-70mm f/2.8 weighs 28.40 ounces (805 g), more than twice as much as the Olympus at 13.47 ounces (382 g). After a long day of hiking and traveling, with gear on by back, this makes a big difference. With the lighter kit, I’m ready to go further, and faster. It’s also small enough to keep with me everyday, greatly reducing any missed opportunities. In addition to the weight savings, it’s also quite reasonably priced. The Canon and Nikon version of this focal length averages $1899 while this Olympus model can be purchased for around $899.

Macro Surprise

Perhaps the most unexpected benefit is the ability to shoot extreme close-ups. In fact, I recently sold my 100mm Canon macro lens as this satisfies my macro needs. With a minimum focusing distance of 20 centimetres (7.9 inches), it is ideal for flowers, plant life, and butterflies. Having this type of capability in a single lens makes it possible to do more while traveling lighter.

Shift into Manual Focus

Manual focus is activated by gently pulling the lens barrel down. With no buttons to find or push, this can be done without taking your eye from the viewfinder. Coupled with focus peaking, it has never been easier to achieve sharp focus manually. I particularly enjoy this feature when doing creative multiple exposures. This involves auto focus for the first shot, followed by a shift to manual focus to purposely create an out of focus second frame.

Built for Adventure

When paired with a weatherproof body, the lens completes a rugged combo that can withstand heavy rain, snow, dust, and even freezing conditions. I was able to test the weatherproof capabilities of the system during an airshow at the beach. As rain fell from the stormy sky several DSLR users frantically packed away their gear and headed for cover. Meanwhile, I continued to shoot the action and captured some unique shots with ominous dark clouds. Sure I could purchase and use a rain cover which are reasonably effective. They are clumsy enough however, to negatively affect my shooting technique.

Nice Bokeh

Despite what some critics have reported, it is quite possible to achieve shallow depth of field with a micro 4/3 system. Admittedly, the background won’t be as out of focus as an equivalent lens on a full frame camera, but it absolutely gets the job done. With this particular lens at f/2.8 I’ve found the bokeh to be very pleasing. In fact, I have no problems reaching for this lens should shallow depth of field be necessary.

Fast to Focus

Perhaps there’s no worse feeling than struggling to find focus as the magic light fades. Unlike many zooms, this lens does not hunt for focus. Whether you are using a camera with contrast or phase detection, it locks onto the subject, and fast. Not only does this benefit outdoor work, but also those indoor situations when the light levels are very low.

No Compromises

I’ve used a great deal of lenses throughout my career, many of which were stellar. Still, this lens really shines not only for its optical quality, but its versatile focal range. You can use it for just about anything, making it the first lens you’ll grab for most situations. Typically a lens with this many features would come at the price of other compromises, but this in not the case with the 12-40mm. Olympus has done a stellar job in creating what I find to be the perfect lens for micro 4/3 users.

The post Writer’s Favorite Lens: Olympus Zuiko 12-40mm f/2.8 by Chris Corradino appeared first on Digital Photography School.


it's from Digital Photography School http://ift.tt/1LSJBUn
via Chris Corradino

Jun 29, 2015

[Photography] 7 Tips for Better Skyline Photography

Reminder: now until July 7th (AUS EST) the Landscapes, Cityscapes & Photography Tricks eBook is on 50% off at Snapndeals.

When we talk about cityscape photography, one of the most basic and trademark shots is the full skyline; the artificial horizon, made of buildings and towers jutting up and down into the sky above. Skylines can be jagged and coarse, or faint and smooth, often depending on the nature of the city itself.

Follow these tips for better skyline photography:

1. Find a Good Vantage Point Outside the City

Skyline image1

To find the city, escape it. One surefire way to capture a city skyline is to leave the city itself. If it’s sitting on a river, hop across; if it’s in a valley, climb the mountain outside. There are terrific vantage points outside cities, like hills, islands and boats, but all will involve a fair bit of travel time and some physical stamina to keep moving until you find a wide enough angle.

Take, for example, downtown Los Angeles: to capture this magnificent skyline, most photographers would hike up a nearby hill or visit the Griffith Observatory until they find a good angle. If you want to include major sites, you’ll need to go even farther: take a boat down to the islands south of Toronto, and you’ll find a clear shot of the CN Tower amid one of the world’s most recognizable downtown skylines. You’ll have to venture to uncommon places to find these angles.

2. Focus on the Corner of a Building

Finding the right focus can be difficult with the city miles away, especially in low light. In LiveView mode, use the LCD screen to zoom in on the corner of a building, and then manually focus until it is crisp.

Skyline image2

This will help ensure that your skyline comes out crisp, and not fuzzy with the autofocus guessing game.

3. Take Some Shots During the Blue Hour

Skylines can light up right after the golden hour, in what’s known as the Blue Hour, that short moment in twilight when the sky is still blue, but the city lights have already turned on. Shooting in pitch-blackness is harder to get good results, and not as visually stimulating, assuming you’re keeping your shot in color. Blue Hour will give your skyline a hearty azure backdrop, and make your image that much more interesting.

Skyline image3

4. Go Wide Angle

For skylines and cityscapes, focal lengths between 12mm-35mm are a good bet. It’s not a necessity, but you will appreciate the wide angle more often than not. This will allow you to capture a nice skyline without having to be miles outside the city.

Skyline image4

5. Use a Deeper Depth of Field

If you want a deeper depth of field, you’ll need a narrower aperture, something like f/11 – f/16, which will create a consistently detailed image.

Skyline image5

Typically, when capturing cities and landscapes, deeper depths of field is more desirable, so every detail of the frame appears in focus. This calls for a narrow aperture, or high f-stop.

6. Consider a Panorama

Sometimes even with a wide angle lens skylines are too long to fit in one photo, that’s when you’ll find a perfect opportunity to try capturing it as a panorama.

Skyline image6

A panorama is where you take multiple photos in a row with overlapping edges, then stitch them together to make a single image. Naturally, this shot is wider than most, long and narrow, it can capture a full skyline, bypassing adding in too much excess sky or ground.

7. Use Your Self-Timer and Bracket at Night

Just after sundown, I usually try and take five bracketed shot sequences in cities; the variety of light, between the bright street lights and the cooling sky, makes for a full palette of color and light that should be captured as accurately as possible. By capturing all these exposure levels you can ensure you are capturing all the light in the scene. You can choose which is best later or combine them with HDR processing techniques.

Skyline image7

Later into the evening, as shutter speeds get longer, I usually condense that to just three bracketed shots because of time. Sometimes even single exposures can do the trick, if I’m spending too long on a shot.

If you set your 2-second self-timer, and use a DSLR with exposure bracketing features – you can click the shutter and the camera will fire off all the shots without you needing to hold it, which risks blur from shaky hands (very useful on a cold rooftop).

Hope these tips have been helpful getting you started, have fun out there!


For Further Training:

SnapnDeals currently has a discount on this new in-depth eBook designed to help you master challenging lighting conditions no matter your experience level, take more compelling photos, post-process them to perfection, and delve even further into long exposure tricks so you know all the possibilities. Get Landscapes, Cityscapes & Photography Tricks at 50% Off now.

The post 7 Tips for Better Skyline Photography by Richard Schneider appeared first on Digital Photography School.


it's from Digital Photography School http://ift.tt/1C2zNr3
via Richard Schneider

[Photography] How to Watermark Your Images Using Lightroom and Photoshop CC

Watermarks, love them or hate them, are a way of protecting your images. Although, just because you have one on your image doesn’t mean it won’t be stolen. If you are like me, I do it as a deterrent.

There are many ways to watermark your images. In this article I’m going to show you how to add a watermark to your images using Adobe Lightroom and Photoshop CC.

Lightroom (6) CC

Lightroom makes watermarking your images very easy, there are a couple of ways of doing it. Once you have processed your images and are ready to export them, then it is also time to watermark them.

Exporting Your Images

Select the images you want to export and watermark. You need to make sure you are in the Library module, then click on Export.

The Export Window will come up. We aren’t going to go through how to export your images, there are other tutorials that will show you how to do that. For this purpose we are concerned with the section down near the bottom, so scroll down until you see Watermarking. Take a look at the following image.

watermarking-1

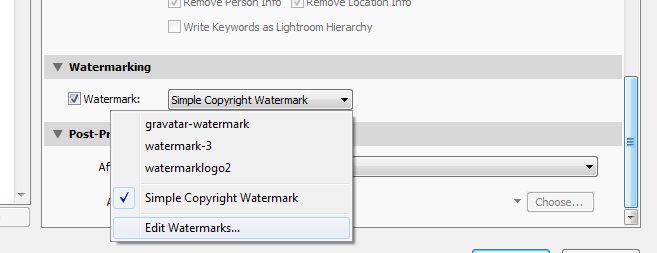
If it hasn’t been ticked, then check the box for Watermark. Next to that is a drop down menu click on that.

Simple Watermark
watermarking-2

If you’ve never watermarked anything before, then you could simply click on Simple Copyright Watermark and it will just put your name on the photos. Though you must be registered in order for Lightroom to know your name.

Another option under that drop down menu is Edit Watermarks, so let’s go through that option.

Edit Watermarks

In this section you can edit the text for the water, or what you want it to look like.

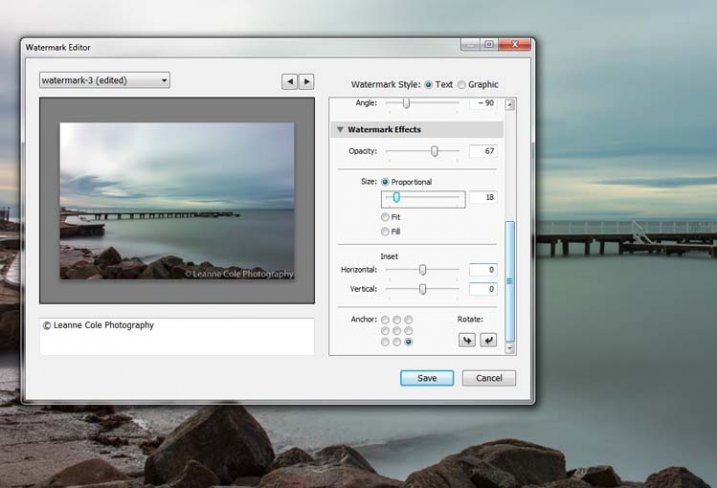
Before you can change the simple watermark you will have to make sure that at the top where it says Watermark Style, you have selected Text. In the image below you can see the window for the Watermark Editor and in the top right corner you can see Watermark Style.

watermarking-3

In the box underneath the image you can see the simple watermark, you can now select that and delete it, and write anything you like. The most common thing to do is put the copyright symbol, ©, with your name or business name after it. To make the copyright character on Windows simply press the Alt key and type the number 0169, on a Mac press Option+G.

There are various sliders in the Watermark editor as well, one allows you to change the opacity of the watermark. How opaque you make it is up to you. I like to make mine so that you can barely see it. A lot of people looking at images can find watermarks distracting, so it is something you should keep in mind when you are adding them to your images.

There are different things you can do to adjust the watermark, for example changing its position. There is also a size slider to make it bigger or smaller.
watermarking-4

Add a Logo or Unique Watermark

If you have a logo or a special watermark you can use this in Lightroom too.

In the same window that we have been using, go back to the top and select graphic. Directly underneath you will see Image Options where you can load your file. You can make the same changes in regards to size, opacity and location as you did with the text watermark.

watermarking-5

Saving the Watermark Preset

Once you have worked it all out, you don’t have to do all that every time you want to export images. You can save what you have done as a watermark preset, and give it a name (pull down the menu top left where is says “Custom” to find Save Current Settings as New Preset – select that to see the pop-up box below) . The next time you want to watermark an image, just look in the same drop down menu that you used earlier to edit the watermark, and you will find your saved preset there.

watermarking-6

Here you can see that I have called one of my presets: watermark-3.

Photoshop CC

There are also some simple ways of watermarking in Photoshop CC as well. It is a little different, but not harder.

Prepare your image as usual, then get it ready for its designated use and how you want to add a watermark to protect it. I resize every image I put online, that is my choice, it is up to you whether you decide to or not.

Easy Watermark

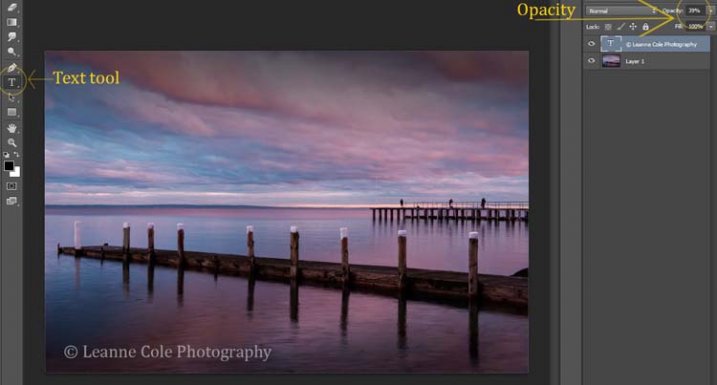
Once you are ready to save your image, read for use, one of the easiest ways of watermarking it is to simply use the text tool, located in the tool bar on the left of your workspace. The image below shows where it is located.

Click on the image where you want to put the watermark, and start typing. Remember you can also add the copyright symbol the same as you did using Lightroom.

You can change the size and colour of the text at the top, in the tool options bar below the main menu (or choose Window>Character to show the text adjustment panel). Select the text to change it. You can also move it around when it is highlighted as well. The opacity slider is above the layers panel on the right, you can change it to suit your preference.
watermarking-7

Making Your Own Logo or Watermark

You always have the option of making a custom watermark, which can be saved and used any time you need it, and can also be used in Lightroom.

To start, go to File in the main menu and click New (File>New). I usually make the size of the new image match my final image size, so the longest side is 1000 pixels. Make the width that size for this example. For the height, it doesn’t have to be that big, it just depends on what you are going to do. For this one it was 300 pixels. You will also need to make sure the Background Contents setting is set to transparent, see below.

watermarking-8

So you can see what you are doing, you could add a new layer. Do that from the new layer icon at the bottom of the Layers Panel, or go to the main menu at the top and select Layer>New>Layer and click OK. Once that is in place use the Paint Bucket Tool which is in your tool bar, it is under the Gradient Tool icon. We are going to make the layer black, so make sure the foreground colour is black. The foreground and background colour selection is also in the tool bar, down near the bottom. There are two squares, one black and one white (click D on your keyboard which defaults the colors to black in the foreground, white in the background). Click on your new layer and it should be filled with all black.

Select the text tool (T) and make sure that white is now the foreground colour (click X on your keyboard to switch the foreground/background colors so white is now on top). Click on your image and start typing. Like you did for the Easy Watermark you can highlight it, then change the size. Once you’ve done that, you can crop it further so just the text appears.

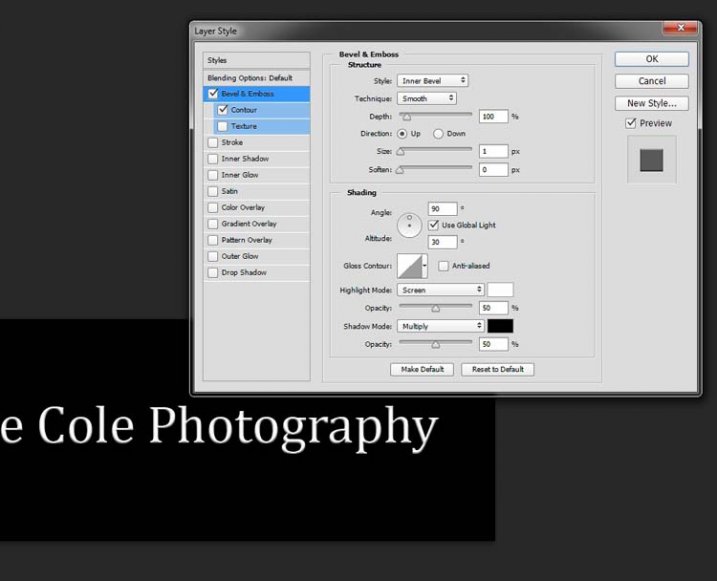
Double click on text layer, towards the right side, and you should get the following window, Layer Style.
watermarking-10

You can see I have checked Bevel Emboss, and the Contour option underneath. You can play around with the sliders, but just ticking those did enough for this purpose. Then the black layer is deleted. You can do that by dragging it to the rubbish bin (trash can) in the bottom right corner. You can also right click on the layer and find delete. The easiest way is to highlight the layer by clicking on it, and pressing delete on the keyboard.

It is very important when you save this file that you do so as a .png or a .psd, otherwise the transparent part of the layer will be made white and you will no longer have the watermark that you desired.

watermarking-11

That is an easy way of doing a watermark that you can save so you can use again, but you could make a logo or something similar as well. One thing that quite a few people do is add a signature, like below.

signature-watermark

There are a couple of ways of doing this, but the most common is using a tablet with a pen, I use a Wacom Intuos Pro. Do everything the same as you did for the last one, but instead of using the text tool, get your brush, make it small enough using the left square bracket key, then write your name.

If you find the surface too slippery, try putting a piece of paper over the top, it will help add some resistance. You can also try doing it with a mouse or touch pad. Again, save it the same way.

Easy Way of Adding Watermarks

One of the easiest ways to use the watermark you have just created is to open it, then select all (Ctrl+A on a PC and Command+A on a Mac), then copy it, (Control+C on a PC and Command+C on a Mac). Go over to your image and press Ctrl+V or Command+V to paste it; the watermark should now be in the middle of your image.

You can use the move tool (V), which is the first one in your tool panel, and move it to where you want, like you did with the Easy Watermark.

Hiding Your Watermark in the Image

With a simple watermark you can also put it into the image and sort of hide it. This is the method I use for many of my fine art images. I try to place it where it isn’t obvious, and where it could be more difficult to remove.

Once your image is ready, copy and paste your watermark onto your image. Now you need Transform it; Edit>Transform in the main menu, or by pressing Ctrl+T/Command+T. You will notice a framework around your image, as shown below.
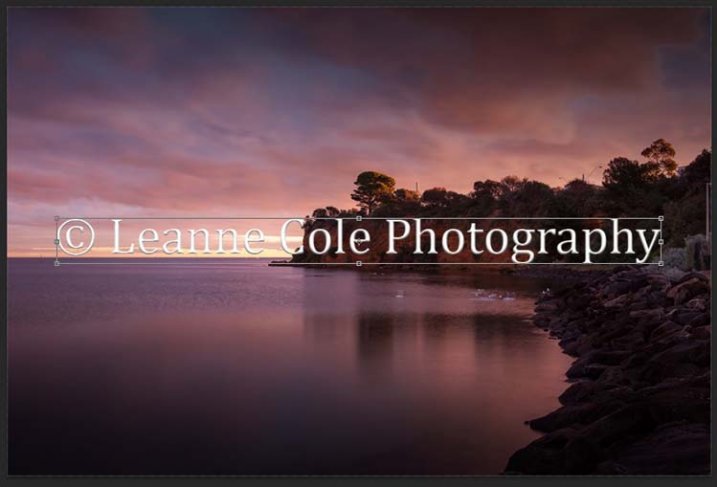
watermarking-12

By clicking and dragging on the corners, or in the middle of the lines, you can change the size. Click and drag to make it bigger or smaller (hold Shift down to keep the proportions the same, otherwise it will stretch out of shape). If you want to rotate it, hover around just outside a corner and a small curve arrow will appear, then you can turn it around. You can also move it by clicking in the middle and moving it where you want. As I said, find somewhere to hide your watermark in the image, hopefully somewhere not too noticeable, as demonstrated in the image below.
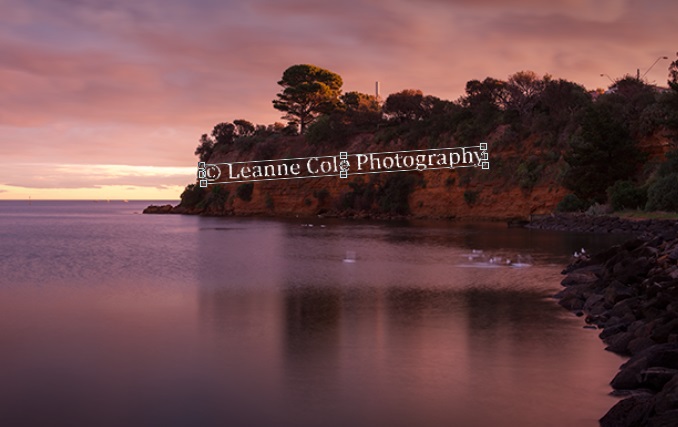
watermarking-13

To apply the Transform Tool you can double click inside the box, press Enter or click it with the move tool. Then the opacity of the watermark layer is changed to help it blend, see below.
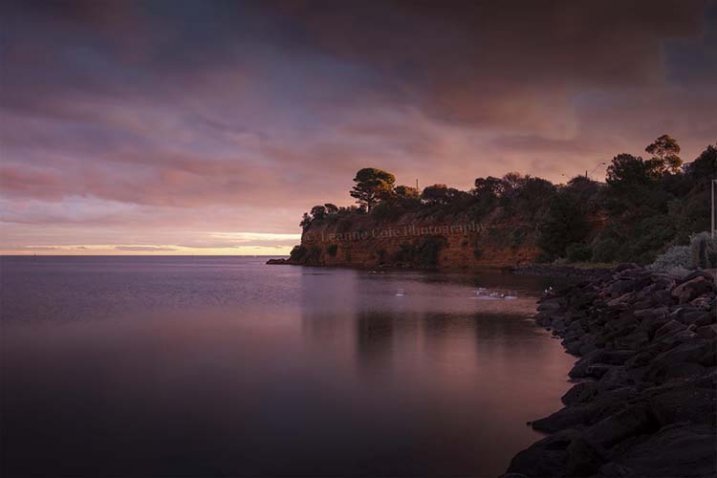
watkinsbaywatermarked-2

Once you get good using Transform, you can experiment with what else the tool does.

Using a Brush to Watermark Your Images

watermarking-14There is a very easy way of doing your watermark, but it takes a bit to set it up. Getting the watermark ready pretty much works the same as before, only this time you want a white background, and you need to use black to create it. Take a look at the image on the right.

Note: create your new file 2500 pixels wide as that is the maximum size for a brush. You can always make the brush smaller when you apply it to your image, but making it the largest size now will give you the best quality.

I created the signature with my Wacom Tablet, but you could also use a pen or black marker on a piece of paper and scan it, that will work just as well.

Once you have your signature, you can now make your custom brush. Go to the Edit menu and choose Define Brush Preset, and click on it.
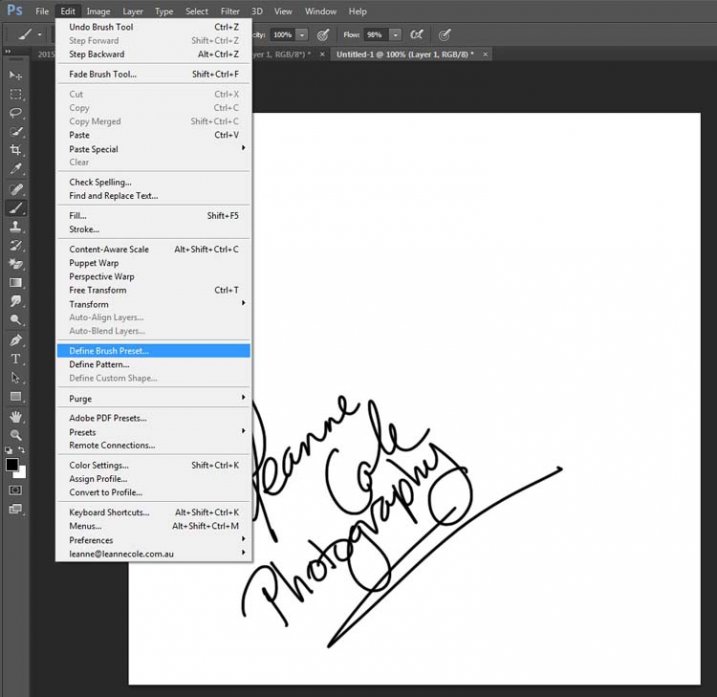
watermarking-15

watermarking-16Next, you will see another window pop up window ,asking you to give your brush a name. You can name it what you like, perhaps something that will remind you what it is later; I called mine Brush Signature Watermark.

Now your watermark will work just like a brush, you can make it smaller or larger (remember if you made it 2500 pixels it will hold quality up to that size with out pixelating), you can also change the colour. It works exactly the same way as the normal brush does; use the square bracket keys to make it bigger or smaller. If you want to change the colour, click on the foreground colour and the Color Picker window will appear.

I would suggest adding your watermark to a new transparent layer, so you can also change the opacity as needed.

To find your new brush, go to your brush presets, they are over on the side of your layers panel, and click on the icon that looks like small lines at the top where a drop down menu should appear.
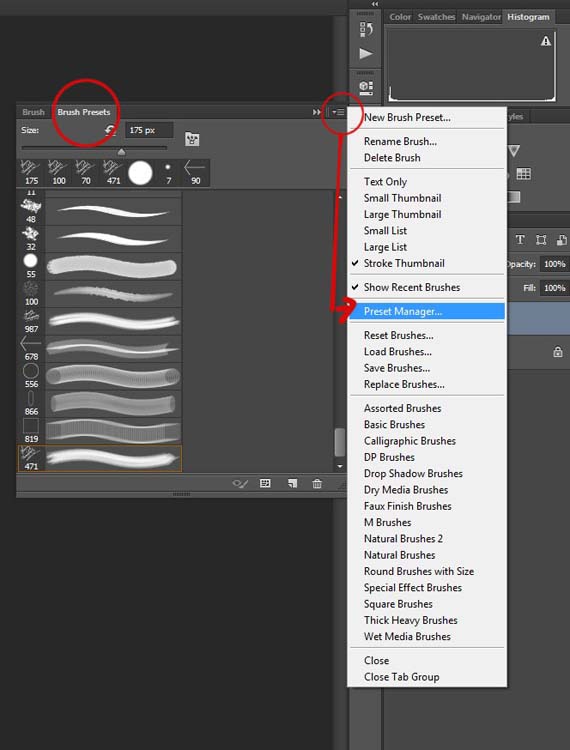
watermarking-18

Go down to Preset Manager and click. A new window will appear with all your brushes. Now you can click, and drag the brush you just created to a spot where it will be easier to find, like up to the top.
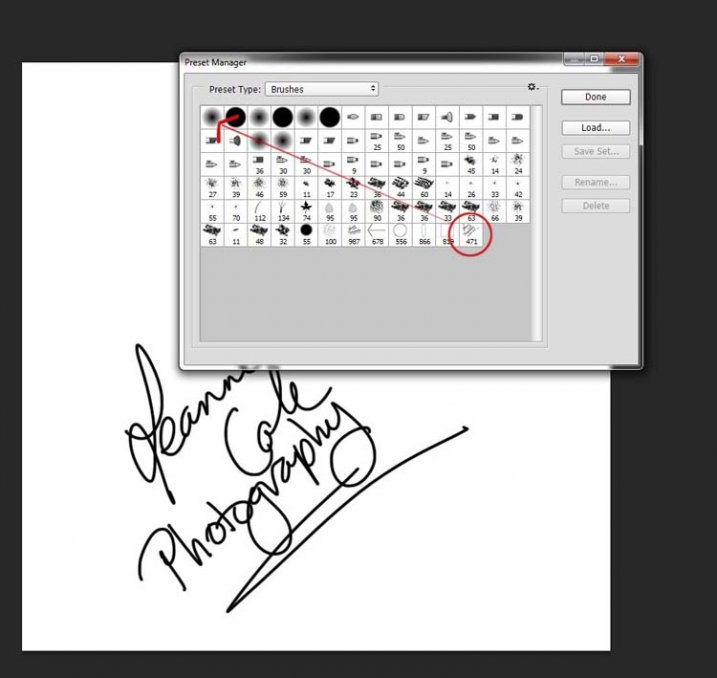
watermarking-19

You are now ready to use your new watermark brush any time you want.

As I said, you can change the size of it using the square bracket keys [ ] on your keyboard. You can change its colour by clicking on the foreground colour in the tool panel and selecting a new one. You can also add layer effects like a drop shadow, emboss, etc., you can even make the text itself transparent and only leave behind the shadow.
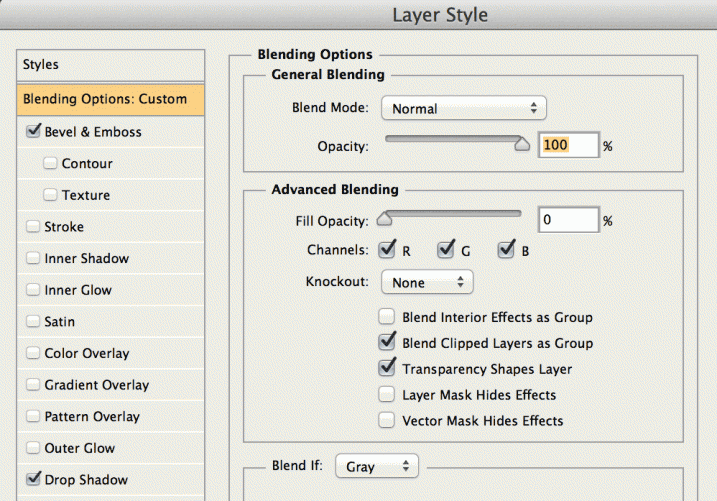
layer-effects

To make text “invisible” change the Fill Opacity Under Blending Options, in the Advanced Blending section to 0%.

It will look something like this and will blend into any area:

layer-effects-transparent

Here is one I played with:

watermarking-17

There are so many different ways to do a watermark and it is really up to you to work out which one will work best for you. Do you have any other tips for watermarks or methods  you use to make them? Please share in the comments below.

The post How to Watermark Your Images Using Lightroom and Photoshop CC by Leanne Cole appeared first on Digital Photography School.


it's from Digital Photography School http://ift.tt/1InHHvY
via Leanne Cole