Aug 30, 2023

[Photography] The Rule of Space in Photography: A Comprehensive Guide (+ Examples)

The post The Rule of Space in Photography: A Comprehensive Guide (+ Examples) appeared first on Digital Photography School. It was authored by Megan Kennedy.

rule of space in photography: a comprehensive guide (+ examples)

In this article, I’m going to answer all your questions about the rule of space in photography:

What it is. How it works. And how you can use it for amazing results.

Specifically, by applying the rule of space to photography, you can embrace the quieter moments in visual imagery – and you can amplify the impact of your subject by balancing positive and negative compositional elements.

Let’s dive right in.

A photograph of a softly focused fly demonstrating the rule of space in photography
Canon 5D Mark II | Canon EF 50mm f/1.8 II with extension tubes | f/2 | 1/8000s | ISO 500

What is the rule of space in photography?

The rule of space in photography is a method of incorporating visual absence to give a subject room to breathe.

Although the rule of space is more like a guide than a rigid rule, it is a handy compositional device. It’s a great way to add a sense of vastness, depth, and/or motion to a photograph.

Why is the rule of space important?

To understand the rule of space, we first need to take a brief look at positive and negative space.

Photographers use the terms positive space and negative space to contrast impactful and more subtle areas in a photograph.

Generally, positive space refers to specific subjects that command a viewer’s attention. Negative space, on the other hand, is less visually demanding and provides a frame for the main event in an image.

For example, in the image below, the clouds represent positive space, whereas the sky and dark shadows create the negative space that frames the main subject:

rule of space in photography clouds
Canon 5D Mark IV | Canon EF 24-105mm f/4L IS USM | f/10 | 1/500s | ISO 100

So where does the rule of space in photography fit in?

In general terms, the rule of space governs the use of negative space within an image. By understanding the nature of the rule of space, a photographer can harness the intent of a subject, as well as add depth and perspective to the image.

The rule of space is important because it aids a photographer in articulating the energy of a photograph – and it guides the viewer’s eye by sculpting key visual events and affording the subject more room to move.

Working with the rule of space: the basics

To work with the rule of space in photography, first consider the behavior of your subject.

Ask yourself: What is the subject doing? Is it moving or stationary? How does it occupy space?

At the same time, visualize what you want to convey in the photograph. Is it movement? Perspective? Depth? Narrative?

The nature and behavior of your subject plus your intent should together determine how you apply the rule of space.

Perspective

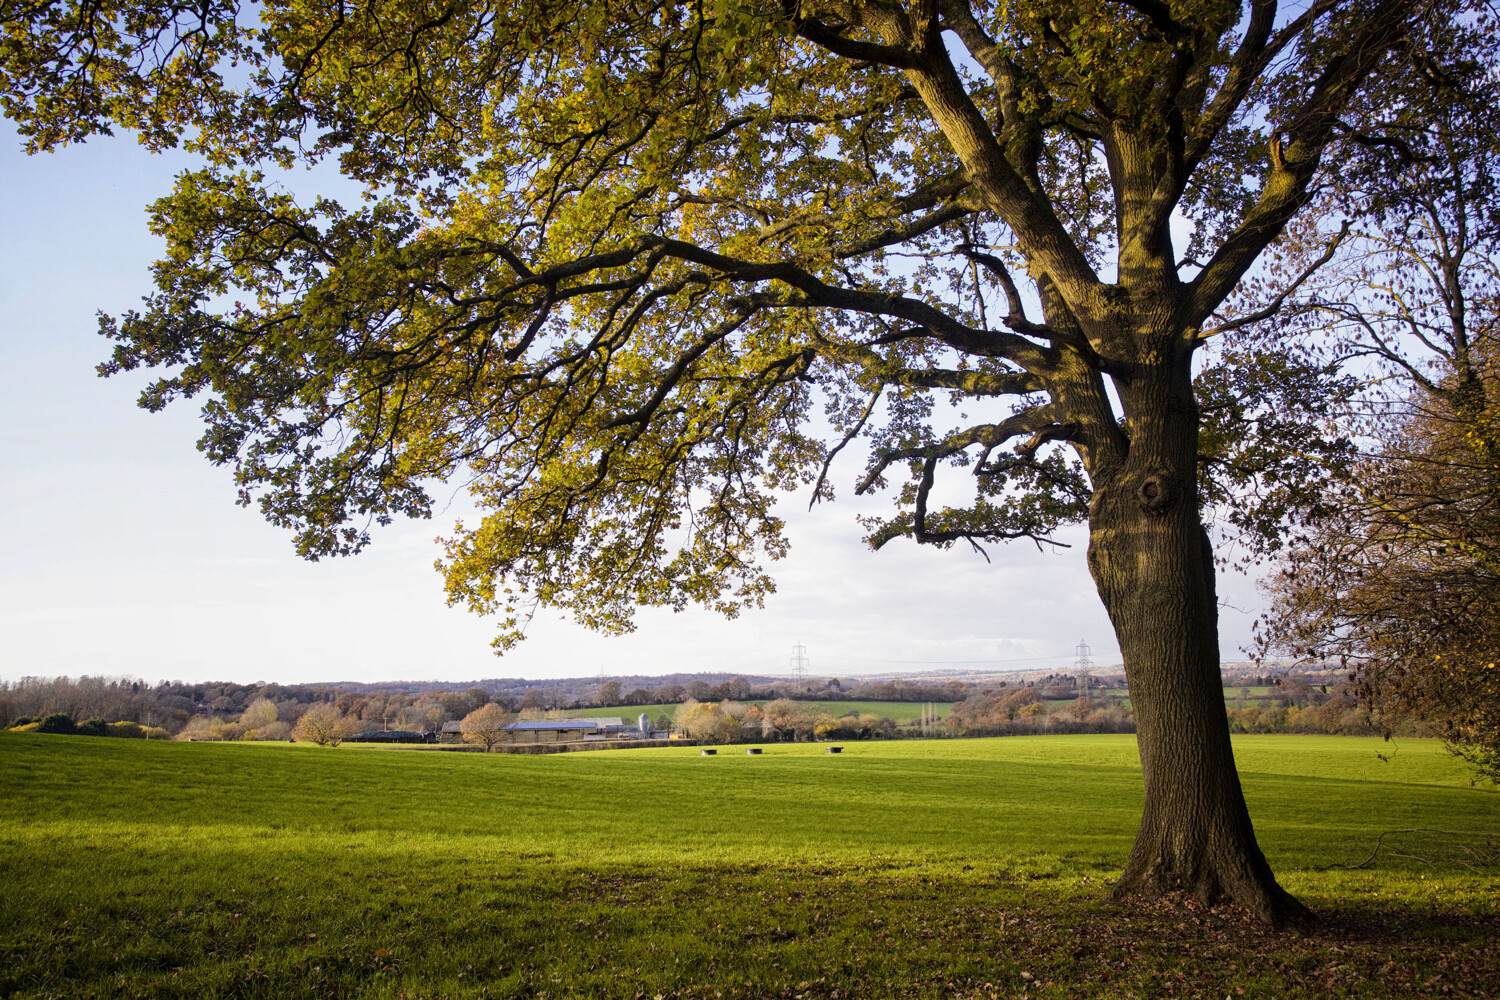
One of the main ways the rule of space can impact a photograph is through perspective. Abundant space around a subject can make the subject appear smaller or larger depending on the camera angle.

For example, a subject photographed from a high angle, surrounded with minimal detail, can seem smaller and more immersed in negative space:

a cat in an apartment window rule of space in photography
Canon 5D Mark IV | Canon EF 24-105mm f/4L IS USM | f/5.6 | 1/200s | ISO 100

Conveying momentum

The rule of space in photography can help you create the impression of movement.

To convey action, the rule suggests that space should be left either in front of or behind the subject (or both).

For example, if a subject is moving across a scene, you can aim to capture both the subject and the negative space surrounding the subject. The extra space conveys the subject’s movement, adding the momentum a tight crop may lack.

airplane flying
Allowing a subject room to move adds momentum.
Canon 5D Mark II | Canon EF 24-105mm f/4L IS USM | f/10 | 1/640s | ISO 250

Adding depth

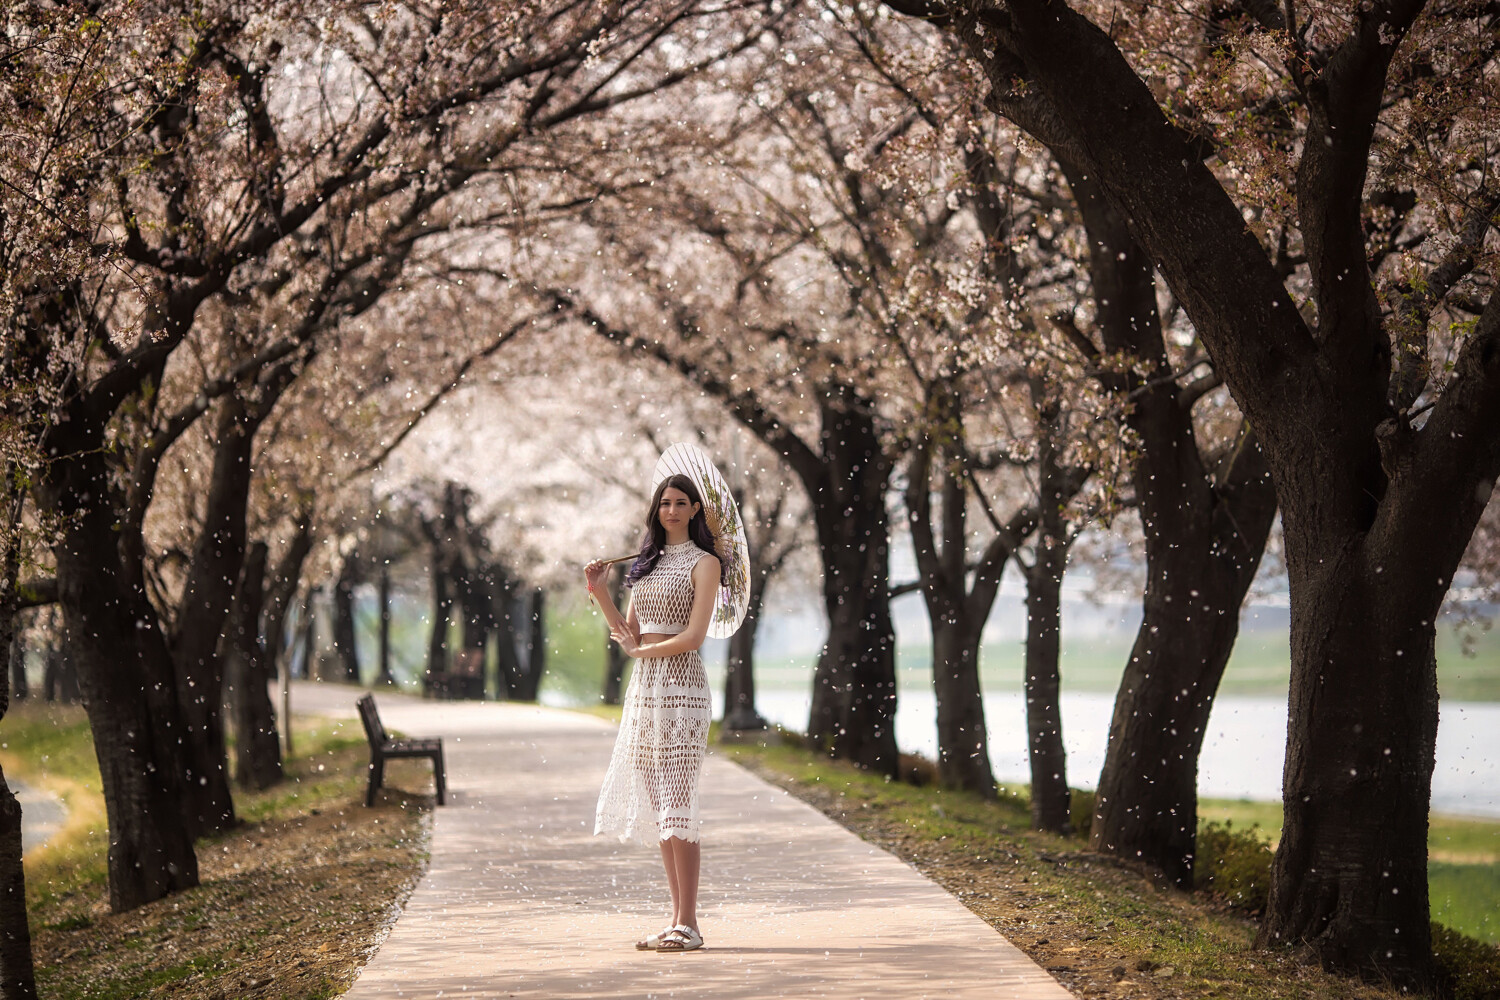
The rule of space in photography is not limited to highly active subjects; it works for stationary subject matter, too!

For example, in portraiture, your composition can be governed by pairing the gaze or gesticulations of the subject with negative space. A subject’s gaze naturally directs our attention – we want to see what the subject sees.

But when a gaze is met by negative space, the viewer’s eye will often naturally return to the original source of the gaze. The rule of space provides an organic way of adding depth and directing viewer attention.

You can also use the rule of space with non-human/animal subject matter – based on their movement, perceived gesticulations, and extensions. By following the momentum, composition, or behavior of a non-human subject, you’ll find ideal placements for negative space.

In the example below, I surrounded several blossoms with negative space; this additional room suggests growth and depth. It also highlights the detail in the individual florets.

pink flowers rule of space in photography
Leaving extra room around specific flower heads to articulate their elemental composition is one way to emphasize non-human subjects through the rule of space.
Canon 5D Mark II | Canon EF 50mm f/1.8 II with extension tubes | f/2.5 | 1/1250s | ISO 200

Rule of space challenges

The process of applying the rule of space to photographs is not that difficult in itself. However, a tendency to cram each image with as much visual information as possible can get in the way of exploring negative space.

Instead, deliberately and mindfully take a minimalist approach. You can also zoom out or physically take a few steps back from a subject to refocus on the rule of space.

Tips and techniques for working with the rule of space

Here are a few tips for working with the rule of space:

Tip 1: Use other compositional rules, too

Applying the rule of space to your photography doesn’t have to come at the cost of other compositional rules.

In fact, combining compositional tenets with the rule of space in photography can increase the chances of creating a successful photograph.

Compositional rules such as the rule of thirds, leading lines, depth of field, and repetition can all be used in conjunction with the rule of space to create engaging imagery.

lightning striking above a city
Canon 5D Mark IV | Canon EF 24-105mm f/4L IS USM | f/5 | 30s | ISO 100

Tip 2: Let it breathe

The rule of space is all about giving a subject or a scene room to breathe.

So step back, zoom out, or even try a wider lens; that way, you can add a sense of spaciousness to your photos.

Tip 3: Experiment with different camera settings

Your choice of camera settings can help follow the rule of space more effectively.

For instance, you might use a shallow depth of field to surround a subject with negative space. You could also try using a slow shutter speed and panning your camera while leaving space before or after a subject to amplify movement.

fence with shallow depth of field rule of space in photography
You can amplify perspective with the rule of space in photography.
Canon 5D Mark II | Canon EF 100-400mm f/4.5-5.6L IS II USM | f/5.6 | 1/125s | ISO 200

The rule of space in photography: conclusion

The rule of space aims to create a mindful harmony of positive and negative space.

And by applying this rule, you can emphasize and frame positive subject matter while generating an evocative balance of weight and weightlessness within an image.

So the next time you’re out with your camera, remember the rule of space – and do what you can to apply it in your images!

Now over to you:

Have you been using the rule of space in your photos? How are you going to change your compositions to improve your use of space? Share your thoughts (and photos!) in the comments below.

Rule of space FAQs

What is the rule of space?

In visual art, the rule of space guides your inclusion of negative space within an image.

What is negative space?

Generally, negative space refers to areas in a photograph that are not occupied by the main subject matter. Often, negative space serves as a frame to emphasize the key subjects in an image.

How do photographers use the rule of space in composition?

The rule encourages photographers to make use of negative space. There are many ways to do this. You can focus on coupling subjects with negative space by selecting minimalist backdrops, or you can pair the gaze of a portrait subject with additional negative space.

Who are some photographers that use the rule of space?

There are countless photographers who make use of the rule of space. For example, photographers Martin Parr and Helen Levitt made striking use of the rule, as well as Hiroshi Sugimoto, Michael Kenna, and Eric Kim.

When can I break the rule of space in photography?

Photography is all about developing personal creative instincts and approaches. That’s why compositional rules can be broken. The rule of space in photography is simply a guide – so if an image looks better without extra space, then go with your instincts. And if you aren’t sure, try taking a series of photos with different spatial approaches and analyze the results.

The post The Rule of Space in Photography: A Comprehensive Guide (+ Examples) appeared first on Digital Photography School. It was authored by Megan Kennedy.


it's from Digital Photography School https://ift.tt/UElb4Zh
via Megan Kennedy

[Photography] 8 Tips for Beautiful Tree Photography

The post 8 Tips for Beautiful Tree Photography appeared first on Digital Photography School. It was authored by Simon Bond.

Tips for beautiful photos of trees

Want to take stunning photos of trees? You’ve come to the right place. I’ve been capturing trees for years, and in this article, I share plenty of tree photography tips and tricks, including:

  • Simple creative techniques you can apply to your tree photos
  • Interesting perspectives for beautiful images
  • How to get a great “lone tree” shot
  • Much more!

I also include a handful of tree photography ideas so that you never run out of inspiration.

So take a deep breath, fill your lungs with tree-produced oxygen, and learn how you can take stunning photos!

1. Find a single tree standing on its own

tree photography tips tree on its own in a field

The lone-tree-in-the-field shot is a nature photography classic, and for good reason: You get a strong main subject, you get a beautiful background, and you can often frame the tree against a beautiful sky.

Note that you’ll need to carefully position the lone tree in your composition. If the tree is symmetrical, putting it smack-dab in the middle of the frame can work. Otherwise, you’ll want to consider the rule of thirds, which encourages you to put the tree a third of the way into the frame.

If you can get close, try using a wide-angle lens to show the entire tree in all its glory. You can also zoom out to create interesting minimalist images (with the tree framed by the beautiful background).

8 Tips for Beautiful Tree Photography

And if you can’t get close to the tree, consider using a telephoto lens. You’ll get a more compressed look, but that’s not necessarily a bad thing (and it can help you blur the background, too).

So the next time you’re driving, look around for potential subjects. Make sure you check out the background, too, as you don’t want the viewer to be distracted by elements positioned off in the distance.

2. Look for tree tunnels

This is another classic tree photo: The tree tunnel, which features two rows of trees leading off into the distance:

tree photography tips tree tunnel with people walking in the distance

Here, it’s important that you find two unbroken, symmetrical rows of trees. You need a strong leading line in the center, and the tighter the tree lines, the better.

You can experiment with different depth of field approaches for creative images. A deep depth of field will show lots of detail, while a narrow depth of field has the potential to create highly artistic images.

If you can, include a person or two in the background; that way, the viewer has an obvious place to rest their eyes.

The tough part is actually finding the tree tunnel. I’d recommend doing some Googling for “tree tunnels,” “fall foliage walks,” and the like. You might also check out Instagram; see if you come across any great tree tunnel images taken in nearby areas.

Speaking of which: If you can shoot during the fall – when the colors are looking amazing – or even in the winter when the snow is falling, your results will be truly legendary.

3. Photograph the same tree for a year

Trees change over the course of the year, which gives you a fantastic tree time-lapse opportunity. This works best away from the equator, but you can try it pretty much anywhere (if you’re working in the tropics, the changes will be more subtle).

First, find a tree and carefully determine your composition. I recommend using a tripod to maintain consistency; take photos of the exact position of the tripod and its height, then store them on your phone so you can easily reference them when you come back.

(If you can’t pick a single composition, feel free to come up with three or four. But you’ll need to carefully document each setup so you can return later on.)

Next, determine your settings. Make sure to record the aperture so you can keep the depth of field consistent. And if you’re using a zoom lens, record the focal length.

Finally, take the same shot several times over the next twelve months! You can come back once during each season, or – if you want to create a more intensive time-lapse series – come back every month or even every week.

Once the cycle is complete, you’ll have a beautiful set of images documenting the changing seasons.

trees in fall seen from above

4. Try some creative techniques

If your tree images are looking a bit bland, then why not try out a fun creative technique?

For instance, you might capture a:

  • Tree silhouette. This works great with trees featuring beautifully shaped branches! Head out around sunset, make sure your tree is framed against the bright sky, and expose for the brightest part of the scene.
  • Refraction shot. Bring along a lensball, hold it up in front of the tree, and shoot through the glass. You’ll get an interesting inverted image inside the small glass sphere (see the example below).
  • Infrared scene. Go shooting on a sunny summer day with some clouds in the sky. Find a tree with plenty of green leaves, and use either an infrared filter or an IR-converted camera. You may need to experiment with the settings, but you’ll end up with a beautiful dreamscape shot.
  • Long-exposure photo. If you can find a tree near a river or framed against a partly cloudy sky, you can create a beautiful long-exposure blur. Slow down your shutter speed (you may need a neutral density filter), use a tripod, then photograph the tree surrounded by movement.
upside-down image with a tree in a lensball

5. Focus on the details

Compositions that include the entire tree are nice…

…but tree detail images can be beautiful, too! In fact, trees offer all kinds of potential for amazing detail shots. Here are some items to consider:

  • Leaves. You can focus on a single leaf and widen the aperture for a beautiful bokeh background. Or you can grab a macro lens and focus even closer (so you highlight the leaf’s veins).
  • Bark. Trees offer beautifully textured bark, so get up close and use a deep depth of field for plenty of detail. For maximum texture, position yourself so the bark is sidelit.
  • The trunk. Observe the root system around the trunk. See what patterns you can photograph at the foot of the tree.
  • Branches. Take a minute to look up. Interlocking branches can create beautiful patterns, especially when they’re silhouetted against a bright sky.
the roots of trees in the jungle

6. Use trees as portrait backgrounds

Not every tree image needs to use the tree as the main subject; you can also use trees as stunning backgrounds.

Portrait photos, in particular, benefit from tree backdrops. You can use tree tunnels to frame your subject, or you can position a lone subject near a lone tree for a minimalistic effect.

woman standing in a tunnel of trees with an umbrella

Plus, in summer and fall, tree leaves make gorgeous background bokeh. Just put your subject in front of a leafy tree, widen the aperture, and watch as you create jaw-dropping portraits! This approach works especially well if you shoot during the golden hours and the background leaves are lit by the setting sun.

7. Try different vantage points

Most photographers shoot trees from the most obvious angle: Standing and looking straight ahead.

But if you want unique tree photos, why not mix it up a little? Here are a few fun perspectives you can use for more original tree images:

  • Low angle. Get down low and shoot from the perspective of a four-legged creature. This will create an intimate image that emphasizes the height of the surrounding trees. You might consider adding in a foreground subject; try placing flowers in the foreground while keeping the tree in the background.
  • Worm’s-eye view. Get down low on the forest floor, but instead of pointing the lens straight ahead, point it up at the treetops. See if you can shoot from the middle of a clearing with a wide-angle lens; that way, the trees will seem to be reaching for the sky.
  • Bird’s-eye view. For this angle – looking down from above – you’ll need a drone, a helicopter, or some other way of getting high above the trees. It might take some work (and money), but the results can be spectacular!

8. Include wildlife in your tree photos

Do you like to photograph mammals, birds, or insects? Try combining the wildlife with the trees for spectacular forest images.

You can start small. Grab a close-focusing lens, then see if you can find some ants, beetles, caterpillars, or butterflies to capture.

And if you have a telephoto lens, try creating some portraits of the local wildlife. Depending on your location, squirrels, chipmunks, and even monkeys will make stunning subjects.

monkey in the trees

Want to photograph birds? You can, though unless you’re shooting near a feeder or working in a blind, you’ll need a very long lens. I’d recommend 300mm as an absolute minimum, but 400mm, 500mm, or even 600mm is ideal.

Tree photography: final words

tree photography tips

Trees make amazing subjects, plus they’re everywhere!

So remember these tree photography tips. Then head out with your camera and have fun. You’re bound to capture some stunning photos!

What type of tree images do you plan to take? Do you have any tree photography ideas you’d like to share? Leave a comment below!

The post 8 Tips for Beautiful Tree Photography appeared first on Digital Photography School. It was authored by Simon Bond.


it's from Digital Photography School https://ift.tt/TuHbGxX
via Simon Bond

Aug 27, 2023

[Photography] 12 Must-Know Camera Settings for Concert Photography

The post 12 Must-Know Camera Settings for Concert Photography appeared first on Digital Photography School. It was authored by Matthias Hombauer.

Essential settings for concert photography

Struggling to determine the right concert photography settings for beautiful images of musicians, bands, and even symphonies? You’ve come to the right place.

Selecting the perfect camera settings is a key part of capturing awesome concert photos, especially in low-light situations. If you get your settings right, the results will be spectacular: crisp, clear, and full of detail. But if you get them wrong? Your images will look blurry, unpleasant, and just all-around bad.

That’s why, in this article, I’m going to share 12 settings for concert photography. These are the exact camera settings I use in my own concert shooting, so you know they work. (And I promise: They’ll help you boost your images and your career!)

Let’s dive right in.

The best concert photography settings, in brief

Concert photography settings

Before we dive into the nitty-gritty, let’s take a moment to review my go-to settings for concert photography. If you’re eager to grab your camera and head to a gig tonight, these settings will net you solid results:

  • RAW format
  • Manual mode
  • A wide aperture
  • A reasonably fast shutter speed
  • A high ISO
  • Image stabilization
  • Auto White Balance
  • Spot metering
  • Back-button AF
  • Burst mode

Think of this list as your concert photography cheat sheet. It’ll get you about 80% of the way – but to truly shine in this challenging field, you need to understand when to fine-tune your settings, you’ll need to understand why these settings are so crucial and what they actually do, and you’ll also need to learn a few additional camera settings to consider.

Also, always remember that every concert is unique. Lighting conditions can change from one moment to the next, and what works for a high-energy rock concert may not be ideal for a subdued jazz performance. Still, by dialing in these key settings, you’ll be well on your way to capturing stellar images that bring the stage to life.

The 12 concert photography settings everyone should know

Looking to level up your photos of rock concerts, symphonies, and everything in between? Here are the settings that I recommend you keep in mind while photographing:

1. Shoot in RAW format

Concert photography settings

Here’s your first concert photography setting, and it’s a big one:

Always, always, always shoot in RAW.

If you shoot in JPEG, your camera will automatically add processing, such as contrast, saturation, and sharpness. And while it might look nice, it’ll limit your post-production freedom, so you won’t be able to further enhance your concert photos.

On the other hand, if you shoot in RAW, the camera won’t process your photo at all. That way, you can change parameters such as exposure, white balance, saturation, contrast, and clarity long after you hit the shutter button.

(In other words: If you’re careful and deliberate with your editing, you can make your photos look a lot better!)

2. Use Manual or Aperture Priority mode

The Rolling Stones Concert photography settings
The Rolling Stones
Nikon D800 | 185mm | f/4 | 1/320s | ISO 1600

When I started off doing concert photography, I used Aperture Priority mode. I would dial in the aperture, my camera would set the shutter speed accordingly, and I’d hit the shutter button.

And in general, Aperture Priority works well. It’s great for beginners because it partially automates the exposure process, giving you one less thing to worry about.

But after shooting for a while, I recognized that only Manual mode would give me the flexibility I was after. I wanted to set the aperture, shutter speed, and ISO – and then change each setting on the fly based on my requirements.

Fink concert photography settings
Fink
Nikon D700 | 14mm | f/2.8 | 1/200s | ISO 3200

So depending on your level of experience and comfort, pick one of these two options. Starting with Aperture Priority and working up to Manual can make sense, though if you’re already familiar with Manual mode, you might test it out and see if you can use it effectively right away.

Pro tip: If you do choose Manual mode, make sure to frequently check your histogram to ensure your exposure is correct!

3. Use your lens’s widest aperture setting

Concert photography settings

Struggling to decide which lens to use for concert photography? I always give the same advice: Use fast lenses and shoot them wide open.

Set your aperture to the smallest f-number your lens allows, which will give you the biggest aperture opening. That way, the most possible light hits your sensor.

A wide aperture is especially important in low-light concert photography. If possible, shoot with an f/2.8, f/1.8, f/1.4, or f/1.2 lens.

If you’re a beginner on a budget, I’d recommend grabbing a 50mm f/1.8 lens, which is cheap, features a wide maximum aperture, and offers surprisingly nice image quality.

4. Use a fast shutter speed

Miley Cyrus Concert photography settings
Miley Cyrus
Nikon D800 | 340mm | f/4.8 | 1/320s | ISO 1600

Have you ever been to a concert where the artist was running and jumping from one side of the stage to the other?

This type of action makes for some great photography – but to freeze such movement, you must use a fast shutter speed.

In general, I set my shutter speed to 1/200s or faster (and depending on the level of action, you may want to push this even higher.) Certain concerts will allow you to get away with a slower speed, such as 1/160s, but it’s often better to err on the side of caution and go higher rather than lower, even if you’re forced to increase your ISO as a result. Speaking of which:

5. Boost your ISO

Concert photography settings

The higher your ISO, the less light you need for a proper exposure – and in concert photography, where light is generally limited, this is a key setting to get right.

Your camera’s ISO range likely starts at 100. But if you’re shooting a low-light concert, I’d recommend kicking this up to 1600, 3200, or even 6400. Otherwise, your shots will end up far too dark (or you’ll be forced to drop your shutter speed, which will introduce blur).

Unfortunately, a high ISO does come with a significant tradeoff: image noise.

In other words, as you push your ISO from 400 to 800 to 1600, you start to get little flecks of color and light that look pretty bad. The specifics will depend on your camera (modern sensors do a very good job of minimizing high-ISO noise!), but you should always be cautious when boosting the ISO. Only raise it when absolutely necessary, and be mindful of your particular camera’s high-ISO capabilities.

It can help to spend some time capturing test shots at various ISOs, then magnifying the images on your computer and evaluating the noise levels in your images. Also note that you can sometimes salvage noise-heavy images with noise reduction during post-processing, or you can convert your files to black and white for a grittier, noir-type look.

6. Turn on image stabilization

Concert photography settings

Modern camera gear offers a lot of tech to make our lives easier, and image stabilization is one of those wonderful advancements. Available in many of today’s lenses and some (mostly high-end) mirrorless cameras, image stabilization helps to counteract the effects of camera shake so you can keep your files looking tack-sharp.

Imagine you’re at a concert and trying to shoot in low-light conditions. If your hands shake, you shoot while panning, or you get bumped by an audience member or another photographer, you risk introducing blur into your images, even if you’re working at a reasonably fast shutter speed.

Turn on your camera or lens’s image stabilization, however, and it’ll compensate for minor camera movements. In fact, it can make a noticeable difference in the sharpness of your photos, and it’ll certainly improve your consistency.

Not sure whether your camera or lens offers image stabilization? This feature can be labeled differently depending on your gear. For instance, camera-based image stabilization is often referred to as IBIS (in-body image stabilization), while lens-based image stabilization goes by a host of acronyms like IS, VR, OS, OSS, or VC. When in doubt, do a bit of Googling!

Pro tip: It’s important to remember that while image stabilization can help with camera shake, it won’t freeze the motion of a performer jumping around the stage. For that, you’ll still need a fast shutter speed!

7. Use spot metering

Atari Teenage Riot Concert photography settings
Atari Teenage Riot
Nikon D700 | 50mm | f/1.8 | 1/2500s | ISO 1600

Spot metering limits your camera’s exposure readings to the center of the scene – which allows you to determine the exposure based on a small subject (e.g., a face). It works especially well when your subject and background are differently lit.

When shooting concerts, the artist will often be lit by a spotlight while the rest of the stage remains dark. So here’s what you do:

First, switch your camera to spot metering mode.

Then place the artist’s face in the middle of your viewfinder and memorize the recommended exposure settings.

If you’re using Manual mode, you can dial in the settings, then compose without worrying about fluctuating meter readings. If you’re using Aperture Priority, you’ll need to lock the exposure; that way, you don’t end up with varied exposures as the performers jump around the frame.

If you don’t like spot metering and it’s giving you bad results, you can try your camera’s matrix/evaluative metering mode. The camera will take a light reading at several points in the scene, and this can work – but you’ll want to be on the lookout for overexposed faces, especially when the background is dark.

8. Use the middle autofocus point

Zola Jesus concert photography settings
Zola Jesus
Nikon D700 | 50mm | f/1.8 | 1/200s | ISO 1600

Did you know that different autofocus points feature different levels of accuracy?

It’s true. Peripheral autofocus points tend to work fine in good light, but the performance weakens as the light drops. Whereas the center autofocus point remains effective in both good light and bad.

That’s why I recommend you use the central focus point in low-light situations. It’ll be the most accurate, and it’ll ensure you get the sharpest results, no matter what the artist is doing on stage.

If you don’t want the artist to sit smack-dab in the center of the frame, you’ll need to use a focus-and-recompose technique; simply push your shutter button halfway down to focus on the artist’s face – this will lock focus – then adjust your composition until you get the desired framing. Once you’ve nailed both focus and composition, press the shutter button the rest of the way.

Concert photography settings

Note: To use this focus-and-recompose technique, you’ll need to set your camera to One-Shot AF, also known as AF-S. Otherwise, the camera will focus continuously while you reframe your picture.

(You can also set up back-button focus, which many shooters – myself included! – love. With back-button AF, you use a button on the rear of your camera to lock focus, then use the shutter button to take the shot.)

9. Use Auto White Balance

Skunk Anansie Concert photography settings
Skunk Anansie
Nikon D700 | 85mm | f/3.5 | 1/500s | ISO 1600

White balance combats unwanted color casts in your scene, and it’s important to use if you want good-looking photos.

However, I highly recommend you deal with white balance after taking your photos, during post-processing. So set your camera to Auto White Balance, then ignore the WB setting until you’re back at home.

You see, if you shoot in RAW, the white balance is completely flexible. Whether you determine the white balance setting at the time of capture or whether you wait until you’ve opened up Lightroom days later makes zero difference.

Plus, setting the white balance during a concert is difficult to do, especially when you have different lights flashing all around the stage. So do yourself a favor and leave the white balance setting for another time!

10. Use burst mode

The Prodigy Concert photography settings
The Prodigy
Nikon D800 | 85mm | f/1.8 | 1/320s | ISO 1600

Your camera’s burst mode setting, also referred to as continuous shooting, lets you do rapid-fire photography. With burst mode activated, you can shoot five, ten, or even sixty frames per second, depending on your camera.

And this is hugely helpful in concert photography for two reasons:

  1. If you take several shots in a row, at least one of them will probably turn out sharp even if the others aren’t in focus.
  2. Multiple photos increase your chances of nailing the perfect frame.

Now, I don’t recommend you set your camera to its high-speed continuous shooting mode and use it nonstop. You’ll run out of storage space pretty quickly, plus you’ll just end up with thousands of unnecessary photos.

Korn concert photography settings
Korn
Nikon D700 | 130mm | f/2.8 | 1/250s | ISO 3200

But I do recommend analyzing the situation, then – when you’re ready to capture split-second action shots – turn on burst mode and use it judiciously. Of course, be sure to stock up on memory cards, and be prepared to spend some extra time going through your files when you get home. Even a careful burst-mode shooter will end up with a lot of files at the end of a night, and while you’ll likely end up with some absolute gems, storing and finding them can require real effort.

11. Never use flash

Concert photography settings

This is a quick tip but an important one: Don’t use flash at a concert.

First, you’re not allowed; imagine ten photographers bursting their flashes all at the same time – it’d distract the audience and the musicians.

And straight-flash pictures don’t look great. For good flash photography, you’ll generally need to position your flash off to the side of the artist (i.e., you’ll need an off-camera flash), which isn’t really feasible in a concert setting.

So turn off that flash and rely on careful concert photography settings, such as a high ISO and a wide aperture, for well-exposed files.

12. Consider using a silent shooting mode

Concert photography settings

Concert photography can be enthralling. But while you’re absorbed in capturing the event, the noise of your camera’s shutter can be a distraction for those around you – and you might not even realize it!

This is where your camera’s silent mode can come in handy. You see, many mirrorless cameras, and even some DSLRs, offer silent-shooting options; these are designed for quieter events like weddings and award ceremonies, where it’s essential that the photographer remains as inconspicuous as possible. Turn on silent shooting, and the chatter of your camera will instantly disappear.

Not all concerts require a quiet camera, of course. A heavy-metal band, for instance, will drown out the sound of your camera shutter – but in settings like low-key acoustic concerts or classical performances, the quiet or silent mode can make a huge difference. That way, you can click away without drawing attention, and both the audience and the performers will thank you.

Plus, some cameras offer increased continuous shooting speeds when set to their silent-shooting mode, which allows you to capture more frames in quick succession!

Must-know concert photography settings: final words

Now that you’ve finished this article, you’re well-equipped to capture some stunning concert photos! Whether you’re a beginner or have been shooting concerts for a while, I hope you found these concert settings tips to be both practical and easy to apply.

So the next time you’re out shooting a concert, make sure to dial in the settings I shared. Your photos will instantly improve!

Now over to you:

Which of my recommended settings do you use for concert photography? Do you have any additional settings you love to use for concerts? Share your thoughts in the comments below!

The post 12 Must-Know Camera Settings for Concert Photography appeared first on Digital Photography School. It was authored by Matthias Hombauer.


it's from Digital Photography School https://ift.tt/NQxiag4
via Matthias Hombauer

[Photography] Photography in Bright Sunlight: 14 Easy Tips for Beautiful Results

The post Photography in Bright Sunlight: 14 Easy Tips for Beautiful Results appeared first on Digital Photography School. It was authored by Darren Rowse.

How to capture great photos in bright sunlight

How can you take good pictures in bright sunlight? As you may be aware, shooting on sunny days – especially around noon – can often seem impossible. If you’re not careful, you’ll end up with harshly lit photos that are full of unwanted contrast, blown-out highlights, lens flare, and ugly colors. So what’s a photographer to do?

Fortunately, there are simple methods for doing photography in bright sunlight. You just have to choose your approach carefully – and at times, get a bit creative.

And in this article, I’ll help you navigate the difficulties of direct sunlight and provide tips and tricks to get the best possible shots. I offer 14 practical tips that literally anyone can use to level up their sunlit images, no matter their level of experience.

Bottom line: Whether you’re into portraiture, landscape photography, close-up shooting, street photography, or some other photographic genre, there’s a way to make the sun work for you, so let’s dive right in!

Why is photography in bright sunlight so difficult?

how to photograph in bright sunlight

You’ve probably heard seasoned photographers advise against shooting in direct sunlight. But why is this the case? For starters, bright sunlight is a form of hard light. It creates deep shadows and stark contrast, making it difficult to capture flattering images—whether it’s of people, landscapes, or even flowers. Think about portrait photography at midday. You’ll end up with strong shadows, often in awkward places like under your subject’s chin, thanks to the overhead angle of the sun.

Then there’s the issue of exposure. Hard light makes it challenging to find that sweet spot between too bright and too dark. You’ll often find areas of your shot that are overexposed, washed out, or underexposed and too dark. You won’t just struggle with exposure; even colors can appear less vibrant in bright sunlight. A vivid red rose, for instance, can look surprisingly dull when photographed in harsh sunlight.

Ever seen those circles of light that show up unexpectedly in your photos, like in the shot of the plane below? That’s lens flare. While it can be used intentionally for artistic effect, more often than not, it’s an unwelcome distraction that reduces the overall contrast of your image.

Photography in Bright Sunlight: 14 Easy Tips for Beautiful Results

But fear not! As I explained above, taking good pictures in bright sunlight is very attainable. It just requires a little extra know-how, which leads us to some basic strategies you can employ to improve your sunlit shots:

5 basic strategies for dealing with bright sunlight

So you find yourself outdoors, camera in hand, and the sun is blazing. It’s clear that the light conditions aren’t ideal, but what can you do?

There are five fundamental approaches you can take, each with its own pros and cons. The effectiveness of these strategies will depend on your specific situation, so it’s a good idea to familiarize yourself with all of them and pick different techniques as needed.

1. Diffuse the light

We’ve established that bright sunlight is a hard light source, creating those deep, dramatic shadows. One way to counteract this is to use some kind of diffusion material between the sun and your subject.

Photography in Bright Sunlight: 14 Easy Tips for Beautiful Results

The fabric will disperse the light over a broader area, effectively reducing those problematic shadows and toning down contrast. The end result is a softer, more natural look.

2. Block the light

Photography in Bright Sunlight: 14 Easy Tips for Beautiful Results

Diffusion isn’t always an option; maybe you don’t have the necessary equipment or simply can’t position it effectively. In such cases, blocking the light is your next best bet.

Essentially, you’re looking to shade your subject. This doesn’t mean shoving them under a tree, although that could work. But you could also use objects like a building or even a large umbrella to cast a shadow, which helps to reduce contrast and makes the lighting on your subject more even.

3. Add more light

If you find that the natural sunlight is casting harsh shadows on your subject, why not add your own source of light? This could be an off-camera flash or a reflector that bounces light back onto your subject.

Photography in Bright Sunlight: 14 Easy Tips for Beautiful Results

Sure, it’s a bit tricky – using flash outdoors can feel intimidating, and getting the balance right takes some practice. But when done correctly, this technique can help eliminate those unflattering shadows and give your subject a more balanced, pleasing look.

4. Wait for the light to change

If you have the luxury of waiting, it can be a great strategy. Clouds can act as natural diffusers, and the setting sun offers a softer light that’s easier to work with than the harsh midday sun.

In other words, clouds are your friends here; they soften the light, making your job a whole lot easier. The atmosphere has a similar effect during sunrise and sunset, giving you a softer, more diffused light that’s generally easier to work with.

Photography in Bright Sunlight: 14 Easy Tips for Beautiful Results

5. Embrace the light

Last but not least, why not lean into the challenge? Bright sunlight brings with it deep shadows and high contrast, but those aren’t necessarily bad things. You can use them creatively to make compelling images.

Photography in Bright Sunlight: 14 Easy Tips for Beautiful Results

For instance, stark contrast can actually add a sense of drama to landscapes or make a portrait more intriguing. This approach is all about experimenting, about trying out high-contrast shots and simply appreciating how direct sun renders subjects in a unique way.

How to take good pictures in bright sunlight: tips and tricks

In this section, I offer plenty of detailed, practical guidelines for capturing portraits, street scenes, landscapes, and more – even in the harshest of light!

1. Use a pop-up diffuser

Photography in Bright Sunlight: 14 Easy Tips for Beautiful Results

You may associate diffusers primarily with indoor flash photography, but they’re incredibly useful in outdoor settings as well. A diffuser is essentially a piece of translucent material that scatters light, softening those harsh shadows and reducing contrast. When working with a flash, you can use diffusers in various forms, from white umbrellas to softboxes – but when working outdoors, a standard sheet or a rounded pop-up diffuser will do the trick.

You or an assistant can simply hold the diffuser between the light and your subject, and the result will often feature a natural lighting effect. This technique is particularly useful for portrait and close-up photography, but remember that diffusers do have their limitations; you can’t exactly hold one over a building or a wide landscape!

2. Move into the shade

Photography in Bright Sunlight: 14 Easy Tips for Beautiful Results

The simplest way to take beautiful images in direct sunlight?

Just move into the shade.

Obviously, as with diffuser techniques, this isn’t always feasible – you certainly can’t move an entire seascape! – but with some subjects, heading into the shade is quick and easy. It’s a good solution when shooting portraits, assuming you’re not tied to a particular location.

After all, sometimes the simplest solutions are best!

3. Make your own shade

Photography in Bright Sunlight: 14 Easy Tips for Beautiful Results

For small subjects that aren’t movable – for instance, a small flower in a field – create your own shade!

You have a few different options, some more convenient than others:

  • Block the light with your body
  • Ask an assistant to stand between the subject and the light
  • Hold a piece of cardboard or an umbrella above the subject

Note that some of these options will be more effective depending on the direction of the light (e.g., if the bright sun is directly overhead, it’ll be tough to block it with your own body).

4. Use fill flash

Photography in Bright Sunlight: 14 Easy Tips for Beautiful Results

One of the biggest problems with shooting in direct sunlight is the harsh shadows. For instance, portrait subjects will get unwanted shadows under the chin, flowers will get heavy shadows underneath the petals, and pets will get dark shadows under their head and body.

In general, these harsh shadows look bad, but there’s an easy solution:

Fill flash.

Simply point a flash toward the dark shadows and fire away! Make sure the flash is on a low power setting – after all, you don’t want to make the underside of your subject brighter than its top! – and experiment with different flash angles for the best results.

You also might try putting the sun behind your subject, then using the fill flash to brighten up your subject’s front. It can look really good, though watch out for lens flare.

5. Use a reflector

Want to fill in harsh shadows but don’t like using flash?

You have another easy option:

A reflector.

Reflectors are white or metallic items that bounce light back into darker areas, and they’re really easy to use. Simply point the reflector at the area you want to brighten up, then adjust it until you get some nice fill (by angling the reflector back and forth, you’ll see the reflected light change position, and you can use this “preview” to fine-tune the effect).

portrait with backlight

Note that you can also try the same tactic I mentioned in the previous section, where you position your subject in front of the sun and bounce light back onto their front. A reflector isn’t as powerful as a fill flash, so you’ll need to carefully angle it for maximum effect – but if you get it right, the results will be amazing.

6. Change your perspective

Sometimes, moving your subject into the shade isn’t possible – but moving around your subject can give the same effect.

For instance, if you’re shooting an interesting tree in the forest, you might move to the tree’s other side, you might find an interesting part of the tree that’s shrouded in shadow, or you might get low and shoot up.

bright sunlight looking up at trees

The idea is to observe your subject carefully, looking for ways to maximize shade and minimize bright highlights and annoying contrast.

7. Use a lens hood

Suffering from lens flare?

While flare can be artistic, it can also be very annoying, especially if you’re after a clean, straightforward image.

Fortunately, many lenses come with hoods, which block flare-causing light and keep your photos flare-free.

a lens hood

If you don’t have a lens hood, don’t fret; it’s not that difficult to construct a hood out of cardboard or to use your hand to shield your lens from the sun.

(Just make sure you keep your makeshift lens hood and your hand out of the shot – otherwise, you’ll be doing a lot of cropping in post-production!)

8. Consider using a filter

a filter

Unfortunately, filters don’t offer a magical solution for bright sunlight – there’s no “avoid direct sunlight” filter, at least not currently – but filters can be handy for direct sunlight photography.

For instance, a polarizing filter will help cut down on reflections, plus it’ll help you achieve vibrant colors (including a beautiful blue sky).

And a neutral density filter will reduce the light hitting your camera sensor, allowing for slower shutter speeds and smaller apertures at midday.

(Why might that be useful? Sometimes, you’ll want to shoot with a wide aperture for the shallow depth of field effect, or you’ll want a slow shutter speed to convey motion blur.)

9. Play with your white balance settings

These days, pretty much every digital camera lets you choose between different white balance settings (for instance, you can dial in a white balance preset, such as Cloudy or Daylight, or you can set a custom white balance based on your scene).

Now, you can adjust the white balance later on in post-processing, assuming you’re shooting in RAW. But if you shoot in JPEG, or you simply prefer to get things right in-camera, you’ll want to carefully set your white balance from the start.

How is this helpful for taking good pictures in bright sunlight?

Well, white balances can offer artistic effects that enhance the look of highlights and shadows. A cooler white balance, for instance, can give a neat effect to more monochrome images – while a warm white balance will make bright sunlight appear softer and more inviting.

Photography in Bright Sunlight: 14 Easy Tips for Beautiful Results

10. Use spot metering for the best results

Harsh sunlight makes correct metering tricky. So here’s my advice:

Use spot metering. This will force your camera to expose based on a targeted portion of your scene; you can aim at your main subject, then dial in the recommended exposure settings.

woman in the bright sun

Alternatively, you can spot meter off a midtone in your shot – this will ensure the entire scene is exposed relatively well (as opposed to the former technique, which will ensure you expose for your subject).

After taking an image, check the back of your camera for a preview; you may need to adjust your technique depending on the result. Here, your histogram can be very handy, especially because it’s tough to accurately evaluate an LCD preview in bright sunlight.

Also, if you have the luxury of time, try metering off different parts of the scene while taking multiple shots – that way, you can choose the best option later on.

11. Carefully choose the time of day you shoot

camel silhouette

Most of us don’t have the luxury of sitting around all day waiting for the perfect light.

But heading out an hour or two earlier or waiting until an hour or two later might be feasible – and if that’s manageable, I highly recommend you consider it.

You see, the time of day can dramatically impact your shot. Midday offers unpleasant, harsh light, but if you go out in the early morning or late afternoon, even direct sunlight starts to look good. You’ll lose the unwanted contrast, you’ll lose the ugly shadows, and you’ll get soft, golden light that’ll flatter your subjects.

Make sense?

13. Shoot silhouettes

Photography in Bright Sunlight: 14 Easy Tips for Beautiful Results

As the saying goes:

If you can’t beat ’em, join ’em!

And that applies when photographing subjects in bright sunlight. If the sun is causing you problems, just use it to your advantage; make your subject stand in front of the bright light, then capture stunning silhouettes all day long.

I recommend getting down low (so that you’re shooting against the bright sky). And compose so your subject is clearly defined against the background.

13. Work with the contrast

Contrast might seem like your enemy – but with a bit of creativity, it can be your ally. Consider the realm of street photography, where dynamic light and shadows can create compelling images. A well-placed shadow can add depth and interest to your compositions!

Photography in Bright Sunlight: 14 Easy Tips for Beautiful Results

And in portraiture, a partially shaded face can give off a mysterious or moody vibe. The key is to be intentional with your use of contrast. While this approach may not be suited for every occasion, when done right, it can result in truly captivating shots.

14. Go black and white

If you find yourself struggling with too much contrast and washed-out colors, why not consider a monochrome approach? Black and white photography thrives on the play between light and shadow, making it a strong option when dealing with bright sunlight.

Photography in Bright Sunlight: 14 Easy Tips for Beautiful Results

You don’t have to commit to black and white from the outset, especially if you’re shooting in RAW format (and you definitely should be!). Just capture your images and later convert them to monochrome during post-processing. You might discover that the highlights and shadows actually improve your compositions!

How to take good pictures in bright sunlight: final words

Navigating the challenges of bright sunlight in photography may seem daunting at first, but with the right techniques in your arsenal, you can transform your struggles into opportunities.

From utilizing diffusers and embracing contrast to even venturing into the world of black and white, there’s a range of options available to help you capture stunning images, regardless of the sun’s position.

Photography in Bright Sunlight: 14 Easy Tips for Beautiful Results

So the next time you find yourself squinting against the glaring sun, camera in hand, don’t shy away. Instead, remember these tips and turn that harsh light into your creative playground!

Now over to you:

Do you struggle to shoot in bright sunlight? Do you have any tips or tricks for dealing with these issues? Share your thoughts (and images) in the comments below.

The post Photography in Bright Sunlight: 14 Easy Tips for Beautiful Results appeared first on Digital Photography School. It was authored by Darren Rowse.


it's from Digital Photography School https://ift.tt/6uE8Io7
via Darren Rowse