Apr 30, 2022

[Photography] Lifestyle Photography: 4 Tips for Incredible Images of the Everyday

The post Lifestyle Photography: 4 Tips for Incredible Images of the Everyday appeared first on Digital Photography School. It was authored by Melinda Smith.

tips for beautiful lifestyle photography

Lifestyle photography is a lot of fun, but how can you get started capturing beautiful lifestyle photos?

In this article, I explain what lifestyle photography actually is; I then share my top tips for these “day-in-the-life” images, including planning advice, composition techniques, and a simple way to create more meaningful lifestyle shots.

I also illustrate the entire article with lifestyle shots of a single family; that way, you can get a sense of what to expect from your own photoshoots!

Let’s dive right in.

What is lifestyle photography?

Lifestyle photography features slice-of-life images. It is the photography of people’s lives over the course of a normal day.

Lifestyle photographers love documenting the day-to-day lives of families, students, and children. They make beautiful photos out of real-life events – the everyday stuff we often forget to treasure.

Some lifestyle photography features moments that are perfect and gorgeous, and other lifestyle photography contains moments that are more ordinary and sometimes even unattractive. Personally, I love moments of all kinds, and I like to look for the beauty in everything.

4 lifestyle photography tips

Want to capture stunning lifestyle shots? Here are my four best tips to help you out:

1. Set yourself up for success

tips for beautiful lifestyle photography

If you decide to do a lifestyle session and just show up without a plan, you may get exactly what you planned for: nothing.

On the other hand, with a bit of careful planning, you can dramatically increase your lifestyle photography successes. Your images will be far more meaningful, plus they’ll often feature lots of interaction between family members (always a good thing!).

Here’s my advice:

Before you conduct a family lifestyle photoshoot, ask your clients to tell you some of the things they enjoy doing together as a group.

Then pick a handful of possibilities that photograph well – here, you’ll need to use your judgment – and that best represent the family’s life.

There are so many scenarios that can be planned and prepared! You could have the family bake cookies or go for a picnic in the park. And if the family loves the outdoors, a hike might be the perfect thing to shoot. It’s really all about the family’s interests.

In one of my recent sessions, I took photographs of the family snack time as the kids helped prepare and then ate the peanut butter and apples. I also took a few photographs of the kids jumping on the trampoline, and then came inside while the family played games together. I ended the session with something the family does every single day: reading scripture and praying as a family.

It was important to me that I capture the essence of the family, so we planned the right activities in advance. That’s how I got shots like this one:

tips for beautiful lifestyle photography

By the way, families definitely aren’t the only good subjects for lifestyle photography. A group of tweens painting fingernails together or kids playing a game of basketball could make for great lifestyle sessions, too. A day in the life of a college student or a documentary-style session with an elementary school teacher could also be amazing.

Just make sure you do plenty of planning – so that you can capture your subjects in action, doing the things they love.

Pro tip: It can be helpful to create a shot list, but don’t get too attached to it. If all the things on your list don’t happen, don’t fret, but you can always rely on the list if you’re struggling to get good images.

2. Be ready for the unexpected

If you’ve followed the previous tip, you’ve planned and prepared for your lifestyle photography photoshoot…

…but you should also loosen up and go with the flow. If you try to manage every moment, or even if you direct your subjects too much, you’ll lose the authenticity of a lifestyle session. Things just happen during your time together, and those things are what often make the most memorable photos.

For instance, before I took the photo displayed below, the little one got quite upset over something that happened in the game she was playing and had to go to time-out. Although it wasn’t her finest moment and she probably didn’t enjoy it very much, I’m pretty sure this photo will be one that she loves when she grows up (and that her parents will cherish forever).

tips for beautiful lifestyle photography

Moments like that aren’t on a shot list. You can’t predict them, but you do need to be ready to capture them and include them as part of your photographic story. You may even have days where you don’t capture the one thing you had planned, and nothing on your shot list is even available to shoot, and that’s okay! When that happens, just go with the flow, and know that you may create something even better than you could have planned.

Bottom line: If you have a calm mindset, and you know that you are prepared but that you are also ready to roll with the punches, you’ll be just fine.

3. Capture the little details

tips for beautiful lifestyle photography

Beginner lifestyle photographers often focus on the “big” events: major interactions between family members, scene-setting shots of subjects in their home, and people engaging in hobbies.

But while these big events matter, I encourage you to aim for compositional variety. Seek out the small moments, too, even if they don’t include faces or human subjects. These little moments will help tell the story even if they’re not especially interesting on their own, and they’ll create a more meaningful set of photos for your clients.

Therefore, as you approach each lifestyle scene, consider first taking the “big” shots that show off all the participants and their surroundings. This will provide context, and it’ll help your viewer understand what’s going on.

But then, once you’ve captured the wider shots, grab a telephoto or macro lens and break things down. Shoot a close-up of one or two people interacting, a close-up of faces, or a close-up of an activity.

And if you like this close-up breakdown idea, you could go even further and take shots of little objects and details, such as a stack of books on a chair, or a hand holding a pencil.

tips for beautiful lifestyle photography

As you capture these little details, you’ll enrich the story by showing the emotions and objects that are most important to your subject.

One piece of advice, however: Be careful not to get too sidetracked. If you start photographing anything and everything that is in the room, the story will become muddy, and it won’t be clear what you are trying to portray. Have a clear vision of the story you are telling, and maintain that focus as you shoot.

4. Shoot from different perspectives

When doing lifestyle photography, it’s easy to get stuck shooting eye-level images; in fact, many photographers do this without ever noticing.

But while eye-level lifestyle images often look nice, and you should definitely capture some images from an eye-level perspective, you can get even better shots by adjusting your position.

In particular, I’d recommend you consider:

  • The camera’s height
  • The camera’s distance from the subject

By getting up high and shooting down from above, you can create a scene-setting shot that viewers wouldn’t normally expect (and that your clients wouldn’t otherwise see!).

tips for beautiful lifestyle photography

And by getting down low, you can show the world from the perspective of a child; the result can be wonderfully intimate.

I’d also recommend considering the space between your camera and your subjects. Certain interactions, such as a mother doing her daughter’s hair, are enhanced by a close-up perspective:

tips for beautiful lifestyle photography

While other activities, such as a family praying, are often best captured from a distance:

tips for beautiful lifestyle photography

If you’re working from far away, try adding in foreground objects such as curtains or stair railings. These foreground items can make the viewer feel like they’re really seeing into the heart of someone’s life, which can be very powerful.

What if you’re not sure which type of perspective works best? Just experiment. Move closer, move back, move around. Be creative. There’s nothing wrong with taking extra shots!

Lifestyle photography tips: final words

Well, there you have it:

My best tips for beautiful lifestyle photos.

Hopefully, you now feel better equipped to capture stunning images – and the next time you have a photo session, be sure to remember my advice.

Of course, you should also have plenty of fun!

Now over to you:

Which of these tips do you plan to use in your lifestyle photography? Do you have any lifestyle shots that you’re proud of? Share your thoughts and photos in the comments below!

The post Lifestyle Photography: 4 Tips for Incredible Images of the Everyday appeared first on Digital Photography School. It was authored by Melinda Smith.


it's from Digital Photography School https://ift.tt/l2vmux7
via Melinda Smith

Apr 29, 2022

[Photography] dPS Weekly Challenge – Insects

The post dPS Weekly Challenge – Insects appeared first on Digital Photography School. It was authored by Sime.

Those creepy crawly critters in your garden / under a rock / in a tree / at the park – you can find an insect pretty much anywhere, BUT, can you photograph it? This one will be challenging – do your best, flex your photo taking muscles and see what you come up with!

Here’s a helpful article for you on photographing insects!

Share your photo on social media with the hashtag #dPSWeeklyChallenge and #dPSInsects

dPS Weekly Challenge – Insects
Photo by Sue Thomas on Unsplash
dPS Weekly Challenge – Insects
Photo by USGS on Unsplash

Share your photograph in the comments, remember, this is about challenging yourself to take a NEW photo!

The post dPS Weekly Challenge – Insects appeared first on Digital Photography School. It was authored by Sime.


it's from Digital Photography School https://ift.tt/RkSC2ch
via Sime

[Photography] Canon to Release the EOS R7 in 2022

The post Canon to Release the EOS R7 in 2022 appeared first on Digital Photography School. It was authored by Jaymes Dempsey.

Canon to release the EOS R7 in 2022

For years, news and rumor sites have teased the possibility of the Canon EOS R7 – a mirrorless camera that would combine Canon’s powerful RF-mount technology and an APS-C sensor for a lightning-fast, pro-level camera.

But others have claimed that the RF mount, currently exclusive to Canon’s full-frame cameras, will never enter the APS-C arena. Canon already offers APS-C mirrorless bodies, the argument goes. Why create a new product that will compete with Canon’s EOS-M lineup?

We now have a definitive response, at least according to the reliable Canon Rumors:

The EOS R7 is real, both in concept and in name.

And it’ll launch sometime in 2022.

“We have confirmed that the camera will be called the ‘EOS R7,'” Canon Rumors writes, “and it will come this year, Q4 being most likely.”

As CR notes, Canon frequently unveils cameras in the late summer and early fall; the Canon EOS R, Canon’s first RF-mount camera, dropped in October of 2018, while Canon’s flagship camera, the EOS R3, was announced in September of 2021.

While CR doesn’t offer any confirmed EOS R7 specs, the camera’s name likely hearkens back to the Canon EOS 7D and 7D Mark II, a popular DSLR duo that catered to serious – even professional – wildlife, bird, and sports photographers. The EOS 7D debuted back in 2009 and offered everything you’d expect from a competitive action camera: snappy autofocus, an unusually rugged frame, and fast (for the time) continuous shooting speeds. The 7D Mark II also added dual card slots, essential for professionals who require instant image backup.

An EOS R7 made in the spirit of the 7D should adopt most or all of these features. CR shares a few specs, labeled as “rumored and unconfirmed,” including:

  • A 32 MP APS-C sensor (with BSI technology for improved low-light performance)
  • 20 frames-per-second continuous shooting, on par with the pro-level EOS R5 and EOS R6
  • 4K/60p video
  • Dual card slots

I’d also expect to see in-body image stabilization, which Canon has included in each of its latest RF-mount cameras, and is a major feature for photographers seeking to handhold large telephoto lenses in low-light situations.

But the most exciting aspect of the EOS R7 is, of course, the RF mount. Canon’s RF lens lineup is growing fast (a company report promises dozens of new lenses over the next handful of years), and an APS-C EOS R7 will likely be compatible with every RF lens, including several pro-level telephoto primes and zooms. Thanks to the APS-C crop factor, Canon’s lenses will reach focal lengths (or equivalent focal lengths) like never before. Want to shoot an f/2.8 lens at 640mm? Grab the 400mm f/2.8; when mounted on the EOS R7, you’ll have a 600mm+ field of view. Want to shoot at 1200mm? Grab the EOS R7 and the 800mm f/11.

Bottom line:

The EOS R7 is coming, bringing with it a unique set of high-level features. So if you’re a sports photographer, wildlife photographer, or action photographer, keep an eye out for an R7 announcement this fall!

Now over to you:

What do you think about the Canon EOS R7? What do you hope the camera offers? Share your thoughts in the comments below!

The post Canon to Release the EOS R7 in 2022 appeared first on Digital Photography School. It was authored by Jaymes Dempsey.


it's from Digital Photography School https://ift.tt/uhJarlH
via Jaymes Dempsey

Apr 28, 2022

[Photography] 8 Tips to Improve Your Architectural Detail Photography

The post 8 Tips to Improve Your Architectural Detail Photography appeared first on Digital Photography School. It was authored by John McIntire.

tips for beautiful photos of architectural details

When doing architectural photography, it’s easy to get lost in the grandeur of buildings – yet the details matter, too. In fact, with a bit of know-how, you can capture architectural detail photography that looks as good, if not better, than expansive, wide-angle shots of structures.

I love photographing architectural details, and in this article, I explain how you can capture great detail shots of your own. I include plenty of my favorite tips, tricks, and techniques – developed over long hours of practice – with a focus on two essential architectural photography elements: lighting and composition.

By the time you’re done reading, you’ll be itching to grab your camera and shoot some details!

1. Seek out soft light to emphasize details

If the weather is poor and the sky is a drab, colorless grey, you should stay inside, right? Wrong!

Cloudy weather might seem bad for architectural photography, but nothing could be further from the truth. You see, overcast days provide incredibly soft light that looks great in architectural shots – especially all the little details that photographers tend to neglect.

In fact, the soft light actually brings out all the little details that are lost in high-contrast lighting, allowing you to create highly descriptive, intricate shots of roofs, building edges, inscriptions, and more.

Soft light is also great for bringing out colors; look at how the greens and yellows pop in this next shot:

architectural detail photography

Even if you’re photographing on a sunny day, you can still find soft light. Either wait for a cloud to pass over the sun, or keep an eye out for photo opportunities in shade. While shaded light often isn’t quite as soft and lovely as cloudy light, it can still look great:

architectural detail photography

One final tip: If you want to create architectural detail shots that are sharp throughout, you’ll definitely need a tripod. Soft light, while beautiful, is not strong, and you’ll be forced to drop your shutter speed for sufficient depth of field. I don’t recommend handholding your camera in such situations; instead, bring along that tripod, use a remote shutter release, and capture some tack-sharp images.

2. Use intense sidelighting

Cloudy light is great for highly detailed images, but what if you’re after more intense, shadowy, even abstract shots?

That’s when sidelight comes in handy.

No, it won’t show off intricate detail, but it will let you turn details into fine art masterpieces by emphasizing texture and shape:

architectural detail photography

For the best sidelight, shoot on a sunny morning or afternoon. Note the position of the sun, then search for subjects that are illuminated from the side (plus or minus a handful of degrees!). Don’t be afraid to underexpose your shadows or blow out your highlights – the look can add to the abstract effect – but be careful; you don’t want to take the high-contrast look too far.

3. Look for highlights and shadows

Sometimes, the best architectural detail photography focuses less on building details…

…and more on the way the light falls on the building. For instance, late afternoon light can create interesting shadows, which you can turn into powerful abstract subjects. Look at how I created a composition using only the shadows on these steps:

architectural detail photography

That’s why I recommend you always pay close attention to the sun, its position in the sky, and how it’s falling on the scene. As soon as you notice some interesting shadows or highlights, get closer. Consider how you might incorporate them into a powerful image. And test out different camera angles and framings until you get an architectural composition you like!

For the best results, by the way, I recommend heading out when the sky is clear and the sun is strong. High noon will offer plenty of intense shadows, while morning and afternoon feature softer, but no less interesting, shadows of their own.

4. Look for patterns in the architecture

My favorite thing about photographing architectural details is the wealth of compositional possibilities. Human-made structures are full of patterns and shapes, and with a bit of work, you can exploit these to create incredible photos!

For the most powerful images, I recommend you slap on a telephoto lens, then – when you find an interesting pattern – zoom in to fill the frame. Make sure you pay careful attention to the aperture and depth of field; while there’s no single best approach, you should think about your different options and choose the settings that fit your vision.

For this architectural detail image, I used a narrow aperture to achieve a deep depth of field:

architectural detail photography

Note how the entire pattern is sharp, from the window in the front right to the window in the back left.

On the other hand, a shallow depth of field effect, while more unorthodox, can work great, too:

architectural detail photography

5. Look for reflections

The world offers picturesque buildings, yes – but it’s also full of drab and ugly structures, and if you ask most photographers, these are rarely worth capturing.

But ugly architecture does, in fact, offer plenty to shoot! You just have to get a little creative.

Here’s what I recommend:

If you’re faced with a drab building, look around. See if you can find any reflective surfaces nearby (ideally across the street), such as windows or car hoods. Then get close to the surfaces and play with different angles, trying to reflect the ugly building. I’d also recommend testing out different points of focus; by focusing on the reflective surface itself, you’ll get one shot, but by focusing on the reflected buildings, you’ll get a completely different result.

With a little luck, you’ll find an interesting composition, you’ll find the right point of focus, and you’ll manage to capture a stunning shot. Even boring buildings look great with a cool reflection effect!

architectural detail photography

6. Photograph light fixtures

Architectural detail photography isn’t just about the buildings.

You see, exterior details make for great subjects too, and one of my absolute favorite items to shoot is the humble light fixture:

architectural detail photography

Nobody pays attention to light fixtures, yet they often offer beautiful colors, powerful shapes, compelling lines, and – when shot at night – a lovely golden glow.

Don’t just stick to light fixtures, by the way. Once you’ve checked out all the lights on a building, search for other interesting items, such as signs, security cameras, door handles, and gates.

Pro tip: To capture stunning shots of fixtures, you’ll want to use a telephoto lens; many fixtures are located too far off the ground to emphasize with a wide focal length. And if you plan to capture especially small subjects – such as intricate carvings on a door handle – try working with a macro lens.

7. Don’t forget about statues!

Architectural photographers rarely pay attention to statues – yet these are a key part of many buildings and monuments. The Charles Bridge in Prague, for instance, features 30 large, detailed, statues that beg to be photographed.

architectural detail photography

So don’t skip the statue photography! Plus, it’s a lot of fun, especially when you start trying out different approaches and techniques.

You can get down low to frame the statue against the sky, or you can find a vantage point and shoot down, or you can shoot on a level with the statue. Make sure you pay careful attention to the lighting, too; sidelight will emphasize texture, cloudy light will bring out details, and backlight will create beautiful flare and/or silhouette effects.

Finally, be sure to vary your focal lengths. You can zoom out to capture a statue in its entirety, but you can also zoom in tight and focus on heads, edges, gestures, and other details:

architectural detail photography

8. Convert to black and white

Architectural detail shots are often based on strong compositions.

And by stripping the color out of a shot, you can emphasize the composition while letting distracting elements recede.

That’s why I highly recommend you convert your architectural detail photos to black and white. (This move tends to work well if your compositions are full of texture or strong patterns.)

Of course, not all detail shots will look good in black and white, and that’s okay. You can do this conversion in Lightroom or Photoshop, and then, if you don’t like the result, simply undo the adjustment.

But in my experience, your monochrome photos will often turn out great!

architectural detail photography

Architectural detail photography tips: final words

Now that you’ve finished this article, you know how to work with light. You know how to create beautiful compositions. And you know how to discover interesting subjects.

In other words, you’re ready to capture some stunning architecture photography!

So head out with your camera. Use these tips. And take great photos!

Now over to you:

Which of these architectural detail photography tips is your favorite? Which do you plan to use? Share your thoughts in the comments below!

Table of contents

Architectural Photography

The post 8 Tips to Improve Your Architectural Detail Photography appeared first on Digital Photography School. It was authored by John McIntire.


it's from Digital Photography School https://ift.tt/iZfDaFl
via John McIntire

Apr 27, 2022

[Photography] How to Create an Infrared Effect in Photoshop (Step by Step)

The post How to Create an Infrared Effect in Photoshop (Step by Step) appeared first on Digital Photography School. It was authored by Megan Kennedy.

how to create an infrared effect in Photoshop

Looking to create a beautiful infrared effect in Photoshop, but you’re not sure how to start? You’ve come to the right place.

In this article, I explain everything you need to know about Photoshop infrared effects, including a simple, step-by-step plan that anyone can use to go from an image like this:

how to create an infrared effect in Photoshop

To an image like this:

how to create an infrared effect in Photoshop

I also include several infrared photography examples, so you know exactly what to expect!

Let’s dive right in, starting with:

What is a Photoshop infrared effect?

Infrared photography is all about capturing infrared light with a camera – but doing real live infrared photography is cumbersome, not to mention expensive. You need a special camera, special filters, or special film, and the process can be finicky.

However, infrared photography creates a very specific look, which you can replicate in Photoshop. No, you won’t be producing true infrared photos, but you’ll be creating a realistic infrared effect:

how to create an infrared effect in Photoshop

As you can see in the image above, the infrared effect looks both very red and very surreal. Why is this? In basic terms, anything that reflects a lot of infrared light will appear red in an infrared image, and photosynthetic organic matter – such as vegetation – reflects a lot of infrared light. So trees, plants, and grass turn red, which is why IR photography is so popular among landscape photographers; it’s a way to capture unique shots of more standard subjects.

how to create an infrared effect in Photoshop

How to create an infrared effect in Photoshop: A step-by-step approach

In this section, I show you how to mimic the distinct surrealistic effect of in-camera IR photography. Note that you will need Photoshop (or an equivalent program, like Affinity Photo) to produce the infrared effect. You cannot create a similar look in Lightroom, Luminar, or many other RAW editors (at least as far as I know!).

how to create an infrared effect in Photoshop

Step 1: Pick your image and open it in Photoshop

First, you must select an image for the infrared treatment.

Not every image is suitable for an infrared Photoshop conversion. As I mentioned above, photosynthetic organic matter – trees, bushes, grass – all work great for infrared conversions, but other landscape subjects, including mountainscapes and seascapes, tend to produce lackluster results.

Of course, you don’t always need an ultra-powerful IR conversion. Subtler infrared images can look nice, too, so if you like the idea of a more restrained effect, simply pick an image with less greenery. Sometimes, less can be more!

(By the way, if you convert an image and you don’t like the result, or you don’t see much change, that’s okay; you can always find another image and try again!)

Next, open your file in Adobe Photoshop. If Photoshop is already open, you can tap File>Open, then browse for your image.

Step 2: Duplicate your image layer

Once your image is open in Photoshop, you’ll see it as a layer in the Layers palette. Make sure that the image layer is selected, then tap Layer>Duplicate Layer or use the shortcut Ctrl/Cmd + J.

Double-click on the new layer name, and type in Infrared:

how to create an infrared effect in Photoshop

Step 3: Invert the new layer

Next, you’ll need to invert the colors of your “Infrared” layer (while the original image – the bottom layer – remains untouched).

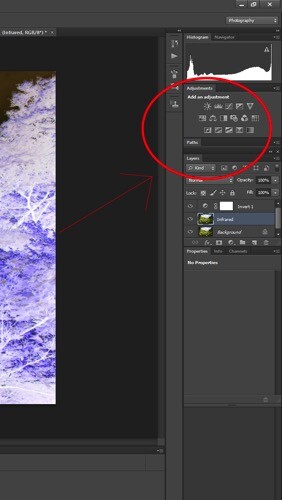
Select the Invert adjustment layer, which should be located in the Adjustments panel:

how to create an infrared effect in Photoshop

The layer will instantly invert, creating an image just like a color negative:

how to create an infrared effect in Photoshop

Step 4: Use blending modes to adjust the image tones

Next, select the Invert adjustment layer in the Layers palette, then change the blending mode to Color:

how to create an infrared effect in Photoshop

This will prevent the Invert adjustment layer from affecting the image tones but will allow the color adjustments to shine through. Your image should now have a nice orange and blue tone:

how to create an infrared effect in Photoshop

Step 4: Adjust the colors with the Channel Mixer

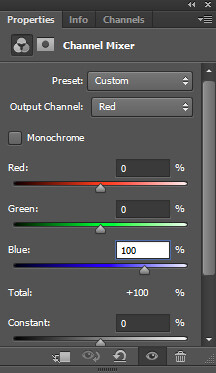
Now it’s time to really dive in and mess with your image colors! Create a Channel Mixer adjustment layer by selecting the Channel Mixer icon from the Adjustments panel. You’ll see a Channel Mixer panel appear:

how to create an infrared effect in Photoshop

Set the output channel to Red (see above) and move the Red slider to 0. Move the Blue slider to +100.

Then set the output channel to Blue. Boost the Red slider to +100 and move the Blue slider to 0:

how to create an infrared effect in Photoshop

Change the output channel to Green. Here, you probably won’t need to make any changes; just check to be sure the Green slider is set to +100:

how to create an infrared effect in Photoshop

The image will now look a lot more natural (though still quite surreal!). Oranges will look bluer, while purples will look redder:

how to create an infrared effect in Photoshop

Step 5: Adjust hues and saturation

This step is going to vary depending on the photo you selected, but the overall goal is the same: isolating the pink/red colors and converting them to white/yellow colors.

Create a Hue/Saturation layer, then select the Reds:

how to create an infrared effect in Photoshop

Decrease the Saturation slider until the result is almost gray.

Next, adjust the Hue slider, watching the image carefully until you get a hint of yellow. At that point, you can move on to the next step, though feel free to play around with the other channels until you get a result you like. My example image now looks more faded and subtle:


12Afterhuesaturation

Step 6: Add some finishing touches

You’ve already created an infrared effect in Photoshop, but if you want to refine your image further, then go wild! You might consider adding a vignette, shifting the colors around further with another Hue/Saturation or even a Color Balance layer, or adding a Photo Filter to produce a filmic effect.

You can also use a Curves adjustment to boost image contrast; that’s what I did to get this result:

how to create an infrared effect in Photoshop

Then save the image as a JPEG, and you’re done!

Photoshop infrared conversion examples

Now that you know how to create an infrared effect in Photoshop, I’d like to share a few examples of my own conversion efforts.

This next image started out with barely any blue tones, so the final version looked rather monochromatic and subtly yellow:

how to create an infrared effect in Photoshop

Inorganic material isn’t often as affected by the IR treatment, so only the grass and plants in this next image took on a surreal hue:

how to create an infrared effect in Photoshop

How to create an infrared effect in Photoshop: final words

Well, there you have it:

Simple, step-by-step instructions for a stunning Photoshop infrared effect!

Once you’ve gone through the process a few times, it’ll become pretty fast, and you can have fun testing it out on all of your photos!

So open Photoshop, find a nice shot or two, then do some of that infrared Photoshop wizardry!

Now over to you:

What type of images do you plan to convert in Photoshop? Share your thoughts – and photos! – in the comments below.

The post How to Create an Infrared Effect in Photoshop (Step by Step) appeared first on Digital Photography School. It was authored by Megan Kennedy.


it's from Digital Photography School https://ift.tt/GhHTzS3
via Megan Kennedy