Hey! it’s Simon here, I’m our support guy and I look after the dPS Facebook group. This weekend I’ve slipped in to have a go at the weekly challenge as our ed, Caz, is off having a well-deserved break!
What I’ve chosen for this week’s theme is ‘Re-Edit’ and by that, I mean going into wherever you keep your photos and re-editing one in Photoshop or Gimp or PSP or whatever you use! Choose a photograph, change it with a re-edit, see what you can make it into and share it! (Details on how and where to share at the end of this post)
My Cuban Street Scene – The OriginalMy Cuban Street Scene – The Re-edit
The photograph can be of anything you desire, and for extra points, you can share the original and the re-edit if you’d like to. By way of example, you can see my original Cuban street scene above, and I’ve gone ahead and re-edited into a grungy black&white, I’ve done the same again with my Melbourne sunset below, and after its re-edit.
Melbourne Skyline – The sunsetMelbourne Skyline – The Re-edit
Great! Where do I upload my photos?
Simply upload your shot into the comment field (look for the little camera icon in the Disqus comments section) and they’ll get embedded for us all to see. Or, if you’d prefer, upload them to your favourite photo-sharing site and leave the link to them. We’re interested to see how you revisit the images that you’ve taken before now in this re-edit challenge!
Share in the dPS Facebook Group
You can also share your images in the dPS Facebook group as the challenge is posted there each week as well.
If you tag your photos on Flickr, Instagram, Twitter or other sites – tag them as #DPSReEdit to help others find them. Linking back to this page might also help others know what you’re doing so that they can share in the fun.
Most of all, have fun, check out other people’s photographs and encourage each other! Thanks for having me! — S
It is arguable that the most important part of a portrait is your subject’s eyes. While there is a case or two in which this might not be true, for the most part, the eyes are the focal point of portraits. This is because, when we interact with people on a one-to-one basis, it’s the eyes that we use to interact with one another.
As a photographer, it’s vital that you are able to present your subject’s eyes as the focal point in your images. One key way to do this is through the deliberate use and manipulation of catchlights. Catchlights in portraiture are the reflection(s) of your light source(s) that appear in the eyes.
This article will discuss why catchlights are important, how to make use of them, and how to manipulate them to your benefit. It will also discuss several ways to help you to include catchlights in your portraiture.
What are catchlights?
Catchlights are the reflection of the light source in your subject’s eyes.
As mentioned above, catchlights are the reflections of your light source as they appear in your subject’s eyes. It doesn’t matter if you are using natural light or flash; if there is light going directly into your subject’s eyes, there will be a catchlight.
In terms of photography, this is important because the presence of a catchlight in portraiture means that the detail in your subject’s eye will be revealed in the final images. If there is no detail in the eyes, it will be that much more difficult for your viewers to engage with the subject. You’ve probably heard of the term dead-eyes before. That’s what this is referring to.
Ensuring you have a catchlight
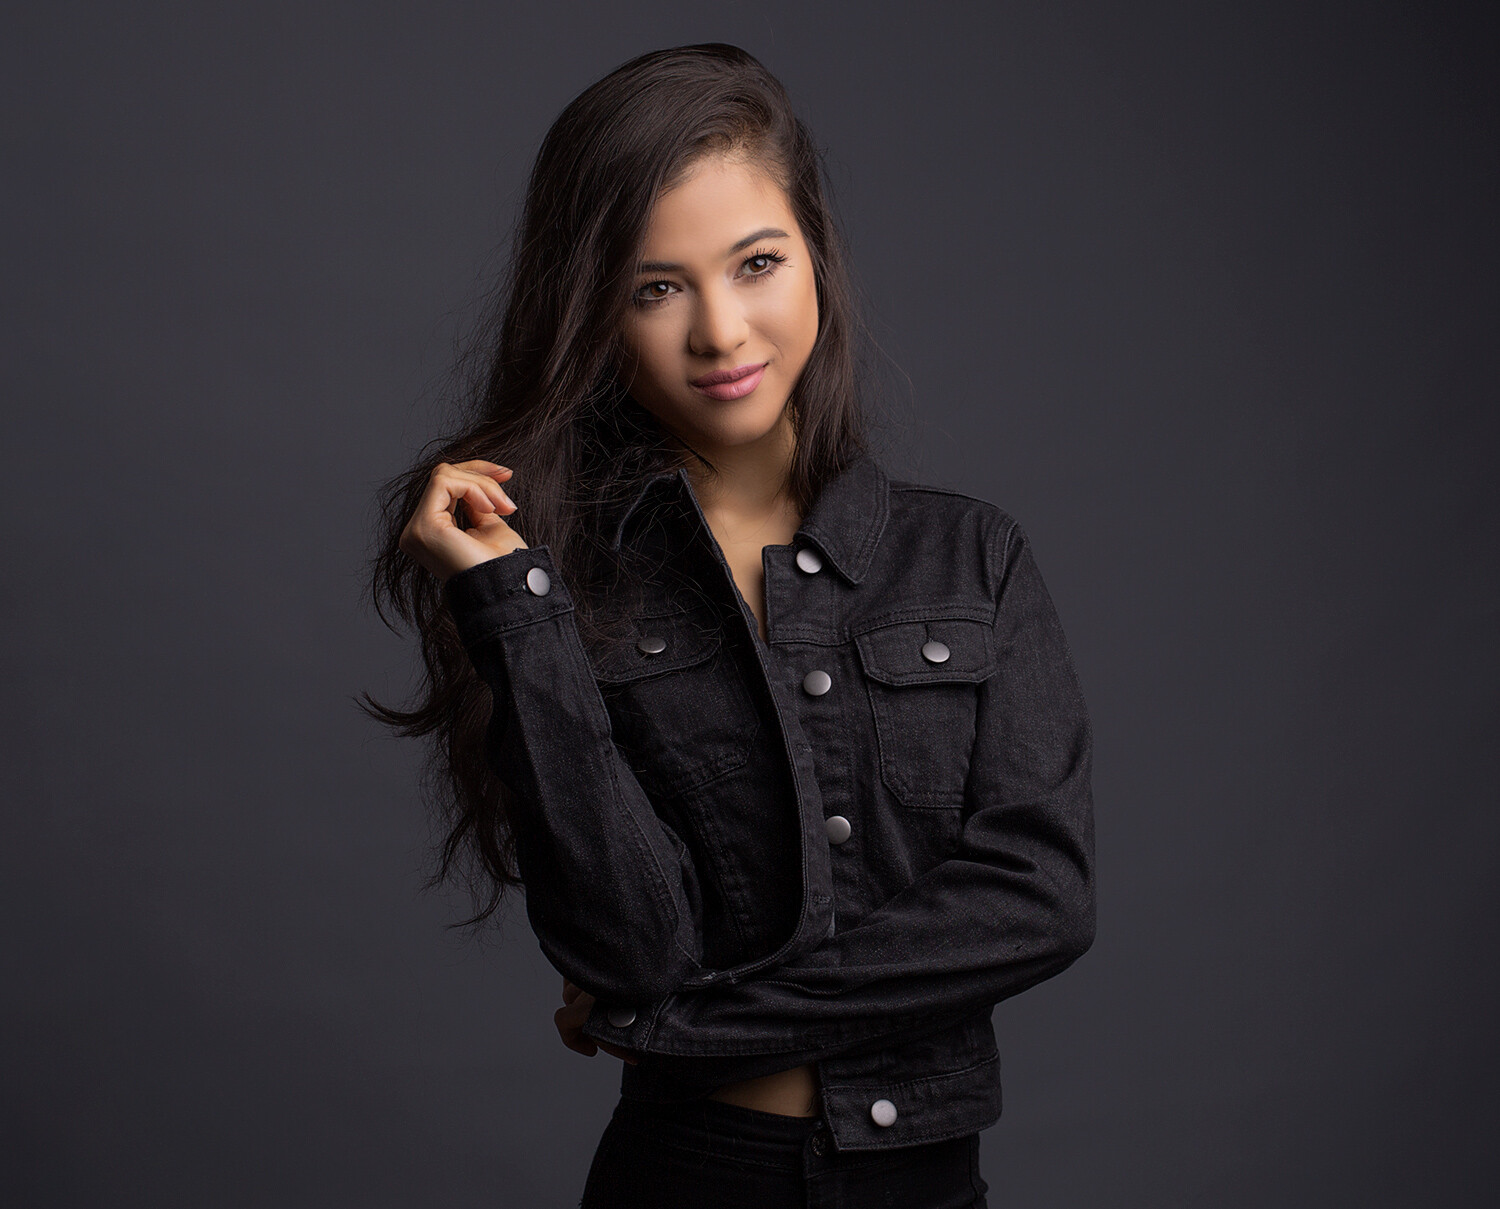
Making sure that your catchlights are a prominent feature in your subject’s eyes can help you to create more evocative portraits. Canon 5D Mark III | Canon EF 50mm f/2.5 Macro | 50mm | 1/125 sec | f/5 | ISO 100
If your goal is to create a catchlight in your portraits, the easiest way to do it is to ensure that your key light is pointed directly into your subject’s eyes. Because your key light will be the brightest light source in your frame, this will help to ensure that the catchlight is as bright as possible, making sure that it stands out.
If you are using natural light, or studio lighting with a modeling light, you will be able to see the catchlights in your subject’s eyes before you take the picture. All you have to do to ensure a catchlight is direct your subject’s pose until you can see the catchlight. If you are using a light source without a modeling light, you will have to be more careful. Take a test shot and review it on the back of your camera to see what’s going on, then guide your subject from there.
Placement
Ensuring that the main catchlight is at the top of your subject’s eye is a great starting point. This is a natural place for the catchlight to sit and leaves most of the eye unobscured. Canon 5D Mark III | Canon EF 50mm f/2.5 Macro | 50mm | 1/60 sec | f/5.0 | ISO 100
To help ensure more natural results, it can help for you to light your subject from above. This has a few effects. The first of these is that it places the catchlight at the top of your subject’s eye, just as it would be if they were outdoors and being lit by the sun. Also, having the catchlight at the top of the eye helps to have more of the eye visible in the frame.
If you are using more than one catchlight, the position of the other ones doesn’t matter too much, but putting the main catchlight at the top of the eye is still a good idea.
Big vs small
The size of your catchlight is going to depend on your chosen light source and how far away that light source is from your subject.
The size of the catchlights in your subject’s eye is entirely dependent on the light sources you are using. If you are shooting in the middle of a clear day, the light source will be the naked sun, and it will appear as a small pinprick of a catchlight in your subject’s eye.
If you are shooting on an overcast day, the entire sky becomes your light source. It is not uncommon for the catchlight to appear massive, as a reflection of everything that appears above the horizon. And if you are in a studio using a large octabox close to your subject, your catchlight will be enormous and take up a large portion of the eye.
How big you want your catchlights is entirely up to you. Personally, I prefer them to be somewhere in the middle. Too small and they barely show up in anything wider than a close-up portrait. Too big and they take up far too much of the eye, dominating one of the most important parts of your image.
On occasion, you might hear people saying that catchlights should only ever be small. This is not a rule. Use whatever size catchlight you want.
Bright vs dim
Large light sources close to your subject will result in dimmer catchlights. Smaller light sources will result in brighter catchlights. It doesn’t matter which you choose, but it can help to be aware of it.
Another aspect of catchlights in portraiture that is dictated by the size of the light source is how bright the catchlights appear. Catchlights made by smaller light sources (such as the sun or small studio modifiers) will appear brighter than those made by large light sources (such as an overcast sky or large studio modifiers).
Again, how you use this is entirely up to you. In a close-up portrait where the eyes take up a large portion of the frame, the brightness of the catchlights won’t matter as much. However, in a three-quarter length or full-length shot where the eyes are a much smaller part of the image, you may need catchlights to be brighter so that they stand out more.
Of course, you always have the option of brightening up your catchlights with a bit of dodging and burning afterward, but making the choice at the time of capture can help to save you a lot of time behind the computer.
Doing more with catchlights in portraiture
Beyond the basics of simply placing a catchlight in your subject’s eye, looking out for new and intriguing ways to use catchlights in portraiture can be a fun and rewarding pursuit. There are a lot of different things you can do to try and make your catchlights more exciting and visually interesting. This section will outline a few of these.
1) Add more lights
Adding more lights (that show in your subject’s eyes) is one simple way of changing up the catchlights in your portraits. Canon 5D Mark III | Canon EF 16-35mm f/4L IS USM | 35mm | 1/125 sec | f/5.6 | ISO 100
Simply adding an extra light or two is possibly the easiest way to make your catchlights a little more interesting. Any secondary lighting that you use that is in your subject’s line of sight will usually appear as a second catchlight in their eye.
Here the two fill lights show up as two additional catchlights.
The thing to look out for here is that you don’t go overboard. Having your subject’s entire eye consumed by multiple large catchlights will probably look more disconcerting to your viewer than clever. By all means, experiment, but don’t be afraid to dial it back a notch if you go too far.
2) Use a reflector
The humble white reflector is a great way to add a subtle second catchlight that lifts the brightness of your subject’s eyes. Canon 5D Mark III | Canon EF 16-35mm f/4L IS USM | 35mm | 1/125 sec | f/14 | ISO 100
Adding a simple white reflector as fill can help to lift your subject’s eyes with a catchlight of its own. This will usually result in a subtler effect, but it can lead to much brighter and more vivid eyes in your images.
Here you can see just how much the reflector is doing.
3) Try different lighting patterns
Some lighting patterns like clamshell lighting make for really interesting catchlights. Canon 5D Mark III | Canon EF 50mm f/2.5 Macro | 50mm | 1/100 sec | f/9 | ISO 100
Using lighting patterns that require multiple light sources can provide interesting catchlights as well. Cross lighting and clamshell lighting are two patterns in particular that can create interesting effects. Both of these patterns only require two lights as well.
Here you can see the effect that clamshell lighting has on the subject’s eyes.
4) Use novelty light sources
Ring lights and other novelty light sources produce unique catchlights that can be used for visual interest. Canon 5D Mark III | Canon EF 50mm f/2.5 Macro | 50mm | 1/60 sec | f/8 | ISO 1000
There are fair few interesting lighting options on the market that provide unique catchlights. The most prominent of these is the ring light. Ring lights provide on-axis lighting for your subject as you put your camera through the aperture of the ring. The catchlight appears as a ring in your subject’s eyes.
These lights, and other lights like them, are fun to use and can help you achieve interesting lighting in your portraits.
Here, you can see the distinct ring shape of the catchlight made by a continuous ring light.
One caveat for these novelty light sources: While a lot of people really love the effect they produce, a lot of people really hate it, and are very vocal about how much they hate it. Depending on the purpose and the audience of your images, novelty light sources may not be the right choice.
The end
Taking control of your catchlights can be a great way to help you get the most out of your portrait photography. Hopefully, you see how easy and impactful this can be. It’s also a lot of fun.
Chasing catchlights in portraiture can lead you to a lot of interesting scenarios and lighting setups that you may not find, or come up with, by other means.
When it comes to photography, timing can be everything. Whether you are photographing a high-speed car or a static landscape, knowing when to press the shutter button is all-important. But the average human reaction time to a visual stimulus is 0.25 seconds, making photographs of brief opportunities somewhat difficult. Fortunately, when frantically depressing the shutter button just doesn’t cut it, there’s burst mode.
Let’s take a speedy look at burst mode, and how it can benefit your photography.
Burst mode is great for capturing fast-moving subjects. 1/250s | f/9 | ISO 160
What is burst mode?
Burst mode is also known as continuous shooting mode or continuous high-speed mode. It’s a camera function that allows you to make a series of photographs in quick succession. With burst mode activated, a photographer can hold the shutter button down and the camera will take multiple photographs, minimizing the interval between shots.
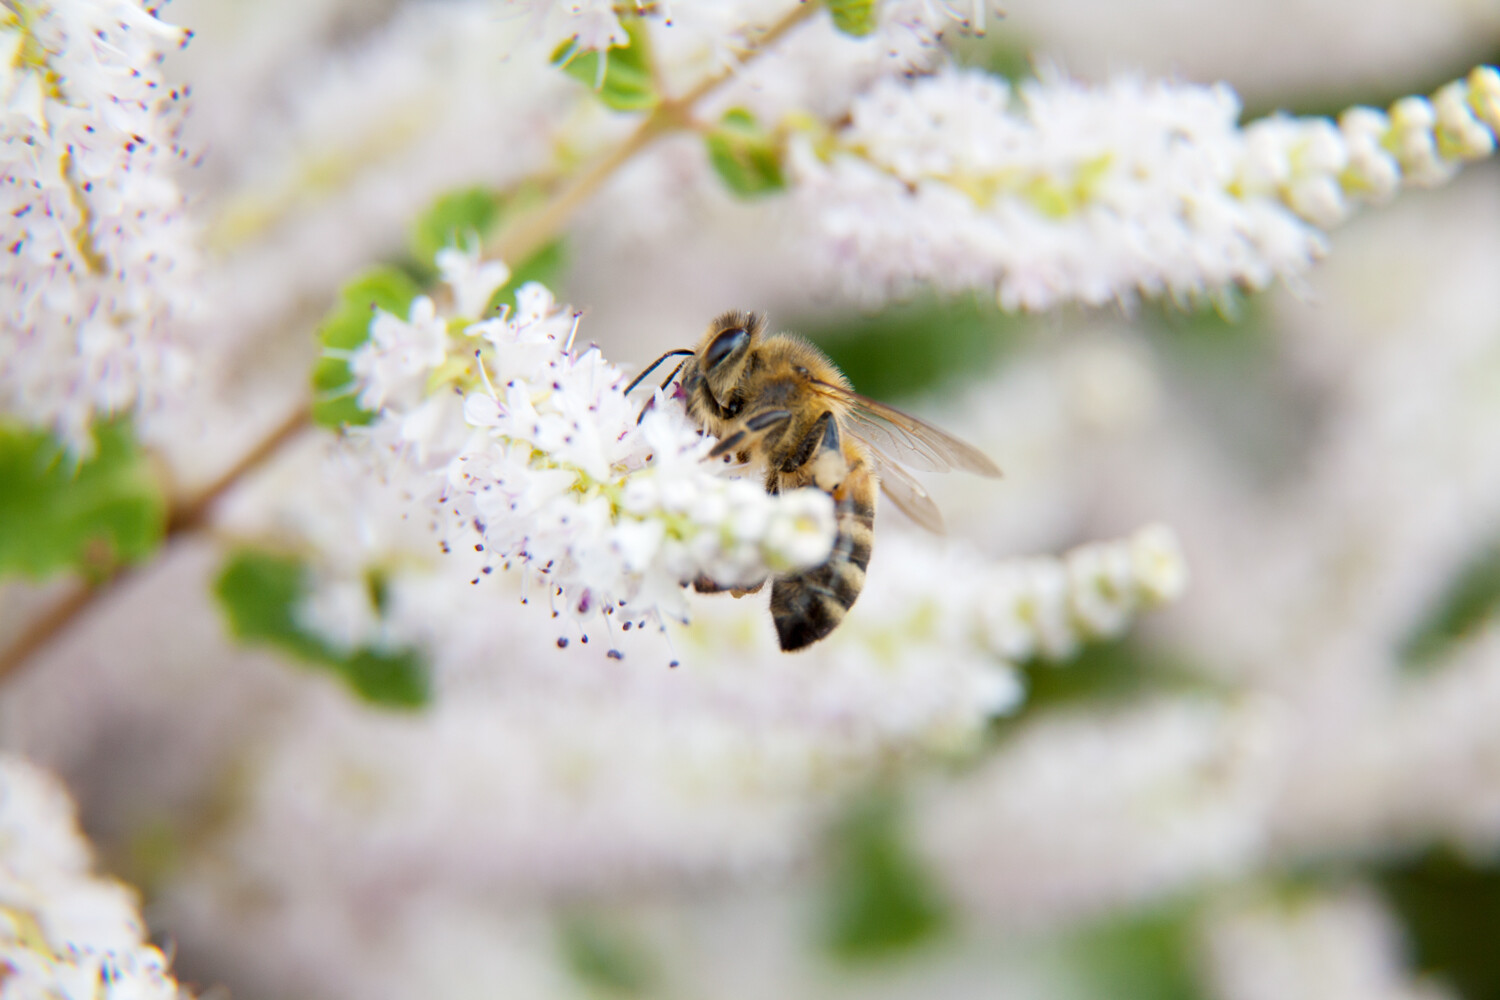
I used burst mode to capture this moment of a cockatoo eating grass seed. 1/8000s | f/5.6 | ISO 500
When is burst mode used?
Burst mode can be used at any time, but it’s especially useful for fast-moving subjects and fleeting opportunities. Burst mode records moments much faster than capturing an event manually frame-by-frame. This increases the chance of making successful photographs of short-lived moments.
Handholding with extension tubes can be tricky. Using burst mode is one way to increase the ratio of sharp macro images. 1/100s | f/6.3 | ISO 100
Burst mode is often viewed as a setting best suited to photographing high-action sports events. But street photographers, for example, may use the mode to anticipate interesting photographic opportunities. Burst mode is also great for macro and wildlife photography and for capturing the nuanced expressions of subjects in portraiture.
How to use burst mode
Activating burst mode can vary depending on the camera. For my Canon 5D Mark II, I activate continuous shooting by pressing the dedicated AF•DRIVE button on my camera and selecting continuous shooting on the main screen with the quick control dial. If you aren’t sure how to activate burst mode, consult your manual or have a look online.
The burst mode icon displayed on a Canon 5D MK II. 1/60s | f/9 | ISO 500
With burst mode engaged, you’ll also need to ensure you set the right focus mode. For burst mode photography, it’s best to shoot in continuous focusing mode. Known as AI Servo on Canon and AF-C on Nikon, continuous focus will constantly track moving objects, helping to maintain sharp focus while burst mode is activated.
Finally, set your camera settings (shutter speed, aperture, and ISO) accordingly, and you are ready to go! Focus on a subject, depress the shutter button, and the camera will take a burst of images as long as the shutter button is held down (to an extent; see below).
The technical bits of burst mode
There are a few aspects that govern the performance of continuous shooting. The speed of a camera’s burst mode can depend largely on the camera itself. While some cameras operate at two or three frames per second (fps), higher-end cameras can perform at 8+ fps per burst.
In addition, burst mode photographs are saved to a shot buffer before they are transferred to your memory card. The size of the camera’s shot buffer and memory card determines how long you can shoot in burst mode, and the writing speed of any images taken. For example, with a UDMA card, my Canon 5D Mark II can shoot a burst of 310 large JPEG files.
Burst mode is good for capturing fleeting moments. 1/160s | f/6.3 | ISO 400
However, if I want to shoot in RAW, the buffer has the capacity for 13 images per burst with a UDMA card. This is important to know when planning a shoot as the requirement for a longer burst will depend on your willingness to shoot in JPEG.
Another option to improve the length of a burst is to change the camera’s frames per second setting. Not all cameras have this option. However, selecting a slower burst mode will maintain your burst for longer, but with a greater interval between each shot.
An additional aspect to keep in mind when using burst mode is battery life. Shooting in burst mode can drain the life of a battery faster than with single-frame shooting. If you plan to use burst mode frequently over the course of a shoot, it could be prudent to take an extra battery or two along with you.
Conclusion
Whether you’re photographing a family portrait with active kids, capturing a flock of birds in flight, or covering a sporting event, burst mode can snap up the moments that could otherwise be missed in single-shooting. By setting your camera to burst mode, you can anticipate events and make a series of exposures without worrying so much about reaction time.
Lightroom Mobile has been around for many years, with the earliest version dating all the way back to 2014. While it is not as popular as its traditional desktop-based counterpart, Lightroom Mobile has grown into a capable and feature-packed editing tool that can hold its own against many other programs.
Editing with Lightroom Mobile isn’t quite the same as editing on Lightroom Classic. But if you take the time to learn, you’ll find that it is up to almost any task you can throw at it.
The first thing to understand when working with Lightroom Mobile is that it’s not just a mobile version of Lightroom Classic. Lightroom Mobile was written from the ground up to work with phones and tablets, and that meant Adobe had to re-imagine the entire user interface.
Design considerations were also made for the types of edits that people are likely to do on a mobile device. Screen size, touch targets, editing, and navigation; no stone was left unturned when Lightroom Mobile was developed.
As such, using Lightroom Mobile involves a jarring transition for people used to the desktop version, though if you have a mobile-first workflow you might be used to it. Even so, understanding a few basic tips and techniques for editing with Lightroom Mobile can improve your workflow a great deal.
Understanding the interface
The first thing you will notice when editing a photo in Lightroom Mobile is that the interface is quite different from Lightroom Classic. Gone are the Library, Develop, and other modules. You will also not find the traditional panels like Basic, Detail, Effects, etc. In their place is a series of buttons and icons along with some words to tap on.
The basic editing interface for Lightroom Mobile. Most of the editing tools are on the right side and can be activated by touching and tapping.
All the icons may be a bit overwhelming at first, but if you start at the top left and work your way around clockwise things start to make sense. Tap the Edit button to switch between the different modes available to you.
Tap the Edit button to switch between modes. This is sort of like moving between the traditional Library, Develop, Print, and other modules in Lightroom Classic. However, these modes in Lightroom Mobile serve very different purposes.
These modes come in handy when you want to cull images, assign keywords, and otherwise speed up your workflow. They are not particularly useful for editing, but I do recommend familiarizing yourself with them by experimenting on your own.
Moving towards the top right you will see more icons. Tap the question mark to get help, the up arrow to share an image, and the cloud to see the sync status of your Lightroom Mobile images. The three dots inside a circle is where things start to get interesting, and where you can start to get an understanding of the depth of Lightroom Mobile.
The three-dots-in-a-circle icon lets you access some advanced features you might recognize from Lightroom Classic.
It’s important to keep your expectations in check; this is not Lightroom Classic. If you are looking for a mobile version of Lightroom that replicates the desktop version, you are in for a big disappointment. But if you want a solid tool that lets you do a lot of editing on your mobile device, this is where things start to get really interesting.
You can use the three-dot menu to copy/paste settings, create an editing preset, and even specify custom gestures by scrolling down and tapping the Settings button. You can also use the View Options button to toggle the histogram and show/hide photo information when editing.
Tablet vs phone
All the screenshots so far have been for Lightroom Mobile on a phone. The interface is similar on a tablet, but the added screen real estate puts a lot more information and options at your fingertips.
Lightroom Mobile on a tablet has all the same tools and options as on a phone. The added screen real estate allows for more information to be displayed, while editing tools are grouped slightly differently.
In terms of photo editing, the main difference between a phone and a tablet is that the global edits are grouped together in a single icon. The icon with three sliders in the top-right corner is where you tap to access global edits like Light, Color, Effects, Detail, Optics, and more. Tap any of these to get a series of sliders that you can adjust with your finger, and watch as your changes are instantly applied to the image.
The extra room on a tablet means you get a lot more information and options on the screen.
The larger size of a tablet means that you can see the entire photo as you apply your edits, with plenty of room to move sliders and adjust parameters. This is my preferred method of editing with Lightroom Mobile, though plenty of people like using a phone. Either way is fine, as long as you find an option that works for you.
Tapping to edit
The true depth of Lightroom Mobile is further revealed with the vertical column of icons on the right side. This is where you can dive deep into the editing tools and perform all manner of intricate adjustments similar to those in Lightroom Classic.
(Note that these same icons appear in a horizontal row at the bottom of your screen if you hold your phone in portrait mode.)
Already you can start to see the sheer volume of editing options available to you in Lightroom Mobile, but that’s not all. Tap and scroll on the vertical row of icons to reveal even more.
If the icons seem confusing, one trick you can use is to simply rotate your mobile device from landscape to portrait mode. This shows brief descriptions beneath each icon which helps if you ever start to feel overwhelmed.
The simplest way to learn more about these tools is to just start tapping them and experimenting. In true Lightroom fashion, none of your edits are permanent; the Undo button will always let you step back to your previous edit. The Reset button will erase all your changes entirely, and you can even step back in time to a specific version of your photo by using the clock icon just above the Reset button.
Selective and global editing
There are two basic types of edits in Lightroom Mobile: selective and global. Selective edits are adjustments applied to specific portions of an image. Global edits are applied to the entire image. If you were to compare it to Lightroom Classic, selective edits are tools such as the Graduated Filter, Radial Filter, and the Adjustment Brush. Global edits include any of the Basic Panel adjustments along with features such as Detail, Color, Effects, the Tone Curve, etc.
To illustrate the touch-based workflow inherent to Lightroom Mobile, my favorite example is the Selective Edit tool. Tap the round dot icon at the very top of the panel on the right side to bring up the Selective Edit interface.
Tap the blue “plus” icon in the top left corner to create a new brush or filter adjustment.
At this point, you might think you can start tapping on the photo. But, if you try it, nothing happens. Tapping on the icons on the right side doesn’t do anything either.
Why? Because before you can start editing, you have to create a new selective edit, which you can do by tapping the blue “plus” icon in the top left corner. This lets you select from three types of brushes: Adjustments, Radial Filter, and Graduated Filter. Tap to select one of these options.
After choosing a specific type of selective edit, tap and drag to apply it to your image.
Now you’re ready to start editing! Tap and drag your finger around the screen to see your brush or filter applied instantly with buttery smoothness. After your adjustment or filter is in place, tap one of the icons on the right side to add a specific edit: white balance, sharpness, etc. You might be surprised at how quickly you can do editing with Lightroom Mobile if you are used to the desktop interface, which can be a bit sluggish at times.
Use the icons on the right to choose what parameters are adjusted in the edit: white balance, exposure, etc.
At this point you might notice one common theme with all the pictures in this article: They are in landscape orientation. Lightroom Mobile lets you edit in either portrait or landscape, and the interface automatically adjusts according to how your phone is positioned.
Editing can be done in horizontal or vertical orientation, and the interface adjusts automatically based on how you hold your device.
After applying a selective edit, you will see a blue diamond appear on your image. Tap on that to bring up the selective edit, and also to see a red overlay which indicates where the edit was applied. As with Lightroom Classic, your selective edits can be altered at any time or removed altogether.
The key thing to remember about editing with Lightroom Mobile is that you can’t permanently mess anything up. Just like the standard desktop version of Lightroom, all your edits are nondestructive, which means you can revert to a previous state of your image at any time.
The Selective Edit tool is a great example of how the basic Lightroom Mobile workflow functions: You tap on an editing tool, and then tap to implement the edit or alter its parameters. Global edits function in the same manner, except they are applied to the whole photo and not just specific portions. It’s not too difficult once you get the hang of it, which for most people is a matter of mere minutes.
If you have an Adobe Creative Cloud subscription, Lightroom Mobile is included in the price, and I recommend giving it a try. Even if you just use it to speed up your workflow rather than in-depth editing, it’s still a powerful arrow to have in your photography quiver. Editing with Lightroom Mobile is a fun process that, while not quite on par with the in-depth options in Lightroom Classic, is certainly worth a look. Or a second look if it’s been a while since you last checked it out.
You may have heard the term depth of field (DoF), but if you are new to photography you may not yet be taking advantage of how DoF can enhance your photos.
A basic definition of depth of field is: the zone of acceptable sharpness within a photo that will appear in focus. In every picture there is a certain area of your image in front of, and behind the subject that will appear in focus.
This zone will vary from photo to photo. Some images may have very small zones of focus which is called shallow depth of field.
Three main factors that will affect how you control the depth of field of your images are: aperture (f-stop), distance from the subject to the camera, and focal length of the lens on your camera. Here are some explanations and answers to other common questions concerning depth of field.
How does aperture control depth of field?
Aperture refers to the access given to light from the lens to the camera sensors. The size of your aperture (the diameter of the hole through which light enters the camera) controls the amount of light entering your lens. Using the aperture (f-stop) of your lens is the simplest way to control your depth of field as you set up your shot.
Large aperture = Small f-number = Shallow (small) depth of field Small aperture = Larger f-number = Deeper (larger) depth of field
It may be easier to remember this simple concept: The lower your f-number, the smaller your depth of field. Likewise, the higher your f-number, the larger your depth of field. For example, using a setting of f/2.8 will produce a very shallow depth of field while f/11 will produce a deeper DoF.
The image on the left was captured at 250th of a second at f/5.0 which resulted in a very shallow depth of field. Because of this the background is out of focus allowing the subject to stand out. The image on the right was captured at 1/5th of a second at f/32 which created a deep depth of field and a sharper background.
How does distance control depth of field?
The closer your subject is to the camera, the shallower your depth of field becomes. Therefore, moving further away from your subject will deepen your depth of field.
How does the focal length of a lens control depth of field?
Focal Length refers to the capability of a lens to magnify the image of a distant subject. This can get complicated, but the simple answer is that the longer you set your focal length the shallower the depth of field. Example: Your subject is 10 meters (33 feet) away, using a focal length of 50mm at f/4; your depth of field range would be from 7.5 -14.7 meters (24.6-48 feet) for a total DOF of 7.2 meters (23.6 feet). If you zoom into 100mm from the same spot, the depth of field changes to 9.2-10.9m (30.1-35.8′) for a total of 1.7m (5.7′) of depth of field. But if you move to 20m (66′) away from your subject using the 100mm lens, your depth of field is almost the same as it would be at 10 meters using a 50mm lens.
This image of a swan hiding in the tall foliage was captured from about 5m (16′) with a 300mm focal length lens. This combination of focal length and distance created a depth of field of approximately 5cm (2″).
What if I just have a point and shoot camera, or don’t know how to change those settings?
Even with a point and shoot camera, there are ways to control your depth of field. In the Scene Modes menu, look for a symbol of a human head, which is the setting for portraits. This will give you a narrow depth of field. In the same menu there is also a mountain symbol, which is a setting for landscapes, which will give you a deeper depth of field.
If you are a beginner with a DSLR there are some simple ways you can control depth of field and still use and automatic shooting mode. By choosing Aperture Priority mode you can set your aperture to get the depth of field that you want, and the camera will automatically set the shutter speed.
Can I set the depth of field exactly for each situation?
Yes, but because changing your aperture affects your shutter speed, the result may not meet the needs of your image. For instance, if you are trying to increase your depth of field by reducing aperture size you will also need to increase (slow down) your shutter speed which could make your image blurry. Understanding how all these settings work together can increase your control over depth of field.
Is depth of field equally distributed in front and back of my focus point?
No, it’s usually about one third in front and two thirds behind your focal point, but as your focal length increases it becomes more equal.
How will understanding depth of field improve my images?
Managing depth of field is one of the most important tools at your disposal, because having tack sharp images is one of the most important factors to getting that great shot. Knowing how to make the parts of your image you want sharp and the parts you want to be out of focus, is a great artistic tool to create great images.
Getting the right depth of field for your shot can make all the difference.
When should I use a shallow depth of field?
Using a shallow depth of field is a good way to make your subject stand out from its background and is great for portrait photography. Shallow DoF can also be useful in wildlife photography, where you want the subject to stand out from its surroundings. This is also useful because many wildlife photo opportunities are low light situations, and increasing your aperture size will give you more light. Shallow depth of field is also effective for sports photography where many times you want to separate the athlete from the background to bring attention to them. The result of this should also help give you a fast enough shutter speed to freeze the action.
This image captured at 300mm focal length and f/5.6 produced a very shallow depth of field. Because of this, it is important to set your focal point on the subject’s eye. Notice how the bird pops out from the background.
When should I use deeper depth of field?
In landscape photography it is important to get as much of your scene in focus as possible. By using a wide angle lens and a small aperture you will be able maximize your depth of field to get your scene in focus.
This landscape was captured with a 50mm focal length at f/16. The focus point was set at 8 meters, which made everything from 4 meters to infinity in focus.
How can you determine depth of field?
There are several on-line sites that will provide depth of field charts for your camera and lenses. Also, there are a number of apps available for smart phone users that can calculate it for you while you’re in the field. Most cameras have a DoF preview button which will give you a preview as you look through the eye piece. (This is probably the easiest and most under-utilized method.) Using this button may cause your image to appear darker as you view it through the eye piece, but not to worry. Your image will be properly exposed as long as you have the correct exposure settings.
Can depth of field be adjusted to get everything in focus?
Yes, using what is called the hyperfocal distance. When you are focused at the hyperfocal distance, your depth of field will extend from half the distance to your focal point to infinity. Use a DOF calculator to find your hyperfocal distance. If you don’t have a DoF calculator, a good rule of thumb is to focus a third of the way into the scene. Using an aperture of about f/11 or higher with a wide angle lens will maximize your depth of field.
What about depth of field in macro photography?
Because most macro images are produced in low light and with a longer focal length, the depth of field is often very shallow. Adjust your lens to the smallest aperture that the light will allow. It may also be necessary to increase your ISO to allow you to properly expose the image and to maximize your depth of field. Still, in many macro images your DoF may be very minute. With this very narrow focus it becomes necessary to use a tripod, because even the slightest movement of the camera will move your macro subject outside your depth of field.
This 120 mm macro even at f/8 still has a very shallow depth of field.
What is bokeh?
Bokeh (boh-ke) comes from the Japanese word meaning blur. This effect is produced by the out-of-focus areas in your image that are beyond the depth of field. Bokeh commonly refers to the pleasing circle shapes caused by the shape of the lens aperture. Usually created when shooting with your aperture wide open, such as f/2.8, bokeh can also be created with smaller apertures if the background is distant enough.
Bokeh in this image was created by the distance of the subject to the background, which fell well beyond the depth of field.
To summarize controlling depth of field:
Increase depth of field
Narrow your aperture (larger f-number)
Move farther from the subject
Shorten focal length
Decrease depth of field
Widen your aperture (smaller f-number)
Move closer to the subject
Lengthen your focal length
Take control of your depth of field. Understanding how these adjustments control your it will greatly improve your photography. What questions do you have about depth of field? Please share your photos and comments.
Recommended Reading for Beginner to Intermediate Photographers
If you enjoyed reading this tutorial we’ve put together a series of comprehensive advice for photographers: