Jan 31, 2021

[Photography] Beginner’s Guide to Light Painting

The post Beginner’s Guide to Light Painting appeared first on Digital Photography School. It was authored by Bruce Wunderlich.

a beginner's guide to light painting in photography

Do you want to use light painting for stunning results? Do you want to discover all the ins-and-outs of light painting so you can create otherworldly images at night?

You’ve come to the right place.

In this article, I’m going to share everything you need to know about light-painting techniques.

And by the time you’re done, you’ll be able to light-paint your images with ease!

Let’s dive right in.

light painting for beginners
Mill Falls in Logan, Ohio. The main source of light for this scene was the street lights on the bridge over the river. The bridge was light-painted with a high-powered spotlight. I also added light to the rocks in the foreground. The exposure was 69 seconds, and I set the aperture to f/14 to maximize the starburst on the street lights. This image won me a Photographer’s Choice award in the 2014 Shoot the Hills photo contest.

What is light painting?

Light painting is a photography technique that uses a moving light source (e.g., a flashlight) to add light to a subject while taking a long-exposure photograph. A scene or object can be brought to life by painting with a beam of light.

When light painting, you, the photographer, become an entirely different kind of artist. Instead of just capturing an image as it’s presented, you create the image that the camera is capturing.

Now, light painting may take lots of patience and practice to perfect, but the results can be very rewarding.

And it’s important to recognize the simplicity of lighting painting – it’s a lot like any low-light photography, except you are putting an external light source in motion to enhance an image.

Let’s take a look at some of the basics for beautiful light painting photography.

school house in snow
Schoolhouse in the snow. This was a long, 170-second exposure, shot at f/8 (for depth of field) and ISO 100. Notice the light coming from inside the schoolhouse, added from the outside by shining a flashlight through windows at the back of the building.

Tools for light painting

Before you start doing light painting, you’ll need to make sure you have the proper tools:

  • Camera – Any digital camera capable of manual settings (including Bulb mode).
  • Tripod – One of the most important tools to produce light paintings. In most cases, your shutter is going to be open for several minutes, and it is very important that your camera does not move during the exposure.
  • Shutter release – Either use a cable release or a remote shutter release to begin your exposure. If you don’t have either of these, use your camera’s self-timer function to initiate the shot. It is very important that you never touch your camera or tripod during the exposure.
  • Stopwatch – A stopwatch or some other way of timing your exposures is helpful, since most light-painting exposures will use Bulb mode.
  • Light source – Many different types of lights can be used for light painting. These light sources are your “brushes” and may include flashlights, torch lights, lasers, glow sticks, flashes, cell phones, and even candles. Just about anything that can produce light can be used for light painting. Note that different light sources will produce different colors of light. For example, an LED light source will produce a cooler (blue) colored light, while a halogen source will produce a much warmer (orange) colored light.
  • Color gels – Color gels can be used to alter the tint of your light and add color to your painting.
light painting farmhouse
30 seconds | f/8

Camera settings

Now let’s take a look at the best camera settings for light painting:

  • Mode – Shoot in Manual mode, which allows you to set your shutter speed and aperture.
  • Image quality – Set your image quality to RAW, which allows you to capture as much information as possible. (This is not a necessity, but it is an important recommendation.)
  • White balance – If you want to balance out your artificial light source, choose either the Incandescent or Tungsten white balance setting. However, sometimes experimenting with other white balance settings can produce some interesting light effects. Daylight white balance is a good starting point if you want to maintain the original colors of your artificial light sources. Auto White Balance is not recommended.
  • ISO – Use a low ISO, such as 100.
  • F-stop or aperture – Stop down to f/8 or f/10, which allows you to get more depth of field and enables you to use a longer shutter speed.
  • Shutter speed – Set your shutter speed to Bulb mode (your final shutter speed will be determined by the amount of ambient light in the scene).
  • LCD brightness – Lower the brightness of your LCD preview, because the normal setting is too bright at night and will make your image look bright when it’s actually underexposed.
  • HistogramUse your histogram to check your exposure. If the histogram skews heavily to the left, your image is going to be too dark.
  • Blinkies – Turn on your blinkies (a highlight warning) to help you determine if your highlights are exposed properly. It is perfectly acceptable for your brightest highlights to be slightly clipped if the rest of your image is properly exposed.
  • Image stabilization – Set this to Off. With your camera on a tripod, having image stabilization turned on can actually fool your camera or lens and cause blurring in your image.
  • Long exposure noise reduction – The recommended setting is Off. This can be set to On, but it will cause your exposure time to double (because the camera takes a second black exposure to help remove noise). If your camera is set to a reasonable ISO, the noise level will be low enough in most cases that in-camera noise reduction is unnecessary. Still, it is a good idea to check your noise levels in advance, and some older cameras may require this setting to be On to get acceptable noise levels.
still life flowers
This vase was backlit with a candle and I painted the flowers with a small penlight.
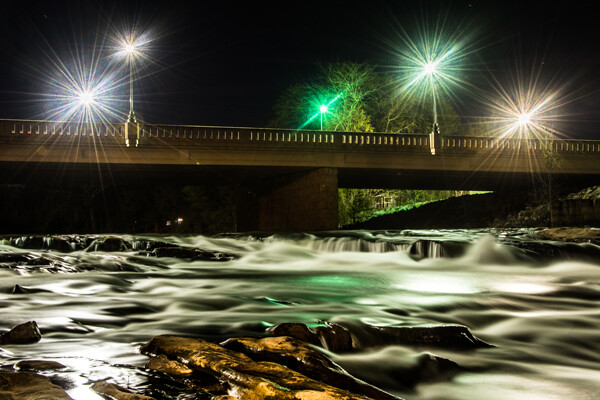
30 seconds | f/16 | ISO 100.

Begin with ambient light

The first step – before the actual light painting – is to determine the correct exposure for any ambient light in your scene.

Unfortunately, determining base exposures can be time-consuming when you’re experimenting with three- to four-minute shutter speeds.

Here’s a little trick that can help expedite this process:

  1. Set your ISO to six stops higher than the ISO you plan to ultimately use. For example, if you are planning to shoot at ISO 100, set your ISO to 6400.
  2. With your camera set to ISO 6400, experiment to find out how many seconds you will need for a nice exposure. Every second of exposure at ISO 6400 is equal to one minute at ISO 100.
  3. Once you’ve determined the proper shutter speed at ISO 6400, set your ISO back to 100 and prepare your exposure in minutes instead of seconds. (Many camera’s lowest ISO is 200, so 6 stops higher would be ISO 12800. And if your camera’s lowest ISO is 50, six stops higher would be ISO 3200.)
person with arms raised to the sky
A 30-second exposure at ISO 800. For this image, I increased the ISO to shorten the exposure to 30 seconds, because a longer exposure would cause a noticeable blur on the stars. Light painting was applied from the front of the subject, without letting the light shine directly back at the camera.

Focusing

Correctly focusing your camera is an important step – and in the dark, it can sometimes be difficult to pull off. The simplest way to get perfect focus is to shine a light source at a spot in your scene that you’ve determined must be in focus.

Then, using autofocus, focus on the light.

Finally, switch your lens from autofocus to manual focus (so that your focus point won’t change).

But remember:

If you move the camera, you must turn your autofocus back on and refocus. 

(Back button focusing is another great way to achieve focus when light painting.)

The exposure

At this point, you should have determined your exposure time, and your camera should be focused on your subject.

So now it’s time to begin your exposure and start painting! 

Most cameras allow you to set exposures of up to 30 seconds. For exposures over 30 seconds, set your shutter speed to Bulb. Use your cable release or remote to trigger your shutter button. Your shutter will remain open until you press the release again. Use your stopwatch, or the timer on your phone, to time the exposure length.

1971 VW bus light painting
This vintage 1971 bus was painted using one LED flashlight on the outside, with a second light inside to illuminate the bus interior.

Painting techniques

Light painting is subjective, so you’re free to approach it however you like.

But here is some advice for getting the most impressive results:

  • Paint from the sides – Don’t just stand behind your camera and wave the light across your image. Painting flat surfaces from the side will allow you to bring out textures.
  • Use lots of different angles – For instance, when painting the ground, hold the beam low and pan the light along the floor. This will keep the ground from appearing flat, and it’ll bring out all the details of the surface. Also, by adding light from many angles, the resulting image will have an interesting three-dimensional effect.
  • Don’t stand between the camera and your light source – If you do this, you will show up as a silhouetted ghost in the final photo!
  • Wear dark, non-reflective clothing and keep moving – Again, you do not want to appear as a ghost in your image!
  • Don’t shine the light source back at the camera – Otherwise, you’ll create a bright spot in the image.
  • Use a flashlight with a red filter when you check your camera to make adjustments. The red light will keep you from ruining your night vision.
  • Different surfaces are going to react to light differently – Wood surfaces may require more light than shiny surfaces such as metal or glass, because rougher surfaces absorb more light than smooth surfaces.
  • Keep your light moving – Move the beam in slow strokes to add lots of light and make faster strokes in areas where less light is needed.
  • Paint in up-and-down or side-to-side strokes, just like you’d work with real paint.
  • You probably won’t get the shot you want on the first try – It may take multiple attempts to get an image that you’re satisfied with. For this reason, try to keep track of how much light you add to each surface. Develop a plan so that you can make adjustments to each exposure until you get the image you’ve visualized.

A beginner’s guide to light painting: Conclusion

I’ve shared lots of tips and techniques to get you started with light painting, but there is so much more you can do with the medium! Be creative and fearless about trying new things.

Once you start to get the hang of light painting, there is no limit to the images you can create – all you need is a camera and a few creative light sources. 

Now over to you:

Which of these light painting tips is your favorite? Have you tried light painting before? Do you have any additional tips or tricks for great light painted photos? Share your thoughts in the comments below!

The post Beginner’s Guide to Light Painting appeared first on Digital Photography School. It was authored by Bruce Wunderlich.


it's from Digital Photography School https://ift.tt/2kUSOaz
via Bruce Wunderlich

Jan 30, 2021

[Photography] 10 Tips for Doing Your First Family Portrait Session

The post 10 Tips for Doing Your First Family Portrait Session appeared first on Digital Photography School. It was authored by Louise Downham.

family portrait tips

Photographs from a good family portrait session will be treasured for many years to come. It’s an incredibly rewarding area of photography, but it can also be a little daunting for new photographers. You need to build a rapport with the family, keep the children on board, and meet the parents’ expectations with gorgeous photographs.

Family portrait family group

So where do you start? Which camera settings should you choose?

Here are some important pointers to make your first session go smoothly, and to help you take great family portraits every time!

1. Get down on their level

If you’re photographing children, get down on their eye level. This will lead to far more engaging photographs, and will also help you interact better with the child.

Family portrait girl with flowers

2. Use the center AF point to focus

Different focus settings suit different photographers, but using the center point to focus tends to be the most useful for family portraits. As you take more and more family images, you’ll get a feeling for whether this setting suits you.

But it’s a great starting point for your first session.

3. Choose an appropriate aperture

Your aperture settings will be influenced by the style of photography you prefer.

As a starting point, many lifestyle family photographers choose to shoot wide open for individual portraits (f/2.2 works really well if you’re after beautiful background bokeh), and around f/5.6 for group shots to ensure everyone is in focus.

Here’s an example of the effect you get with a wide aperture:

girl in the park family portrait
This image was shot at f/2.2.

And here’s what you get when shooting at f/5.6:

Family portrait dad and son black and white
This image was taken at f/5.6.

4. Choose a fast shutter speed

Children move fast, and sometimes unpredictably.

That’s why you generally want a faster shutter speed, at least compared to your average portrait settings. A good place to start is 1/250s, which will still deliver sharp photos, even if children are rolling over or waving.

If you have a situation where someone is moving very fast, such as a child jumping or racing off into the distance, choose a much faster shutter speed (such as 1/800s).

family portrait baby held up high
To capture a sharp shot of this child being tossed in the air, I shot at 1/800s.

5. Use Auto ISO

While you’re familiarizing yourself with the apertures and shutter speeds that work for family portrait sessions, consider setting your ISO to Auto. The results are usually satisfactory, and it’s one less thing to think about when shooting.

As you gain experience and confidence, you can start to select the ISO manually.

6. Experiment with metering modes

Certain metering options suit some photographers better than others. As you take more family portraits, you’ll soon see which mode works best for you.

To start with, try using Spot metering for individual portraits, and Evaluative metering (also known as Matrix metering) for group shots.

family portrait mother and baby
This photo was taken using Evaluative metering mode.

7. Shoot in RAW format

If you shoot in RAW, you’ll have a far greater range of colors and details in your images – which you can then use for stunning edits in Lightroom.

8. Use Auto White Balance

Set your white balance to Auto if you’re doing a location shoot.

Why?

Because you’ll be working with a variety of scenes with different lighting, and you won’t have much time to change the white balance as you go.

Plus, correcting white balance is an easy edit in Lightroom, so you’d be better off spending the time engaging with the family you’re photographing.

9. Choose your lenses carefully

Carefully consider which lenses to take to the family portrait session.

If you don’t have several lenses, consider renting some. This can be surprisingly economical, and it’ll give you the opportunity to try out different focal lengths to see which suit your style of shooting.

Family portrait baby at 85mm
This baby photo was taken with an 85mm lens.

Using several lenses in a family portrait session will also help you vary your compositions, and it’ll ensure you can cope with most locations. A zoom lens like a 24-70mm will give you lots of flexibility, while a popular prime lens for family portraits is an 85mm lens (it creates very flattering photos!). A wide lens, such as a 35mm prime, will help you set the scene.

As you gain experience photographing families, you’ll develop a sense of which lenses work best for your style. And once you know what you like, I recommend you invest in the highest-quality lenses you can afford.

family portrait siblings at 35mm
This sibling photo was taken with a 35mm lens.

10. Set limits

Limit yourself to capturing five versions of each scene. This will train your eye to look for the details and expressions you want to capture, and will teach you to include everything you need in a single photograph.

Family portrait photography tips: Conclusion

So there you have it – family portraits in a nutshell!

Practice makes perfect, though, so be prepared to work hard and hone your camera skills. Above all, a friendly and professional attitude combined with careful preparation for each family portrait shoot should make for happy clients and repeat business.

Do you have any family portrait photos you’re proud of? Share them in the comments below!

The post 10 Tips for Doing Your First Family Portrait Session appeared first on Digital Photography School. It was authored by Louise Downham.


it's from Digital Photography School https://ift.tt/2fAXPBe
via Louise Downham

Jan 29, 2021

[Photography] Weekly Photo Challenge – Trees

The post Weekly Photo Challenge – Trees appeared first on Digital Photography School. It was authored by Sime.

Where would we be without them! I left the weekly challenge topic to my 11yo today, his first choice was “Piranhas” I’m thankful he got the idea from my facial expression that his first topic choice wouldn’t fly… ‘Trees’ he said, thoughtfully.

Tag your photograph #dPSTrees if you share it on social media.

Black and White Photo of a Tree

Still trees, silhouetted trees, reflected trees, trees with lots of movement and a slow shutter… As ever, your options are endless and this is where your creativity must rear up and show itself! A tree is an easy thing to photograph, there it is, sitting there keeping you alive, click, job done right? No no no… take some time and show us something we haven’t seen before, detail, angles, the life of a tree.

Missed a challenge? Catch up here!

Tree Photograph

The two trees above couldn’t be any more different, the first one on Coombe Hill, in London, this one just above in Tilba Tilba, Australia, an old Oak and an old Gum… Moody was what I was going for there! Below’s tree, in London again, for a spot of reflection. Well, don’t just stand there, make like a tree and leaf…. (yes, I know, that was terrible)

Sports car reflecting a tree

Great! Where do I upload my photos?

Simply upload your shot into the comments field (look for the little camera icon in the Disqus comments section) and they’ll get embedded for us all to see. Or, if you’d prefer, upload them to your favourite photo-sharing site and leave the link to them.

Weekly Photography Challenge – Looking Up

The post Weekly Photo Challenge – Trees appeared first on Digital Photography School. It was authored by Sime.


it's from Digital Photography School https://ift.tt/3agXyzb
via Sime

[Photography] Sony Announces the a1, Its Best Mirrorless Camera to Date

The post Sony Announces the a1, Its Best Mirrorless Camera to Date appeared first on Digital Photography School. It was authored by Jaymes Dempsey.

Sony a1 announcement

Sony has announced its latest full-frame mirrorless offering, the Alpha 1.

A groundbreaking camera that offers a shocking combination of speed, resolution, and video capabilities, the a1 somehow manages to speak to action photographers, wildlife photographers, and even all-around professional shooters without sacrificing on, well, anything.

For several years now, Sony has maintained the same four full-frame camera lineups:

  • The a9 lineup, geared toward professional sports and action photographers
  • The a7R lineup, geared toward landscape and commercial photographers
  • The a7 lineup, geared toward all-around professionals and advanced hobbyists
  • The a7s lineup, geared toward serious videographers (plus the occasional hybrid shooter)

(Sony also recently released the a7C, a compact full-frame model.)

Note the division of labor here, with one camera tailored toward action photographers, another tailored toward videographers, and yet another tailored toward landscape shooters.

But now, with the launch of the Sony a1, the division between action photography, landscape photography, and even video seems to have crumbled, leaving Sony users with a camera clearly more capable than the a7 III, and even offering a leg up over the a7S III, the a9 II, and more.

Sony a1

So what does the Sony a1 offer?

First, check out the sensor:

50 MP for intense cropping abilities, plus it gathers enough detail to satisfy professional landscape shooters.

Then there’s the autofocus, which packs “improved real-time Eye AF for humans and animals, and new real-time Eye AF for birds.” Sony is well-known for its top-tier autofocus algorithms, so don’t be surprised if the bird Eye AF makes the a1 a hot choice among serious bird photographers.

You also get in-body image stabilization (Sony claims up to 5.5 stops), as well as a lightning-fast continuous shooting speed (30 frames per second using the electronic shutter).

The a1 also boasts one of the most impressive electronic viewfinders on the market. With a whopping 9.44M-dots of resolution, you should have a clear view, even in low light, which is always a plus for event photographers, night street photographers, and wildlife photographers, to name just a few.

Sony a1

Finally, there’s the video capabilities. The a1 can record at 8K/30p, as well as 4K/120p; the former capability is what puts the camera above the Sony a7S, at least in terms of raw recording power. While 8K is likely overkill for casual videographers, I can highly recommend the a1 for serious videographers and true hybrid video/stills shooters.

Sony a1

Of course, you should also consider the price: $6499.99. In other words, the a1 costs more than the Nikon Z7 II, more than the Canon EOS R5, more than the Sony a9 II, and more than every other full-frame mirrorless camera on the market.

But the a1 really is one heck of a camera, and those who can afford it are bound to be impressed (to say the least!).

Now over to you:

What do you think about the Sony a1 announcement? Are you excited? Apprehensive? Frustrated? Share your thoughts in the comments below!

The post Sony Announces the a1, Its Best Mirrorless Camera to Date appeared first on Digital Photography School. It was authored by Jaymes Dempsey.


it's from Digital Photography School https://ift.tt/3ciRWY0
via Jaymes Dempsey

Jan 28, 2021

[Photography] How to Shoot Images for Book Covers: The Essential Guide

The post How to Shoot Images for Book Covers: The Essential Guide appeared first on Digital Photography School. It was authored by Charlie Moss.

how to shoot images for book covers

There’s lots of information out there about making money shooting stock images. However, the most successful stock photographers have a secret – they’re shooting niche content for specialist agencies! There are lots of different specialist fields that you might consider, but in this blog post, I’ll walk you through how to shoot images for book covers.

Let’s get started.

How to break into the book cover industry

There are several specialist book cover stock agencies that exist purely to match clients with photographers and illustrators. These agencies can be a great way to get into shooting book covers.

However, book cover stock agencies do require a good portfolio as part of your application. If you don’t already have a portfolio suitable for a book cover agency and you want to get started right away, you can try networking with potential clients on social media – Instagram is a great place to connect with other creatives.

Think about format and layout

One of the most important things to think about when it comes to shooting book cover images is the aspect ratio. Book covers are almost always produced in a vertical format, so landscape images generally won’t be of interest to book cover designers.

shoot images for book covers examples
Left: Canon EOS 5D Mark IICanon EF 100mm f/2.8 Macro USM | 100mm | 1/125s | f/8.0 | ISO 100 | Window Light + Reflector
Right: Canon EOS 5D Mark II| Canon EF 70-200mm f/2.8 IS II USM | 70mm | 1/640s | f/2.8 | ISO 800 | Available Light

Books can be printed in all different sizes, meaning that no single aspect ratio is the best for shooting cover photos. Therefore, book cover designers will usually need to crop images to make them fit on a cover.

Keep this need to crop in mind when you shoot images for book covers, and make sure you don’t place any interesting parts of the subject or composition near the edge of the frame. This will give a designer more options when using your images in different book cover layouts.

Leave some blank space

When you shoot images for book covers, you can’t just think about the photo. You also need to leave room for the title of the book and the author. In other words, there should be at least one place in your book cover shot that is plain enough to place text.

book cover layout examples
Left: Fujifilm X-T20 | Fujifilm XF 35mm f/1.4 R | 35mm | 1/280s | f/1.4 | ISO 200 | Window Light
Right: Fujifilm X-T20 | Fujifilm XF 35mm f/1.4 R | 35mm | 1/3500s | f/1.4 | ISO 200 | Available Light

You can achieve these plain sections by using simple colors, by shooting areas with less detail, or by using a shallow depth of field to blur backgrounds and foregrounds.

There’s no rule dictating where book cover designers must put the title and author text. However, it’s good practice to shoot several variations of each image, including compositions that leave room in the middle of the photo, as well as compositions that leave room at the top and bottom.

Plan your images out

If you’re finding it hard to shoot compositions that allow for text placement, then go old school and get out your sketchbook.

Take a pen and paper, draw some empty rectangles, and start imagining all the different places a designer might put the title and name of the author. You can then start to imagine how and where you might leave blank space.

book cover sketches
These are a set of sketches based on the bestseller listings of a popular bookseller. The boxes show the text location on the cover of each book.

To take your shots to the next level, think about the props you’d like to use in your photos and how they might fit into the sketches you just made.

Playing around in a sketchbook can really improve your images and save you lots of time.

Finding inspiration

If you’re trying to come up with ideas for potential book cover images, I highly recommend browsing through a bookstore. You don’t have to do this in person; there are plenty of opportunities to browse book covers on the internet, as well!

You’ll quickly get a feel for the different styles of cover images across various genres.

shoot images for book covers
Left: Fujifilm X-T20 | Fujifilm XF 35mm f/1.4 R | 35mm | 1/450s | f/2.0 | ISO 200 | Window Light + Reflector
Right: Fujifilm X-T20 | Fujifilm XF 35mm f/1.4 R | 35mm | 1/640s | f/1.4 | ISO 200 | Window Light + Reflector

It’s also a good idea to follow the social media feeds of publishers in your favorite genres. Many publishers regularly post pictures of upcoming books, which will give you a sense of industry trends.

If you’re an author, but not a photographer

So you’re a self-published author who wants to do the design work for your book yourself? That’s great, and all of the tips above still apply. However, you might find some of our beginner’s articles helpful; these will help you understand the creative potential of your camera.

It’s also important to be realistic when shooting images for your book cover; photography isn’t instinctive for everyone, and the best photographs are usually the result of years of hard work and practice.

However, if you put your mind to it and you learn the basics, there really is no reason why you shouldn’t shoot photos for your own book cover. Though it’s always worth asking a few trusted friends for their opinion when it comes to the final layout – especially if you have friends who buy and read a lot of books!

How to shoot images for book covers: Conclusion

Whether you want to diversify your photography business and start shooting images for a book cover agency, or you simply want to create your own book cover for your self-published book, the tips above should get you started. Follow traditional rules of composition, make space for titles and other text, and seek out inspiration in your genre.

Ultimately, if you’re looking to start shooting images for book covers, the best advice is to jump right in. Put together a portfolio, then get it out there for people to see. Ask around to determine which stock agencies work best for photographers you know, and see if you can get your pictures on a new bestseller!

The post How to Shoot Images for Book Covers: The Essential Guide appeared first on Digital Photography School. It was authored by Charlie Moss.


it's from Digital Photography School https://ift.tt/3psgbH1
via Charlie Moss

Jan 27, 2021

[Photography] Vanishing Point in Photoshop: The Essential Guide

The post Vanishing Point in Photoshop: The Essential Guide appeared first on Digital Photography School. It was authored by Ana Mireles.

The essential guide to Vanishing Point in Photoshop

Have you ever used Vanishing Point in Photoshop? If you’re only using the Transform tools to give perspective to image elements, you’re missing out on a fantastic opportunity.

The Vanishing Point filter is often overlooked; most photographers believe it’s only useful in a 3D workspace.

But here’s the truth:

Vanishing Point is actually a hugely useful tool, one that I absolutely recommend you learn how to use.

In this article, I’ll explain what the Vanishing Point filter is – and how you can use it to simplify and improve your photography.

Let’s get started!

What is Vanishing Point in Photoshop?

Vanishing Point grid in Photoshop

Vanishing Point is a Photoshop filter that allows objects and edits in your image to be scaled and oriented according to the image’s perspective.

You can find Vanishing Point under the Filter menu (simply click Filter, then Vanishing Point).

Once you’ve selected the Vanishing Point filter, Photoshop opens a special workspace for all your in-perspective edits.

Why is Vanishing Point important?

A vanishing point is what gives depth to an image.

For example, if you photograph a wall parallel to your camera’s sensor, the wall (and the overall image) should look flat.

But if you instead photograph the wall at an angle and you capture the way it vanishes toward a point in the distance, the wall – and the scene – appears three-dimensional.

Perspective and Vanishing Point

Take a look at the arrows in the image above.

The wall is flat, with no depth.

But the railing moves toward the horizon, where (if it continued to stretch onward) it would vanish.

The Vanishing Point filter allows you to make adjustments to your photos in perspective, so that you achieve a realistic final result that perfectly mirrors the scene’s perspective.

(Do you see how the arrow stretching along the railing appears to fade into the scene? That’s because I added it with Vanishing Point!)

Working with Vanishing Point: The basics

When you launch the Vanishing Point filter, you might be wondering what to do and how to use it.

It looks similar to the normal Photoshop interface, but where do you start?

Here are the answers to some of the most common Vanishing Point questions:

How do you create a perspective plane?

Click the Create Plane Tool at the top of the toolbar on the left.

Then click on the corners of the plane you want to create.

(Here, you need to carefully follow in-perspective elements.)

Photoshop will immediately add your plane to the image, like this:

Create a Vanishing Point in Photoshop

Now, when the lines that form the plane are blue, it means everything is working well. Yellow or red lines mean that Photoshop doesn’t accept the plane you’re tracing.

Once you’ve created a plane, try moving the corner points until you get it right. You can zoom in if you need to be more precise.

Everything you paste and everything you edit inside that plane (while you’re in the Vanishing Point workspace) will be put into that perspective.

How do you save a perspective plane?

When you’re done working inside Vanishing Point, click OK (in the top right) to accept the changes. This will add the perspective plane as part of your file.

If you save and close your image, the perspective plane will be saved, too. When you open your file again, you can launch the Vanishing Point filter, and the perspective plane(s) that you created will be present and editable.

How do you delete a perspective plane?

To delete a plane, simply select it, then press the Backspace key.

To select your plane, just click on it using the Edit Plane Tool. You’ll know your plane is selected if you can see the edge nodes around it.

Can you create more than one plane?

Yes, you can create multiple planes. And these can be separate or connected.

If you want to create a separate second plane, just finish working on your first plane, then click another part of the image and start afresh.

If you want to have your two planes connected, you need to tear the second plane off from the first. To do this, press the Ctrl/Cmd key and drag one of the edge nodes to create the next plane.

By default, the second plane will be at a 90-degree angle from the first. If this is not the way you want it, you can use the Angle controller you’ll find in the toolbar at the top of the Vanishing Point window:

Connecting perspective planes

How do you use Vanishing Point in Photoshop to paste objects in perspective?

First, make sure the object you want to add in perspective is present on a layer. Select the object (you can use Ctrl/Cmd + A to select all), then hit Ctrl/Cmd + C to copy it to your clipboard.

Once you have the object on your clipboard, add a new blank layer above the background image. This is because anything you do inside the Vanishing Point workspace will be applied to the layer that is selected when you actually open the filter.

Next, open the Vanishing Point filter and create a perspective plane that follows the perspective you want to give to the new element.

Once this is done, paste the new element into the Vanishing Point workspace by pressing Ctrl/Cmd + V. It will be pasted as a floating selection without perspective, but that’s okay.

Paste using Vanishing Point in Photoshop

Feel free to scale or modify the object. Then, once you’re satisfied with its shape and size, click on it and drag it inside the plane.

You’ll notice that the object will change shape and size according to its position in the plane. It will get smaller as it gets farther away from the camera, and bigger as it gets closer to the camera.

Place objects in perspective

That’s it – now you can click OK to get back to the normal workspace. You’ll find the pasted element (in perspective) on the new layer. You can then use the Layer Style options to add shadows and create more realistic composites.

You can use this paste-in-perspective technique to showcase your photos on a billboard, create graffiti on a wall, or apply logos to product packaging photographs.

Advanced tips and techniques for working with Vanishing Point

Pasting elements in perspective is one of the most common uses for the Vanishing Point filter in Photoshop.

However, there are some other cool things you can do with the feature, including:

Painting in Vanishing Point

Paint in Vanishing Point in Photoshop

Inside the Vanishing Point workspace, you’ll find a Brush tool. With it, you can paint, write, or draw in perspective.

Therefore, the brushstrokes will get smaller as they move farther away from the viewer (to simulate depth).

You can choose the size of the brush, the hardness, and the color. Unfortunately, you can’t use brushes you’ve loaded into the normal workspace.

Cloning in Vanishing Point

You can also clone with the Vanishing Point filter. This is very useful, because the Clone Stamp tool will follow the angle and the size of the perspective plane.

Choose the size and hardness of your Stamp Tool in the top toolbar. Make sure that Heal is turned off.

Then source the pixels that you want to clone. To do this, hold the Alt/Option key and click on the target pixels (note that you must click somewhere inside the perspective plane).

Finally, clone the pixels onto a different part of the perspective plane.

You can clone the same way you’d use the regular Clone Stamp tool. However, the results will be very different.

Look at the composite below, which shows an original image, the image modified with standard Clone Stamp methods, and the image modified with the Stamp Tool in Vanishing Point.

Clone in Vanishing Point in Photoshop

When I sourced the pixels from the top of the brick wall using the regular Clone Stamp tool, the bricks had a different angle; when I cloned them from the side, they had a different size.

However, when I used the Vanishing Point Stamp Tool, I was able to add pixels in-perspective.

You can also use the Vanishing Point Stamp Tool as a Healing Brush by turning on the Heal option in the top toolbar.

Using the Marquee Tool in Vanishing Point

The Marquee Tool is the only selection instrument available inside the Vanishing Point workspace.

It’s very straightforward to use; just click and drag around the area that you want to select.

If you have two connected planes, the selection will “bend” to follow the perspective in both planes.

Select and Duplicate in Vanishing Point in Photoshop

This is extremely useful if you want to duplicate elements that run through two planes. Look at the example above – I just selected an area, copied it, and pasted it again. It behaved according to the perspective of the plane, which allowed me to keep any depth and make the entire duplication job look more natural.

For better blending, you can feather the selection, just as you would in the regular workspace.

How to use Vanishing Point in Photoshop: Conclusion

Vanishing Point in Photoshop can make your work easier and faster when you’re dealing with perspective.

So make sure to give it a try!

Now it’s your turn:

What do you think of Vanishing Point? Is it a tool you plan to use in the future? Share your thoughts, questions, and tips in the comments below!

The post Vanishing Point in Photoshop: The Essential Guide appeared first on Digital Photography School. It was authored by Ana Mireles.


it's from Digital Photography School https://ift.tt/3oic0vP
via Ana Mireles