There are three fundamental settings in landscape photography: the ISO, Aperture and Shutter Speed (known as the Exposure Triangle). While all of these are equally important to understand in order to create technically correct images, there’s one that’s extra important when it comes to an image’s visual impact. Adjusting the shutter speed makes a big difference and is often what can make your image stand out from the crowd.
Choosing the ideal shutter speed is not an easy process though. There rarely is a single correct shutter speed but there certainly are scenarios that benefit from a specific one. In this article, we’ll look at a few different scenes and how the shutter speed affects each of them.
Working with Fast Shutter Speeds
The easiest shutter speed to work with is a fast one. Working with fast shutter speeds doesn’t require a tripod and you can easily photograph subjects that quickly pass by. This is also the most common choice for most beginning photographers as it doesn’t require much effort (and most auto functions choose a relatively fast shutter speed).
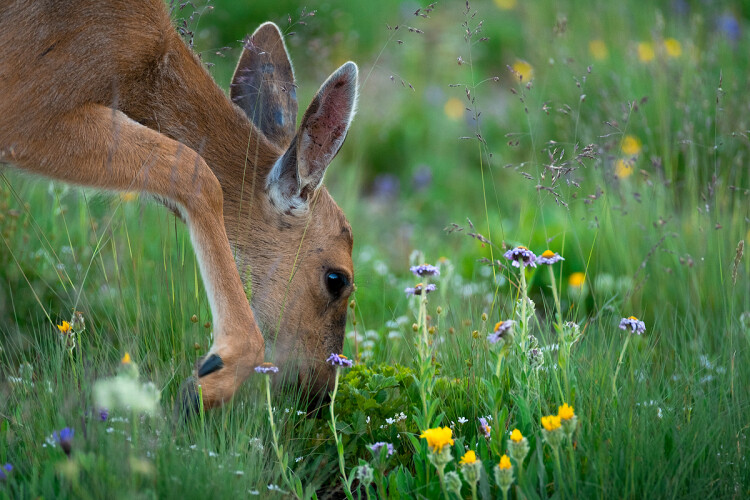
Below you have a typical example of when you need to use a fast shutter speed. In order to freeze the motion of the deer, I had to increase the shutter speed to 1/320th of a second. Had the deer been moving at a higher tempo I would have to increase the shutter speed even more to avoid any motion blur.
Photographing animals is not the only time where you should use a fast shutter speed though. In the image below, I used a shutter speed of 1/1600th.
Why did I use such a quick shutter speed for that scene? By the looks of it, the water is quite still, there are no moving subjects and there’s still enough light to use a slightly slower shutter speed, right? Yes, however, this shot was taken from a boat and even though the waters were relatively still, I needed a very quick shutter speed in order to freeze the scene without any blur from camera movement.
Use the ideal settings not perfect ones
Had I been standing on land, I could have easily used a slower shutter speed and achieved a similar look. In fact, the overall quality could have been even better as I could have used a lower ISO and an ideal aperture. However, the purpose of photography isn’t to always have the perfect settings; it’s having the ideal settings that allows you to get the shot within the given conditions. The most important is to actually capture the image.
For too long I was too focused on always having the perfect settings. The truth is that this often leads to missing the shot as you focus too much on the technical aspect rather than working with the conditions you’re given.
For example, using a slower shutter speed when standing on a boat (such as in the image above) would have led to the icebergs being blurry due to the motion. What would you prefer? A blurry picture which is “technically” perfect, or a sharp picture that doesn’t have the technically perfect settings?
Before we move on to slower shutter speeds, let’s look at a few more scenarios where a fast shutter speed is recommended:
When photographing handheld.
Photographing quickly moving subjects.
When aiming to freeze motion.
When photographing from a vehicle.
Working with Slow Shutter Speeds
In landscape photography, the difference between slow shutter speeds is much bigger than between fast shutter speeds. While you won’t see a huge difference between 1/320th of a second and 1/640th of a second (in most cases) you may see a big difference between 10 seconds and 60 seconds. Because of this, I’ll split this section in two parts: less than 30 seconds, and more than 30 seconds (Bulb Mode).
The definition of a long exposureis somewhat vague but in my Ultimate Guide to Long Exposure Photography eBook, I describe is at the shutter speed where you no longer can capture a sharp handheld image. Typically, this is in the range of 1/50th of a second, depending on your camera and focal length (a longer focal length requires a quicker shutter speed to capture a sharp handheld image than a wide-angle).
Shutter speeds up to 30 seconds
While the difference between a 1 second and 30-second shutter speed is big, it’s more natural to put these together in one section to keep this easier to follow. Still, I’ll try to break it up a little to give you an idea of which shutter speeds you should experiment with in different situations. Again, there’s no correct choice and it often comes down to your preference and the tools you’ve got to work with.
When photographing beaches and seascapes where waves are crashing onto the shore or forming around rocks, I often work with a shutter speed of 0.5-1 second. I find that this creates a nice blur in the water while still keeping enough texture. A slower shutter speed such as 8 seconds blurs the water but not enough to give it the “silky” effect you often see with long exposure photography (we’ll come back to that in a bit).
This also applies when photographing waterfalls and rivers. I tend to use a semi-slow shutter speed rather than an ultra-slow shutter speed when working with these scenes, as I prefer to keep some textures in the water.
As you lengthen the shutter speed you’ll see that moving elements become more and more blurry. In the image below, I used a shutter speed of 20 seconds to blur the water and give some motion to the sky. If you look at the clouds, you can see that they have been moving and it’s starting to have the “dragged sky” effect.
Keep in mind that the speed of the clouds determine how slow the shutter speed needs to be in order to pick up this motion. When clouds are moving quickly you can pick up their motion even with a shutter speed of 5-10 seconds, but to really get the “dragged sky” effect you often need to use a shutter speed (or exposure time) longer than 30 seconds.
Shutter speeds longer than 30 seconds (Bulb Mode)
In order to achieve a shutter speed longer than 30 seconds you most likely need to activate Bulb Mode.
When I first got into long exposure photography and purchased my first 10-Stop ND filters, I immediately got hooked on these ultra-slow shutter speeds. I’ll admit that I don’t do as much of it anymore (as it rarely fits with the vision I have for most locations) but it’s certainly a lot of fun to play with.
The main reason to use a shutter speed longer than 30 seconds for landscape photography is to achieve the “dragged sky” effect and to completely blur out moving elements such as water. It can also be a good way to remove people from your images (if they walk around during your 2-3 minute exposure they most likely “disappear”).
For the image above I used a shutter speed of 180 seconds. As you can see, this has completely blurred the water and the sky is dragged across the frame.
Conclusion
Working with longer exposures can be a lot of fun but it’s not something that’s always beneficial. For example, when photographing a scene that doesn’t have any moving elements (and no clouds), there’s no need to use an ultra slow shutter speed, as it will most likely look exactly the same with a slower one.
So knowing how to select the best or most appropriate shutter speed takes practice, and comes down to what you want to achieve in your image.
Shooting landscapes is one of the most popular genres of photography. Photographs of landscapes typically capture the presence of nature and can inspire you. Outside towns and cities, you are surrounded by beautiful scenery. However, taking a good photo of those epic views is not as easy as you think. Are you making these landscape photography mistakes?
Here are some tips to help you uncover why your landscape photos are not working for you and how you can turn unsatisfying pictures into your best ever images.
1. Including too much detail in the frame
Have you ever been on an amazing trip, gazed at a glorious landscape and captured the incredible scenery on camera only to find out your picture doesn’t stand out? There are several reasons why this is happening.
Including too much in the frame is one of the reasons why your photograph is not appealing to you. Perhaps the trees you have included are overwhelming the scene and making the view too broad. If so, eliminate these objects from the frame. Crop inwards slightly and simplify the field of view.
2. Wonky horizons
One common mistake some photographers regularly make is to capture a scene with uneven horizon levels. You can become so engrossed in enjoying a breathtaking view that you can overlook this aspect.
Make sure you pay attention to ensuring the horizon line is straight when photographing your next landscape image. Don’t leave it until you get home to find out that your pictures are unbalanced or crooked.
3. Taking the picture without thinking
Another mistake people make when photographing landscapes is to start snapping away without giving any thought as to what they are capturing. It is easy to get carried away with an incredible view in front of you. But if you take the time to consider why your photographs are not working for you, your results will improve.
Take a view of the location with just your eyes, think what you would like to capture, and then take your photo. This approach of “seeing the scene” first can help you to take better pictures rather than just picking up your camera and taking a shot without thinking about what you are photographing.
4. Shooting flat, uninteresting scenes
Imagine your dream landscape scene is right in front of you. You’re standing at the top of a magical mountain, alongside a beautiful flowing river, or above some rolling hills in the countryside, for example, and you start photographing the beautiful view.
When you check your images you discover they look dull and uninteresting. So you ask yourself why they are not standing out?
A major factor that can make or break an image of that stunning panorama is light. Without directional sunlight in your shots, the images can look flat and lifeless with few textures and tones. Below is an image where the sun catching the hills adds warmth to the image to make it more interesting.
On your next landscape photography trip, I recommend paying attention to the light and trying to take pictures of more illuminated scenes. I suggest taking a photograph in no light and comparing it with one captured in some light.
Look at the differences and see how the images vary. Ask yourself how do they contrast? Is one better than the other? What makes it stand out?
5. Including distracting elements
Once you have found a visually compelling location and have some nice light, give some thought to the composition. Consider what subject matter looks interesting and only include that.
You will not be making the most of a scene if you include unsightly aspects of the surroundings such as telegraph poles or overhead electricity cables. If you have no choice but to capture these elements in your composition, you can always remove them in post-processing.
Below is an example where I have eliminated distracting elements after taking the picture, in the post-production phase.
Before
After editing.
Editing the photo to remove the unsightly wires enhances the image and helps to focus attention on the church, trees, and the mist.
Conclusion
With this article, I have identified five key landscape photography mistakes as to why your images might not standing out, and to help you take better pictures at your next photography outing. Now it’s time for you to put these tips to the test, so get out there and capture your greatest ever landscapes.
When people start photography, or even after they have been doing it for a while, they find a time when they want to start learning how to do some processing on their computer. Then they are faced with a heap of options. There are so many choices and trying to work out which one to choose can be hard. One option that is becoming very popular is ON1 Photo Raw 2018.
You can buy the software outright, so you don’t need to worry about any monthly subscription costs like others are offering. It is easy to learn and you will find that ON1 can likely do everything you need to do. One of the best aspects is the community of photographers around the program as well.
Having fun with layers and the textures.
Here is a beginner’s guide to help you find your way through ON1 Photo RAW 2018 and give you the confidence to start working on your photos. You can download the program from their website.
There is a 30-day free trial available to see if you like it before buying, which of course you will. You can also just pay for it which isn’t very expensive either. Finally, if you do purchase it you will have the peace of mind knowing it is backed by a 30-day money back guarantee.
Browse Module
This is where you start when you open the program. Here you can find all your folders that contain your images. This is where you should start exploring what is possible inside ON1 Photo RAW. You can’t break anything and it is good to see what is available.
Hover over all the menu items along the top of the main window. You will see File, Edit, Album, etc., each of those has different options. While you may not use many of them at first, it is always good to know what is there. It will help you understand what is available and if you watch the many ON1 videos you will understand what they are saying and how easy it is to learn.
In the Browse module. Hover along the top to see what is in each of the menus.
An image with only basic adjustments made to it using ON1 Photo RAW 2018.
The most important thing to do is to find where your photos are located. Then click on Browse and look below. You may have to go searching, but just use the same process that you would if you were looking for them on your computer.
Again, it’s simple. Just point Browse to where your photos are located for them to appear. You don’t have to import photos to start working. You can add folders, subfolders, albums and smart albums (collections) so that they are easier to find in the future as well.
In Browse, you can see all your folders and subfolders.
Now it is time to pick a photo. Once you have one selected, double-click on it, press Enter, or you can just go to the side panel on the right, go to Develop, and your image will open there. Watch the short video below on the Browse module.
Develop
In this module, you can start to make changes to your images. This is where you can begin the process of creating the image that you had in your head when you took it. This is also where the first steps in raw processing will occur if you are shooting raw files.
Overall Settings
In Develop you can make many of the most common adjustments. Most images need something, whether that is changing the exposure, or perhaps bringing out the shadows, and you can do it all in the Develop module. If you’re just starting out with editing, the Tone and Color Mode is a good place to begin. From there you can make many adjustments to your image that will help make it look a lot better.
Overall Settings is where you can make most of the adjustments you will need to do.
You should play with all the sliders to see what they each can do. Don’t worry about going too far, nothing is fixed, and you can undo everything. In the photography industry, we call that non-destructive editing. You aren’t doing anything to your image that is permanent.
When using the sliders you don’t have to click on the actual pointer, just click anywhere you want and the pointer will catch up to you. You can slide along underneath it as well.
You will make the changes by using the sliders in the appropriate panels.
Go to the Extremes
Another reason for going too far is that it can help you work out where you need to be with your image. Take the slider to the max, and then you bring it back to where you think it should be. As you do this, you will start to understand what each slider is for and how you can use it. Don’t forget to try it in both directions.
Take the sliders to the extreme, see how far you can go. Don’t forget to bring them back.
Resetting or Undoing
If you want to go back to where you were at the start simply go to the top of the section (where the heading is) for example, Tone and Color. On the right, you will see a half-circle with an arrow. Click on that and everything will be reset.
Press the icon in the top right of the adjustments window to reset everything you have done.
For individual sliders, if you would like to reset just one, double-click on the name of the slider.
You can see in this section you can also change the white balance, vibrancy, and saturation. You can add structure to the image, though this should always be applied with caution. Many people think it will help sharpen their image, but if the image is not sharp already structure will not do that. What it does do, is give your sharp lines more definition.
This is the section where you can change the color aspects of your images, like White Balance.
There are a couple of other settings used for portraits. If you are doing photos with people you should try them out and see how they work with your images.
Lens Corrections
Most lenses affect your images and it is in the Lens Correction area of ON1 Photo RAW that you can correct that. Most of the time the software can detect your lens is, but if you use an unusual lens then you may have to add its profile or tell the program which lens was used. You don’t have to do this, but if you are using a wide-angle lens then it can be good to apply this setting.
Lens Correction is where you can fix the distortion that your lens can cause.
Details
The Details section is where you can reduce noise in your photos and do some sharpening. Both need to be used with caution. Overdoing it can cause unwanted halos and give your images a weird harsh texture.
As with the other sections, you should play around with all the sliders to see what they each do. Some will seem to make a difference, while others will look like they’ve done nothing. To really see what they do try enlarging the image to 100 or 200 percent. Some of them only work on individual pixels.
Details is the area where you can sharpen your image and reduce the noise in it.
Along the top of Details, you can see a default, low, high, and other options. These are like presets that you can use, or you can set your own and save it.
Using Detail to help reduce noise and sharpen the image.
Show More
Under Overall Settings, you will see a button that says Show More, click it. More adjustments will then be shown. If you select one a new window will appear under the others. Scroll down so you can make the necessary changes. Like many of the other settings try them all to see what you can do.
Under Overall Settings, you will see Show More. You will be given more options for adjustments to your image.
Local Adjustments
If you would like to make adjustments to particular areas of your image only, then this is the place for you to do so. Local Adjustments allows you to target parts of your images as opposed to global edits that apply to the entire image.
Local Adjustments is next to the Overall Settings tab.
If you decide that you want to make a certain part of the image darker or lighter (or add vibrance or detail) then choose Add Layer and a brush will come up. The brush has feathering which you can change to suit your image. The solid circle in the middle is how big the solid part will be and the dotted line around the outside is how far the feathering will go. To change that you can do it along the top, click on Feather, and move left or right to change the size.
The brush comes with feathering and it is good to know how to adjust it.
Along the top is where you change the brush settings.
Choose a setting that will make a big a difference for your image, like lighten or darken. Brush it over the area you want to change, this is how to make your selection. This is a good way to figure out and select the area that you want to edit or adjust.
In Local Adjustments, you can make the selection of the part of the image you want to work on.
Once you have the area you want to adjust selected, you can change the settings however you want. Undo the lighten or darken, go to the adjustments in that window and make the changes you really want. You can add as many layers as you want to make lots of changes to different parts of your image.
Experiment with this. Have a go at all of them to see how they work. It is a good way to learn what is possible. When you are done testing, you can delete any unwanted layers. Click the cross in the top right corner of each one.
Tools in the Develop Module
On the left side of the program, there are some tools. Some of them you can use straight away, other tools you can only use within the Local Adjustments tab.
Straightening Your Image
One of the questions that I get asked the most is “Why are all my images crooked?” It is such a common problem and something everyone does. Part of my answer is that it is so common, that most editing software has very easy ways to correct it. ON1 Photo Raw is no different.
The first tool in the left-side panel is the Crop Tool. Click on it and then look at the top panel across the image where you will see a small level. Click on that.
To make your image level you need to click on the crop tool first, and then look for the level icon along the top.
Pick a straight line to use in your image, like the horizon, or a tall building. Click on one end of your straight line, then hold and drag down to the other end. Keep the line along the straight edge and then click at the other end. You will see the image straighten, then just press enter to apply and crop it. The image should now be level.
Click along a straight line to make the image level.
Sometimes it can take a few times to do this, so if it doesn’t look level then just undo and repeat.
The image is now level or straightened.
Making an image straight and level.
Removing things from your image
It is in the section, that you will find the tools you need to remove unwanted items from your images. The Healing Brush, the Eraser, and the Clone Stamp are all here. Again, you should play around with them to see how they each work and the effect they will have.
The tools you will use to remove unwanted things in your images.
Use Ctrl/Cmd+Z to undo what you have done.
The first two options, Erase and Heal are like brushes so you can apply them to the items you want to remove.
The third one is called Fix, but you need to take a sample of the image to copy over the unwanted thing. You can do this by looking for an area that can be copied and then apply Fix to that area. Once you have selected the area press Alt or Option and a circle with a cross will appear, click on that area. Now you can release the Alt or Option key and then click on what you want to get rid of.
Using those tools to remove a duck from this image.
It might take a few attempts, so don’t be discouraged. Just make sure that what you are replacing the area with something that will match.
Presets
There are a number of presets that you can apply to your image. These are great when you first start as they can really show you what is possible with the program. You can add a preset, but each time you add a new one it will cancel out the previous one. If you want to stack presets on top of each other, simply right-click on the preset thumbnail preview, and choose Insert Preset.
On the right-side, you will see a number of new windows appear with all the adjustments that were made to help get that effect. If you study them you will start to understand how ON1 Photo RAW works and what you can apply to your own images.
ON1 Photo RAW comes with a series of presets.
As all the adjustments are there from the preset, you can also make your own changes to fine-tune the preset to your liking You might find parts of it are not exactly how you would like them.
The preset Firenza was added to this image.
When you go to Develop you can see all the presets on the left. Click on the different folders and quite a few of them will come up. You can see them applied to your image in small preview versions.
There are many different presets that you can use. You can see a small version (thumbnail) of each as a preview of how it will look applied to your image.
However, if you would like to see them a lot bigger then all you need to do is click the square in the top right corner of the window with the presets. It has four small squares inside a larger one.
Click on the four dots in the upper left corner to get bigger previews of the presets.
This will give a grid view and you can see how each one will look applied to your image. This is a much easier way to plan and choose which one to use.
The larger previews.
If you would like to see even bigger versions then simply click Ctrl or Cmd and the plus key. You can really see how the preset will look on your image. To exit, press Escape or the arrow in the top left corner.
Applying the preset to your image.
Moving on to Effects
One of the first things you will notice in the Effects Module is that there are more tools available. There are brushes and gradients that have masks attached to them. The mask will make it easier to make changes and corrections later on if you decide you don’t like them. Masks are good to use, but you do need to get used to them. It takes a bit of practice.
When you go to the Effects Mode you get a lot more tools to start using. Many come with masks.
Presets and Filters
Over where the presets were in the Develop mode, you will now find a series of Filters that can be applied to your image. As you did with the previous module, you can click on one, then the four preview thumbnails of the filters for that set on your image.
In Effects, you also get to use special filters to apply to your images.
You can also select the filters on the right under Overall Settings. If you know which one you want to choose then you can just select it there. When you do make the selection you will see that a new window will open up. In there you can adjust the filter as you want it. You can change the opacity, along with other settings that are used to make the filter. You don’t have to accept everything the filter gives you, feel free to tweak the options to your liking.
Click on the four dots again to get larger previews.
Over on the right under Overall Settings and Local Adjustments, there is a button called Add Filter, click it to see a list of the ones available.
Once again, you should try them all and see how they work. Try adding several filters to the same image. If you don’t like it you can press Ctrl/Cmd+Z to remove it. Otherwise, click the cross in the top right corner.
For each filter there are windows where you can make adjustments to the filters you have applied.
Working with Layers
Layers can be scary, but once you know what they are and how to use them you will see a lot more opportunities open up for your image.
The Layers Module has a lot more tools and adjustments you can use. Plus it also gives you the added bonus of being able to apply other images and work with layers.
You can change the sky if you aren’t happy with what is there in your shot. ON1 makes this very easy with the masking brush. You can make it so that you only mask particular colors, for example, so you can remove just that one and show the image that is below.
To replace your sky or to add textures you have to be able to work with layers and learn about blending them. It can be very hard to grasp at the beginning, but if you keep experimenting you will figure it out.
Here you can see the effect of several textures added and blended to completely change the look of the image.
Resizing Images
This is where you can resize your images depending on what you are going to do with them. For most of us, that is probably going to mean doing images for Social Media. However, there are a lot of other options available so you can prepare your images for printing or whatever you need.
If you want big prints, Resize uses Genuine Fractals® technology to enlarge your images.
Resize is where you can get your image ready for social media or printing.
The ON1 RAW Community
If you really want to go to this level then consider watching the many videos available on their YouTube channel or on their website under product training. ON1 also has a great community (called ON1 Plus Pro, which is $149 annually, regular price) and always includes the latest edition of ON1 Photo RAW as a perpetual license. Or you can buy the lower priced standard membership, ON1 Plus, for just $49.99 per year without the upgrade to the next version of ON1 Photo RAW. ON1 Photo RAW 2018 is available for $119.99 for new customers and an upgrade price of $99.99 for previous owners.
The entire community is always happy to help you learn. The membership also includes different coaches, themes, and topics each month to teach to the Plus community. Some of the names coming to ON1 Plus this year include Matt Kloskowski, Tamara Lackey, Don Komarechka, Colin Smith, Hudson Henry, Colby Brown, James Brandon, Jim Welninski, and Dan Harlacher the Product Director.
You will find many videos that take you through the more complicated parts of the program step by step. Dan has a great voice and is a great instructor. They are all really good.
Editing Your Photos
Whether you are a beginner or more advanced user, ON1 Photo RAW will have what you need. It isn’t a hard program to learn, especially with all the added support that ON1 offers. If you are a very beginner then it is the perfect place to start and grow into.