Nov 29, 2022

[Photography] The 10 Best Travel Photography Backpacks in 2022

The post The 10 Best Travel Photography Backpacks in 2022 appeared first on Digital Photography School. It was authored by Jeremy Flint.

The best backpacks for travel photography

When doing travel photography, one of the most important things to consider is your backpack. You have hundreds of options – but unfortunately, not all backpacks are adequately sturdy, comfortable, spacious, and cost-effective.

That’s where this article comes in handy. I share the best travel photography backpacks you can buy in 2022, so whether you’re a newbie looking for your first travel photo backpack or a more serious photographer in search of a high-quality backpack to take on lengthy trips, this article is guaranteed to help you out.

Let’s get started.

How to choose a travel photography backpack

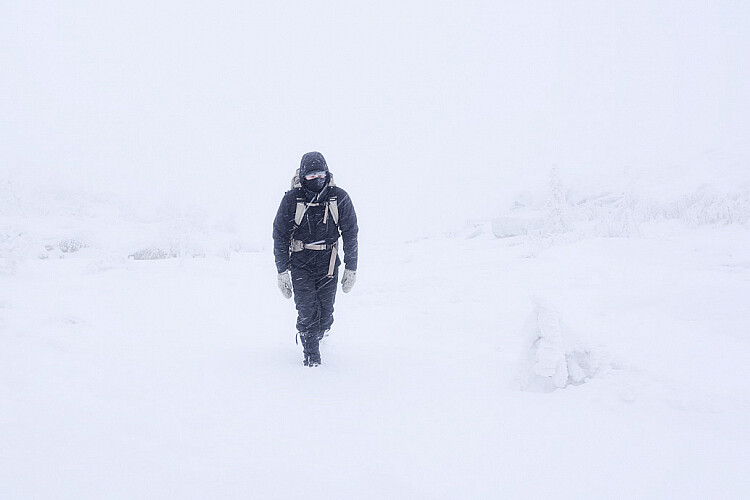
A travel photography backpack is ultimately your best companion, and it should be designed to serve a range of needs; after all, you may require a bag for long countryside walks, hiking in the hills, air travel, or even city breaks and rural adventures.

As you’ll probably carry your backpack at all times throughout your travels, you’ll want a product that feels comfortable, is highly practical, and (if style is important to you) looks great. Your camera equipment should be easy to access, and the zippers should be well-placed. A suitable bag will be able to store and protect your camera gear successfully in all weather, so you should definitely consider the durability and strength of the material as well as any rain-protection measures.

The bag’s size is important, too. You may require a large pack with extra space and compartments for your photography accessories and other items (e.g., clothing, food, storage drives, laptops). Or you may prefer a more compact, lightweight bag. If you frequently take (or wish to take) a travel tripod on your trips, it’s important you get a backpack that can carry one.

Best travel photography backpacks

Below, I help you choose from the diverse selection of backpacks currently on the market while highlighting their unique features. Let’s start by taking a look at the best travel photography backpack you can find:

1. LowePro Tahoe BP 150 Backpack

Best travel photography backpacks

My first travel photography backpack pick is the LowePro Tahoe BP 150, a lightweight option with an adaptable and well-padded main interior. Thanks to the smaller build, it’s ideal for traveling by car or plane, and the reasonable price makes it a favorite of beginners and hobbyists.

Designed with strong and moisture-resistant fabrics, this backpack will keep your gear safe in all types of weather and is perfect for outdoor travel shoots. It has the capacity to store a DSLR or mirrorless camera with a zoom lens attached in addition to a second lens and even a flash. Extra room is provided for personal items (such as a 10-inch tablet), and the side pockets offer space to store a water bottle and some camera-cleaning gear.

2. LowePro ProTactic BP 350 AW II Backpack

Best travel photography backpacks

Due to its impressive performance and versatility, the LowePro ProTactic BP 350 AW II Backpack is one of the best travel photography backpacks money can buy.

It costs significantly more than the LowePro Tahoe (above), yet it’s also far more spacious, making it a better choice for serious photographers. The LowePro ProTactic offers enough room to carry a pro mirrorless camera or DSLR, extra lenses, and even a drone. It has multiple access points to your gear, has an adaptable interior you can tailor to fit your equipment, and can hold a 13-inch laptop.

And you get a handful of useful additional features, including an all-weather cover to protect your gear, an all-purpose utility pouch, a bottle pouch, and a tripod cup (so you can carry a tripod without difficulty).

3. Manfrotto Pro Light RedBee-310 Backpack

Best travel photography backpacks

The Manfrotto Pro Light RedBee-310 Backpack doesn’t come cheap, but the larger capacity, rugged build, and stylish exterior make it worth every penny.

The RedBee-310 offers a spacious interior – you can store a handful of lenses in addition to a sizable DSLR or two – yet it’s still suitable for airline carry-on luggage. The backpack also includes handy dividers, easy rear access to your equipment, and a 15-inch laptop sleeve.

The backpack looks very stylish and is ideal for serious photographers, though it may be overkill for hobbyists just hoping to travel with a camera and a couple of lenses.

4. F-stop Loka 37 L Ultra-Light Travel Camera Backpack

Best travel photography backpacks

F-stop makes some of the best travel photography backpacks around; although they’re more expensive than competitor products, the bags are high quality and designed to last. They’re made to fit, comfortable to carry, and are my backpack of choice as a professional travel photographer embarking on adventures.

The Loka Ultra-Light Travel Camera Backpack isn’t huge, but it offers space for a camera, a few lenses, and key accessories. It’s also incredibly comfortable, and fitted inserts can be bought as a bundle with the bag and adapted to suit your needs.

If your goal is to keep your camera as protected as possible while traveling around the globe, this F-stop backpack is reliable and incredibly durable.

5. Peak Design Everyday Backpack (20 L)

Best travel photography backpacks

These days, the Peak Design Everyday Backpack is much loved in the photography community; for one, it looks amazing, though not so much in the standard “camera backpack” sense and more in the designer-clothing vein. It also feels great, thanks to plenty of internal support, adjustable shoulder straps, and a comfortable hip belt.

As the name suggests, this backpack is suitable for everyday use, from city breaks to rural escapes. It also fits as carry-on luggage, making it perfect for plane travel. Made with durable (and weatherproof) outer fabric, the Everyday Backpack will protect your gear in snow, rain, and sleet, and it’ll also prevent damage from the standard bumps and knocks.

The easy-to-configure internal FlexFold dividers make it incredibly easy to organize gear; you can customize the backpack interior to fit a camera body with a lens attached as well as 4-5 extra lenses and even a 13-inch laptop. The bag comes in a range of colors, and for those who need to carry more gear when traveling, there’s a 30 L option with plenty of additional space.

6. MindShift Gear BackLight (26 L)

Best travel photography backpacks

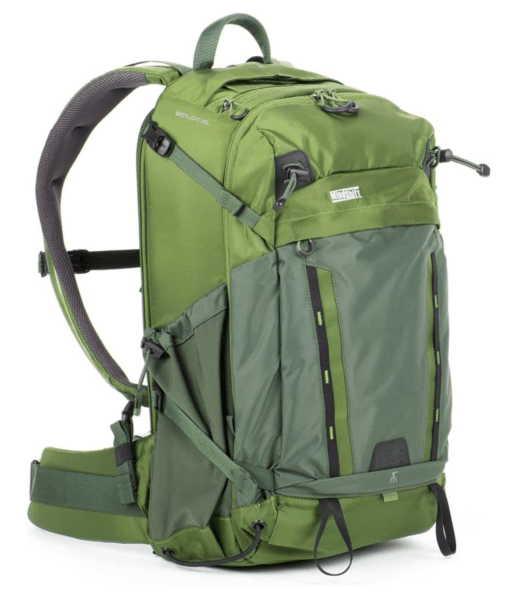
The MindShift BackLight 26 L isn’t especially stylish, but it is spacious, which is why it’s the perfect bag for serious travel shooters who spend day after day in the field. It’s designed to carry heavy gear for long periods, and it offers enough room for multiple camera bodies, a handful of lenses (including longer telephoto glass), and accessories, plus you get a handful of inner and outer compartments to fit storage drives, filters, cleaning cloths, and more.

The rear-panel compartment offers rapid access to your equipment, and your back covers the main access point for increased security. The bag is comfortable, too, and a waist belt keeps wearers feeling good during long outings.

7. Thule Aspect Camera Backpack

Best travel photography backpacks

The Thule Aspect is a midrange camera backpack that’s perfect for smaller or more informal travel adventures; no, it can’t carry multiple camera bodies and 4+ lenses, but it’ll have no problem carrying a camera, a couple of lenses, and even a tripod and a drone. Plus, because the bag includes handy pockets for a jacket, memory cards, and a laptop, you can store all of your essentials while traveling.

The backpack is well-padded, so you won’t have a problem wearing it for hikes or long walks. The waist belt provides comfort, and the storage space is adjustable. The Thule Aspect is well-built and comes with a Thule guarantee, yet it’s not too expensive, either – so if you’re looking for a reasonably priced backpack that’ll keep your gear safe, it’s certainly worth a look.

8. Tenba Fulton v2 16 L All-Weather Backpack

Best travel photography backpacks

The Tenba Fulton v2 backpack isn’t extremely expensive, yet it’s a great product for travel photographers who work in rough conditions, including rain, snow, dust, and hail. The backpack contains the ultimate protective features including water-repelling fabric and a water-resistant rain cover designed to protect your camera in all weather.

And while the Tenba Fulton v2 might not be as spacious as some of the other options on this list, it can still carry plenty of gear, including a camera, 5+ lenses, and plenty of accessories. Really, the backpack is perfect for long trips, and it includes a protective sleeve for laptops, a trolley strap for convenient travel, adjustable dividers you can change to suit your requirements, and support for a tripod or monopod.

9. K&F Concept Multifunctional Camera Backpack

Best travel photography backpacks

The K&F Concept Multifunctional Camera Backpack is an elegantly designed product that is ideal for transporting your equipment on planes, in cars, or when hiking.

The inside is spacious, yet the bag itself feels reasonably sized, so you should have no problem carrying it on a plane. You get an equipment compartment, which is capable of housing a camera body and 3-4 additional lenses, as well as a general-purpose compartment, which fits accessories, a jacket, and other clothing.

The bag comes with a rain cover to protect your gear in case of inclement weather, and it even boasts a tripod attachment. It’s well-priced, relatively lightweight, and includes a laptop compartment and access from the back and side. What more could you want?

10. F-stop Ajna 37 L DuraDiamond Travel and Adventure Camera Backpack

Best travel photography backpacks

The Ajna 37 L backpack is the most expensive product on this list. But for those who care about quality above all else, it’s also the best travel photography backpack on the market. It is an outstanding pick for photographers looking for a mix of volume and versatility, and it’s ideal for adventures of all types.

Key features of the bag include a superbly comfortable aluminum frame; well-designed pockets and a back panel to help organize and store items neatly; a hip belt and foam shoulder straps; and a safety whistle.

The backpack’s unique material is extremely durable, and the fabric and zippers are weatherproof. The pack is pleasant to transport on long excursions and works as carry-on luggage. Gatekeeper straps are great for adding extra gear from a tripod to snowboards or skis and are available to purchase separately or as a bundle with an insert and rain cover. And for the ultimate travel photography backpack, you can even buy an attachable drone pouch.

Best travel photography backpacks

The best travel photography backpacks: final words

Picking the perfect travel photography backpack might seem tough, but it doesn’t have to be! If you’re still struggling to choose, here are my quick recommendations:

The best bag for beginners is either the LowePro Tahoe BP 150 or the Thule Aspect; both are well-priced, practical, comfortable, and stylish.

For more serious photographers and professionals looking for a high-quality backpack to take on lengthy trips, the LowePro ProTactic BP 350 AW II, F-stop Loka, or F-Stop Ajna are fantastic choices thanks to their excellent capacities, easy access, airline compliance, comfort, and functionality.

The best travel photography backpacks FAQ

Are camera bags useful?

Yes! Camera bags protect equipment against theft, impacts, weather, and more.

Is a camera bag a carry-on?

Camera bags can be used as carry-on or checked luggage.

How do you take camera gear on a plane?

Cameras are fragile items, so I recommend you always pack them in your carry-on luggage. Make sure that your camera bag is small enough to fit in an overhead carry compartment (though if you can get away with it, stow it at your feet as a personal item).

How do I protect my camera in my backpack?

Keep the front body cap on, pack your equipment snugly so it doesn’t move around, and store lots of accessories in zipper pockets.

The post The 10 Best Travel Photography Backpacks in 2022 appeared first on Digital Photography School. It was authored by Jeremy Flint.


it's from Digital Photography School https://ift.tt/z7Iqxyk
via Jeremy Flint

Nov 28, 2022

[Photography] How to Capture Gorgeous Holiday Food Photos (5 Tips)

The post How to Capture Gorgeous Holiday Food Photos (5 Tips) appeared first on Digital Photography School. It was authored by Mat Coker.

How to capture holiday food photos

Each new holiday season comes with plenty of beauty: beautiful decorations, beautiful smiles, beautiful presents, and of course, beautiful food.

But while holiday food photography is tons of fun, it’s easy to end up with dark, blurry, and discolored images – the kind of shots that you won’t want to add to an Instagram or Facebook feed, let alone a website portfolio.

In this article, I share five key tips for capturing beautiful food photos this holiday season. I discuss all the essentials, including settings, backgrounds, lighting, and composition; that way, you can photograph all those delicious-looking cakes, pies, cookies, hot chocolates, and lattes in all their glory!

Let’s get started.

1. Carefully arrange your holiday food setup

Sometimes, you won’t have control over the placement of the food (if you’re in a restaurant, say, or you’re a guest at a friend’s home). However, if you’re making the food on your own, or you get an opportunity to adjust the food’s positioning, make sure you spend some time creating a pleasing composition.

After all, nobody wants to see a mess of cookies strewn about a plate. But a carefully ordered spread of cookies with little crumbs sprinkled artfully across the tray? That looks amazing, and the beautiful arrangement will dramatically enhance the resulting photo.

When arranging the food, pay careful attention to the broad shapes, the colors, and the relationship of each food item to its neighbors (and to the frame as a whole). Aim to create balance throughout the scene, and see if you can enhance interest through the use of color contrast. (If you’re doing Christmas food photography, green and red make for a great color combination!) Don’t let things get too messy, but don’t leave things looking static, either; try to create a natural setup that leads the eye around the frame.

It can also be helpful to choose a general color palette but add little color accents. For instance, the splash of red in the next photo breaks up the monotony of the warm whites and browns:

Holiday food photography

It can also help to remember various food photography composition guidelines. For instance, you can use the rule of odds to enhance the viewer’s sense of dynamism, and you can use the rule of thirds to position the main elements in the frame, as I did for this next shot:

Holiday food photography
The plate and the mug are roughly positioned at rule-of-thirds power points.

2. Use soft, flattering light

In my experience, light can make or break your food photos. By adjusting the direction of the light (overhead, front, back, or side) and by modifying the quality of the light (hard or soft), you can capture a great shot – or you can create a bland, boring, unflattering image.

So what kind of light is best for holiday food photos? First of all, make sure that you turn off your camera’s pop-up flash. This will only produce harsh shadows and bright highlights, and it won’t do the food any favors.

Instead, seek out soft light – such as light shining through translucent curtains or light coming through a north- or south-facing window. Soft light will help preserve detail and keep the food looking delicious, plus it’ll make it easier to capture well-exposed images.

Note the difference between the hard light (created by a pop-up flash) on the left and the soft light (created by a window) on the right:

Holiday food photography

As for lighting direction:

Many food photographers like to use side lighting that comes from slightly behind the food items. The side lighting helps sculpt the food and add texture, creating a sense of three-dimensionality.

Take a look at this next shot, which is lit by the large window in the background. The light skims across the cupcake from the side, bringing out depth through highlights and shadows:

Holiday food photography

I’d encourage you to experiment with variations of backlighting and side lighting. Direct backlight generally isn’t great – it’ll limit detail in your photos – but by adjusting the position of the food relative to the light, you can create different effects. Here, I’ve used soft side light to create a three-dimensional feel (notice how the cupcake is brighter on the right-hand side?).

Holiday food photography

But this next shot uses soft backlight for a moodier effect. Note that the higher position of the lighting ensured that some detail is still present on the front of the cupcake:

Holiday food photography

If you’re extremely serious about your holiday food photography (or food photography more generally), then consider purchasing some flashes or studio strobes. You can use these to mimic soft window light, and you won’t need to worry about repositioning the food in relation to the window, nor will you need to wait for good light; instead, you can shoot whenever – and wherever – you like!

3. Think about your angle

Once you’ve determined the right arrangement and lighting for your holiday food setup, you’ll want to think about your position in relation to the food – that is, your angle.

Food photographers use three broad approaches:

  1. Photographing from directly above
  2. Photographing from 45 degrees
  3. Photographing on a level with the food

And while any of these approaches can work, it’s important to consider how each angle will affect your final image. Shooting from directly overhead will highlight patterns and colors on top of the food, but it’ll also flatten the scene. Conversely, shooting on a level with the food will emphasize its height and potentially its depth, but it won’t let the viewer explore the broader patterns created by the food arrangement.

Note the difference between this holiday scene, shot from above:

Holiday food photography

And this holiday scene, shot from much lower:

Holiday food photography

Finally, we have a third scene, which was shot on a level with the holiday cookies:

Holiday food photography

Each angle works well, but the results are very different. The overhead view produced a flat shot, the 45-degree view added lots of depth and context, and the table-level view provided a sense of intimacy.

So before you start snapping away, take some time to think about the food you’re photographing. Ask yourself: What makes these subjects special? What do I want to highlight?

And pick an angle accordingly.

4. Choose a complementary background

Many beginner food photographers will spend time on the composition, they’ll choose the lighting, they’ll think carefully about the angle – but they’ll forget about the background.

Yet the background significantly affects the final results. A good background should look clean, it should look simple, and it should (ideally!) complement the subject. For this next photo, I snapped a quick shot without thinking, and the background was a mess:

Holiday food photography

But then I placed a clipboard behind the food, which dramatically simplified the background:

Holiday food photography

While I didn’t love the look of the photo above, it does have a nice simplicity to it, don’t you think?

Finally, I created a new setup, with the goal of complementing the cookies while adding a bit of holiday cheer:

Holiday food photography

While bokeh backgrounds – as featured in the photo above – can look amazing, you don’t have to get that sophisticated. It’s often enough to make sure the background is free of distractions; failing that, you can simply place a solid-colored poster behind the food!

5. Make sure you use the right indoor photography settings

If you’re photographing your holiday food indoors – and I’m guessing you will be! – it’s important to pay careful attention to your camera settings. Indoor scenes tend to have very little light, and if you’re not careful, you’ll end up with blurry and/or underexposed photos.

I’d encourage you to switch your camera mode to Aperture Priority, which will give you control over your aperture and (indirectly) over your shutter speed. (Manual mode is another option, though it can be a bit intimidating for beginners.)

Make sure your shutter speed is fast enough to produce sharp images (1/100s is a good starting point). And if you’re struggling to get a reasonably fast shutter speed while also capturing a well-exposed photo, it can help to boost the ISO. (If you plan to regularly photograph food, a tripod can be a big help, too; it’ll free you from the need to use a fast shutter speed.)

By the way, I’d also encourage you to use a lens with a wide maximum aperture. That way, you can shoot wide open, which will let in more light while also creating beautiful background blur effects!

Holiday food photography: final words

Now that you’ve finished this article, you know how to capture some beautiful holiday food shots.

So have plenty of fun! Enjoy the delicious food! And be sure to share your photos in the comments below.

Table of contents

Food Photography

The post How to Capture Gorgeous Holiday Food Photos (5 Tips) appeared first on Digital Photography School. It was authored by Mat Coker.


it's from Digital Photography School https://ift.tt/lYJxP8F
via Mat Coker

Nov 27, 2022

[Photography] 10 Tips for Gorgeous Winter Landscape Photography

The post 10 Tips for Gorgeous Winter Landscape Photography appeared first on Digital Photography School. It was authored by Christian Hoiberg.

tips for jaw-dropping winter landscape photography

Winter landscape photography is a lot of fun – and it doesn’t have to be hard, either, assuming you know the right techniques!

In this article, I share ten critical winter landscape tips so you can start capturing beautiful snowy landscapes like the pros. Specifically, I discuss:

  • The best time of day for winter landscape photography (this one might surprise you!)
  • How to work with the weather
  • The right winter camera settings
  • How to enhance your winter landscape compositions
  • Much, much more!

So if you’re ready to take your winter images to the next level, then let’s dive right in, starting with my first tip:

1. Pay attention to the weather

Weather can be the difference between an exhilarating photoshoot and a wasted handful of hours – so it’s always important to check the weather in advance, follow the weather on your phone, and constantly observe the conditions while you’re out shooting.

There’s not one best type of weather for winter landscape photography, of course. Instead, you need to think about the type of images you want to create, then make plans that coincide with your weather requirements. For instance:

  • If you want to photograph a pristine snowfall at sunrise, make sure you choose a morning just after the snow has ended so that the blanket of white is completely undisturbed.
  • If you want to photograph mountains or trees in a snowstorm, make sure you head out in the thick of the snow (or just before the snow starts). It can help to observe the snowflakes before setting off to make sure they’re reasonably large and are falling sufficiently fast; otherwise, you may struggle to capture the kind of moody winter landscape you’re pursuing.

You should also watch the weather for safety reasons. If you plan to photograph a snowy mountain scene from a high altitude, you’ll want to avoid driving in during a blizzard. Instead, you should wait until the snow stops or head out in advance. That way, you can capture the photos you want, but you don’t risk yourself or your gear in the process.

2. Look for contrast to make those winter compositions stand out

After a few days of heavy snowfall, the landscape will be completely white: white trees, white lakes, white mountains, and (normally) a white sky. And when everything is white, it’s quite challenging to find a compositional focal point as nothing really catches the eye.

So what do you do?

You look for contrast – either color contrast, where you find a splash of red, blue, or green against the white – or tonal contrast, such as a splash of darkness against the bright snow.

Here’s an example of color contrast, where I found a red house against a white and gray background:

red house in winter landscape scene

The red color is what makes this picture interesting. Without it, the scene would lack a focal point and the viewer’s eyes would have no place to rest, which would make for a bad shot.

Happily, contrast is easy to find on snowy days because it’ll catch your eye just the same as it’ll catch a photo viewer’s eye. So you can just go around with your camera, searching for an eye-catching element or two. Make sense?

By the way, I find red color contrast to be particularly pleasing in winter landscape scenes, but you can really search for any dominant color or tonal variation. Maybe there’s an autumn leaf laying on top of a thin layer of snow, or maybe you can see a few skiers wearing red jackets, or maybe you’re standing before a dark mountain surrounded by white. Just find a dominant color or tone in the otherwise white landscape, then use careful composition techniques to make it a standout focal point.

3. Don’t be afraid to use manual focus

As I mentioned in the previous tip, winter landscapes can be intensely white – and when you’re dealing with monochromatic scenes, your camera will often struggle to lock focus.

When that happens, you have two options, both of which are generally effective. First, you can try using the focus-and-recompose technique. Simply set your camera to its AF-S (or One-Shot AF) setting, set the AF point to the center of the frame, half-press your shutter button to lock focus on an area of clear contrast in the scene, then recompose the shot. As long as you can find some part of your shot that’s contrasty – a few rocks, a lone tree, or a river – you’ll manage to capture a photo that’s both in-focus and well-composed.

Occasionally, however, you’ll run into a situation where your scene features very little contrast or the only clear contrast exists far behind your main subject. In the latter situations, I’d recommend switching your lens over to manual focus. Then set your camera to Live View, zoom in on your LCD, and carefully adjust the lens focus ring until you get a perfect result!

4. Use exposure compensation to ensure you capture plenty of detail

Camera meters are generally accurate, but they come with a significant problem:

They believe that everything should be a neutral gray tone. So while your camera’s meter will do a great job of properly exposing for medium-toned subjects, a bright white subject – like snow – will cause major underexposure. (Why underexposure? Your camera sees the bright snow and tries to darken it down until it turns gray!)

Fortunately, cameras offer an easy solution: You can add in a stop or two of positive exposure compensation (or, if you’re using Manual mode, you can deliberately overexpose). The perfect amount of exposure compensation depends on the scene, so I’d recommend testing out a few exposure adjustments to see what works. Just pay careful attention to the highlights; you don’t want the snow to become a detailless white!

I sometimes lighten my winter landscapes even further because I like to create a bright-white effect:

winter landscape photography snowy forest scene

Such an artistic technique won’t work for every image. But plenty of snow landscape photography can benefit from a bit of extra brightness, and you can always create multiple shots and see which you prefer!

5. Choose a cold white balance to amplify the atmosphere

Technically, you can choose your white balance in camera or – if you’re photographing in RAW – in post-processing. Either of those options works well, though sometimes it’s nice to see a preview of the white balance in camera, so don’t shy away from doing it that way (and remember: you can always change it later!).

Anyway, because winter is cold, a colder (i.e., bluer) white balance tends to look gorgeous:

foggy snowy mountain winter landscape photography

Note how the cool colors enhance the shot above. The image feels frigid, wouldn’t you say? That’s thanks to the color balance.

Now, I don’t recommend you go overboard. You don’t need your shot to look like it came from a blue alien planet. But feel free to push the white balance, experiment, and see what you get!

You’re also free to tweak the white balance in post-processing, assuming you’ve shot in RAW. You can use the Temperature slider to move back and forth between warm and cool effects, and you can decide which look you prefer.

6. Seek out intimate winter landscape scenes

Many landscape photographers feel compelled to capture sweeping shots that include everything in the composition…

…but did you know that you can also create beautiful photos from intimate subjects? I’m talking about those small-scale scenes that are easy to pass by without noticing, such as:

  • Berries in the snow
  • Bubbles trapped in ice
  • Plants poking out from under the snow
  • Drooping tree branches

Finding intimate landscape shots can be difficult at first, but with a bit of practice, you’ll start to notice all sorts of opportunities. And while you’re free to experiment with different camera setups, I’d recommend starting with a 50mm lens or a short telephoto macro lens. Then just see what you can create!

7. Photograph during the blue hour for ethereal winter landscapes

The blue hour refers to the time just before sunrise and just after sunset when the sun sits below the horizon and the world goes all beautiful and blue. During the blue hour, you still have enough light to shoot, yet nothing is lit directly. The light is soft and gorgeous.

And it works great for winter landscape photography.

You see, the soft light caresses the snow, making for a fairytale effect. And if your photo includes streetlights or house lights, the composition can turn even more magical. Here’s an example blue-hour image:

snowy mountain landscape

See the magical effect? And do you see how the lights from the cabins look truly gorgeous against the cold background?

Spend a few days shooting during blue hour, and you may start to feel overwhelmed by the cold and darkness; in other words, you’ll probably want to stay inside underneath a blanket.

But do yourself a favor. Force yourself to put on a coat, grab that camera, and get outside. The images will be worth it, even if the cold hits you like a blast in the face!

Note: You can still capture beautiful snowy landscape shots during sunrise and sunset or even around noon. But if I were able to choose just one time of day to head out with my camera during winter, it would be the blue hour. It really is that amazing.

8. Bring extra batteries and keep them warm

If you photograph in the bitter cold, then this tip is absolutely essential. Batteries drain much quicker in winter, and if you shoot mirrorless or you use Live View for most compositions, you’ll soon find yourself without a drop of charge – unless you remember to bring plenty of extra batteries. Original-manufacturer batteries can be pretty pricey, so you might want to consider purchasing third-party batteries. (Some people love them and some people hate them; in the end, the choice is yours!)

By the way, it’s a good idea to keep spare batteries in an inner pocket of your jacket. That way, the batteries stay warm, which prevents the charge from draining fast. And once you’ve finished with a battery, put it back in your coat; you can sometimes “resurrect” dead batteries with a bit of coat warmth!

(Make sure, however, you don’t put your camera in your coat. That may cause the lens elements to fog up, which is very problematic.)

9. Keep your gear clean and safe

man walking in the snow

Snow and cold may not seem quite as threatening to your gear as rain or sea spray, but they can still cause problems. Snow can collect on the front of your lens and cause blur; it can also melt inside your lens and – if left unchecked – lead to mold or rust. And cold can cause your equipment to fog up and/or turn frosty, neither of which are good for your images (or your gear!).

Therefore, I encourage you to take a handful of steps to actively prevent cold-weather problems:

  • Don’t change lenses in snowy conditions
  • Keep a towel and rocket blower handy to wipe the snow off your camera and lens
  • If the snow is heavy, consider using a rain cover
  • Always leave your gear in a tightly sealed bag when moving from cold to warm environments (and give the gear a few hours to acclimate before taking it back out)
  • Don’t breathe on the front of your lens

10. Don’t forget to edit your winter landscape shots!

snowy landscape scene

As a landscape photographer, you should do your best to get your photos right in the field.

Yet you should also spend time editing your shots, if only briefly. A bit of editing can dramatically improve nearly every winter landscape you capture, so I encourage you to review each image, then test out a few presets or play around with a few sliders (at the very least).

In particular, I’d recommend tweaking the white balance (as I mentioned above, I favor a cooler color cast, but you can push the Temperature slider until you get an effect you like), adding a bit of contrast, subtly boosting the exposure, fine-tuning the tones (especially the highlights and shadows), and experimenting with different hues and saturations.

Your editing skills will develop over time, but even a few minor adjustments can go a long way!

Winter landscape photography: final words

Hopefully, you can now confidently photograph winter landscapes – so the next time you get a nice snowfall, head outside! Take some photos, appreciate the beauty, and have plenty of fun.

Now over to you:

Which of these tips do you plan to use first? Do you have any winter landscape photography techniques of your own? Share your thoughts in the comments below!

Table of contents

Landscape Photography

The post 10 Tips for Gorgeous Winter Landscape Photography appeared first on Digital Photography School. It was authored by Christian Hoiberg.


it's from Digital Photography School https://ift.tt/DTLKtNY
via Christian Hoiberg