The post Making Sense of the Exposure Triangle – ISO, Aperture, and Shutterspeed Made Simple appeared first on Digital Photography School. It was authored by Jackie Lamas.

Ever hear other photographers talking about shooting in manual mode, and using terms like ISO, aperture, and shutter speed and have no idea what they’re talking about? Then this article is for you. While making sense of the Exposure Triangle may seem overwhelming, you’ll learn everything there is to know so that you can get shooting in manual mode quicker!

Canon 6D, 28mm, f/5.6, 1/250, ISO 400
Everything in photography has to do with light
All three settings, ISO, aperture and shutter speed are collectively called the Exposure Triangle. They work together to allow more or less light to enter the camera depending on the light that you see with your eye in a given situation.

For example, the brighter the light outside, the less you need to enter your camera to record the image. The less light around you, the more light you’ll need the camera to capture in order to make the image visible.
Each part of the Exposure Triangle works together to create a good exposure while controlling the camera fully to suit your creative direction.
What is ISO?
When making sense of the exposure triangle, you first need to understand ISO. ISO is the light sensitivity of the camera’s sensor.
So, think of this as your eye. When it’s really bright outside, your eyes tend to be less sensitive and need to strain less to focus, see, and look at the world around.

When it’s particularly bright outside, like in this photo, use a lower number ISO. Camera settings: f/5.0, 1/800, ISO 200, 85mm shot on Canon 6D.
On the other hand, when you’re in a dark location with little to no light, your eyes strain and become more sensitive to any lights in the scene, helping you see better at night as well.
The same thing happens to a camera’s sensor. The more sensitive, the more light you’ll be able to pick up. The less sensitive, less light will enter the camera.

ISO is measured in numbers ranging from 50 to 25,600 on some models. There is usually a button on your camera that is labeled ISO. This is where you’ll be able to change the ISO depending on the lighting situation.

Here, we used auto mode to get an idea of the exposure we would need to take a photo of these stuffed animals setting the ISO at 100.
The ISO also affects the quality of the image, so be careful when you’re using higher ISO numbers. They tend to record a lot of digital noise (or grain points) that you see when zoomed in.

As you can see in this photo, using a high ISO added more light than we needed.
Using a higher ISO can help you in low light situations when you want to keep a relatively fast shutter speed to avoid camera shake. However, you need that boost in light to help expose correctly.

When you use a high ISO, your camera is more sensitive to light and causes digital noise – little points on your image that make it look grainy.
Aperture
When making sense of the exposure triangle, you need to understand aperture next. Aperture, is the opening and closing of the lens. Measured in F-numbers, it affects both the amount of light entering the camera, and the depth of field in your image.

Camera settings f/2.5, 1/100, IS0 400, 50mm. In order to get the baby’s hand in focus and nothing else, we had to use an open aperture of f/2.5.
The depth of field is how much is in focus from foreground to background. A lower f-number will open your lens and let more light in, but it will also give you a narrower focus range (a shallow, or small depth of field). While a higher f-number will close your lens, and lessen the light entering, it will give you a wider focus range (a wide, or large depth of field).

This is especially important to keep in mind when taking portraits so that you can determine how much you want in focus.
For an individual portrait, any f-number between f/2.8 and f/5.6 works great. You still have your subject in focus but you do get some bokeh (blurry background due to a low f/number).

Here we have a more open aperture and therefore less is in focus.
For groups of people, you’ll want a high f-number like f/8 or f/11 because, at a lower f/number, you have less depth of field. This means your plane of focus is narrower. If you have people standing outside the plane of focus, they will be blurry. Therefore, in order to have everyone in focus, a high f/number is best because it gives you a wider plane of focus.

Here we are using a closed aperture, allowing more to be in focus.
Again, opening and closing of the lens affects how much light enters the camera. Eventually, in manual, you’ll have to compensate with one of the other two settings to make up for the lack of light or excess of light entering your camera.

To capture the bird and the landscape surrounding it, we used an aperture of f/9. Other camera settings are ISO 400, 1/250, at 28mm.
Use Av or A mode on your camera to play with aperture. The camera will set the shutter speed for you to maintain correct exposure. However, you’ll be able to see a noticeable difference in your depth of field and in light entering your camera.
Shutter speed
When making sense of the exposure triangle, shutter speed is the next thing you need to know. Shutter speed dictates the length of time that the shutter is open.

To get a silhouette, you’ll need a fast shutter speed. This image has a shutter speed of 1/1000, f/16, ISO 400, 28mm.
Shutter speed is measured from seconds to fractions of a second (slow to fast shutter speeds). The slower the shutter speed, the longer it stays open to capture light. The faster it opens and closes, the less light is captured to make your photo.

For example, on a really bright afternoon, use faster shutter speed in order to create a good exposure. In a low light situation, like a nighttime scene or a dark cafe, a slower shutter speed can help capture enough light to make the photo.

In these two photos, we only changed the shutter speed and kept the other camera settings the same. You can see a significant difference in light.
Keep in mind, the slower the shutter speed, the more chance of camera shake occurring. Camera shake is an accidental blur due to the camera shaking, either in your hands, or due to some other force.
At slower shutter speeds, usually 1/125th of second or slower you are more likely to get camera shake. At faster shutter speeds this isn’t a problem as the camera opens and closes too quickly to register the shake.

Using a slow shutter speed can give you interesting images with movement. Camera settings f/6.3, 1/13, ISO 400, 50mm.
Shutter speed also allows you to show movement in your photos or freezes moments. Slow shutter speed will show more movement, for example, a child running or playing. While a faster shutter speed will freeze the moment or action that you’re capturing.
Manual Mode
Manual mode is where you have to set all three adjustments manually, therefore, giving you complete control of the light and look of your photo.
Think of these three as a pulley system, all working together. When one is moved, one or both of the other settings must also adjust and compensate.
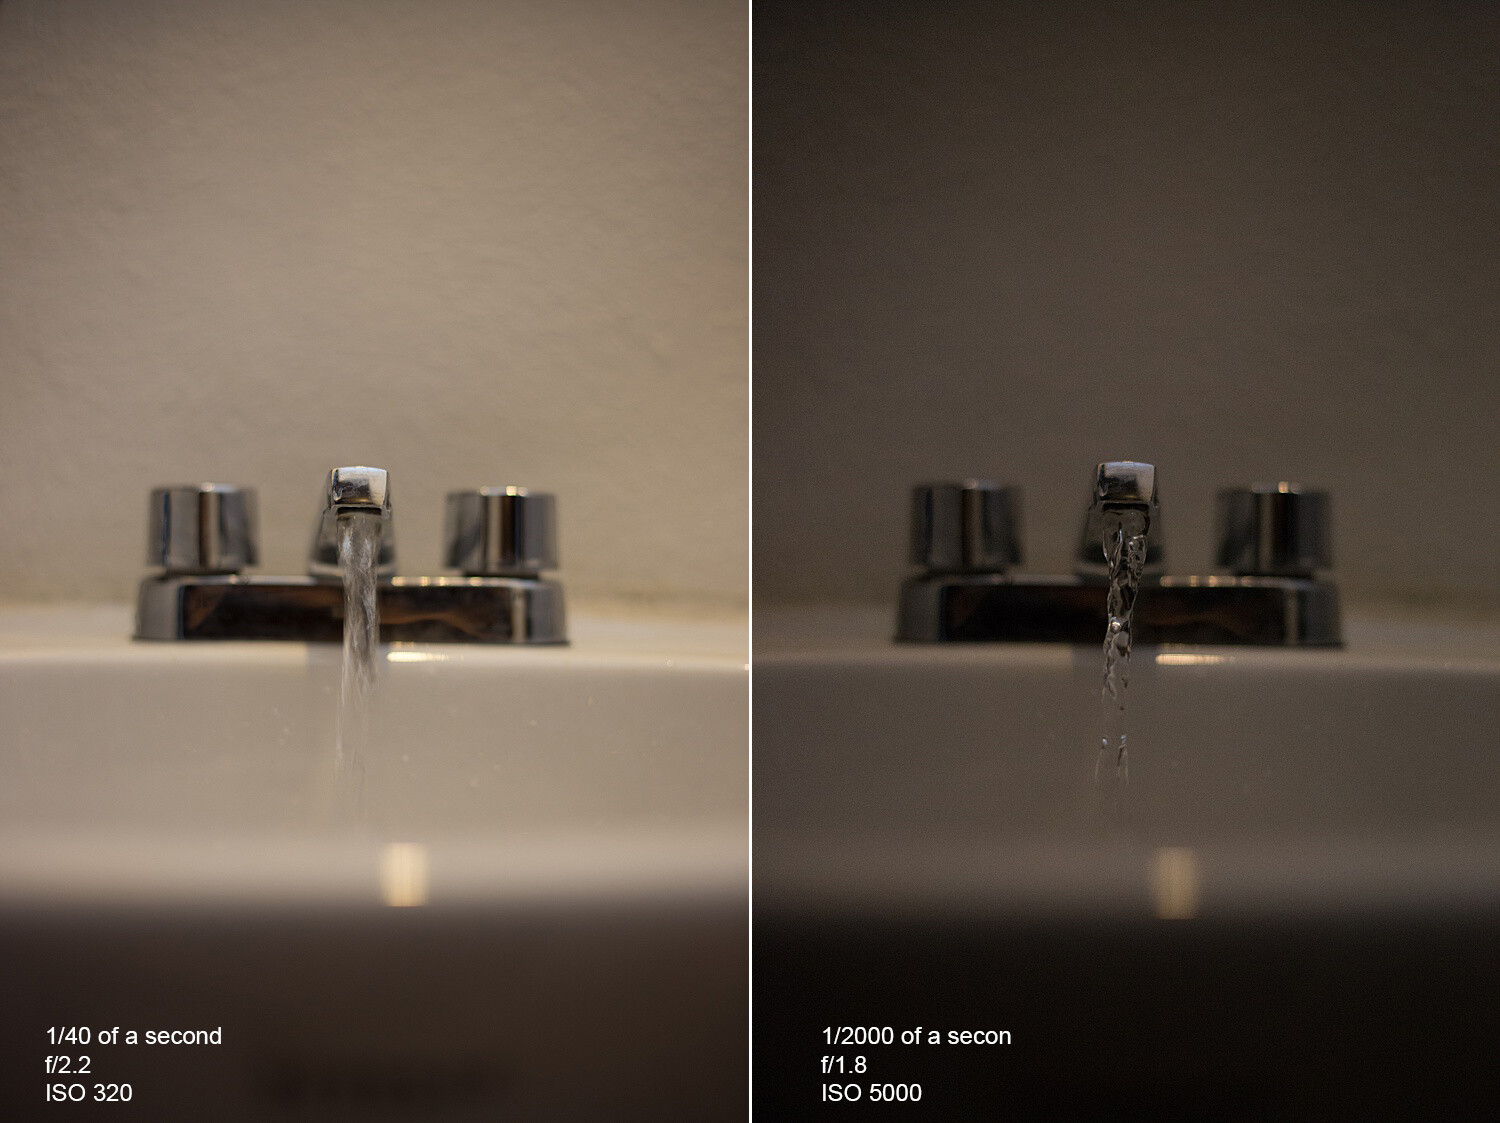
The photo on the left has a slow shutter speed, an open aperture, and low ISO. The slow shutter speed and open aperture help light enter. It also allows the camera to pick up the movement of the water.
In the photo on the right, we get more of an action shot of the water. This is because we have now changed the ISO to 1/2000 sec – a pretty fast shutter speed. With this fast shutter speed, we had to compensate for the loss of light from the fast shutter speed. So, we added light by using a higher ISO and a more open aperture. Even so, it wasn’t enough to get a correct exposure as the photo is a little dark.
The best way to get started in manual mode is to think about what kind of photo you want to make. Are you shooting still life? Is there enough light? Do you want to control your focus range? Is this a portrait? All of these things can help you to determine where to start.

For example, you’re taking photos of your kid’s soccer game in the early evening, and there is still a lot of light left, but it’s not harsh. You want to freeze the action of the game, and so you’d start by setting a fast shutter speed first.
If you’re taking a portrait of someone, then you’d start with the aperture in order to control your depth of field. Then you’d adjust the other two settings accordingly.

Camera settings f/5.6, 1/100, IS0 400, 53mm.
For landscapes, you’d likely start with aperture and shutter speed. You may need a small aperture (eg f/11) to capture a wide plane of focus. Depending on whether there is water in your landscape, you may want to freeze the water or give it a silky look by slowing your shutter speed right down.
Knowing what you’re shooting and type of light will give you a starting point
Also, in manual mode, there is a built-in light meter. This meter looks like a tiny ruler either at the bottom of the live view or inside the viewfinder. It helps you determine if your photo is too bright (metering to the right), or too dark (metering to the left).
When the line is in the middle, or at zero, you’ve got what the camera considers a perfectly-exposed photo.

The ruler at the bottom of the live view, or through the viewfinder, can help you expose your photos correctly. To the right of the ruler your photo will be brighter, and to the left, it will be darker.
Aim to keep it in the middle as you practice in manual mode. Sett one of the adjustments and then move the other two to add or take away light accordingly until the meter is in the middle.
It’s all about practice and really getting to know what each setting does on its own before switching to full manual. This can feel overwhelming, so try using one of the other modes, like Tv/S or Av/A modes first. Doing so may give you a better understanding of the settings and more control over your photos.

Camera settings f/22, 30 seconds, ISO 200, 28mm.

Camera settings f/10, 1/640, ISO 400, 50mm.
Conclusion
The technical side of photography can sometimes seem overwhelming and it seems like there is always something new to learn before feeling confident. Making sense of the exposure triangle will set your creativity free and give you full control of your camera.
The post Making Sense of the Exposure Triangle – ISO, Aperture, and Shutterspeed Made Simple appeared first on Digital Photography School. It was authored by Jackie Lamas.
it's from Digital Photography School https://ift.tt/2PrEOU3
via Jackie Lamas
No comments:
Post a Comment