The post 9 Architectural Photography Tips for Stunning Shots appeared first on Digital Photography School. It was authored by Simon Bond.

Want to improve your architectural photography? In this article, I share my 9 best tips for incredible architectural images. You’ll discover:
- Creative techniques (including infrared and refraction photography) to capture unique photos of buildings
- How to level up your architectural compositions with a few simple adjustments
- How to handle high dynamic range scenes with ease (so you can create incredibly detailed images)
- Much more!
So if you’re ready to take architectural photos like a pro, then let’s dive right in!
1. Explore different perspectives for breathtaking compositions
Architectural photography beginners tend to shoot from eye level – and while you can capture decent images with this standard approach, you can enhance your photos by trying out a different perspective.
For instance, you can get down low and point your camera upward for a worm’s-eye view. It’ll let you incorporate plenty of beautiful sky into your composition, and if you use a wide-angle lens, you’ll make the building appear unimaginably large (even foreboding).
Personally, I like the worm’s-eye view for photographing taller structures. It’s also a great way to emphasize interesting ceiling features when working in building interiors, though make sure you use your wide-angle lens.
You can also create interesting architectural photos using a bird’s-eye view, where you shoot down from high above. To pull off this perspective, you need to find a way to get above the building, and in certain cases, this can be pretty tough. Some serious architectural photographers work with drones or from a plane, but if you’re not ready to take that step, you can get similar results by shooting smaller buildings from the top of a parking garage or observation deck.
2. Try infrared photography for a unique effect
Infrared architectural photography isn’t the most popular technique on the block, but when done right, it can look incredible. It’s a great way to make your architectural shots stand out:

Now, this style of photography does work much better outdoors and in places with vegetation. I don’t recommend doing infrared photography to photograph, say, church interiors – at least not at first. But the infrared technique works great on exteriors, and it has the potential to turn a standard scene into a stunning dreamscape.
How can you create the infrared look? You have a few options. You can use an infrared filter, which can work but will often require very long exposure times. Alternatively, you can pay to have your camera converted for infrared photography; this is the most reliable method, but bear in mind that the converted camera will only shoot in infrared – you can’t switch back and forth between infrared and non-infrared imaging. A third option is to create the effect in post-processing.
Personally, I’d recommend you start with either an infrared filter or the post-processing method. Then, if you like your initial results, consider paying to have a camera converted. That way, you can have tons of infrared photography fun!
3. Paint light for breathtaking architectural photography
I’m a huge fan of light painting; it’s easy to do, it’s fun, and you can use it to capture mind-blowing effects:

The idea is to set up a long-exposure image – for this, you’ll need a tripod and a remote release – then shine a light on or around the architectural subject. You will need to work at night (otherwise the light won’t show up), and you can get very different effects by varying the lighting instrument and intensity.
Note that the painted light will often become a compositional element in and of itself. Like an actual painter, you’ll need to carefully position your “brush strokes” to give maximum effect; try using the light to form a leading line to the architecture or even to frame the architecture (I used the latter technique in the image above).
Here are a few light-painting tools you should consider:
- A flashlight is the simplest of light-painting tools. You can use it to create patterns in your images (by holding the flashlight in front of the camera), or you can use it to light up a section of the architecture you wish to photograph. (For especially interesting results, try adding colorful gels in front of the beam!)
- A light source on a string can look great, plus it can get you some extra height (always useful when working with tall buildings!). I recommend tying your light source – such as a glow stick – to the string, then spinning it through the air while taking your photos. Remember: Position the resulting light strategically in your composition.
- LED light sticks are a more sophisticated method of light painting. Certain light sticks actually allow you to program colors and patterns, which you can then wave around your subject to create glowing shapes, flags, and more. With light sticks, the sky is the limit!
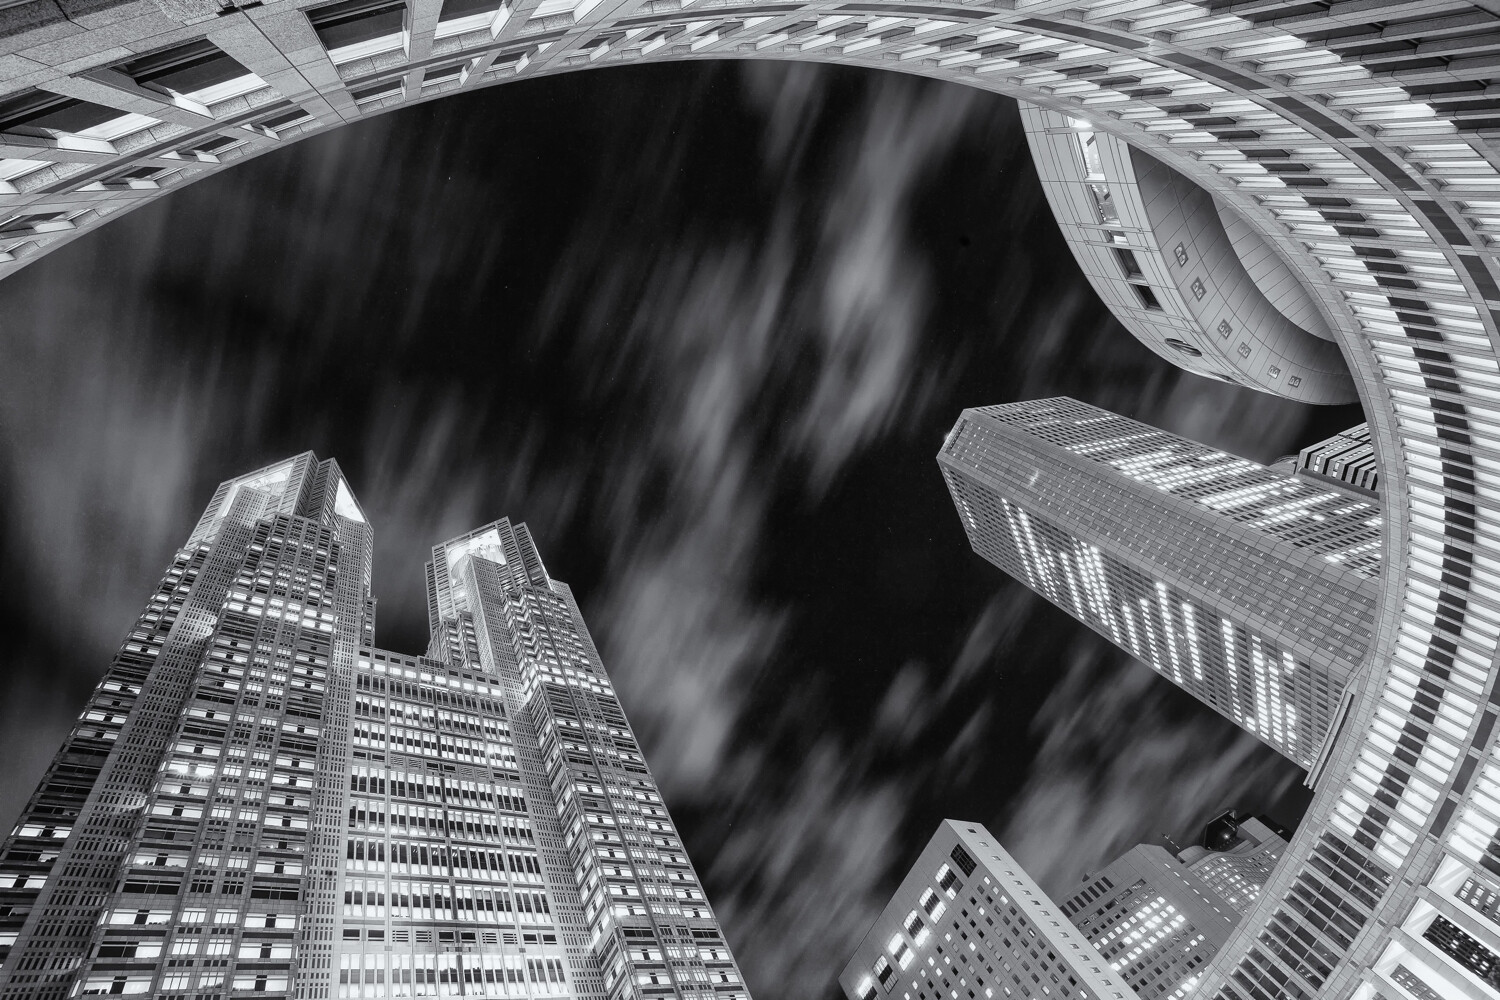
4. Kinetic light painting
Kinetic light painting is like the standard light-painting techniques I shared above, but with a twist:
Instead of moving the light source, you move the camera.
It can be pretty experimental, and not all locations are suited to this style. But if you put in enough time and effort, you’ll eventually come away with some amazing photos.

How does kinetic light painting work? There are two main techniques (both of which require a tripod and a remote release):
- Zoom burst. For a zoom-burst effect, you’ll need to set up your camera, dial in a long shutter speed, then zoom your lens before the image is complete. I’d recommend using a 24-70mm lens (you need plenty of focal length flexibility), though kit lenses work great for this, too. In my experience, the zoom burst technique works well with tall buildings that are lit up with lots of interior building lights.
- Camera rotation. To pull off this technique, you’ll need to use a long shutter speed, then rotate your camera around the tripod head as you shoot. That’s how I captured the image featured above; I took a long exposure, then rotated the camera, stopping every so often for a sharper view of the building. I like to use the camera-rotation technique when shooting up at tall buildings.
5. Use a crystal ball for stunning refraction effects
It may be unorthodox, but photographing with a crystal ball can give you some wild results!
Here, you simply shoot through a glass ball and rely on the refraction to create a very cool look:

Note that buildings will appear upside-down in the crystal ball, so you’ll either need to compose with that in mind, or flip the image in post-processing (that’s what I did for the photo above!).
Pro tip: Don’t rely purely on the crystal ball to capture a great image. Instead, make sure you carefully choose your subject and create a great composition – then let the amazing effect act as the icing on the cake!
6. Don’t forget about the architectural details
Most architectural photographers try to capture an entire building – or even an entire skyline – in a single image.
But if you really want to tell the story of architecture, it often helps to zoom in on the details. Bring a longer lens in your bag, and when you’re done capturing the grander scene with a wide-angle lens, switch on over. (I’d recommend a 70-200mm lens, which will offer plenty of flexibility; you can capture larger details at 70mm, then zoom in to 200mm to highlight intricate elements.)
Note that architectural detail photos don’t have to stand on their own. For instance, you can combine wider images with a few detail shots to depict the entire structure.
So the next time you head out to photograph architecture, keep an eye out for interesting detail! I recommend looking for interesting lines and curves (like arches in a church), ornate decorations on walls, and details in the roofing.
Also, pay careful attention to the lighting, especially if you’re photographing building exteriors. Different sun positions will emphasize or deemphasize certain details, so by working at the right time of day, you can get the precise effect you’re after.

7. Use blending to nail your exposures
Cameras are capable of capturing a limited tonal range, which means that, when faced with a dark interior and bright windows, or a dark building and a bright sunset, your camera will overexpose the bright areas and/or underexpose the dark areas.
Unfortunately, overexposure and underexposure look terrible, and in the worst cases, you won’t be able to fix the issue in post-processing. So what do you do?
I recommend you use an exposure blending technique, which is easier than it sounds. Set up your camera on a tripod, then capture several images at different exposures. The convention is to capture three shots – one exposing for the dark areas, one exposing for the bright areas, and one exposing for the midtones – though you can capture more if the scene is unusually contrasty.
Finally, blend the different exposures together in a program like Lightroom or Photoshop (most post-processing software can do this for you automatically!). You’ll end up with an image full of beautiful shadow and highlight detail:

8. Look for contrast
Contrast is a great way to improve your architectural photography because by incorporating contrast into your shots, you can create lots of eye-catching interest.
Now, “contrast” is a broad term, and you can apply it in several different ways (all of which look amazing!).
First, you can look for tonal contrast – that is, contrasting light and shadow. You’ll often find this on bright, sunny days. The sun will highlight certain parts of a building and hide others, creating an interesting graphic effect. (This is a great way to enhance your abstract architectural photos, by the way!)
You can also look for color contrast. Here, a color wheel is often helpful, and it will display pairs of contrasting (opposite) colors: green and red, purple and yellow, blue and orange. While it can be tough to find architecture featuring contrasting colors, you can always position yourself so that one piece of colorful architecture is juxtaposed with another piece of colorful architecture for a contrasting effect.
Finally, you can look for contrast between old and new architecture. You might shoot an old and a new building side by side, or you might capture an old building surrounded by new buildings (such as a church surrounded by modern skyscrapers).
9. Use framing to level up your compositions
Framing is a classic compositional technique, and it works great for photographing architecture.
The idea is simple: Find an interesting building, then frame it with other elements in the foreground, such as another building, a doorway, fencing wire, or tree branches.
The tough part is finding the frame, but if you’re familiar with common framing devices, you’ll be able to look around and spot one instantly. And if you can’t find a frame, don’t fret; you can always introduce a frame by holding something in front of the camera, like a handful of flowers.
By the way, you don’t necessarily need to start by finding a building and only then add a frame. You can do the reverse: first find an interesting frame, such as an archway. Then move your camera around to see what you can fit within it!

Architectural photography tips: final words
Now that you’ve finished this article, you know how to capture beautiful architectural photos.
So get out your camera! Find some buildings! And use these tips to create stunning shots!
Now over to you:
Which of these architectural photography tips is your favorite? Which will you incorporate into your workflow? Share your thoughts in the comments below!
Table of contents
Architectural Photography
-
GENERAL
-
PREPARATION
-
SETTINGS
-
LIGHTING
-
COMPOSITION
-
GEAR
-
ADVANCED GUIDES
-
CREATIVE TECHNIQUES
-
9 Creative Architecture Photography Techniques for Amazing Photos!
- 1. Explore different perspectives for breathtaking compositions
- 2. Try infrared photography for a unique effect
- 3. Paint light for breathtaking architectural photography
- 4. Kinetic light painting
- 5. Use a crystal ball for stunning refraction effects
- 6. Don’t forget about the architectural details
- 7. Use blending to nail your exposures
- 8. Look for contrast
- 9. Use framing to level up your compositions
- Architectural photography tips: final words
-
-
POST-PROCESSING
-
INSPIRATION
The post 9 Architectural Photography Tips for Stunning Shots appeared first on Digital Photography School. It was authored by Simon Bond.
it's from Digital Photography School https://ift.tt/mhwpdYK
via Simon Bond
No comments:
Post a Comment